LinkedIn Auto Comment
Automate LinkedIn comments to boost reach, save time, and stay visible with smart, targeted engagement - no manual effort required.
Last updated
LinkedIn stands as the go-to platform for professionals seeking to build connections, exchange ideas, and unlock new opportunities. With its expansive network spanning industries and geographies, LinkedIn has transformed into more than a career tool—it’s a dynamic ecosystem for collaboration, knowle
LinkedIn stands as the go-to platform for professionals seeking to build connections, exchange ideas, and unlock new opportunities. With its expansive network spanning industries and geographies, LinkedIn has transformed into more than a career tool—it’s a dynamic ecosystem for collaboration, knowledge sharing, and professional growth. Whether you're a job seeker, business leader, or industry expert, LinkedIn empowers you to amplify your presence and achieve your objectives.
Professionals and businesses utilize LinkedIn for various purposes, including:
- Sharing Insights and Expertise
LinkedIn is a platform where thought leaders and industry experts share valuable insights, best practices, and innovative ideas. By posting articles, creating updates, or participating in discussions, professionals can showcase their expertise and establish themselves as authorities in their field.
- Example: A SaaS founder publishes a post on emerging trends in AI-based automation, generating meaningful conversations with peers and followers.
- Building Meaningful Relationships
Networking is at the heart of LinkedIn. The platform enables professionals to connect with peers, mentors, and industry leaders who can provide guidance, collaboration opportunities, or even career advancement.
- Scenario: A digital marketer connects with content creators and marketing strategists, forming a network that leads to joint ventures and referral opportunities.
- Discovering Job Opportunities and Collaborators
LinkedIn is a goldmine for job seekers and recruiters alike. For businesses, it’s a platform to find partners, employees, and even clients.
- Example: A recruiter in the tech industry uses LinkedIn to identify candidates with specialized skills by browsing their posts and activity.
Despite its benefits, effective engagement on LinkedIn requires consistency, strategy, and significant time investment. One of the most impactful ways to engage consistently is through meaningful commenting, which ensures visibility and fosters authentic connections.
The Importance of Commenting to Enhance Visibility and Build Relationships
Commenting on LinkedIn posts is one of the simplest yet most powerful ways to interact with your network. Unlike likes or shares, comments provide an opportunity to showcase your thoughts, add value to discussions, and establish your presence in your industry.
Here’s why commenting is crucial:
1. Boosts Profile Visibility
Each time you comment, your name, profile picture, and headline are displayed to the original poster and others viewing the content. A thoughtful comment can capture attention and encourage profile visits. To ensure consistency in engagement, professionals can leverage LinkedIn Auto Comment, which automates thoughtful interactions across industry-relevant discussions.
- Example: A marketing professional leaves a detailed comment on a popular post about social media trends. As others view the post, they’re drawn to the marketer’s insightful input, leading to new connection requests and profile views.
2. Sparks Meaningful Conversations
Comments invite dialogue, which can lead to deeper connections with your network. By engaging in discussions, you not only build rapport but also demonstrate your interest in your industry and your willingness to engage.
- Scenario: A sales executive comments on a post about emerging technologies in CRM tools, sharing a success story about implementing one of these solutions. This comment sparks a conversation with peers, some of whom become potential clients.
{% cta buttonText="Start free trial" title="Auto-Comment on LinkedIn to Grow Visibility" description="Stay top-of-mind on LinkedIn by auto-posting relevant comments. Boost reach, save time, and build connections no daily manual effort needed." /%}
3. Showcases Expertise and Builds Credibility
Thoughtful comments that reflect expertise and insight establish you as a knowledgeable professional. This not only builds trust with your audience but also ensures you remain top-of-mind for opportunities.
- Example: A cybersecurity expert comments on a post about recent data breaches, offering actionable tips to mitigate risks. The comment is well-received and results in invitations to speak at industry webinars.
How Thoughtful Commenting Can Transform Your LinkedIn Presence
Real-Life Application of Commenting Effectively
Imagine two professionals—Person A and Person B—who work in digital marketing. Both have similar qualifications, but their approach to LinkedIn engagement differs:
- Person A occasionally likes posts but doesn’t comment. Their activity goes largely unnoticed.
- Person B leaves thoughtful, insightful comments on posts about marketing strategies, offering real-world examples and advice.
Over time, Person B’s comments attract attention from influencers, peers, and even hiring managers. They receive connection requests, partnership offers, and increased visibility within their niche.
This scenario highlights the value of commenting strategically. Whether you’re looking to grow your network, establish thought leadership, or land new opportunities, commenting on LinkedIn is a direct route to success.
Pro Tip for Commenting on LinkedIn
When leaving comments, aim for the Three C’s:
- Contextual: Relate your comment to the specific content of the post.
- Instead of saying, “Great post!” add something like, “This resonates with me, especially your point on [specific insight]. We’ve seen similar results in [your experience].”
- Conversational: Frame your comment to encourage replies.
- Example: “This is an excellent perspective on AI adoption. What are your thoughts on how small businesses can leverage these tools?”
- Credible: Support your comment with facts, examples, or personal experience to demonstrate your expertise.
By following these principles, you ensure your comments stand out, add value to the conversation, and build stronger relationships on LinkedIn.
Engaging consistently through meaningful comments may take effort, but the long-term benefits—greater visibility, stronger relationships, and enhanced credibility—make it an essential part of any professional’s LinkedIn strategy.
How TexAu’s LinkedIn Auto Comment Simplifies the Engagement Process
TexAu’s LinkedIn Auto Comment tool transforms how professionals engage with their network. By automating the commenting process, it ensures consistent, relevant participation without the hours of manual effort. Whether you’re a job seeker, sales professional, or business owner, TexAu helps you stay visible, build connections, and achieve your goals efficiently.
Key Features of TexAu LinkedIn Auto Comment
1. Customizable Comment Templates
Generic comments like “Great post!” rarely add value or grab attention. TexAu allows you to create personalized comment templates tailored to different types of posts or audiences.
Example
- For industry news: “This is such an insightful post, [Name]. I hadn’t considered [specific point]—thanks for sharing!”
- For job updates: “Congratulations on your new role at [Company], [Name]! Wishing you all the best in this exciting chapter.”
These templates ensure that your comments resonate with the context of the post, increasing engagement and credibility.
2. Targeted Engagement
Focus your comments where they matter most by targeting specific posts based on:
- Users: Comment on posts by key prospects, influencers, or connections.
- Industries: Engage with posts from professionals in your target industry.
- Hashtags: Focus on trending topics like #DigitalMarketing or #SaaS to reach a broader audience.
Scenario
A SaaS founder targets posts tagged with #ProductivityTools to comment on discussions about workplace efficiency, thereby positioning their product as a solution.
{% cta buttonText="Start free trial" title="Auto-Comment on LinkedIn to Grow Visibility" description="Stay top-of-mind on LinkedIn by auto-posting relevant comments. Boost reach, save time, and build connections no daily manual effort needed." /%}
3. Multi-Account Compatibility
For businesses or influencers managing multiple LinkedIn accounts, TexAu simplifies the process by enabling you to automate comments across all accounts.
Use Case
A marketing agency uses TexAu to manage LinkedIn engagement for multiple client profiles, ensuring consistent activity without manual effort.
4. Scheduled Execution
Timing is key to maximizing engagement on LinkedIn. TexAu allows you to schedule comments to be posted during peak engagement times, such as early mornings or midweek afternoons.
Example
A sales professional schedules comments on Monday mornings to engage with fresh posts from decision-makers, increasing visibility at the start of the workweek.
5. Real-Time Monitoring
TexAu provides insights into how your comments perform, helping you adjust strategies as needed. By tracking metrics like replies or profile visits generated from your comments, you can refine your approach for better results. Additionally, for those managing extensive LinkedIn connections, the LinkedIn Connections Export feature helps track and analyze LinkedIn network growth. This ensures that engagement efforts align with broader networking goals by providing organized data on who engages with your content the most.
Challenges and Solutions
1. Avoid Over-Automation
Overusing automation can lead to generic comments, which may harm your credibility.
Solution
- Limit automation frequency to balance between manual and automated engagement.
- Use varied comment templates to avoid repetition.
2. Navigating Algorithm Changes
LinkedIn’s algorithms prioritize authentic interactions, so spam-like behavior can reduce visibility.
Solution
- Schedule comments at natural intervals.
- Ensure comments add value and align with the post content.
3. Maintaining Relevance
Irrelevant or vague comments can harm your reputation.
Solution
- Tailor comments to the post’s context.
- Include references to specific points in the post for added credibility.
Benefits of Using TexAu for LinkedIn Auto Comments
1. Increased Visibility
Consistent, thoughtful engagement on LinkedIn helps maintain your visibility within your network and attracts attention from new audiences. When you engage by leaving meaningful comments on relevant posts, your profile becomes more recognizable to industry professionals, potential clients, or recruiters.
How TexAu Helps
TexAu’s LinkedIn Auto Comment automates the process of commenting, ensuring that your name and insights appear consistently in conversations that matter. The tool identifies posts based on your chosen filters—such as hashtags, industries, or users—allowing you to engage strategically without spending hours manually browsing LinkedIn.
Example
A freelance consultant who specializes in digital marketing begins using TexAu to comment on trending posts in their field. By targeting hashtags like #ContentMarketing and #DigitalStrategy, the consultant's comments appear under highly visible discussions. Within weeks, they notice a 30% increase in profile views and several inbound connection requests from potential clients and collaborators.
2. Time Efficiency
Engaging meaningfully on LinkedIn requires consistency, which can be time-consuming. Crafting thoughtful comments and identifying relevant posts daily can divert time away from core business tasks.
How TexAu Saves Time
TexAu automates the process of identifying posts and submitting comments, freeing you from repetitive tasks. It lets you set up predefined templates for various comment scenarios, ensuring you remain visible while focusing on other responsibilities.
Scenario
A small business owner uses TexAu to engage with 50 industry-related posts daily. Instead of manually finding and commenting on each post, they focus on scaling their business operations. TexAu ensures their profile stays active and visible to industry peers, clients, and collaborators, saving them several hours each week.
3. Stronger Relationships
Building trust and rapport with your network requires timely and relevant engagement. By consistently commenting on posts from key individuals, you position yourself as approachable, engaged, and aligned with their interests.
How TexAu Helps Build Relationships
TexAu’s targeted engagement feature enables you to comment on posts from specific users or groups, nurturing relationships with potential clients, collaborators, or recruits. It ensures your comments are seen by the right people at the right time, fostering stronger connections over time.
Example
A recruiter specializing in the tech industry uses TexAu to comment on posts from software engineers and industry groups. By offering insights and encouragement on their updates, the recruiter builds relationships passively. When it's time to reach out with an opportunity, these candidates are already familiar with and receptive to the recruiter.
4. Enhanced Brand Awareness
By engaging with trending topics and industry discussions, you can position yourself or your business as a thought leader. Comments on high-visibility posts amplify your reach and showcase your expertise.
How TexAu Boosts Brand Awareness
TexAu identifies trending conversations in your industry and automates meaningful engagement. By tailoring your comments to reflect your brand’s voice, you can make an impact without appearing robotic or irrelevant.
Example
A SaaS company that develops remote collaboration tools leverages TexAu to comment on trending discussions about remote work. Their comments share actionable insights about productivity and collaboration, positioning the company as an expert in the field. This engagement not only attracts potential users but also strengthens their credibility in the industry.
Use Cases for TexAu LinkedIn Auto Comment
1. For Businesses
Businesses can enhance their brand visibility by engaging with posts from customers, partners, or industry leaders.
- Scenario: A B2B company uses TexAu to comment on posts from clients, congratulating them on milestones or providing feedback on relevant industry discussions. This engagement strengthens relationships and enhances customer loyalty.
2. For Influencers
Influencers can build stronger relationships with their followers by commenting on their posts, boosting engagement, and growing their reach.
- Example: A tech influencer uses TexAu to engage with their followers by commenting on posts about emerging technologies. This consistent interaction builds a loyal following and increases the influencer’s visibility.
3. For Job Seekers
Job seekers can stand out to recruiters and industry leaders by engaging with their posts regularly.
- Scenario: A recent graduate aspiring to enter the marketing field uses TexAu to comment on posts by recruiters and thought leaders, sharing insights and enthusiasm for industry trends. This consistent presence leads to a direct outreach from a recruiter with a job opportunity.
4. For Sales Teams
Sales professionals can nurture prospects by commenting on their content, keeping their profile top-of-mind and building rapport before making direct contact.
- Example: A sales representative targeting decision-makers in SaaS companies uses TexAu to comment on posts related to operational challenges. Their comments offer solutions that subtly highlight their product’s value, paving the way for a warm introduction.
Best Practices for Using LinkedIn Auto Comment
1. Set Clear Goals
Define what you want to achieve with your comments. Are you looking to build relationships, generate leads, or establish thought leadership? Align your comments with these objectives.
- Tip: For lead generation, focus on offering value in your comments. For relationship building, engage with empathy and personalization.
2. Maintain Authenticity
Ensure that your comments feel personal and genuine. Avoid generic responses that might come across as spammy or robotic.
- Tip: Add specific details or personal experiences to your comments to make them stand out.
3. Monitor Engagement
Track metrics such as profile views, connection requests, and responses to gauge the effectiveness of your comments. Use these insights to refine your strategies.
For better insights into LinkedIn engagement trends, LinkedIn Connections Export can help professionals understand how their network is growing and who is interacting with their content.
4. Limit Automation Frequency
Avoid over-automation, which can appear spammy. Balance automated comments with manual interactions to maintain authenticity.
- Tip: Schedule 20–30 comments daily with TexAu, leaving room for manual engagement as needed.
{% cta buttonText="Start free trial" title="Auto-Comment on LinkedIn to Grow Visibility" description="Stay top-of-mind on LinkedIn by auto-posting relevant comments. Boost reach, save time, and build connections no daily manual effort needed." /%}
Advanced Customization Options
1. Dynamic Personalization
TexAu allows you to use placeholders like {name}, {company}, or {industry} to create personalized comments tailored to each user.
- Example: “Hi {name}, your insights on {topic} are spot on! I completely agree with your point about {specific detail}.”
2. Comment Rotation
Avoid repetitive or monotonous comments by setting up multiple templates that TexAu rotates automatically. This keeps your comments fresh and engaging.
- Example: Rotate between templates such as:
-
- “Great post, {name}! I especially liked your perspective on {specific detail}.”
- “Thanks for sharing this, {name}. Your point about {topic} is insightful!”
3. Language Support
Engage with a global audience by creating comment templates in multiple languages. This is especially useful for businesses with international clients or collaborators.
- Scenario: A company targeting the European market uses TexAu to comment in English, French, and German, fostering inclusivity and local relevance.
Conclusion
TexAu’s LinkedIn Auto Comment tool transforms how professionals engage on LinkedIn. By automating meaningful, personalized, and timely comments, it helps users achieve their goals—whether it’s building relationships, enhancing visibility, or nurturing leads.
With TexAu, you can:
- Save time by automating repetitive engagement tasks.
- Build stronger connections through relevant and impactful comments.
- Establish your presence as a thought leader or trusted professional.
Take the first step today. Use TexAu LinkedIn Auto Comment to elevate your LinkedIn strategy and make every interaction count!
The LinkedIn Auto Comment automation helps users automatically post comments on LinkedIn content, enabling consistent engagement with minimal effort. This tool is valuable for founders, sales managers, marketers, and growth hackers looking to boost visibility, nurture professional relationships, and drive conversations. With TexAu, you can configure comments, schedule automations, and export activity data to Google Sheets or CSV, running tasks on cloud or desktop for flexibility.
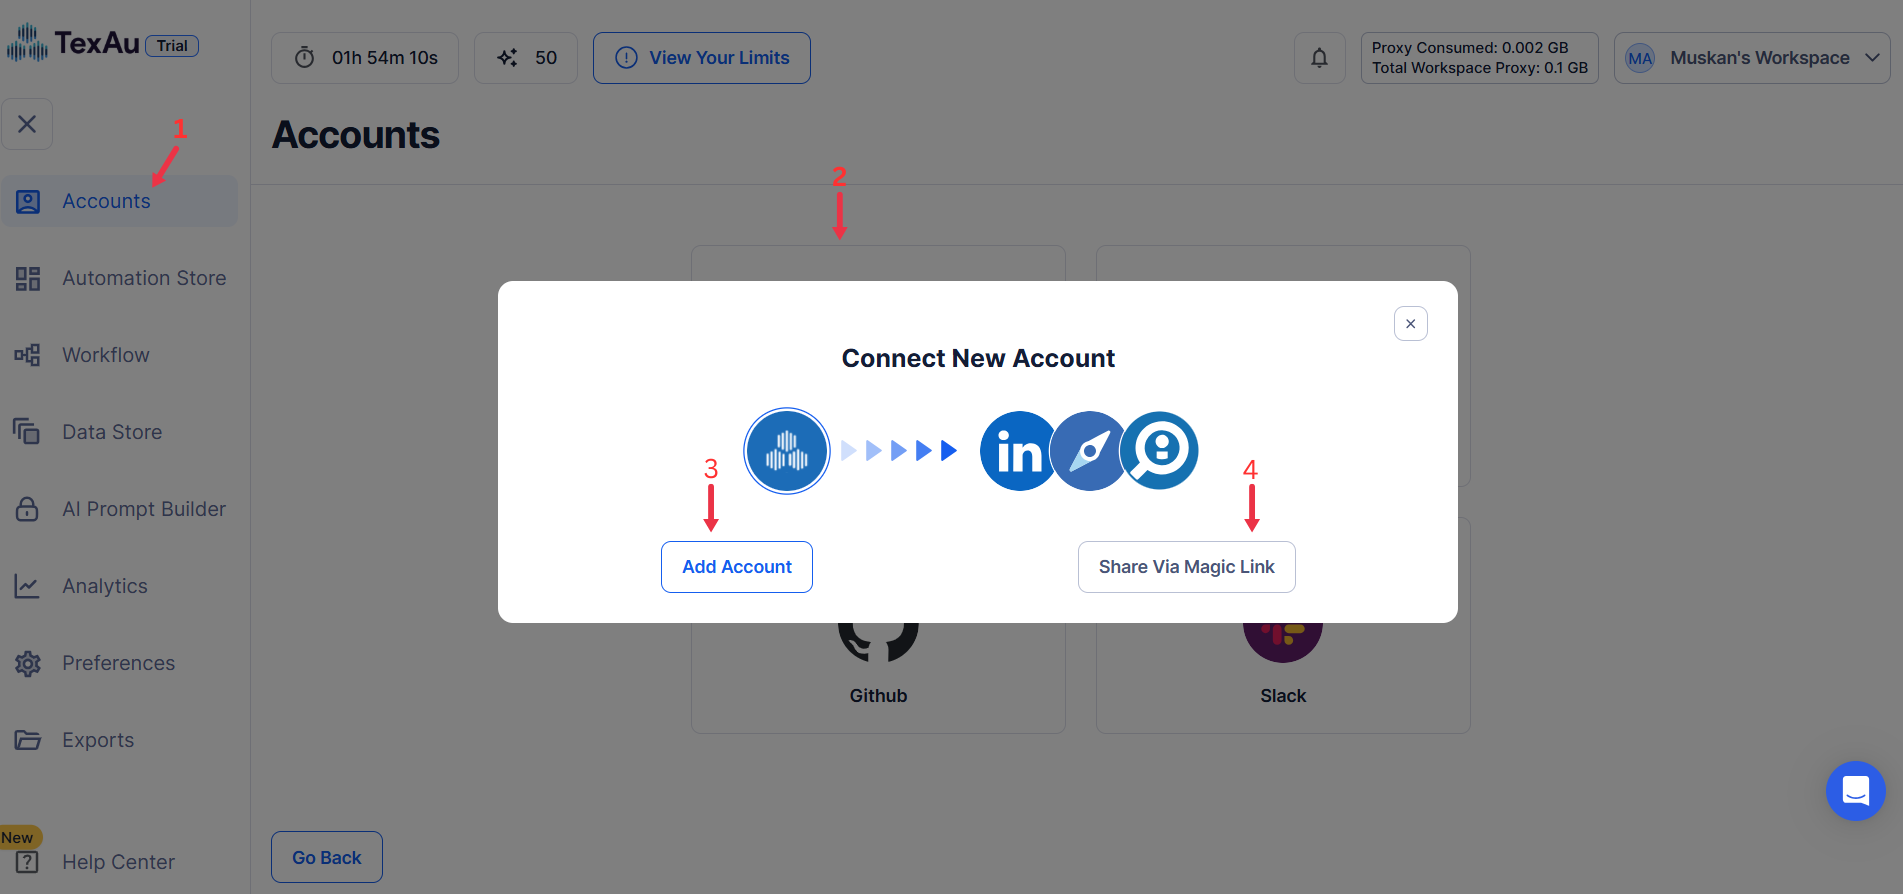
Step 1: Log in to TexAu and Connect LinkedIn
- Log in to your TexAu account at v2-prod.texau.com.
- Go to Accounts and connect your LinkedIn account. You can choose one of these methods:
- Share via Magic Link: Share the link, copy it to your browser, and follow the steps to integrate your LinkedIn account securely.
- Add Account: Sync cookies and browser data with TexAu for seamless integration.
Tip: Use Magic Link for an easy and secure connection.
{% custom-image src="https://v2-web-assets.s3.us-east-1.amazonaws.com/Common/log-in-to-texau-and-connect-linkedin/connect-linkedin.png" alt="connect-linkedin" /%}
Step 2: Choose Cloud or Desktop Execution
- Decide how you want to run the automation:
- Cloud Mode: Automates tasks on TexAu’s servers with built-in proxies. You can add custom proxies via Settings > Preferences > Proxies.
- Desktop Mode: Runs automation on your local device using your IP address.
Tip: Desktop mode saves cloud runtime credits and gives more control over the process.
{% custom-image src="https://v2-web-assets.s3.us-east-1.amazonaws.com/Common/add-account.png" alt="step2" /%}
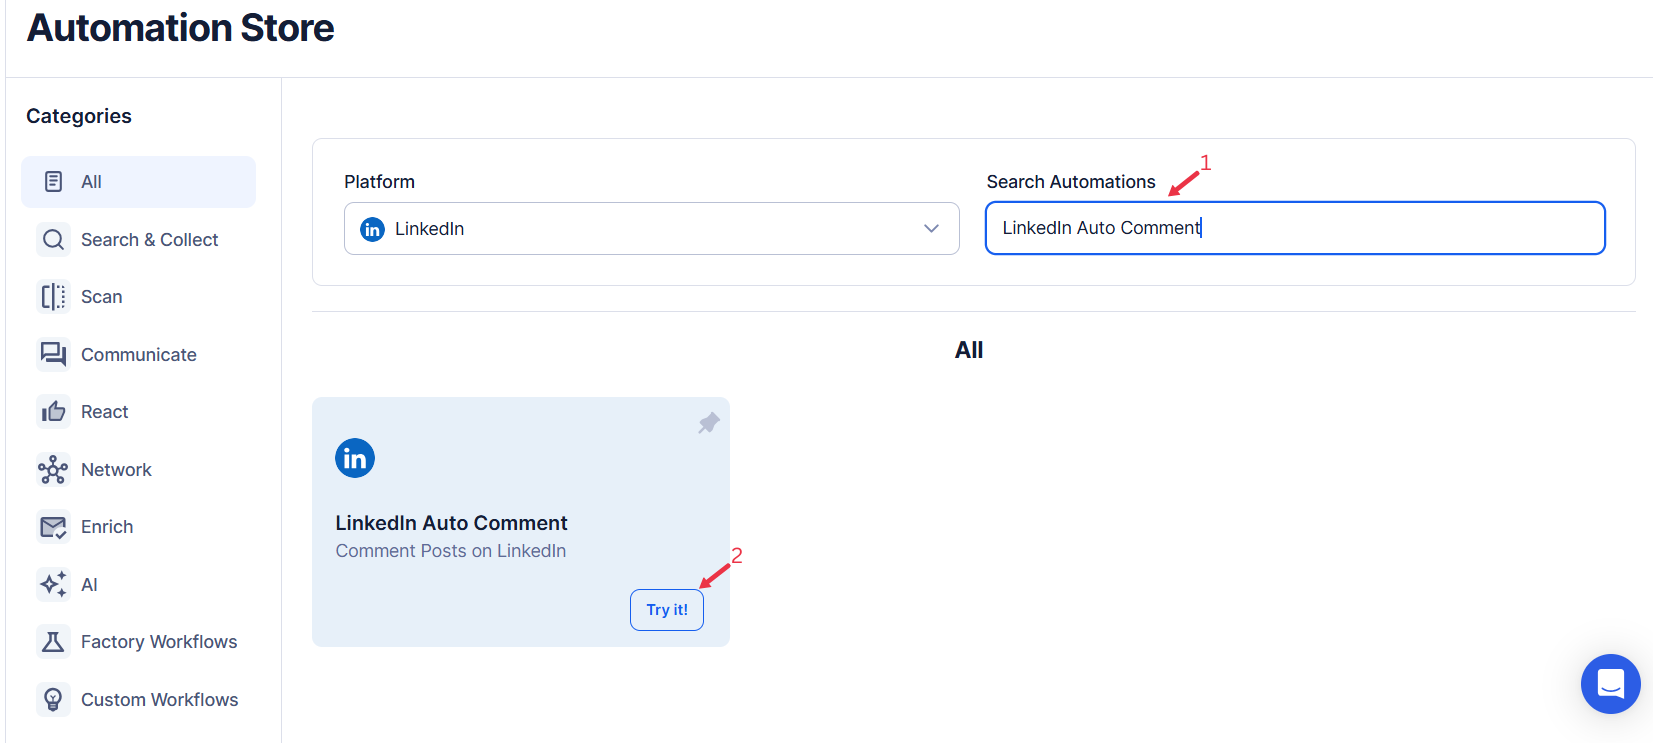
Step 3: Search for the Particular LinkedIn Automation
- Navigate to the Automation Store on TexAu.
- Use the search bar to find LinkedIn Auto Comment automation.
{% custom-image src="https://v2-web-assets.s3.us-east-1.amazonaws.com/Automations/linkedin-auto-comment/linkedin-auto-comment.png" alt="search-for-the-particular-LinkedIn-automation" /%}
Step 4: Select Your Input Source
Define the input source to specify LinkedIn posts and comments for the LinkedIn Auto Comment automation. TexAu provides multiple options to suit the needs of founders, sales managers, marketers, and growth hackers. Here's how to configure each:
{% cta buttonText="Start free trial" title="Auto-Comment on LinkedIn to Grow Visibility" description="Stay top-of-mind on LinkedIn by auto-posting relevant comments. Boost reach, save time, and build connections no daily manual effort needed." /%}
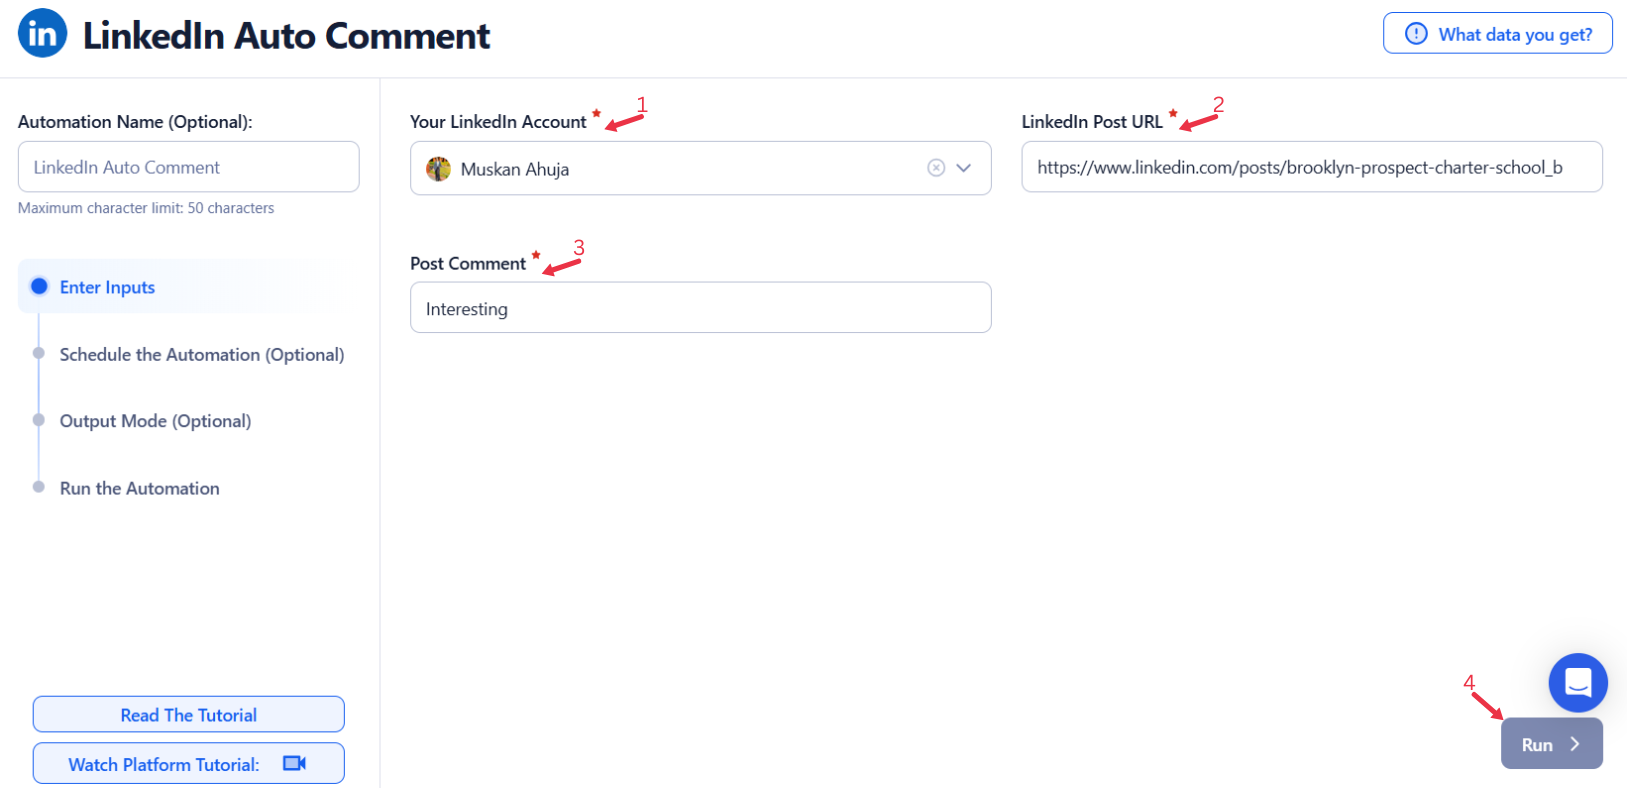
Manually Enter a Single Input
This option is perfect for adding comments to a specific LinkedIn post. Here’s how to use it:
- Input Field: Enter the LinkedIn post URL you want to comment on.
- Comment Field: Enter the comment text you want to post.
- Once the details are entered, click Run in the lower-right corner to start the process.
- This method is best suited for targeted, one-off comments.
{% custom-image src="https://v2-web-assets.s3.us-east-1.amazonaws.com/Automations/linkedin-auto-comment/linkedin-auto-comment-single-inputs.png" alt="enter-a-single-input" /%}
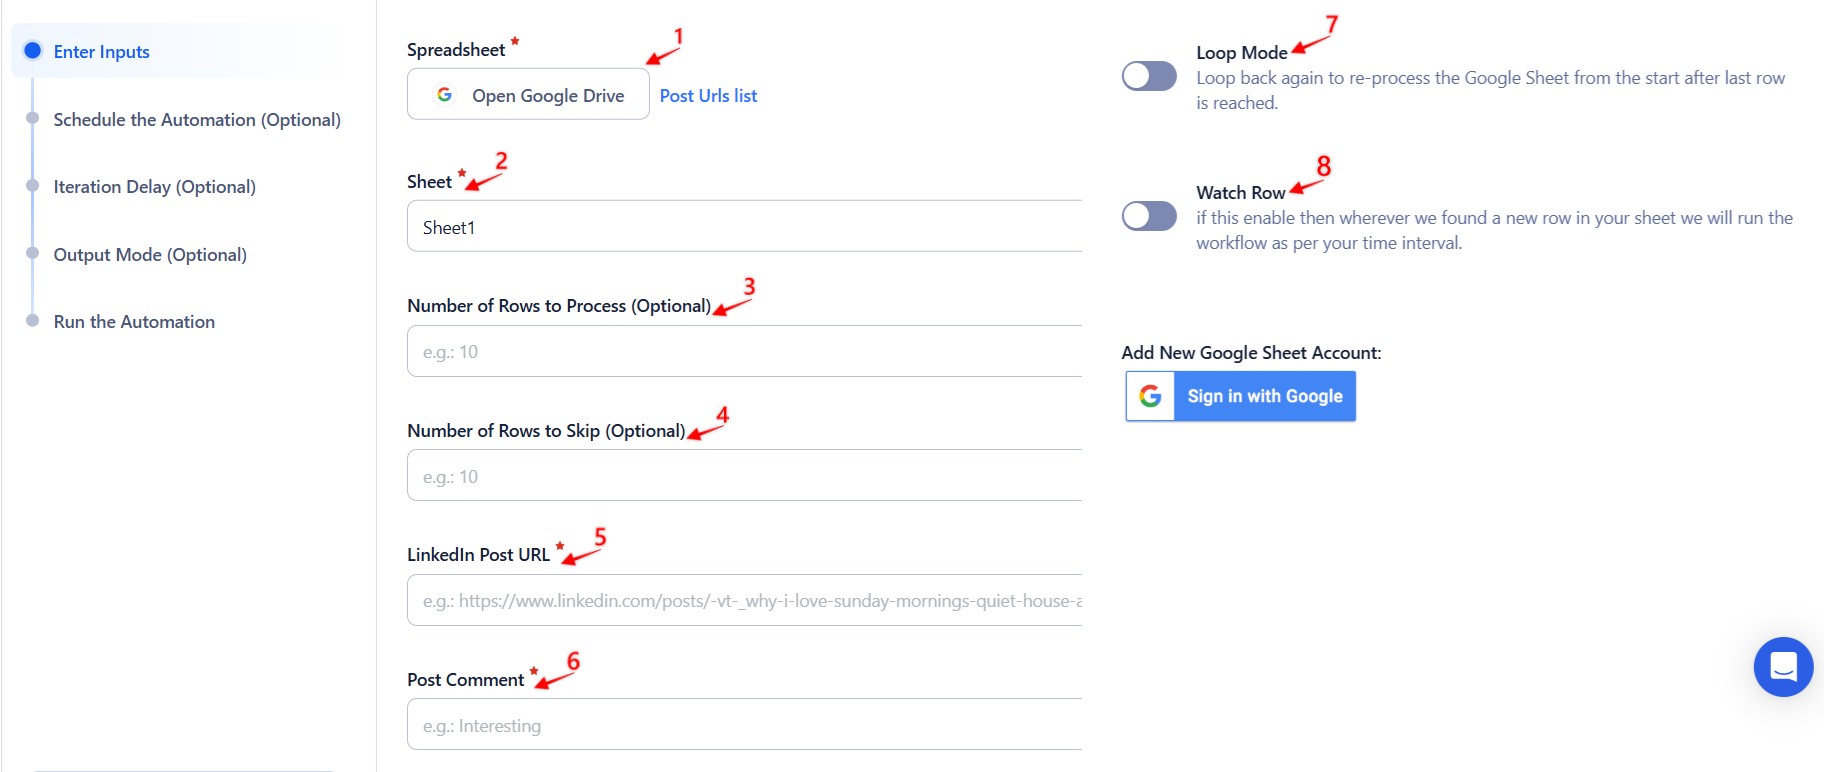
Use Google Sheets for Bulk Input
If you want to comment on multiple LinkedIn posts, integrating Google Sheets is a highly efficient choice. Follow these steps:
- Connect Your Google Account
- Click Select Google Account and choose an existing account.
- If you haven’t connected your account yet, click Add New Google Sheet Account to link a new one.
- Select the Spreadsheet
- Once your Google account is connected, click Open Google Drive to browse and select the spreadsheet containing LinkedIn post URLs.
- Choose the specific sheet where the URLs are stored.
- Adjust Processing Options
- Number of Rows to Process (Optional): Specify how many rows of data you want to process.
- Number of Rows to Skip (Optional): If you need to skip initial rows, define the number here.
- Provide Input Details
- LinkedIn Post URLs: Choose the column containing LinkedIn post URLs.
- Comments: Provide the column containing comments you want to post.
- Ensure the Data is Correct
- Verify that the selected columns contain valid LinkedIn post URLs and corresponding comments.
- Click Run to initiate the automation.
Optional Advanced Feature:
-
Loop Mode: Enable Loop Mode to re-process the Google Sheet from the beginning once all rows are completed. This is useful for tasks that require recurring updates.
-
Watch Row (Optional)
Watch Row feature ensures automated execution of workflows by checking Google Sheets for new data entries.
Configure Watch Row by selecting a monitoring interval and setting an end date.
Watch Row Schedule
- None
- Scheduling Intervals (e.g., every 15 minutes, every hour)
- One-Time Execution
- Daily Execution
- Weekly Recurrence (e.g., every Monday and Saturday)
- Monthly Specific Dates (e.g., 8th and 23rd)
- Custom Fixed Dates (e.g., July 14)
By default, TexAu checks every 15 minutes and continues for five days unless modified.
With Watch Row, you can ensure workflows trigger automatically when new data arrives.
{% custom-image src="https://v2-web-assets.s3.us-east-1.amazonaws.com/Automations/linkedin-auto-comment/linkedin-auto-comment-google-sheetss.jpeg" alt="use-google-sheets-for-bulk-input" /%}
Process a CSV File
For those who prefer working with a static file, TexAu supports CSV uploads. Here’s how to use this option:
- Upload the File
- Click Upload CSV File and select the file containing LinkedIn post URLs and comments from your computer.
- After uploading, TexAu will display the file name and provide a content preview.
- Configure Processing Settings
- Number of Rows to Process (Optional): Define how many rows you want to process.
- Number of Rows to Skip (Optional): Specify rows to skip if needed.
- Provide Input Details
- LinkedIn Post URLs: Choose the column containing LinkedIn post URLs.
- Comments: Provide the column containing comments you want to post.
- Verify the Data
- Ensure the correct columns contain LinkedIn post URLs and corresponding comments.
- Click Run to begin the process.
Optional: Advanced Feature - Loop Mode
For tasks that require regular updates, enable Loop Mode. This feature reprocesses the Google Sheet from the beginning once all rows are completed, making it ideal for commenting on new posts regularly.
Screenshot Suggestion:
- Show the input fields for "Post URL" and "Comment" to illustrate how to add URLs and comments manually.
- Include a visual of the Google Sheets setup, emphasizing the input fields for LinkedIn post URLs and comments.
{% custom-image src="https://v2-web-assets.s3.us-east-1.amazonaws.com/Common/texau-input-source-options.png" alt="step3" /%}
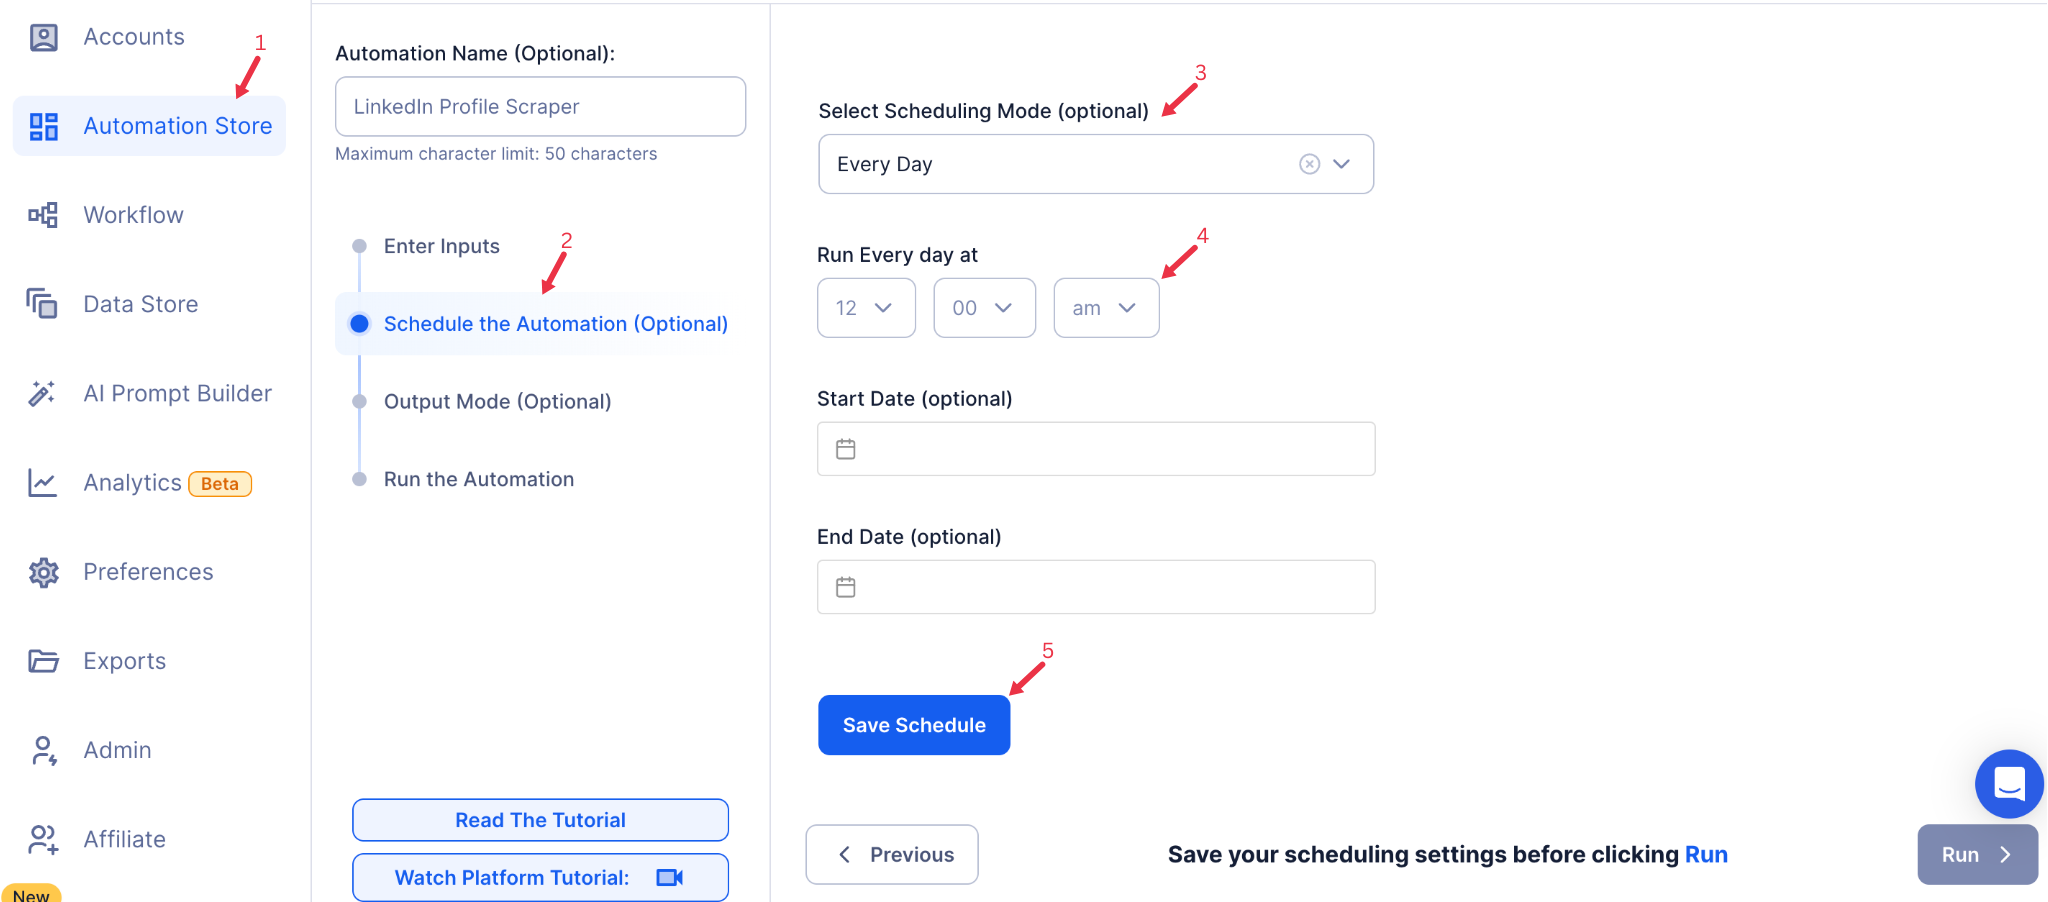
Step 5: Schedule the Automation (Optional)
Use TexAu’s scheduling feature to run the automation at specific times. Click Schedule to configure the timing and frequency:
- None: Run the automation immediately.
- At Regular Intervals (e.g., every 8 hours or daily)
- Once
- Every Day
- On Specific Days of the Week (e.g., every Monday and Thursday)
- On Specific Days of the Month (e.g., the 1st and 15th)
- On Specific Dates (e.g., February 20)
Tip: Scheduling automations ensures consistent and strategic LinkedIn engagement.
{% custom-image src="https://v2-web-assets.s3.us-east-1.amazonaws.com/Common/schedule-the-automation/schedule-the-automation.png" alt=" schedule-the-automation" /%}
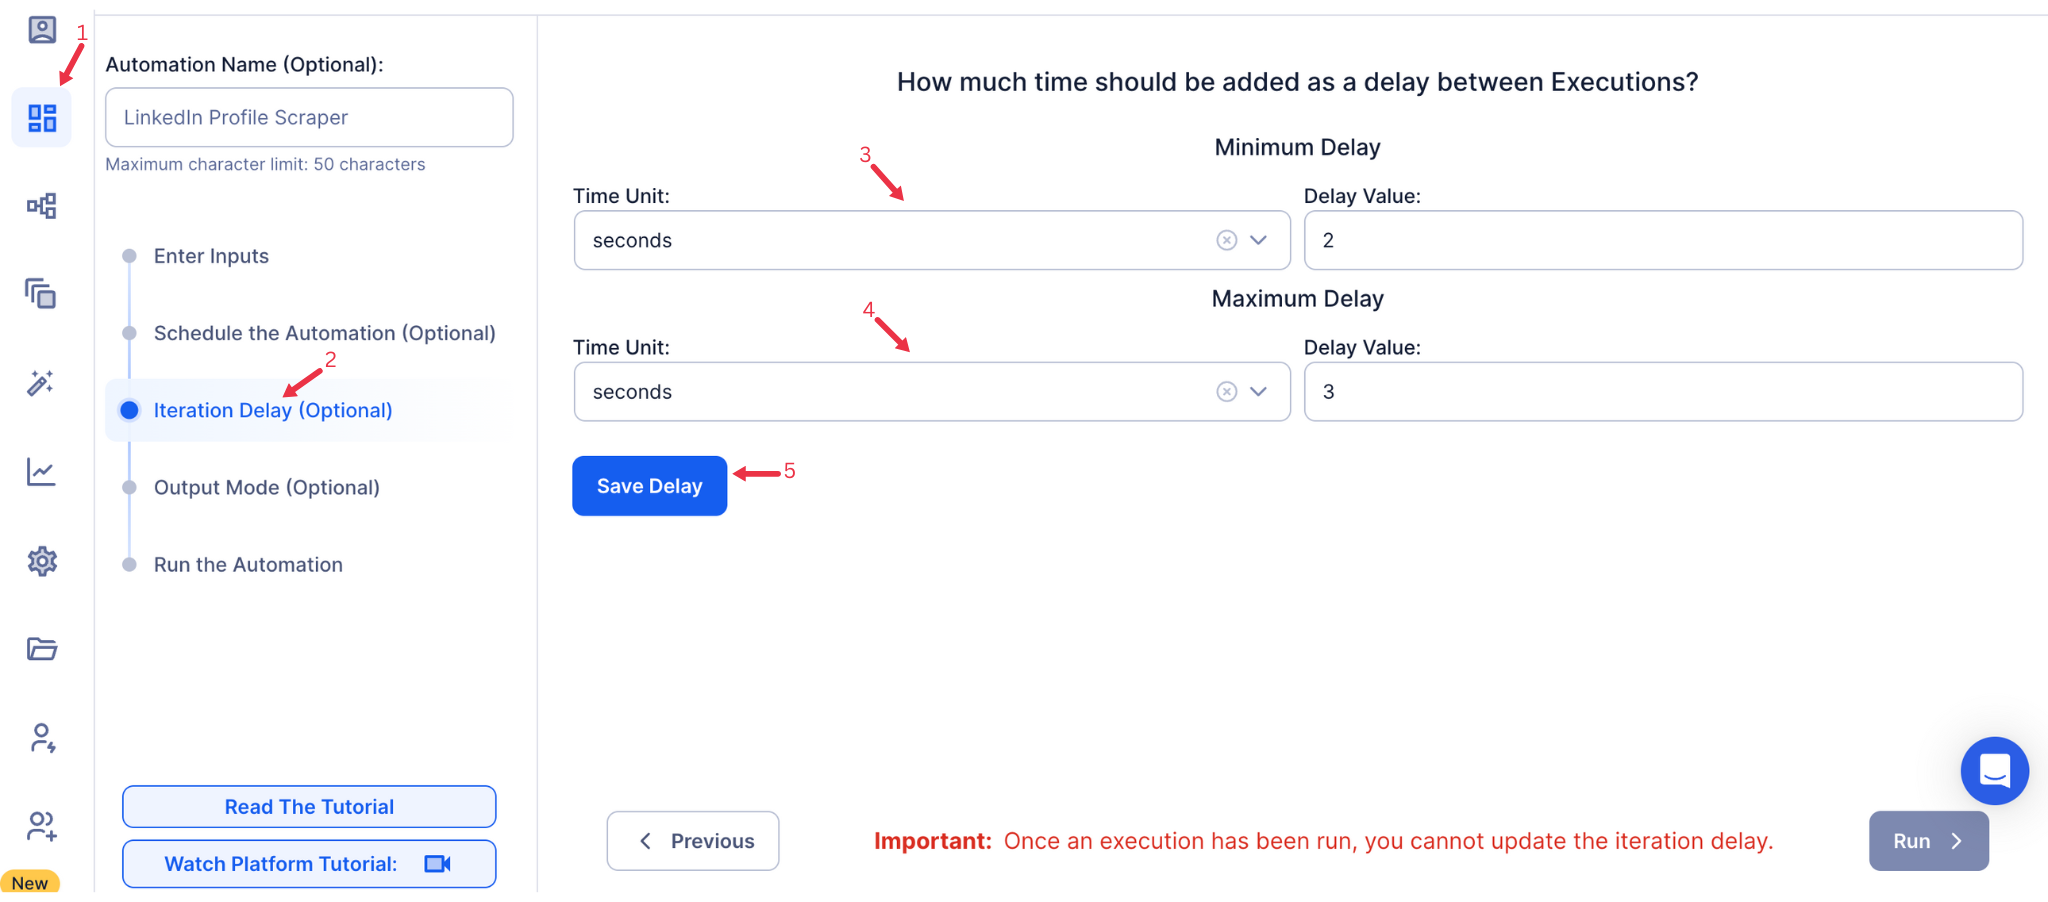
Step 6: Set an Iteration Delay (Optional)
Avoid detection and simulate human-like activity by setting an iteration delay. Choose minimum and maximum time intervals to add randomness between actions. This makes your activity look natural and reduces the chance of being flagged.
- Minimum Delay: Enter the shortest interval (e.g., 10 seconds).
- Maximum Delay: Enter the longest interval (e.g., 20 seconds).
Tip: Random delays keep your automation safe and reliable.
{% custom-image src="https://v2-web-assets.s3.us-east-1.amazonaws.com/Common/iteration-delay/iteration-delay.png" alt="iteration-delay" /%}
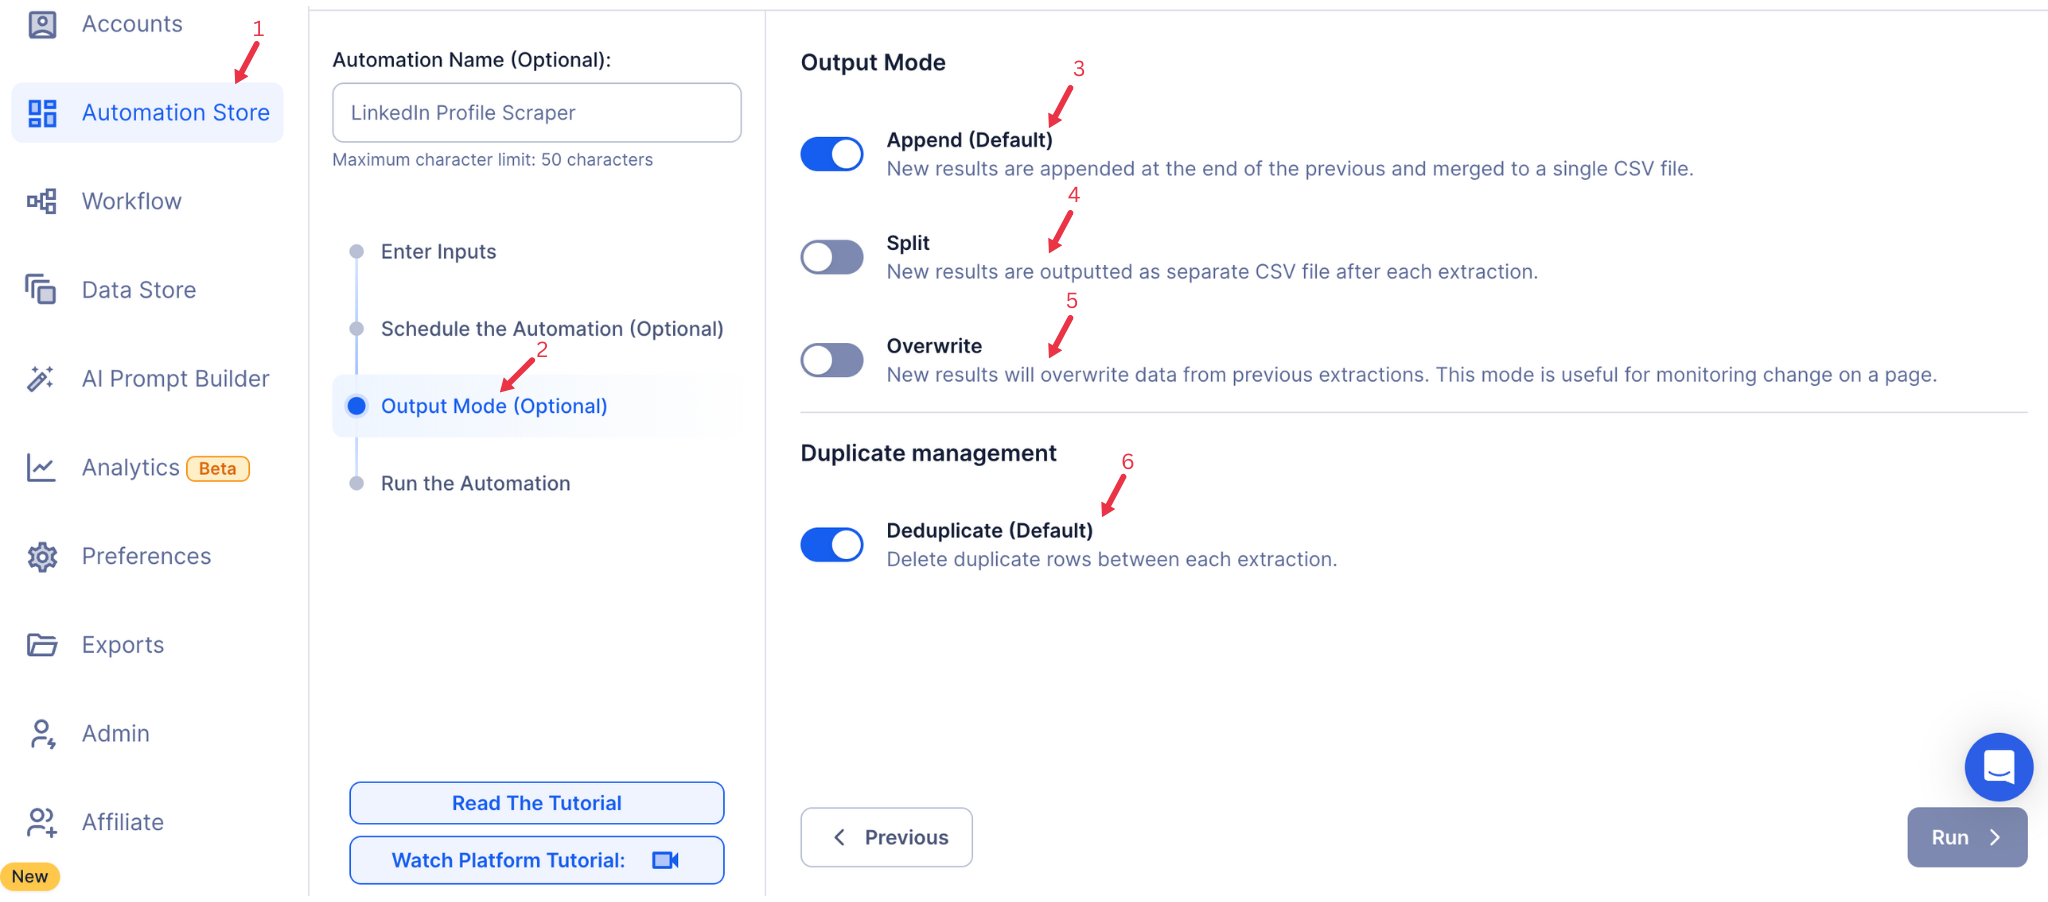
Step 7: Choose Your Output Mode (Optional)
In Output Mode, specify how to save and manage the results of the automation:
- Google Sheets: Export results directly to a Google Sheet for collaborative tracking.
- CSV File: Save results locally for offline analysis.
- Output Management:
- Append (Default): Add new results to the existing file.
- Split: Create a new file for each automation run.
- Overwrite: Replace old data with the latest results.
- Duplicate Management: Enable Deduplicate to automatically remove duplicate entries.
Tip: Exporting to Google Sheets is ideal for teams managing multiple LinkedIn campaigns.
{% custom-image src="https://v2-web-assets.s3.us-east-1.amazonaws.com/Common/output-mode/output-mode.png" alt="output-mode " /%}
Step 8: Access the Data from the Data Store
Once the automation completes, navigate to the Data Store in TexAu. Locate the LinkedIn Auto Comment automation and click See Data to view or download the results.
The exported file includes details such as commented post URLs, timestamps, and comment text for analysis or reporting.
{% custom-image src="https://v2-web-assets.s3.us-east-1.amazonaws.com/Automations/LinkedIn+Job+Scraper/data-store-see-data.png" alt="step8" /%}
The LinkedIn Auto Comment automation simplifies LinkedIn engagement by enabling you to post comments automatically. With scheduling, input customization, and seamless data export to Google Sheets or CSV, this tool helps maintain a consistent presence and drive meaningful conversations on LinkedIn. Save time and maximize impact with TexAu!
Run this automation on your own server.
TexAu V3 doesn't host social-platform automations anymore — but the runnable code is yours. Tell us your inputs, outputs, and target environment, and we'll ship you a working version you can deploy and operate yourself.