LinkedIn Auto Connect
Safely automate LinkedIn connection requests. Grow your network faster, improve outreach, and save time, without risking your LinkedIn account.
Last updated
LinkedIn has become the go-to platform for professionals to network, build relationships, and create opportunities. LinkedIn is the ultimate platform for building a **professional network**, enabling users to cultivate relationships, explore career opportunities, and expand their influence in variou
LinkedIn has become the go-to platform for professionals to network, build relationships, and create opportunities. LinkedIn is the ultimate platform for building a professional network, enabling users to cultivate relationships, explore career opportunities, and expand their influence in various industries. It empowers individuals and organizations alike to connect with the right people, share knowledge, and drive business success. Leveraging its robust tools and features, LinkedIn serves as a critical resource for anyone looking to make meaningful connections and achieve their professional goals.
However, manually sending connection request messages and managing your network can be time-consuming, especially when targeting a specific audience. Enter TexAu’s LinkedIn Auto Connect—a cutting-edge LinkedIn Automation tool designed to automate the process while preserving the essence of personalization. By using auto connect tools, users save valuable time while ensuring personalized campaign messages reach their target audience effectively.
Why Expand Your LinkedIn Network?
Expanding your LinkedIn connections is more than just a numbers game—it’s about building a high-quality professional network that drives personal and business growth. Here’s why growing your LinkedIn network should be a key priority:
1. Career Advancement
Your LinkedIn connections can open doors to exciting career opportunities. By connecting with hiring managers, industry leaders, or recruiters, you can:
- Gain visibility in your field of expertise.
- Stay updated on job openings that align with your skills and aspirations.
- Increase the likelihood of receiving referrals or direct invitations for job interviews.
Example: A software developer connects with CTOs of tech startups in their region. When a startup begins hiring, they already have a connection request message history with the decision-maker, increasing their chances of getting noticed.
2. Business Development
For entrepreneurs and business professionals, LinkedIn is a treasure trove of potential clients, partners, and collaborators. By actively expanding your network, you can:
- Forge relationships that lead to partnerships, collaborations, or direct sales.
- Stay informed about industry trends and potential market opportunities.
- Gain access to decision-makers who can accelerate your business growth.
Example: A B2B marketer uses auto-connect tools to connect with CMOs of mid-sized SaaS companies, eventually landing contracts for marketing automation services. To optimize network management, they also use LinkedIn Sent Request Extractor to track pending connection requests and improve follow-up efficiency.
3. Thought Leadership
LinkedIn provides a platform to share insights, opinions, and expertise, helping you establish authority in your niche. A broader network means your content strategy reaches a larger audience, amplifying your influence.
Example: A content strategist builds a network of 10,000 connections in the marketing industry. By consistently sharing original content, they position themselves as a thought leader, attracting speaking opportunities and consulting clients.
TexAu’s LinkedIn Auto Connect helps achieve these objectives efficiently by automating connection requests to relevant individuals, saving you valuable time while building a meaningful network. Whether you aim to enhance your sales process, generate potential leads, or strengthen your professional presence, TexAu empowers you to grow your network strategically.
Key Features of TexAu LinkedIn Auto Connect
1. Personalized Connection Requests
The first impression matters, and generic connection requests often fail to stand out. TexAu’s LinkedIn Automation enables you to craft personalized messages that resonate with your target audience and increase acceptance rates.
Why It Matters: Personalized connection requests show effort, build trust, and create meaningful engagement.
Example: Instead of sending a generic “Let’s connect,” TexAu allows you to tailor messages like:"Hi [First Name], I noticed we share an interest in [industry/topic]. I’d love to connect and exchange insights on [specific field]."
Use Case: A sales professional targeting decision-makers in healthcare technology can mention shared interests like healthcare innovation, making their outreach more appealing.
2. Targeted Audience Selection
Reaching the right user profiles is critical for achieving your LinkedIn goals. TexAu’s advanced filters enable precise audience selection based on:
- Location: Target professionals in specific cities, regions, or countries.
- Industry: Focus on sectors like SaaS, finance, or marketing.
- Job Title: Connect with individuals in roles such as Marketing Manager or CTO.
- Keywords: Search terms like “content marketing expert” or “cybersecurity specialist” ensure highly relevant connections.
Why It Matters: With targeted outreach, your network grows with LinkedIn users who align with your objectives, maximizing the value of your connections.
Example: A recruiter searching for software engineers in the fintech industry can filter profiles with titles like Full-Stack Developer or Machine Learning Engineer, ensuring a focused outreach.
3. Bulk Automation
Manually sending connection requests is time-consuming. TexAu’s automation tools allow you to scale your efforts without sacrificing personalization.
Scenario: A recruiter needs to connect with 200 candidates in one day. Instead of manually sending each request, they use TexAu to automate the process, including tailored messages for every profile.
Benefit: TexAu helps growth hackers, recruiters, and sales professionals efficiently manage routine tasks, saving valuable time and boosting productivity. To further streamline their recruitment efforts, they also leverage LinkedIn Auto Accept Pending Connection, ensuring inbound requests are accepted automatically, expanding their candidate pool effortlessly.
4. Activity Scheduling
TexAu minimizes the risks associated with bulk actions on LinkedIn by mimicking organic activity through random delays and controlled scheduling.
How It Works:
- Define the number of requests per day.
- Spread requests across various time intervals to simulate natural activity.
Example: Schedule 50 requests daily between 9 AM and 5 PM, sending them in reasonable time intervals.**Benefit:**This feature prevents LinkedIn’s daily limits from being triggered, ensuring consistent and safe account growth.
5. Integration with Other Tools
TexAu’s LinkedIn Auto Connect seamlessly integrates with its other automation tools, creating a comprehensive suite for managing LinkedIn strategies.
Examples of Integration:
- Profile Scraping: Extract detailed user details to refine your connection strategy.
- Message Automation: Automatically send follow-up messages to new connections, sparking meaningful conversations.
- Scenario: A SaaS founder uses Auto Connect to build a network of marketing professionals and combines it with messaging automation tools to introduce their software solution effectively.
TexAu’s LinkedIn Auto Connect combines powerful features with a user-friendly interface, enabling professionals to save loads of time, build meaningful relationships, and achieve steady growth of connections. To optimize their connections list, they employ LinkedIn Connection Remover to periodically remove inactive or irrelevant connections, ensuring their network remains engaged and valuable.
Benefits of Using TexAu
1. Efficient Networking
TexAu eliminates the need for manual outreach, automating repetitive tasks and freeing your time for more strategic interactions.
Scenario
A small business owner uses TexAu to send 100 connection requests daily, allowing them to focus on preparing pitches for prospective clients instead of spending hours on LinkedIn.
2. Enhanced Personalization
Predefined templates in TexAu ensure your messages are tailored to resonate with your audience.
Example
A marketing professional targeting content creators can use:“Hi [Name], I loved your recent post about [topic]. Let’s connect to discuss shared interests in [field].”
Benefit
Personalized messages make recipients feel valued, leading to higher acceptance rates.
3. Lead Generation
TexAu helps you build a pipeline of qualified leads by connecting with decision-makers in your target market.
Scenario
A SaaS founder uses TexAu to connect with 500 marketing managers across North America, laying the groundwork for targeted email campaigns to promote their software.
4. Improved Engagement
Expanding your LinkedIn network in your niche increases engagement with your posts, strengthening your LinkedIn presence.
Example
By connecting with influencers and professionals in your industry, your content gets more likes, comments, and shares, boosting visibility and credibility.
Benefit
A larger, engaged network amplifies your influence and opens more opportunities.
TexAu’s LinkedIn Auto Connect is your gateway to efficient, scalable, and personalized networking, whether your goal is to advance your career, grow your business, or establish thought leadership.
Use Cases for TexAu LinkedIn Auto Connect
1. For Sales Teams
Sales professionals often struggle to reach key decision-makers amidst the vast sea of LinkedIn profiles. TexAu’s LinkedIn Automation Tools streamline this process by automating outreach while preserving personalization.
How It Helps:
- Automate connection requests to target CEOs, managers, or other decision-makers within your niche.
- Save valuable time and effort while expanding your pool of potential leads.
- Pair with message sequencing tools to nurture leads effectively.
Example: A sales representative specializing in SaaS solutions uses TexAu to send bulk messages and connection requests to 300 CEOs in the tech sector. After connections are established, they utilize TexAu’s messaging automation tool to deliver personalized follow-up messages offering a product demo.Outcome: This approach scales outbound marketing efforts, increases response rates, and boosts the chances of closing deals.
2. For Recruiters
Recruiters face the challenge of connecting with candidates who match specific job criteria across industries. TexAu’s advanced filtering options make lead-generation efforts more efficient.
How It Helps:
- Target candidates based on job titles, skills, industries, or specific keywords.
- Automate routine tasks like sending connection requests and follow-ups to streamline recruitment pipelines.
- Build a strong network of qualified candidates for current and future openings.
Scenario: A recruiter specializing in fintech jobs uses TexAu to connect with software engineers experienced in Python, machine learning, and cloud computing. By automating these connection requests, the recruiter eliminates repetitive actions and focuses on interviewing top candidates while TexAu handles outreach.
3. For Professionals
Expanding your LinkedIn network is vital for career advancement, whether you’re a junior professional or an experienced expert. TexAu enables individuals to connect effortlessly with peers, mentors, and thought leaders.
How It Helps:
- Discover professionals in your field and send personalized campaign messages.
- Build relationships that lead to mentorship, collaborations, or career growth.
- Strengthen your personal brand by connecting with influential users on social media platforms.
Example: A junior data analyst uses TexAu to connect with senior analysts, content creators, and growth hackers in the analytics community. Over time, they gain access to actionable insights, learning opportunities, and mentorship.Outcome: This process accelerates their career growth while strengthening their presence in their professional network.
TexAu’s innovative tools for LinkedIn automation are designed to make outreach seamless for sales teams, recruiters, and professionals. By integrating features like customizable templates, message sequences, and follow-up automation, TexAu ensures efficient lead management and helps users achieve steady growth in their professional network.
Best Practices for TexAu LinkedIn Auto Connect
1. Define Clear Goals
Before initiating your outreach, establish clear objectives to ensure your strategy aligns with your desired outcomes.
Key Questions to Ask:
- Are you generating potential leads for sales workflows?
- Are you building a talent pipeline for recruitment efforts?
- Are you expanding your professional network for insights and opportunities?
Tip: Align your messaging with your goals:
- For lead generation: Focus on providing actionable insights or offering solutions to their pain points.
- For recruitment: Emphasize growth opportunities and the unique value of joining your company.
Example: A recruiter targeting software developers might message:"Hi [Name], we’re expanding our [tech department] at [Company]. Your expertise in [skill] caught my attention, and I’d love to discuss this opportunity further."
2. Target Strategically
TexAu’s advanced filters enable you to refine your audience, ensuring your outreach is highly relevant and impactful.
How to Target Effectively:
- Combine filters like location, industry, and job title for precise targeting.
- Focus on profiles that align directly with your business goals.
Example: A B2B marketer targeting marketing managers at mid-sized SaaS companies can use filters to narrow down their search to profiles within a specific industry, company size, or geography.
Tip: Strategic targeting ensures your lead-generation efforts and outbound marketing efforts yield better engagement and results.
3. Maintain Authenticity
Automation doesn’t mean sacrificing the personalization that fosters meaningful connections. Tailored messages resonate better and increase your connection request acceptance rates.
Tip: Reference shared interests or specific details from the recipient’s profile.
Example Message:"Hi [Name], I noticed we both follow [Influencer/Company]. Your insights on [specific topic] have been inspiring—I’d love to connect and exchange ideas."
Avoid: Generic messages like "Let’s connect." Instead, aim to craft effective messages that make your outreach memorable and relevant.
4. Monitor Performance
Tracking your campaign results ensures you can refine your approach for better outcomes.
Metrics to Track:
- Connection acceptance rates: Gauge the effectiveness of your initial outreach.
- Response rates: Evaluate how well your follow-up messages resonate.
- Engagement metrics: Monitor how new connections interact with your posts and content.
Example: If a specific message sequence has low acceptance, adjust the personalization or highlight a stronger value proposition.
Tip: Use TexAu’s analytics and customization options to identify areas for improvement and optimize future outreach campaigns.
By defining clear goals, targeting strategically, personalizing your messages, and monitoring performance, TexAu empowers users to build high-quality connections efficiently. Incorporating these best practices ensures your LinkedIn automation efforts remain impactful and drive meaningful results.
Advanced Metrics and Insights
TexAu’s LinkedIn Auto Connect goes beyond basic automation by providing actionable insights and advanced metrics to refine your networking strategy. By analyzing data on connection acceptance rates and engagement patterns, users can make informed decisions, ensuring their efforts are both effective and aligned with their business goals.
1. Connection Acceptance Tracking
Tracking connection requests and their acceptance rates is a vital metric for measuring the effectiveness of your outreach messages. TexAu provides detailed insights into connection performance, enabling you to optimize your engagement strategies.
How It Helps:
- Optimize Messaging: If certain connection request messages have lower acceptance rates, refine them with more personalization or clarity.
- Refine Targeting: High acceptance rates can identify audience segments that resonate with your approach, allowing you to focus on potential leads.
Example in Action: A sales professional targets two groups:
- Marketing professionals: Achieves a 60% acceptance rate.
- C-level executives: Only 40% acceptance.
What to Do Next:
- Prioritize marketing professionals for quicker results.
- Adjust your message for executives to make it more compelling by referencing shared goals or specific business challenges.
Pro Tip: Experiment with customizable templates and compare their performance:
- Template A: “Hi [Name], I noticed your expertise in [field]. I’d love to connect and explore potential collaborations.”
- Template B: “Hi [Name], as a fellow [industry professional], I’d like to exchange insights on [topic].”
Analyze which template yields higher acceptance rates, helping you fine-tune your messaging automation tool.
2. Engagement Analysis
Beyond connection acceptance, tracking post-connection engagement is critical for gauging the success of your outreach and improving your content strategy.
Why Engagement Analysis Matters:
- Evaluate Outreach Success: Determine if your connections engage with your profile or respond to follow-up messages.
- Guide Content Strategy: Understand what topics resonate to create engaging posts. By leveraging LinkedIn AI Connector, they refine their outreach approach, focusing on users who actively engage with their posts and messages.
Key Metrics to Track:
- Profile Visits: Are connections curious enough to explore your user profile?
- Message Replies: High reply rates suggest effective messages.
- Post Engagement: Likes, comments, and shares on posts indicate strong content alignment with audience interests.
Practical Example: A recruiter connects with 200 software engineers. After a week, they analyze engagement:
- 40% visit their profile.
- 25% reply to personalized follow-ups.
- Only 10% interact with posts.
Action Plan:
- Enhance your LinkedIn profile by showcasing job openings or industry achievements.
- Refine follow-up sequences to make them more relevant and personal.
- Share original content aligned with audience interests, such as industry trends or career tips for engineers.
Tips for Maximizing Engagement:
-
Leverage Personalization: Tailor follow-up messages to reference specific details or shared interests.Example: “Hi [Name], I saw your recent post about [topic]—great insights! I’d love to discuss [related subject] further.”
-
Create Relevant Content: Share posts that deliver valuable insights like case studies, industry tips, or thought leadership articles.
Example: For marketers, create posts about innovative content creation strategies or social media platforms trends.
- Engage Back: Build relationships by responding to comments and interacting with connections’ posts.
Why Advanced Metrics Matter
TexAu’s analysis tools empower you to:
- Refine lead-generation efforts with precise data.
- Create customizable templates for targeted message sequencing.
- Build meaningful relationships through data-driven outreach strategies.
TexAu transforms networking into a data-backed process, ensuring your LinkedIn Automation efforts yield impactful results, saving valuable time while driving measurable growth.
Automation Safety Measures
1. Custom Delays
Maintaining a natural pace in sending connection requests is crucial to avoiding LinkedIn’s spam detection mechanisms. TexAu’s custom delay feature allows users to control the intervals between requests, mimicking organic behavior.
Example: Schedule connection requests every 5–10 minutes instead of sending them in bulk.Benefit: This reduces the risk of being flagged by LinkedIn while ensuring steady growth in your professional network.
2. Daily Limit Customization
LinkedIn enforces limits on the number of daily connection requests to prevent spam. TexAu enables users to customize these limits, ensuring compliance while maximizing outreach.
Tip:
- Start with 20–50 requests per day if you're new to LinkedIn.
- Established profiles with high engagement metrics can safely increase to 50–100 requests daily.
Example: A new LinkedIn user might start with 20 requests daily, gradually increasing as their profile’s credibility grows. On the other hand, an experienced sales professional with an active LinkedIn presence can comfortably send 100 connection requests each day, targeting decision-makers within their industry.
Conclusion
TexAu’s LinkedIn Auto Connect tool is a game-changer for professionals looking to expand their network strategically. By automating connection requests without compromising on personalization, TexAu delivers an outreach solution that is:
- Efficient: Automate repetitive tasks and save valuable time.
- Scalable: Expand your reach without exceeding LinkedIn’s daily limits.
- Impactful: Build meaningful connections with targeted audiences.
Whether you’re a:
- Sales professional connecting with key decision-makers,
- Recruiter building a talent pipeline, or
- Professional expanding your network for collaboration,
TexAu empowers you to achieve your goals with precision and efficiency.
Start leveraging TexAu LinkedIn Auto Connect today to unlock LinkedIn’s full potential for your career or business. Automate smarter, connect faster, and grow stronger with TexAu!
The LinkedIn Auto Connect automation helps professionals streamline their networking efforts by automatically sending personalized connection requests on LinkedIn. This tool is perfect for founders, sales managers, marketers, and growth hackers who want to efficiently expand their LinkedIn network with targeted outreach. TexAu enables seamless automation with features like Google Sheets/CSV integration, scheduling, and cloud or desktop execution.
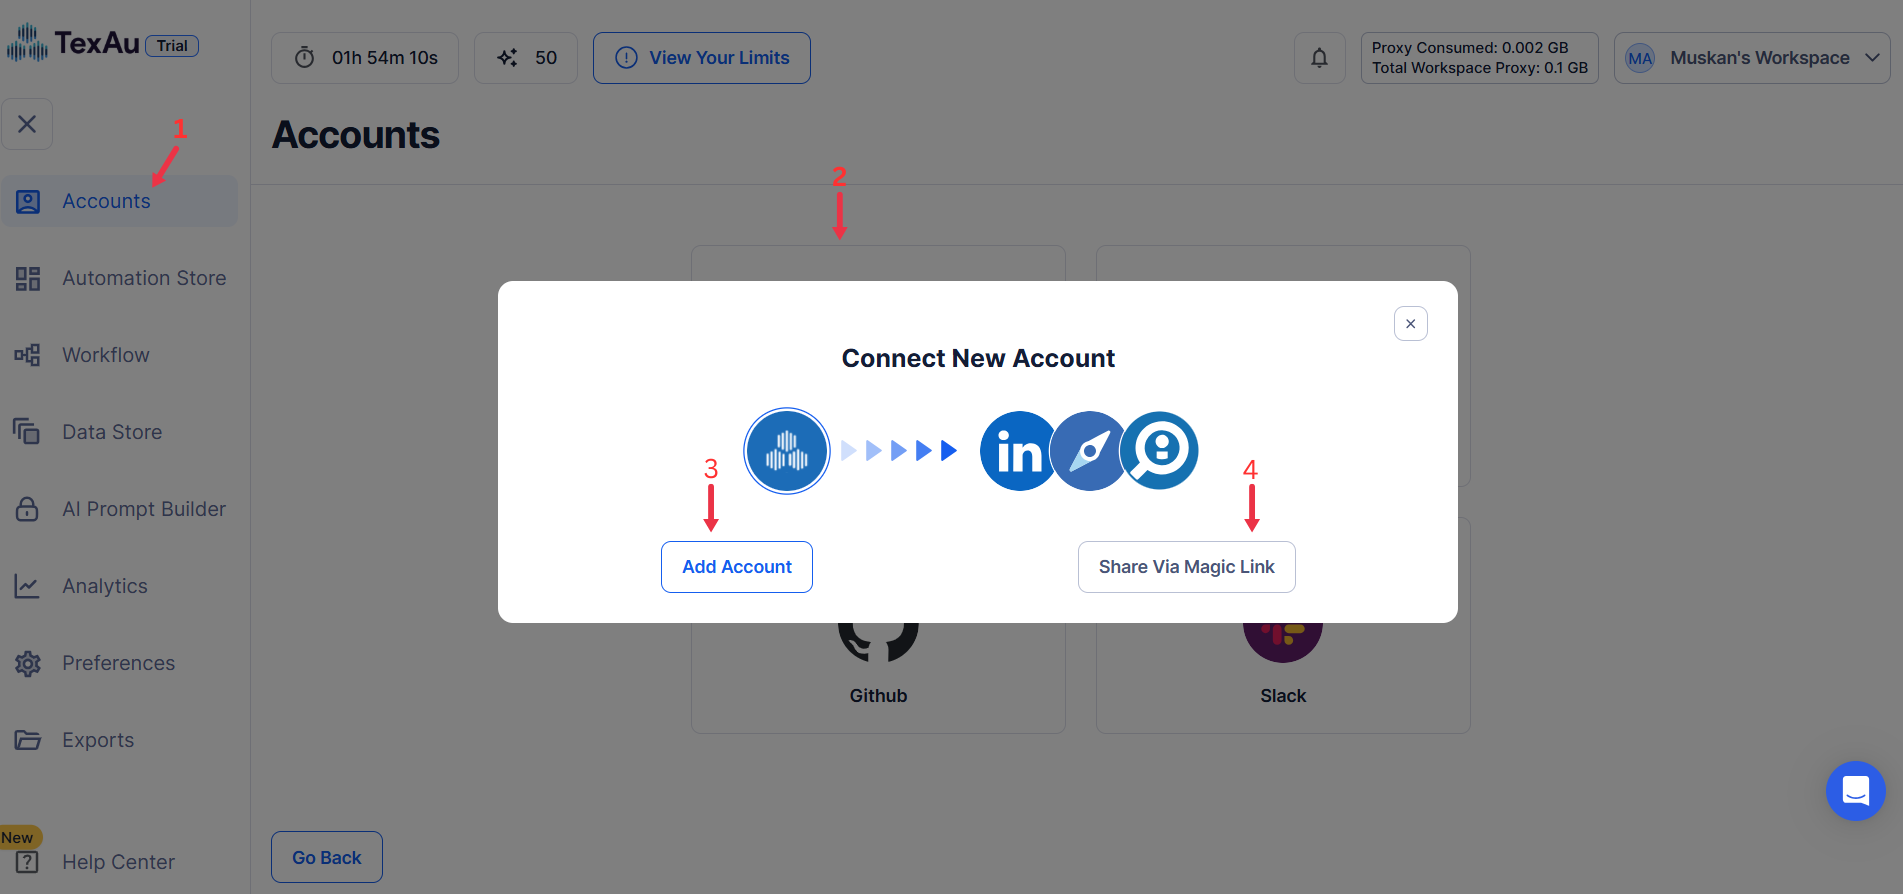
Step 1: Log in to TexAu and Connect LinkedIn
Log in to your TexAu account at v2-prod.texau.com.
Go to Accounts and connect your LinkedIn account. You can choose one of these methods:
- Share via Magic Link: Share the link, copy it to your browser, and follow the steps to integrate your LinkedIn account securely.
- Add Account: Sync cookies and browser data with TexAu for seamless integration.
Tip: Use Magic Link for an easy and secure connection.
{% custom-image src="https://v2-web-assets.s3.us-east-1.amazonaws.com/Common/log-in-to-texau-and-connect-linkedin/connect-linkedin.png" alt="connect-linkedin" /%}
Step 2: Choose Cloud or Desktop Execution
Decide how you want to run the automation:
- Cloud Mode: Automates tasks on TexAu’s servers with built-in proxies. You can add custom proxies via Settings > Preferences > Proxies.
- Desktop Mode: Runs automation on your local device using your IP address.
Tip: Desktop mode saves cloud runtime credits and gives more control over the process.
{% custom-image src="https://v2-web-assets.s3.us-east-1.amazonaws.com/Common/add-account.png" alt="step2" /%}
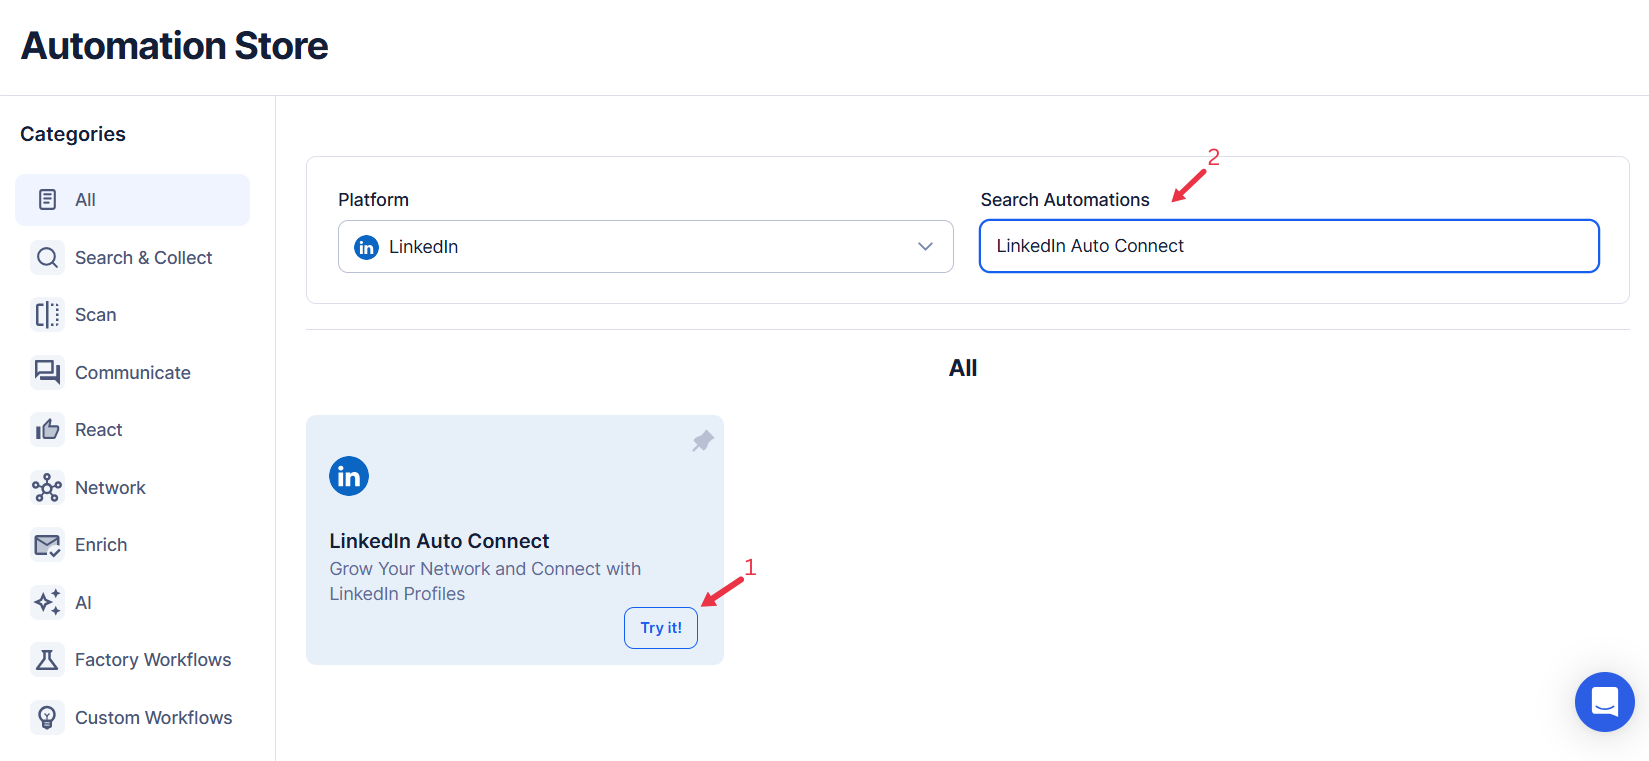
Step 3: Search for the Particular LinkedIn Automation
- Navigate to the Automation Store on TexAu.
- Use the search bar to find LinkedIn Auto Connect automation.
{% custom-image src="https://v2-web-assets.s3.us-east-1.amazonaws.com/Automations/linkedin-auto-connect/linkedin-auto-connect.png" alt="search-for-the-particular-LinkedIn-automation" /%}
{% cta buttonText="Start free trial" title="Auto‑Connect on LinkedIn at Scale" description="Send personalized connection requests automatically. Grow your LinkedIn network daily while saving time, reducing manual work, and reaching more of the right people." /%}
Step 4: Select Your Input Source
Define the input source to specify LinkedIn profiles for the LinkedIn Auto Connect automation. TexAu provides multiple options to suit the needs of founders, sales managers, marketers, and growth hackers. Here's how to configure each:
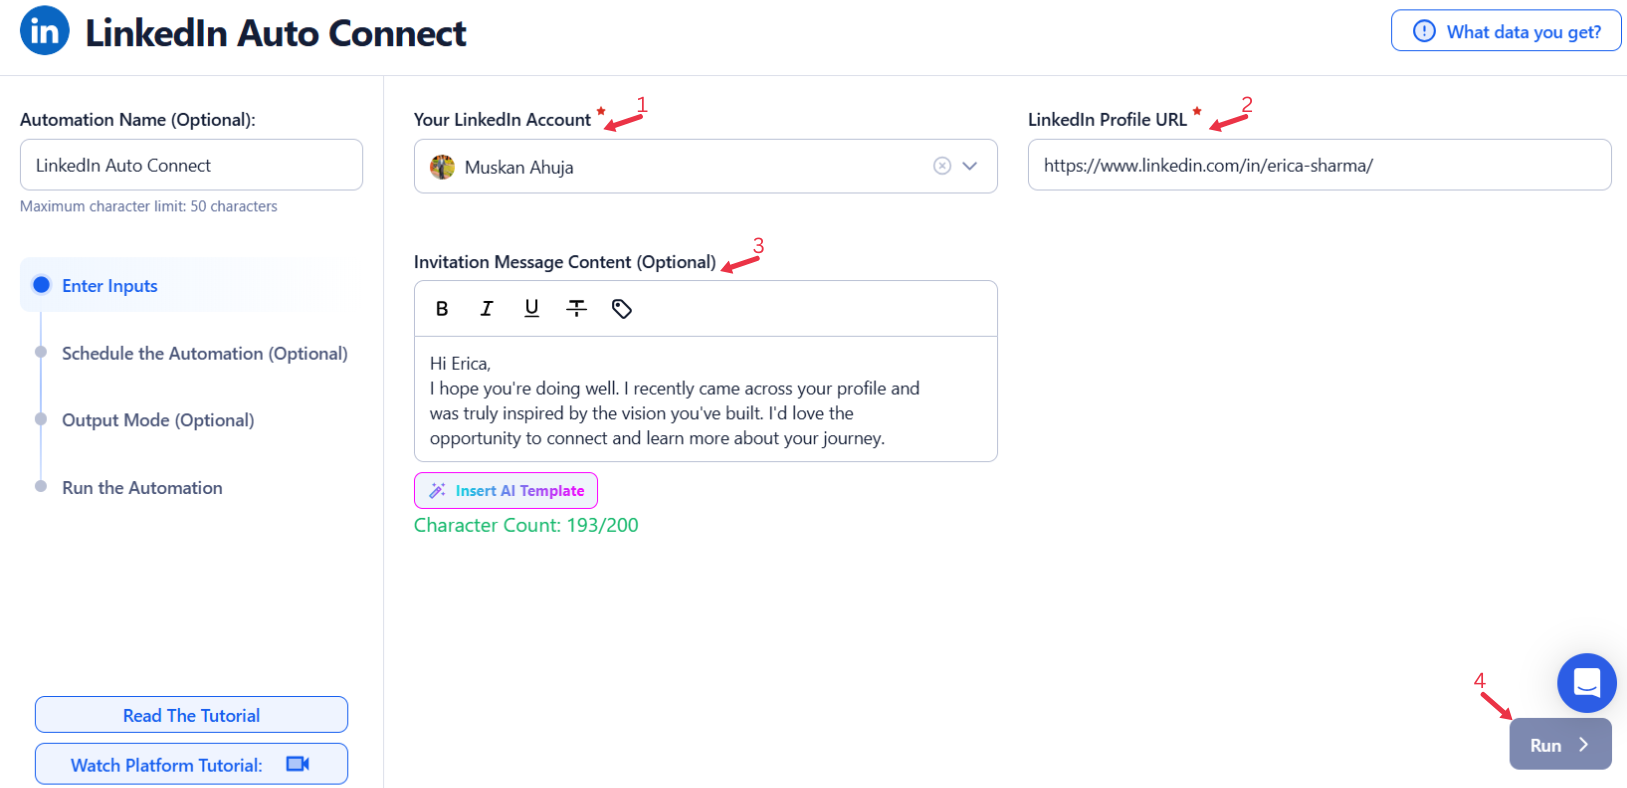
Manually Enter a Single Input
- This option is perfect for sending a connection request to a specific LinkedIn profile. Here’s how to use it:
-
Profile URL: Enter the LinkedIn profile URL where the connection request will be sent.
-
Message (Optional): Customize a message to accompany the connection request.
-
Personalize messages with tags such as First Name, Last Name, or Full Name.
- Alternatively, click Insert AI Template to use predefined LinkedIn AI templates such as LinkedIn AI Message or Sales Navigator AI InMail.
-
This method is ideal for targeted outreach to individual profiles.
{% custom-image src="https://v2-web-assets.s3.us-east-1.amazonaws.com/Automations/linkedin-auto-connect/linkedin-auto-connect-single-inputs.png" alt="enter-a-single-input" /%}
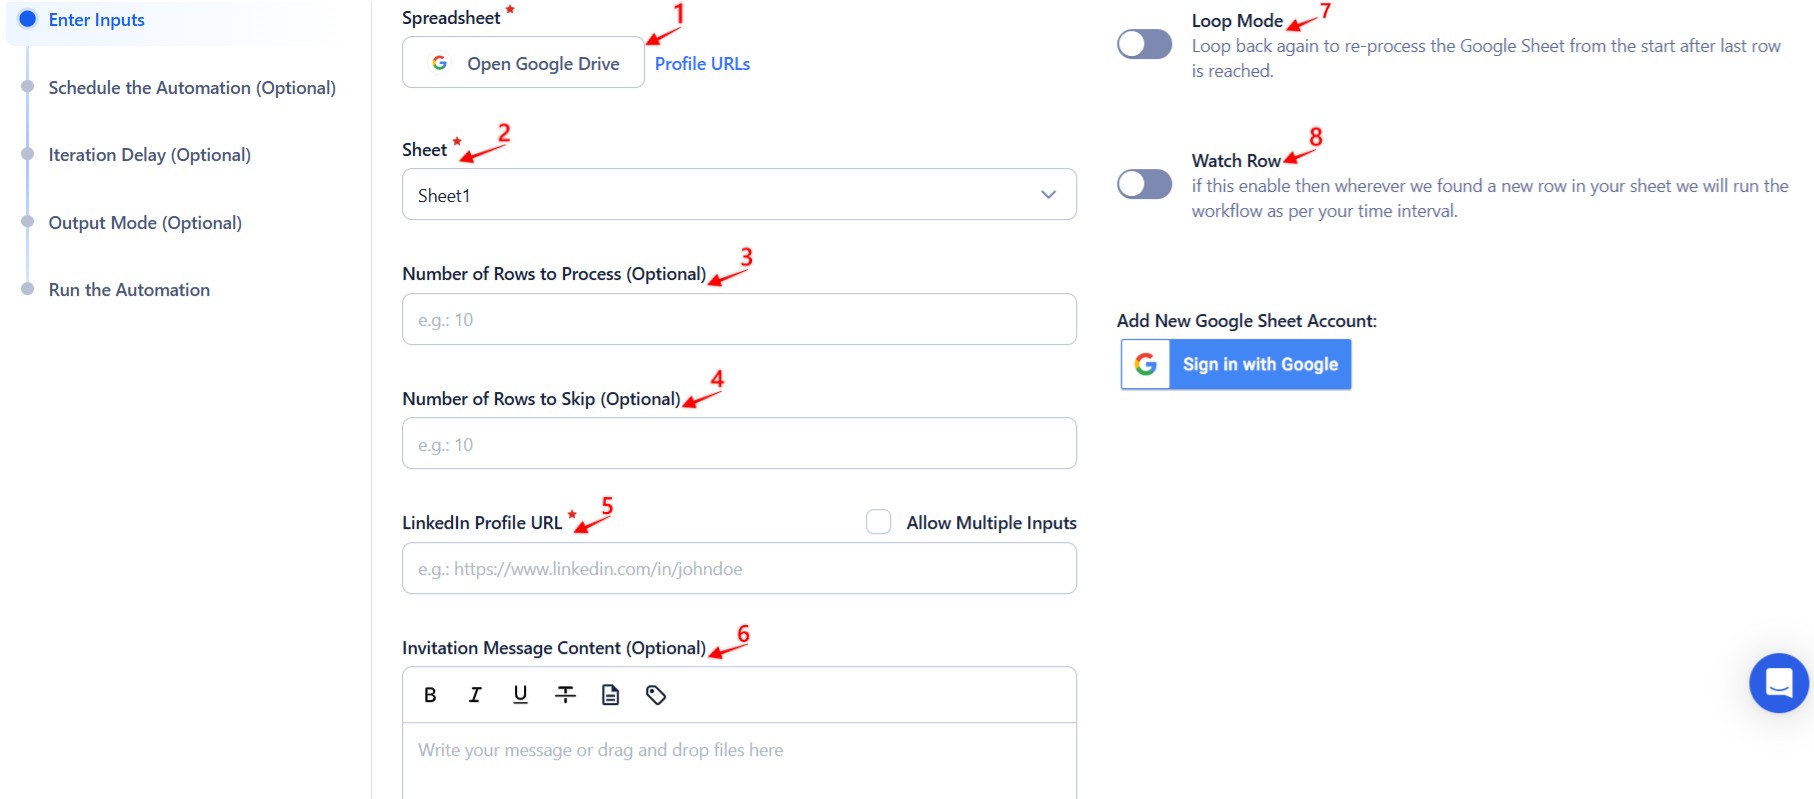
Use Google Sheets for Bulk Input
If you want to send connection requests to multiple LinkedIn profiles, integrating Google Sheets is a highly efficient choice. Follow these steps:
- Connect Your Google Account
- Click Select Google Account to choose your Google account or click Add New Google Sheet Account (you can add multiple Google accounts).
- Select the Spreadsheet
- Click Open Google Drive to locate the Google Sheet containing LinkedIn profile URLs.
- Select the spreadsheet and the specific sheet containing LinkedIn profile URLs.
- Adjust Processing Options
- Number of Rows to Process (Optional): Define the number of rows to scrape from the sheet.
- Number of Rows to Skip (Optional): Specify rows to skip at the beginning of the sheet.
- Provide Input Details
- Profile URL: Specify LinkedIn profile URLs in the selected Google Sheet.
- Message (Optional): Customize a message to accompany the connection requests.
- Personalize messages with tags such as First Name, Last Name, or Full Name.
- Alternatively, click Insert AI Template to use predefined LinkedIn AI templates such as LinkedIn AI Message or Sales Navigator AI InMail.
- Click Run in the lower-right corner to start the automation if no advanced settings are needed.
- Optional Advanced Feature:
- Loop Mode: Enable Loop Mode to re-process the Google Sheet from the beginning once all rows are completed. This is useful for tasks that require recurring updates.
-
Watch Row (Optional)
Watch Row feature automates workflow execution when new rows appear in Google Sheets. It ensures updates are processed without the need for manual execution.
Customize Watch Row by selecting a scan frequency and setting an execution time frame.
Watch Row Schedule
- None
- Scheduling Intervals (e.g., every 15 minutes, every hour)
- One-Time Execution
- Daily Execution
- Weekly Recurrence (e.g., every Wednesday and Saturday)
- Monthly Specific Dates (e.g., 5th and 25th)
- Custom Fixed Dates (e.g., May 22)
By default, TexAu checks for new rows every 15 minutes and runs for five days unless changed.
With Watch Row, you can automate and optimize workflow execution based on real-time data.
{% custom-image src="https://v2-web-assets.s3.us-east-1.amazonaws.com/Automations/linkedin-auto-connect/linkedin-auto-connect-google-sheetss.jpeg" alt="use-google-sheets-for-bulk-input" /%}
Process a CSV File
-
For those who prefer working with a static file, TexAu supports CSV uploads. Here’s how to use this option:
-
Upload the File
- Click Upload CSV File and browse to locate the file containing LinkedIn profile URLs.
- Once uploaded, TexAu will display the file name and provide a content preview.
- Configure Processing Settings
- Number of Rows to Process (Optional): Specify the number of rows to scrape from the CSV file.
- Number of Rows to Skip (Optional): Define rows to skip at the beginning of the file.
- Provide Input Details
- Profile URL: Specify LinkedIn profile URLs in the uploaded CSV file.
- Message (Optional): Customize a message to accompany the connection requests.
- Personalize messages with tags such as First Name, Last Name, or Full Name.
- Alternatively, click Insert AI Template to use predefined LinkedIn AI templates such as LinkedIn AI Message or Sales Navigator AI InMail.
- Click Run in the lower-right corner to initiate the automation if advanced configurations like scheduling are not required.
Optional: Advanced Feature - Loop Mode
For tasks that require regular updates, enable Loop Mode. This feature reprocesses the Google Sheet from the beginning once all rows are completed, making it ideal for recurring tasks.
Tip: Use Google Sheets for dynamic or frequently updated lists of LinkedIn profiles, and CSV files for static data that doesn’t change often.
Screenshot Suggestion: Display the CSV upload feature, file preview, and options to configure rows to process or skip.
{% custom-image src="https://v2-web-assets.s3.us-east-1.amazonaws.com/Common/texau-input-source-options.png" alt="step3" /%}
Step 5: Schedule the Automation (Optional)
Use TexAu’s scheduling feature to run the automation at specific times. Click Schedule to set up the frequency:
- None: Run the automation immediately.
- At Regular Intervals (e.g., every 8 hours or daily).
- Once
- Every Day
- On Specific Days of the Week (e.g., every Monday and Friday).
- On Specific Days of the Month (e.g., the 1st and 15th).
- On Specific Dates (e.g., January 20).
Tip: Scheduling automations ensures your networking efforts are consistent and well-timed.
{% custom-image src="https://v2-web-assets.s3.us-east-1.amazonaws.com/Common/schedule-the-automation/schedule-the-automation.pnghedule-the-automation.png" alt=" schedule-the-automation" /%}
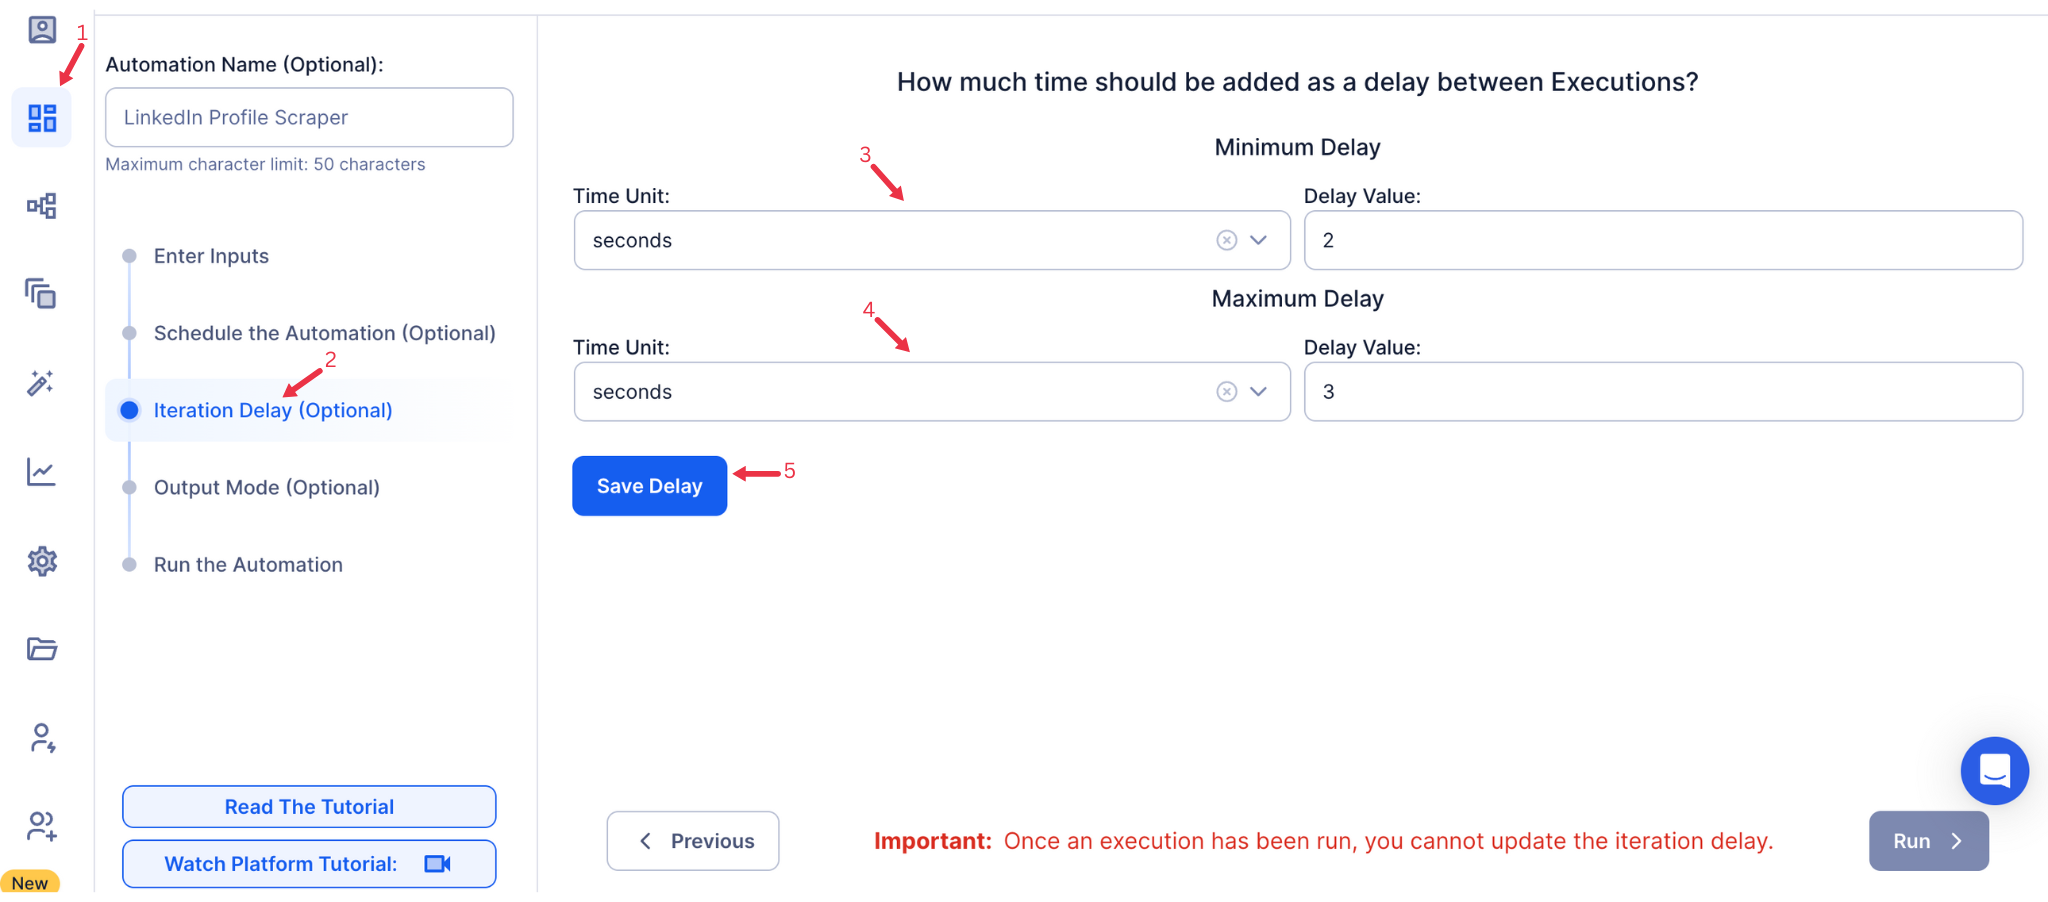
Step 6: Set an Iteration Delay (Optional)
Avoid detection and simulate human-like activity by setting an iteration delay. Choose minimum and maximum time intervals to add randomness between actions. This makes your activity look natural and reduces the chance of being flagged. The weekly limit however is 100.
- Minimum Delay: Enter the shortest interval (e.g., 10 seconds).
- Maximum Delay: Enter the longest interval (e.g., 20 seconds).
Tip: Random delays keep your automation safe and reliable.
{% custom-image src="https://v2-web-assets.s3.us-east-1.amazonaws.com/Common/iteration-delay/iteration-delay.png" alt="iteration-delay" /%}
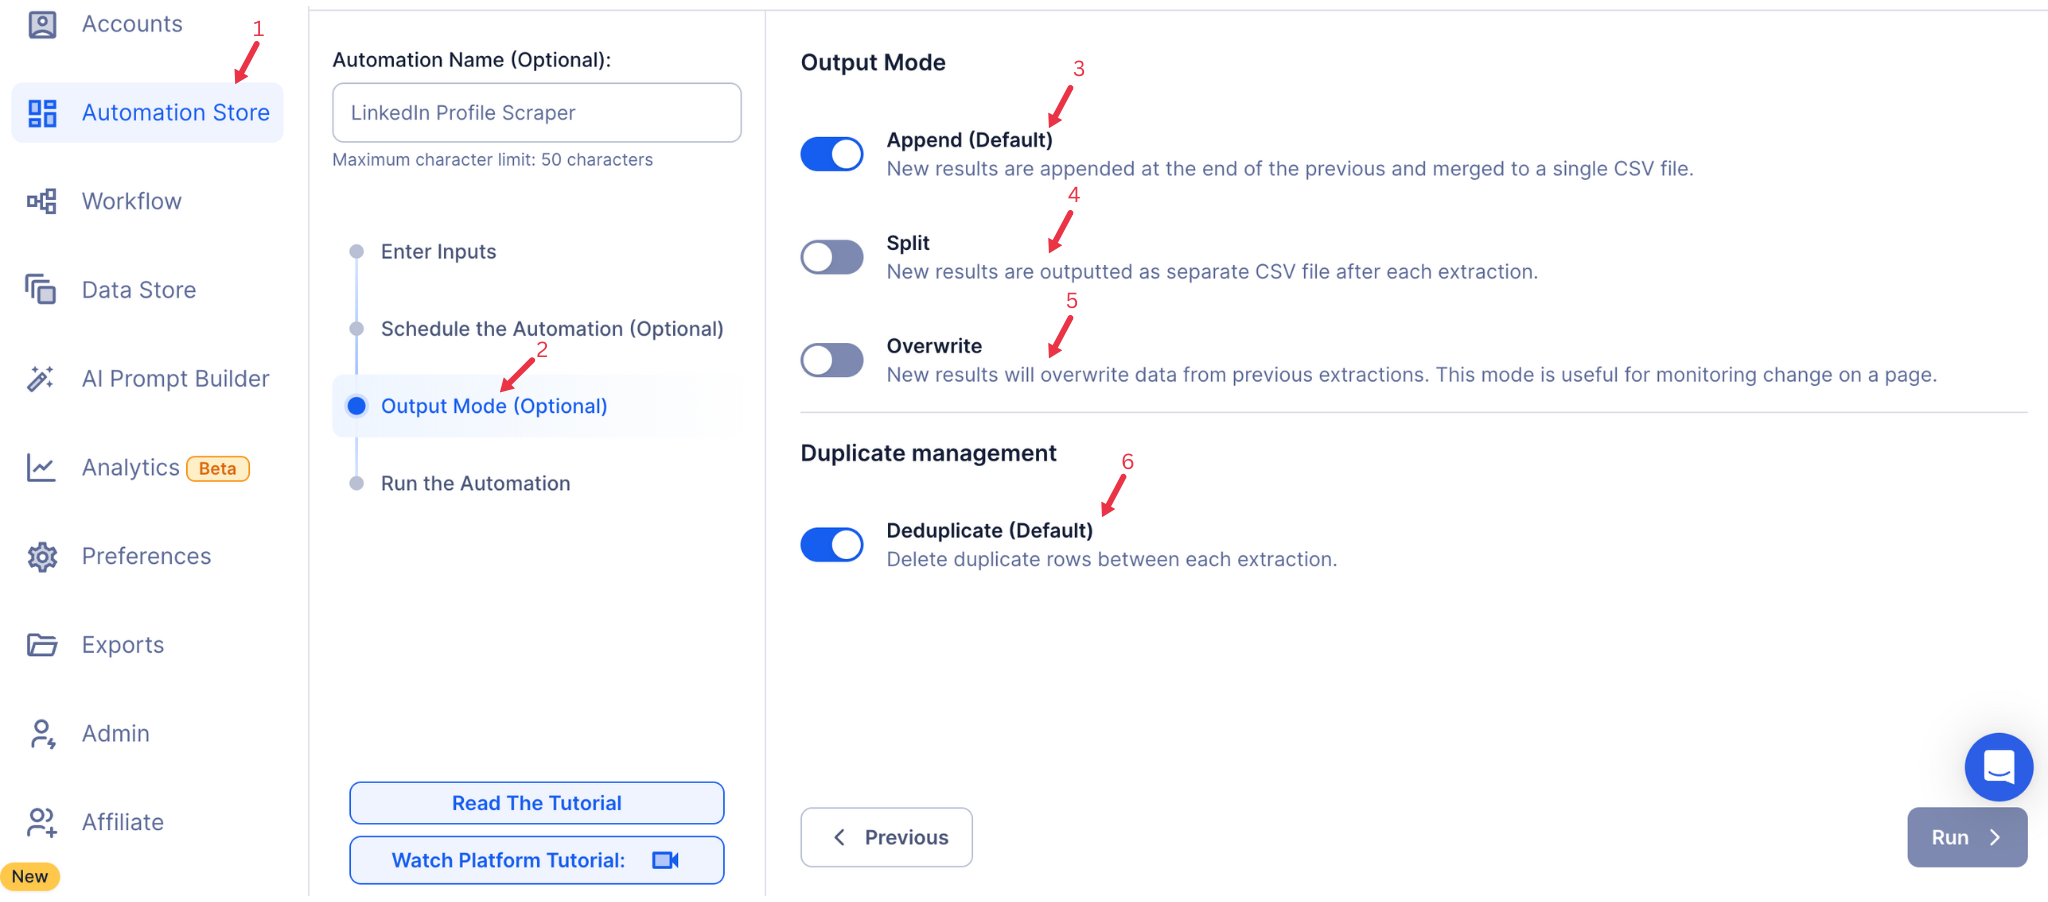
Step 7: Choose Your Output Mode (Optional)
Choose how to save and manage the extracted company insights. TexAu offers the following options:
- Append (Default): Adds new results to the end of existing data, merging them into a single CSV file.
- Split: Saves new results as separate CSV files for each automation run.
- Overwrite: Replaces previous data with the latest results, ideal for tracking changes over time.
- Duplicate Management: Enable Deduplicate (Default) to remove duplicate rows for clean, organized data.
Screenshot Suggestion: Show the Output Mode screen, highlighting Append, Split, Overwrite, and Deduplicate options.
{% custom-image src="https://v2-web-assets.s3.us-east-1.amazonaws.com/Common/output-mode/output-mode.png" alt="output-mode " /%}
Step 8: Access the Data from the Data Store
Once the automation is complete, go to the Data Store in TexAu. Locate the LinkedIn Auto Connect automation and click See Data to view or download the results.
The exported file will include LinkedIn Profile URLs, timestamps, and connection status for reporting and tracking.
{% custom-image src="https://v2-web-assets.s3.us-east-1.amazonaws.com/Automations/LinkedIn+Job+Scraper/data-store-see-data.png" alt="step8" /%}
The LinkedIn Auto Connect automation simplifies the process of building a professional network on LinkedIn. With scheduling, customizable inputs, and seamless export options, this tool helps you efficiently grow your network while saving time. Let TexAu take your LinkedIn networking strategy to the next level!
Run this automation on your own server.
TexAu V3 doesn't host social-platform automations anymore — but the runnable code is yours. Tell us your inputs, outputs, and target environment, and we'll ship you a working version you can deploy and operate yourself.