LinkedIn Auto Attend Event
Join LinkedIn events automatically in one click. Save time, boost visibility, and never miss another networking opportunity.
Last updated
**LinkedIn Events** have become a **powerful tool** for professional engagement, networking, and **knowledge sharing**. Whether it's a **virtual event**, an industry-specific webinar, or a skill-focused workshop, LinkedIn Events connect professionals, foster learning, and provide collaboration oppor
LinkedIn Events have become a powerful tool for professional engagement, networking, and knowledge sharing. Whether it's a virtual event, an industry-specific webinar, or a skill-focused workshop, LinkedIn Events connect professionals, foster learning, and provide collaboration opportunities. By attending relevant networking events, individuals can stay ahead of industry trends, learn from event organizers and thought leaders, and expand their professional audience.
Attending LinkedIn Events is crucial for building connections and gaining insights into the latest innovations in your field. However, manually searching for upcoming events, registering through event description pages, and managing your schedule can be time-intensive, especially for busy professionals. This is where TexAu’s LinkedIn Auto Attend Event comes in. It automates the entire process, including generating a list of attendees and sending automated messages to engage your target audience effectively. With TexAu, you can seamlessly attend multiple successful events, focus on event participants, and maximize the impact of your event visits. By leveraging TexAu, professionals and event organizers alike can streamline their event planning skills, enhance event promotion, and ensure successful events with minimal effort.
Key Features of LinkedIn Auto Attend Event
1.Automated Event Attendance
TexAu’s automation tools simplify the process of attending LinkedIn Events. Instead of manually searching for upcoming events and repeatedly clicking the “Attend” button, the tool automatically enrolls you in relevant networking events based on your preferences.
Example: A digital marketing manager interested in trends like “SEO 2025” and “content marketing strategies” can configure TexAu to auto-join events tagged with these keywords. By automating the event visits process, they can stay informed while focusing on marketing efforts. To enhance event participation, professionals can also use LinkedIn Auto Comment to engage with event discussions and increase visibility.
2.Customizable Filters
To ensure you attend only the most relevant events, TexAu provides customizable filters for refining searches by keywords, industries, locations, or event types, such as virtual events, webinars, or networking events. This feature ensures your event participation aligns with your primary goals and interests.
Example: A software developer specializing in machine learning configures TexAu to filter events by keywords like “AI,” “Deep Learning,” or “Neural Networks.” This targeted approach helps them attend successful events tailored to their niche, connecting with a professional audience. For better targeting, users can utilize LinkedIn Product Search Export to track relevant company events and industry trends.
3.Bulk Event Joining
For professionals aiming to maximize their engagement, TexAu enables bulk joining of LinkedIn Events. With this feature, you can enroll in multiple events simultaneously, saving significant time and effort.
Example: A public relations professional uses TexAu to join all event pages hosted by top media influencers. By enrolling in multiple networking events, they connect with event attendees, build rapport with event organizers, and enhance their professional visibility. To further streamline networking efforts, LinkedIn Connections Export helps professionals track and manage their LinkedIn connections from attended events.
4.Integration with Calendar
Efficient schedule management is vital for maximizing your event engagement. TexAu’s integration with tools like Google Calendar and Outlook allows you to sync event descriptions, details, and reminders, ensuring you never miss an important session.
Example: A project manager attending leadership development webinars integrates their calendar with TexAu to block out time for target events, ensuring no conflicts and staying on top of their professional audience engagements. Additionally, professionals looking to automate LinkedIn engagement alongside event participation can use LinkedIn Auto Post to share event insights and updates with their network.
Challenges Addressed by LinkedIn Auto Attend Event
-
Manual Event Management
Manually searching for and registering for LinkedIn Events can be a repetitive and time-consuming process, causing professionals to miss out on key opportunities. TexAu eliminates the hassle by automating the event management process, enabling you to focus on event participation and engagement rather than administrative tasks.
Scenario: An HR manager focused on talent acquisition trends spends hours weekly searching for networking events. With TexAu, they can automatically join relevant HR and recruitment webinars, saving valuable time for target audience interactions and actionable insights. For recruiters managing a growing network, LinkedIn Connection Checker helps assess and analyze LinkedIn connections to optimize outreach.
-
Missed Opportunities
Missing out on upcoming events can lead to lost chances for professional networking, learning, or generating potential leads. TexAu ensures you never overlook valuable events by automating attendance based on your target audience and preferences.
Example: An entrepreneur looking to attend pitch events for startups may miss a critical opportunity to connect with event organizers or investors. TexAu automates enrollment for such events, ensuring the entrepreneur stays updated and secures key chances for event promotion and lead generation. For seamless networking, LinkedIn AI Message helps automate follow-up messages to event attendees.
-
Limited Engagement
Effective engagement at LinkedIn Events is crucial for building connections and growing your presence within your industry. By automating attendance, TexAu allows you to join more events, enhancing your reach and visibility among event attendees and professional audiences.
Scenario: A sales executive targeting decision-makers in the SaaS space can use TexAu to join more virtual events, increasing their chances of connecting with key decision-makers and boosting their conversion rates. To track event attendee interactions, LinkedIn Company Followers Export provides insights into the audience engaging with your business profile.
Benefits of Automating Event Attendance
-
Maximized Networking Opportunities
LinkedIn Events are an ideal platform for connecting with like-minded professionals, industry leaders, and potential collaborators. However, consistently attending events can be a challenge for busy professionals. TexAu’s automation tools simplify this process by automating event attendance, ensuring you never miss the chance to network with influential individuals in your field.
Attending events regularly helps you establish yourself as an active, engaged participant in your industry. Effective networking can lead to partnerships, mentorships, and even career advancements.
Example: A leadership coach uses TexAu to join multiple virtual events focused on team management, organizational development, and executive coaching. During one event, they connect with an HR director of a multinational corporation who is impressed with their insights. The HR director hires the coach for a corporate training program, showcasing the potential of networking through automated attendance at LinkedIn Events.
-
Stay Updated on Industry Trends
LinkedIn Events are a hub for thought leaders, innovators, and industry experts to share cutting-edge trends, technologies, and best practices. Staying informed is critical for remaining competitive in any field. By automating event attendance with TexAu’s powerful tools, you gain access to relevant knowledge without spending hours searching for opportunities.
Example: A healthcare consultant leverages TexAu to attend webinars on AI in Healthcare. Through these events, they discover innovative tools like predictive analytics for patient care, which they recommend to clients. This positions them as a forward-thinking expert, helping to strengthen existing client relationships and attract potential customers seeking advanced solutions.
-
Improved Visibility
Regularly attending LinkedIn Events can significantly enhance your professional visibility. Engaging in event discussions, interacting with event attendees, and showcasing your expertise helps position you as a knowledgeable professional. This leads to increased profile views, connection requests, and collaboration opportunities.
Example: A cybersecurity professional uses TexAu to attend major events on data protection and compliance. Their active participation attracts attention from key decision-makers, recruiters, and peers. This results in a 50% increase in profile views and invitations to co-host events, speak at conferences, and consult on high-profile projects. The visibility gained directly contributes to new job offers and consulting opportunities.
-
Lead Generation
LinkedIn Events are not just for networking—they’re a valuable resource for identifying and engaging with potential leads. Many decision-makers and clients attend industry-specific events, making these platforms ideal for sales teams and entrepreneurs. With TexAu’s automation features, you can focus on interacting with event participants rather than managing registrations.
Example: A SaaS sales manager automates attendance at webinars on Cloud Computing for Enterprises. During one event, they connect with a CIO of a mid-sized company interested in their software solutions. After the event, the sales manager follows up with a personalized message and successfully converts the CIO into a client, contributing significantly to their generation campaigns and quarterly sales goals.
Use Cases of LinkedIn Auto Attend Event
1. Marketers
Marketers thrive by staying ahead of trends and connecting with potential clients or collaborators. LinkedIn Events provide a platform to explore new strategies, tools, and techniques while networking with industry professionals. TexAu automates event attendance, ensuring marketers never miss critical opportunities to learn and engage.Example: A digital marketer specializing in SEO and content strategy uses TexAu to attend webinars on “Content Marketing Strategies” and “SEO Trends for 2025.” These events provide valuable insights into marketing efforts and the latest tools to improve campaign efficiency. Connections made during these events lead to co-hosting events and collaborative content creation, expanding the marketer’s professional audience and credibility.
2. Recruiters
Recruiters need to be where the target audience of skilled professionals gathers. LinkedIn Events such as career workshops, job fairs, and industry panels are ideal for sourcing potential candidates. TexAu automates attendance, freeing up time to focus on connecting with event participants and building meaningful relationships.Example: A recruiter seeking software engineers uses TexAu to join events like “Career Growth in Software Engineering” and virtual job fairs. During these events, they identify attendees with expertise in programming languages such as Python and Java. TexAu’s automation allows the recruiter to connect with qualified candidates effortlessly, resulting in successful hires and an expanded talent pipeline.
3. Sales Teams
For sales teams, LinkedIn Events are a goldmine for identifying potential leads and connecting with decision-makers. Industry-specific webinars and conferences offer opportunities to understand business goals and customer needs. TexAu automates attendance, ensuring sales professionals never miss these opportunities.Example: A sales executive targeting SaaS companies attends webinars on “SaaS Growth Strategies” using TexAu. During the events, they engage with attendees holding titles like “CEO,” “CTO,” and “VP of Technology.” After the events, they follow up with personalized messages, converting several potential customers into clients. This approach boosts their conversion rates and strengthens their business outreach efforts.
4. Business Owners
For business owners, attending LinkedIn Events fosters collaboration, partnership, and growth. These events bring together event organizers, entrepreneurs, and investors, creating a platform for networking and idea exchange. TexAu automates event participation, allowing business owners to focus on building relationships rather than managing logistics.Example: A startup founder in the sustainable fashion industry uses TexAu to join events like “Small Business Growth Strategies” and “Sustainability in Fashion.” During these events, they meet potential collaborators, manufacturers, designers, and investors interested in funding eco-friendly initiatives. Consistent attendance at these successful events helps the founder grow their network, secure partnerships, and achieve their primary goals of scaling their business.
By automating attendance at LinkedIn Events with TexAu, professionals across various domains can maximize networking, stay informed on industry trends, enhance visibility, and generate valuable leads. Whether you’re a marketer, recruiter, sales professional, or business owner, TexAu ensures you never miss opportunities to connect, grow, and succeed.
Best Practices for Using LinkedIn Auto Attend Event
1. Choose Relevant Events
The key to deriving value from LinkedIn Events is attending those aligned with your professional goals. TexAu’s filtering system allows you to refine your event choices based on keywords, industries, locations, or event types such as webinars, workshops, or conferences. By selecting events that resonate with your objectives, you can focus your energy on building meaningful connections and gaining insights that directly impact your career or business.Example: A digital marketer specializing in video marketing uses TexAu to identify events tagged with keywords like “Video Marketing Strategies” or “Social Media Trends.” By attending these targeted events, they learn about emerging tools like AI-based video editors and strategies for boosting engagement rates for video content. This focused approach ensures the marketer invests their time in events that contribute to their growth and expertise.Pro Tip: Regularly review and update your filters to reflect evolving business goals and professional interests. For better LinkedIn engagement management, LinkedIn Automatic Invitation Withdrawal helps users remove pending invites that may limit networking efficiency.
2. Engage with Participants
Attending events is only part of the equation; the true value lies in engagement. Actively interacting with event participants, speakers, and other attendees during LinkedIn Events helps you build valuable connections that last beyond the event.Here’s how you can engage effectively:
- Ask Questions: Pose thoughtful questions during Q&A sessions to gain insights and stand out as an engaged participant.
- Share Insights: Contribute to discussions by sharing your professional experiences or unique perspectives, showcasing your expertise.
- Follow Up: After the event, connect with attendees and speakers on LinkedIn with personalized messages referencing the event.Example: A recruiter attending a webinar on “Career Growth in Software Engineering” asks a speaker about the most in-demand job titles and programming skills for 2025. This interaction provides actionable insights and establishes rapport with the speaker, who later recommends qualified candidates for open positions.Pro Tip: Take notes during events to recall key takeaways and tailor your follow-up messages effectively. To automate interaction, LinkedIn Message Automation allows professionals to send personalized follow-ups to new LinkedIn connections post-event.
3. Track Event Participation
Keeping a log of the LinkedIn Events you attend is crucial for measuring their impact on your networking efforts, learning, or lead generation. Tracking your participation helps evaluate which events contribute the most value and identify patterns, such as the types of events yielding the highest response rates or ROI.Example: An entrepreneur attending multiple networking events on small business growth discovers that virtual panel discussions generate more connections and actionable insights than standalone online webinars. By tracking this pattern, they focus on attending similar events in the future, maximizing their returns.Pro Tip: Use tools like Google Sheets or TexAu’s analytics features to log event details, attendee lists, connections made, and follow-up actions. For professionals who want structured LinkedIn network tracking, LinkedIn Connections Export helps store and analyze connection data.
Real-Life Applications of LinkedIn Auto Attend Event
Case Study 1: Lead Generation
A SaaS sales team used TexAu to automate attendance at webinars targeting key decision-makers in the software industry. By attending events like “Cloud Computing for Enterprises” and “SaaS Growth Strategies,” they identified and engaged with potential leads. Over a month, the team connected with more than 50 qualified prospects, many of whom converted into paying clients.Takeaway: Automating event attendance allows sales teams to focus on nurturing leads rather than spending time on logistics, leading to improved conversion rates and better resource allocation.
Case Study 2: Recruitment
A recruiter utilized TexAu to join virtual job fairs and career development workshops tailored for software engineers. By attending events such as “Career Opportunities in AI” and “Tech Skills for the Future,” they connected with over 100 candidates, many of whom matched their open positions. This approach streamlined their talent acquisition process and significantly reduced the time-to-hire for critical roles.Takeaway: Automating attendance at candidate-focused events helps recruiters build a robust talent pipeline without manual effort, improving recruitment efficiency.
Case Study 3: Business Networking
A startup founder seeking collaboration opportunities attended multiple LinkedIn Events using TexAu. These events included “Sustainability in Business” and “Entrepreneurship in 2025.” During these sessions, the founder met two investors and formed partnerships with other entrepreneurs. These connections not only provided funding but also led to joint ventures, accelerating the growth of their business.Takeaway: Attending industry-specific events opens doors to partnerships, funding opportunities, and collaborations that might otherwise go unnoticed, providing a significant boost to business growth.
Metrics and Tracking: Measuring the Impact of Event Attendance
1. Connection Growth
One of the most immediate benefits of attending LinkedIn Events is the expansion of your professional network. By tracking how your connections grow after attending events, you can measure the direct impact of your participation.Example: A consultant specializing in digital transformation notices a 15% increase in new connections after automating attendance at events like “AI for Business” and “Digital Transformation Strategies.” These connections include decision-makers and peers who later contribute to referrals and collaboration opportunities.Pro Tip: Monitor not just the quantity but also the quality of new connections by assessing their relevance to your business goals and long-term objectives.
2. Lead Conversion Rates
Attending LinkedIn Events is an effective strategy for generating leads, but the true measure of success lies in how many of those leads convert into clients or collaborators. By tracking conversion rates, you can assess the ROI of your event participation.Example: A sales manager tracks the outcomes of attending webinars like “Customer Success Strategies for SaaS.” They discover that 20% of the leads they connect with during these events convert into paying customers, providing a clear justification for continued use of TexAu’s automation.Pro Tip: Use CRM tools to integrate event leads and track their progression through your sales funnel for a clearer understanding of ROI.
3. Event Engagement Metrics
The level of interaction during an event can be a strong indicator of its success. Metrics such as comments, questions asked, or direct messages exchanged during events help you identify which sessions were the most engaging and valuable.Example: A marketer compares engagement metrics across different types of events—virtual conferences, webinars, and workshops. They find that virtual conferences generate the most engagement, with attendees frequently commenting and initiating follow-up conversations. This insight helps them focus their efforts on attending similar events in the future.Pro Tip: Pay attention to the format and audience demographics of high-engagement events to refine your strategy and prioritize events that yield the greatest impact.
Conclusion
TexAu’s LinkedIn Auto Attend Event feature revolutionizes the way professionals engage with LinkedIn Events. By automating attendance, filtering relevant events, and integrating with your calendar, TexAu saves time and ensures you never miss valuable opportunities. Whether you’re a marketer, recruiter, sales professional, or business owner, leveraging this tool can enhance your networking, boost your visibility, and drive meaningful outcomes. Start automating your LinkedIn Event participation with TexAu today and take your professional growth to the next level.
The LinkedIn Auto Attend Event automation by TexAu is a powerful tool for enhancing your LinkedIn presence. It automatically joins events on your behalf, ensuring you stay engaged with relevant audiences. Perfect for founders, marketers, sales managers, and growth hackers, this automation saves time, boosts event participation, and expands your networking opportunities seamlessly.
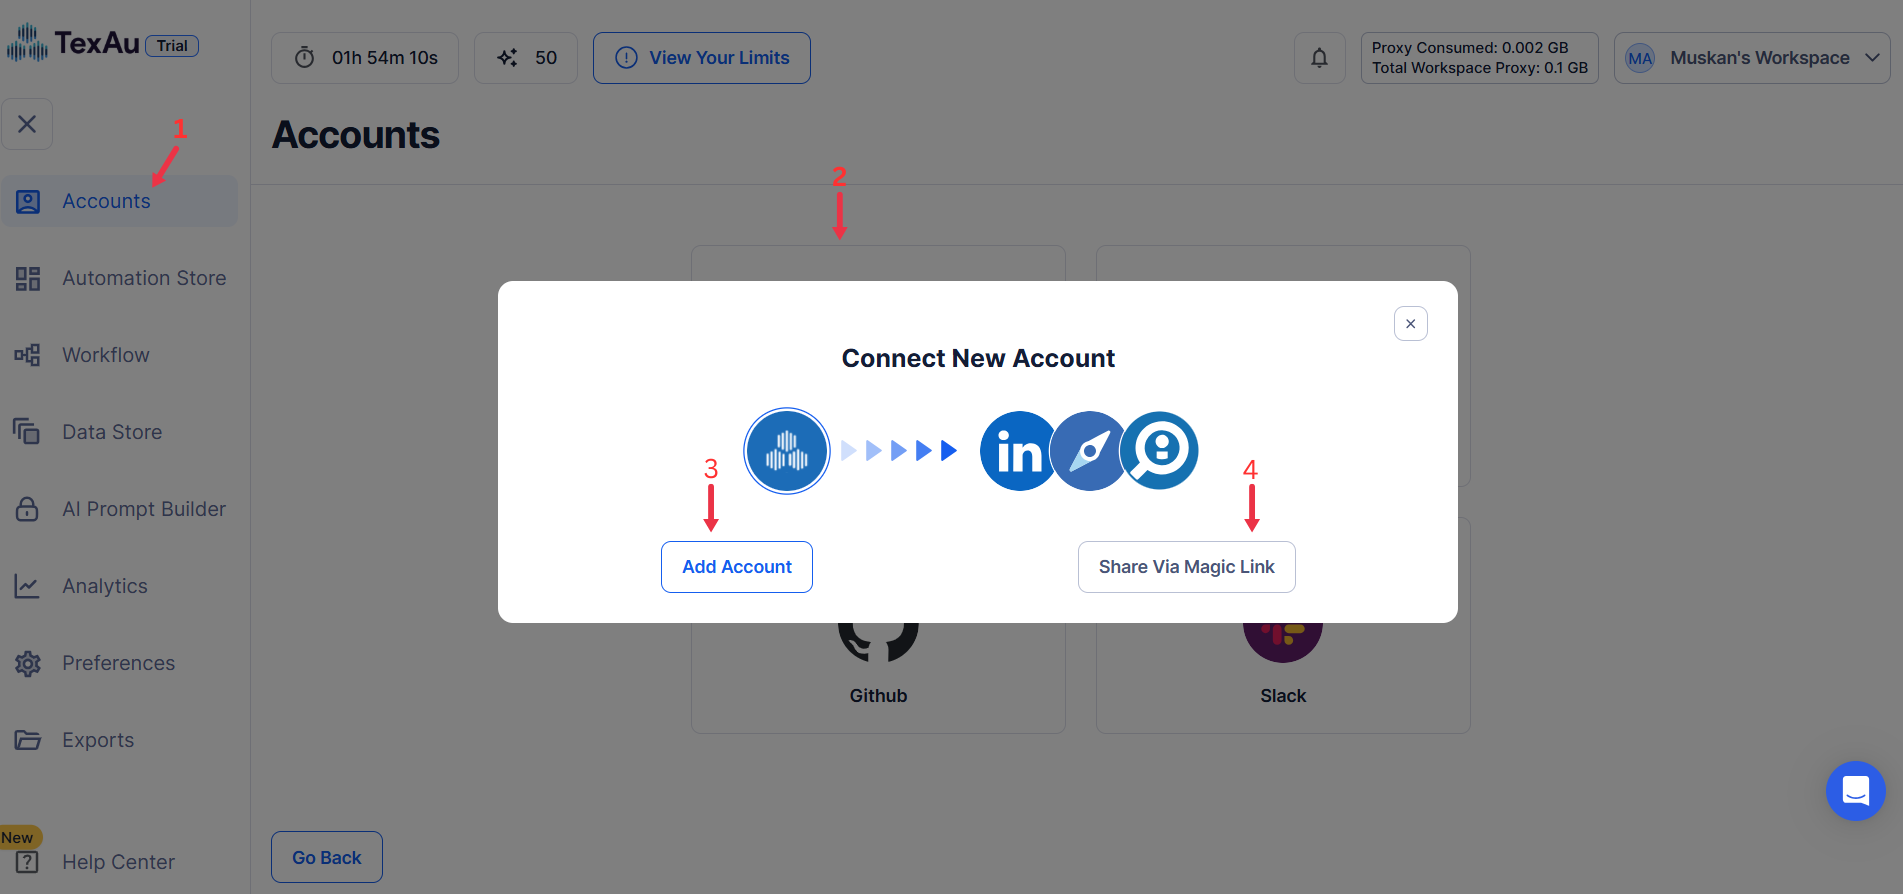
Step 1: Log in to TexAu and Connect LinkedIn
- Log in to your TexAu account at v2-prod.texau.com.
- Go to Accounts and connect your LinkedIn account. You can choose one of these methods:
- Share via Magic Link: Share the link, copy it to your browser, and follow the steps to integrate your LinkedIn account securely.
- Add Account: Sync cookies and browser data with TexAu for seamless integration.
Tip: Use Magic Link for an easy and secure connection.
{% custom-image src="https://v2-web-assets.s3.us-east-1.amazonaws.com/Common/log-in-to-texau-and-connect-linkedin/connect-linkedin.png" alt="connect-linkedin" /%}
Step 2: Choose Cloud or Desktop Execution
- Decide how you want to run the automation:
- Cloud Mode: Automates tasks on TexAu’s servers with built-in proxies. You can add custom proxies via Settings > Preferences > Proxies.
- Desktop Mode: Runs automation on your local device using your IP address.
Tip: Desktop mode saves cloud runtime credits and gives more control over the process.
{% custom-image src="https://v2-web-assets.s3.us-east-1.amazonaws.com/Common/add-account.png" alt="step2" /%}
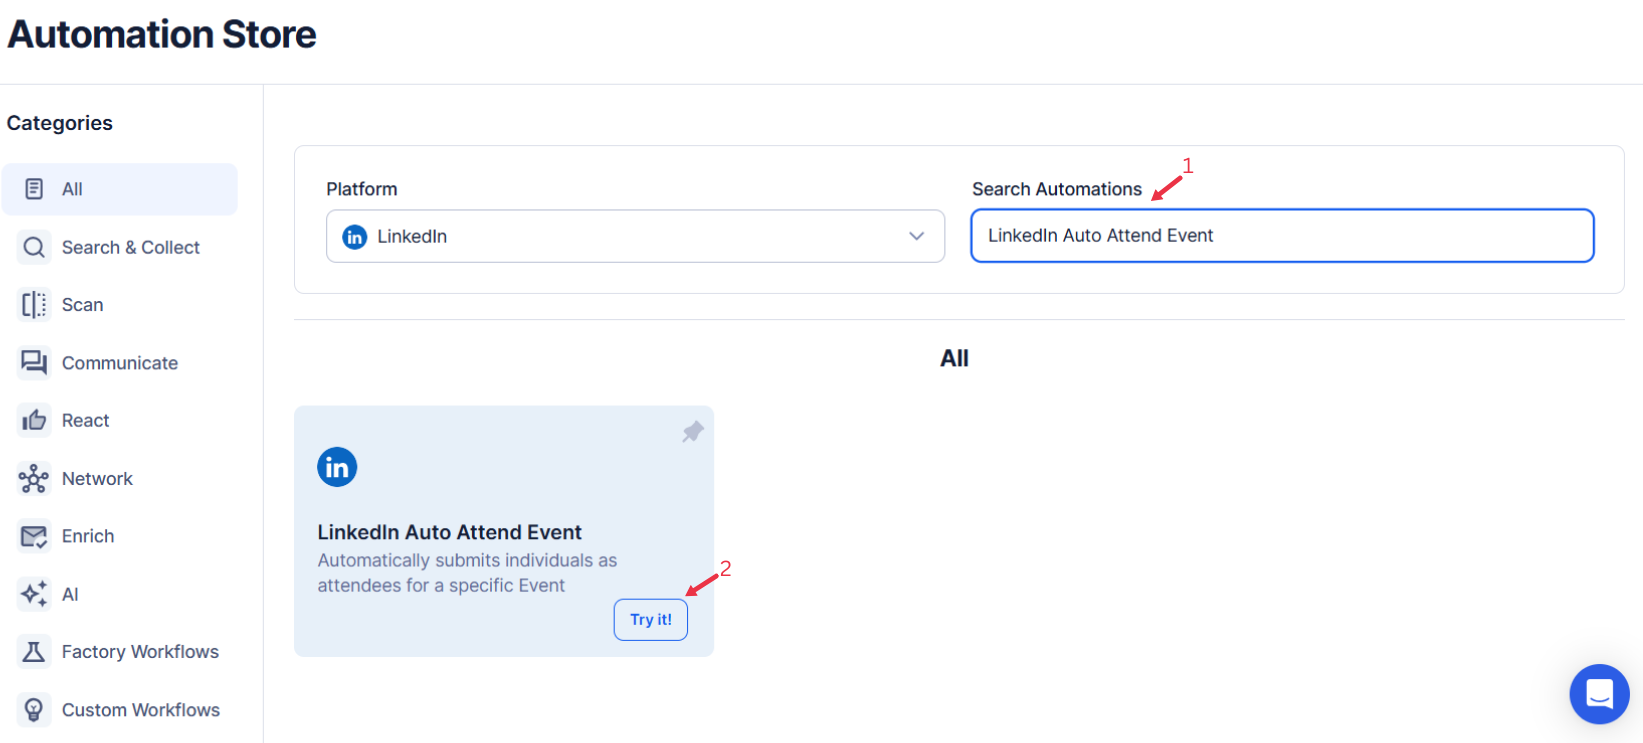
Step 3: Search for the Particular LinkedIn Automation
- Navigate to the Automation Store on TexAu.
- Use the search bar to find LinkedIn Auto Attend Event automation.
{% custom-image src="https://v2-web-assets.s3.us-east-1.amazonaws.com/Automations/linkedin-auto-attend-event/linkedin-auto-attend-event.png" alt="search-for-the-particular-LinkedIn-automation" /%}
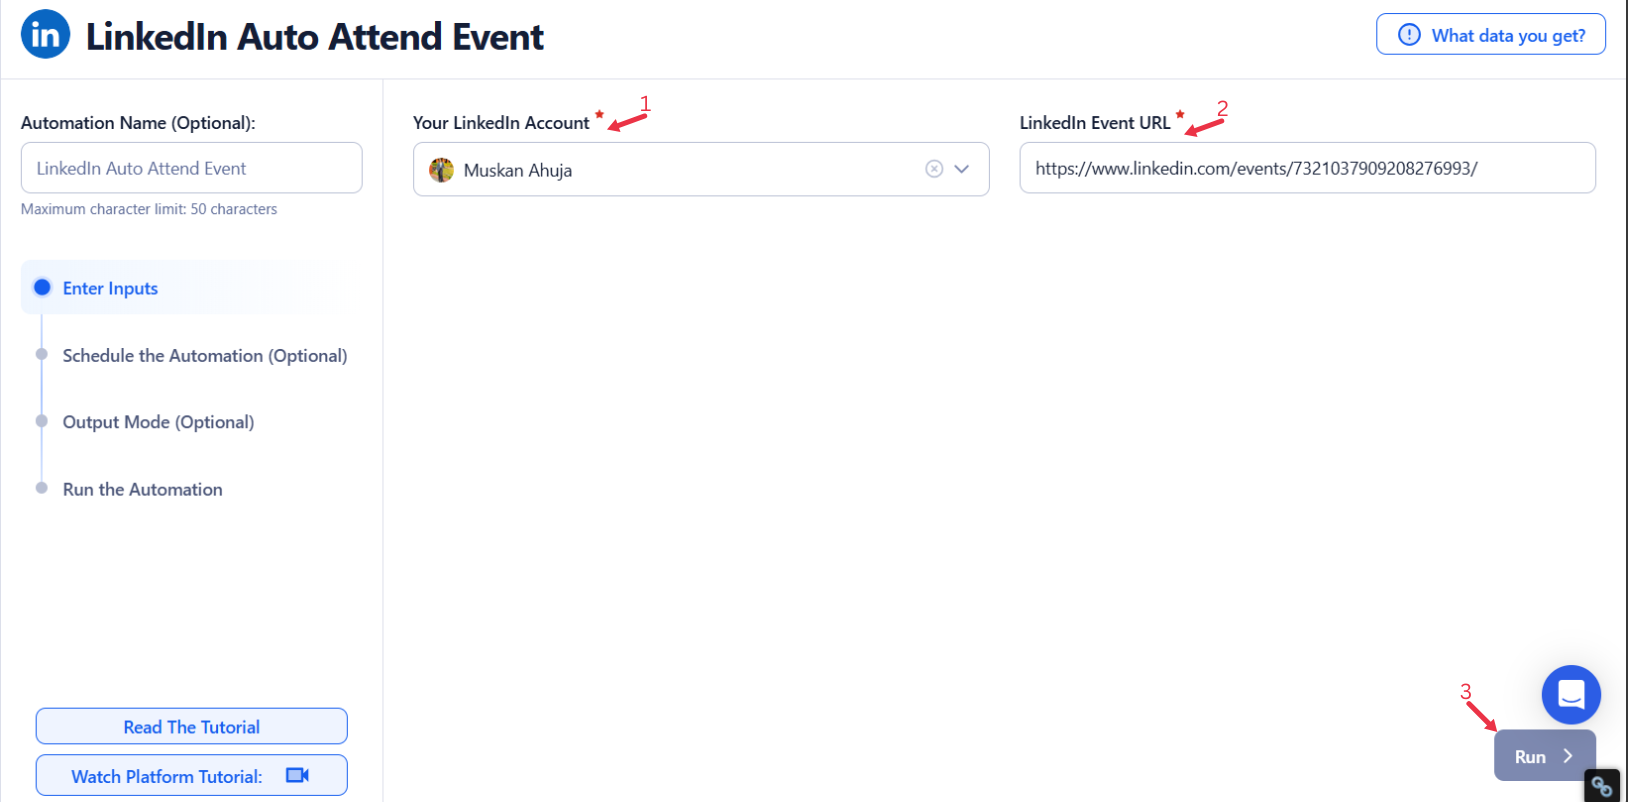
Step 4: Select Your Input Source
Define the input source to specify LinkedIn event URLs for the LinkedIn Auto Attend Event automation. TexAu provides multiple options to cater to the needs of founders, sales managers, marketers, and growth hackers. Here's how to configure each:
Manually Enter a Single Input
This option is perfect for managing attendance for a specific LinkedIn event. Here’s how to use it:
- Input Field: Enter the LinkedIn event URL for the event you want to attend.
- Once the URL is entered, click Run in the lower-right corner to start the process.
- This method is best suited for targeted, one-off event attendance.
{% custom-image src="https://v2-web-assets.s3.us-east-1.amazonaws.com/Automations/linkedin-auto-attend-event/linkedin-auto-attend-event-single-inputs.png" alt="enter-a-single-input" /%}
Use Google Sheets for Bulk Input
If you want to process multiple LinkedIn events, integrating Google Sheets is a highly efficient choice. Follow these steps:
- Connect Your Google Account
- Click Select Google Account and choose an existing account.
- If you haven’t connected your account yet, click Add New Google Sheet Account to link a new one.
- Select the Spreadsheet
- Once your Google account is connected, click Open Google Drive to browse and select the spreadsheet containing LinkedIn event URLs.
- Choose the specific sheet where the URLs are stored.
- Adjust Processing Options
- Number of Rows to Process (Optional): Specify how many rows of data you want to process.
- Number of Rows to Skip (Optional): If you need to skip initial rows, define the number here.
- Ensure the Data is Correct
- Verify that the selected column contains valid LinkedIn event URLs.
- Click Run to initiate the automation.
Optional Advanced Feature:
- Loop Mode: Enable Loop Mode to re-process the Google Sheet from the beginning once all rows are completed. This is useful for tasks that require recurring updates.
Watch Row (Optional)
Watch Row feature ensures workflows are triggered automatically whenever a new row is added to your Google Sheet.
Customize Watch Row by defining an update frequency and selecting an execution duration.
Watch Row Schedule
- None
- Scheduling Intervals (e.g., every 15 minutes, every hour)
- One-Time Execution
- Daily Execution
- Weekly Recurrence (e.g., every Monday and Friday)
- Monthly Specific Dates (e.g., 6th and 24th)
- Custom Fixed Dates (e.g., August 3)
By default, Watch Row checks every 15 minutes and continues for five days unless modified.
With Watch Row, TexAu eliminates the need for manual execution.
{% custom-image src="https://v2-web-assets.s3.us-east-1.amazonaws.com/Automations/linkedin-auto-attend-event/linkedin-auto-attend-event-google-sheetss.jpeg" alt="use-google-sheets-for-bulk-input" /%}
Process a CSV File
For those who prefer working with a static file, TexAu supports CSV uploads. Here’s how to use this option:
- Upload the File
- Click Upload CSV File and select the file containing LinkedIn event URLs from your computer.
- After uploading, TexAu will display the file name and provide a content preview.
- Configure Processing Settings
- Number of Rows to Process (Optional): Define how many rows you want to process.
- Number of Rows to Skip (Optional): Specify rows to skip if needed.
- Verify the Data
- Ensure the correct column contains LinkedIn event URLs.
- Click Run to begin the process.
{% custom-image src="https://v2-web-assets.s3.us-east-1.amazonaws.com/Common/texau-input-source-options.png" alt="step3" /%}
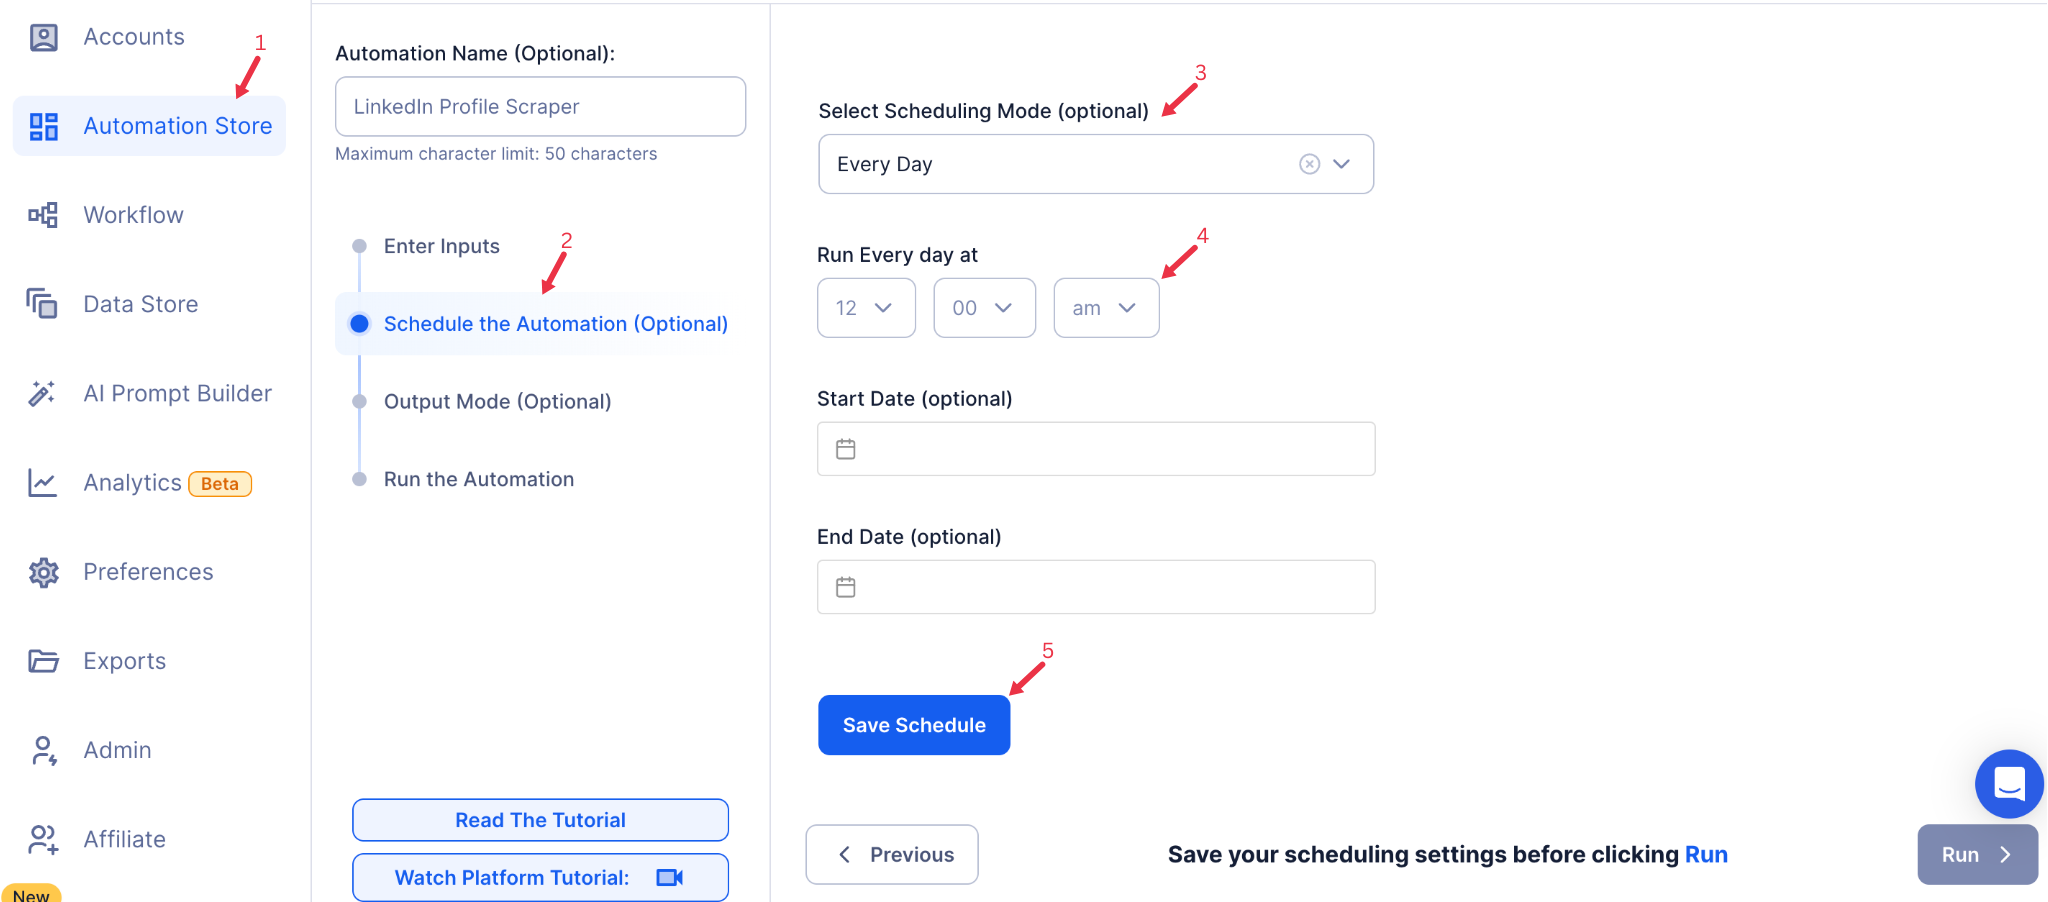
Step 5: Schedule the Automation (Optional)
Configure the automation to run at specific times or intervals using TexAu’s scheduling feature. Click Schedule and choose from the following options:
- None
- At Regular Intervals (e.g., every 6 hours)
- Once
- Every Day
- On Specific Days of the Week (e.g., Mondays and Fridays)
- On Specific Days of the Month (e.g., the 1st and 15th)
- On Specific Dates (e.g., April 5)
Tip: Scheduling ensures you automatically join recurring or time-sensitive events.
{% custom-image src="https://v2-web-assets.s3.us-east-1.amazonaws.com/Common/schedule-the-automation/schedule-the-automation.png" alt="schedule-the-automation" /%}
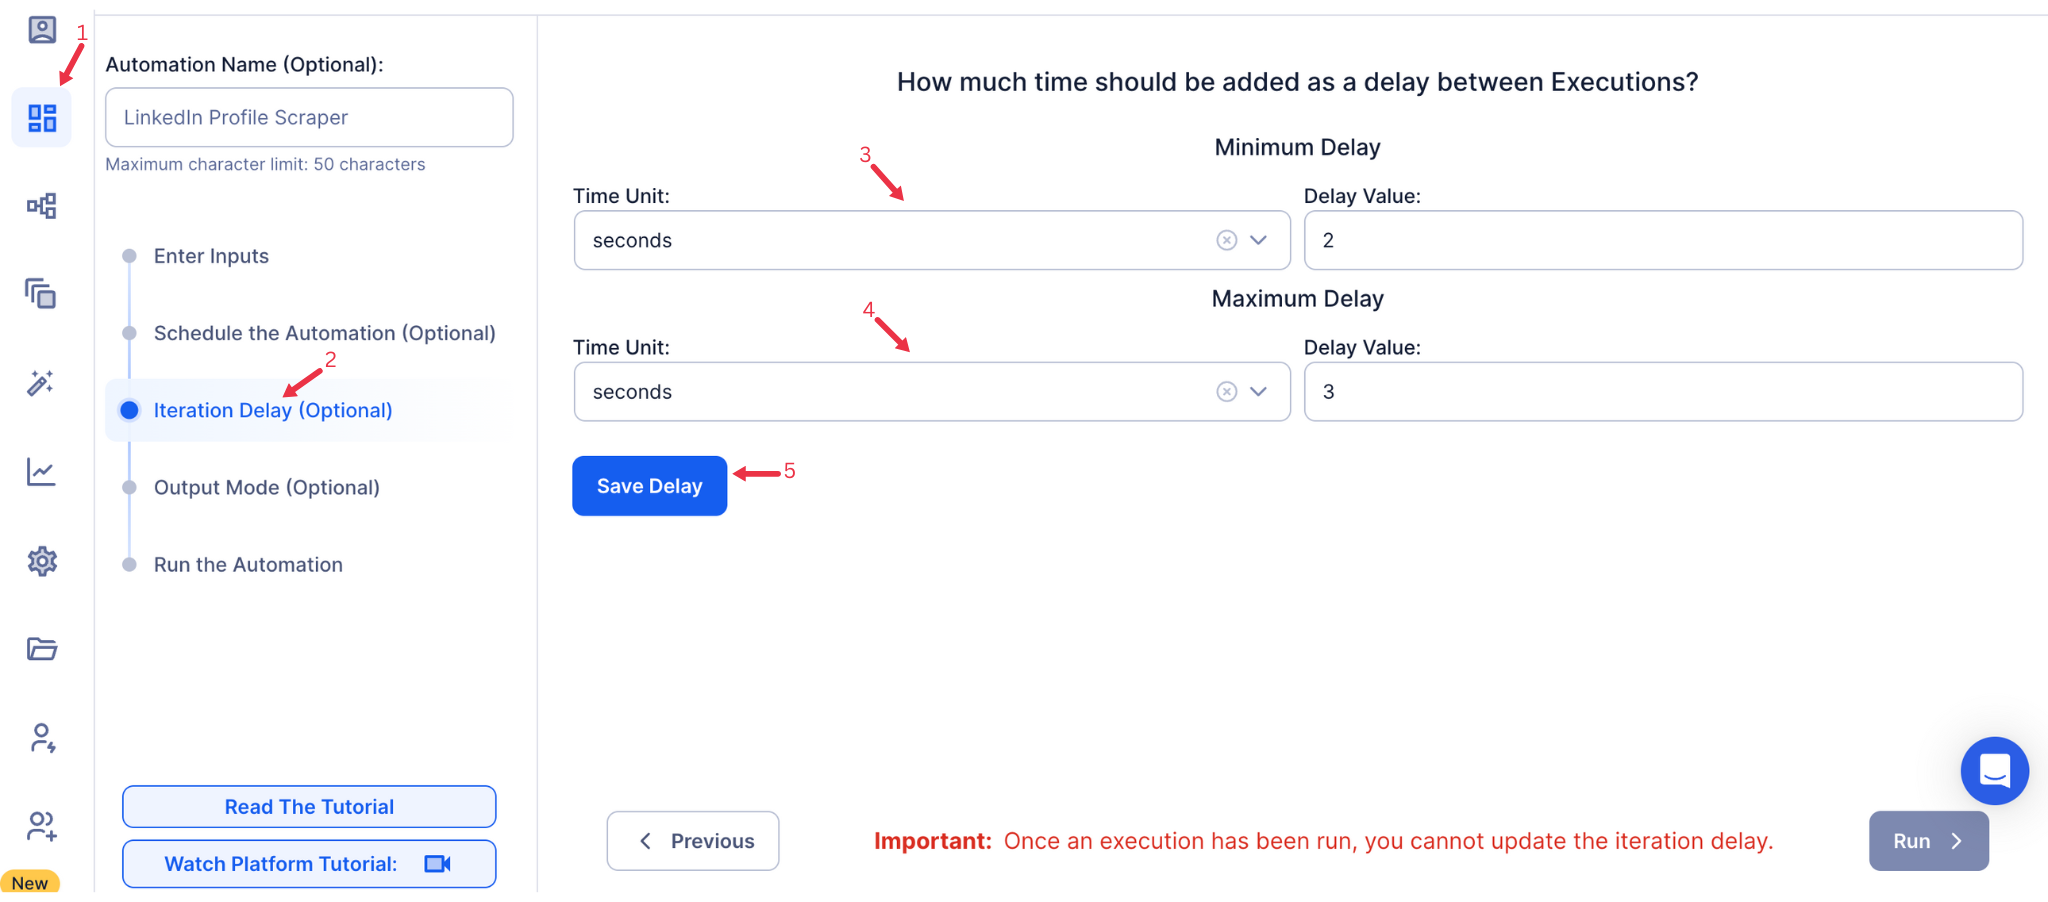
Step 6: Set an Iteration Delay (Optional)
Avoid detection and simulate human-like activity by setting an iteration delay. Choose minimum and maximum time intervals to add randomness between actions. This makes your activity look natural and reduces the chance of being flagged.
- Minimum Delay: Enter the shortest interval (e.g., 10 seconds).
- Maximum Delay: Enter the longest interval (e.g., 20 seconds).
{% custom-image src="https://v2-web-assets.s3.us-east-1.amazonaws.com/Common/iteration-delay/iteration-delay.png" alt="iteration-delay" /%}
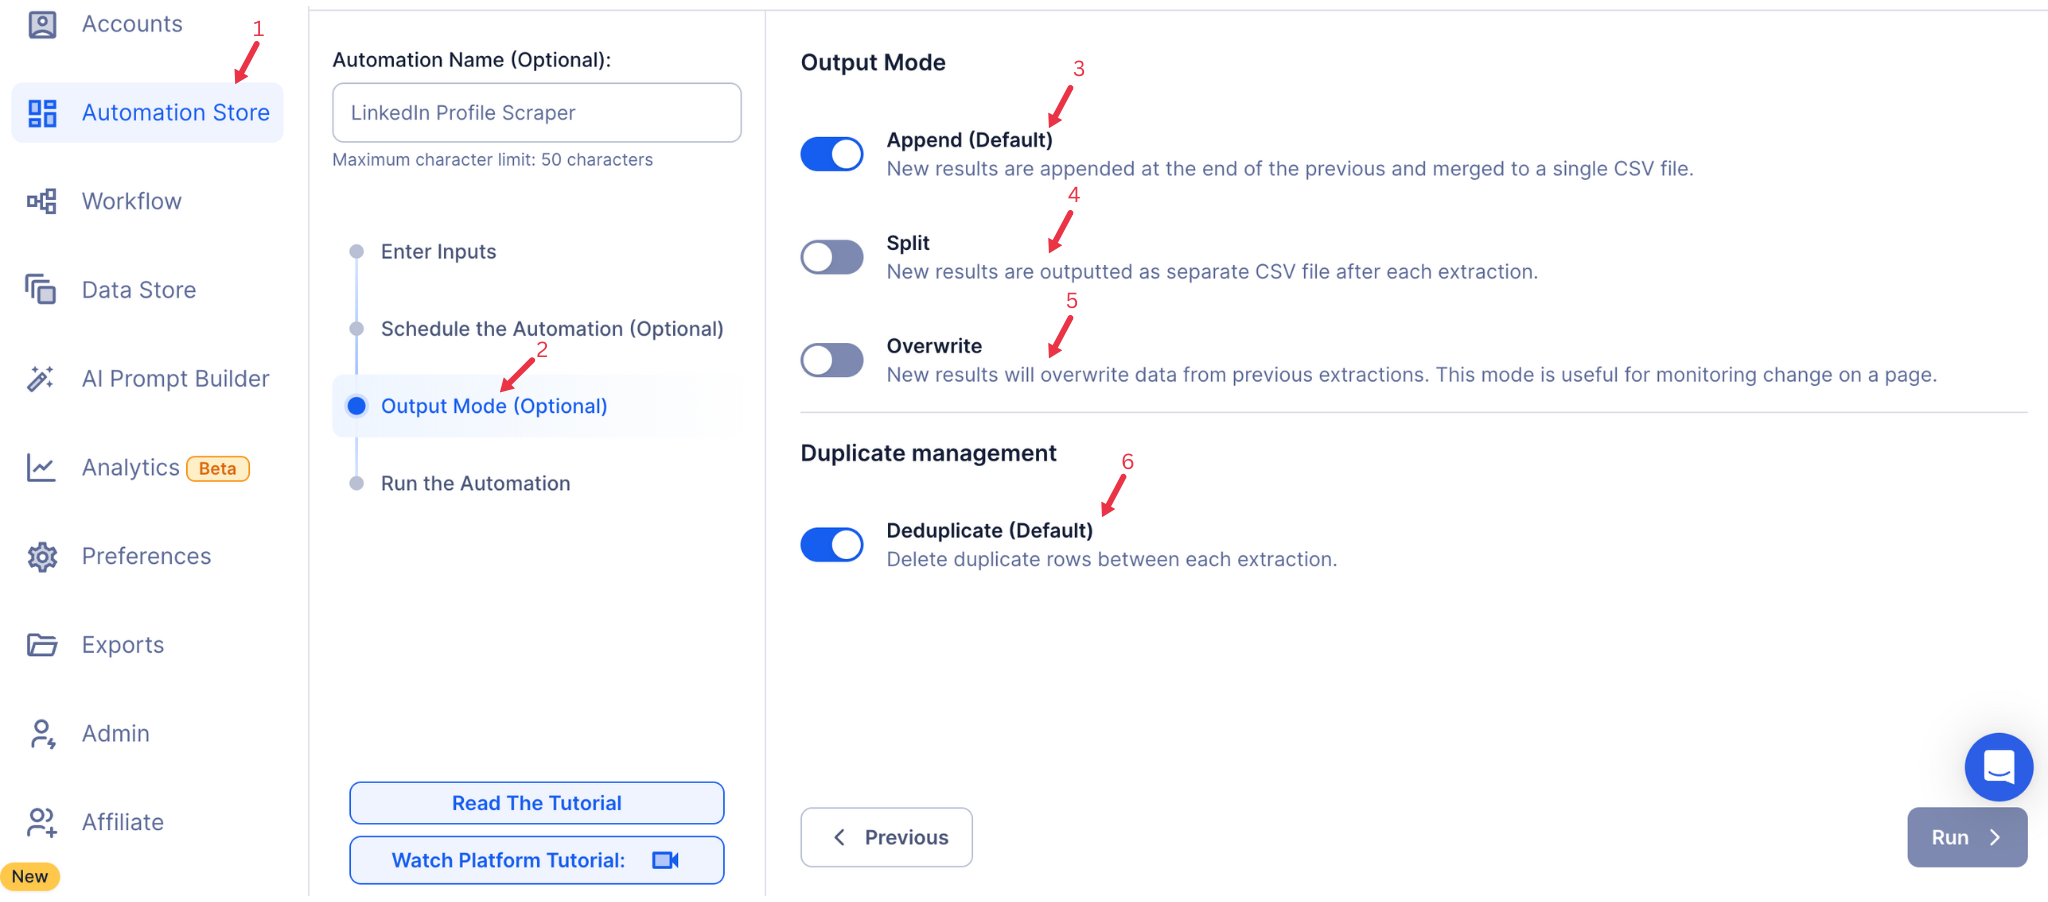
Step 7: Choose Your Output Mode (Optional)
Choose how to save and manage data about the attended events. TexAu provides the following options:
- Append (Default): Adds new results to the end of existing data, merging them into a single CSV file.
- Split: Saves new results as separate CSV files for each automation run.
- Overwrite: Replaces previous data with the latest results.
- Duplicate Management: Enable Deduplicate (Default) to remove duplicate rows for clean, organized data.
{% custom-image src="https://v2-web-assets.s3.us-east-1.amazonaws.com/Common/output-mode/output-mode.png" alt="output-mode" /%}
Step 8: Access the Data from the Data Store
After the automation completes, go to the Data Store section in TexAu to access your results. Find the LinkedIn Auto Attend Event automation or the name you’ve entered, click See Data, then choose either Download CSV to export the data or Open to Google Sheet for quick access.
{% custom-image src="https://v2-web-assets.s3.us-east-1.amazonaws.com/Automations/LinkedIn+Job+Scraper/data-store-see-data.png" alt="step8" /%}
The LinkedIn Auto Attend Event automation simplifies event participation by automating registrations for LinkedIn events. It is ideal for founders, marketers, and sales managers to streamline networking opportunities and ensure consistent participation in relevant events. Save time and track event attendance efficiently with TexAu.
Run this automation on your own server.
TexAu V3 doesn't host social-platform automations anymore — but the runnable code is yours. Tell us your inputs, outputs, and target environment, and we'll ship you a working version you can deploy and operate yourself.