LinkedIn Company Auto Follow
Automatically follow LinkedIn company pages to boost engagement and stay connected with industry updates.
Last updated
LinkedIn has long been the dominant platform for professional networking, offering a wealth of opportunities for individuals and organizations alike to expand their reach, engage with relevant industry contacts, and stay informed about key developments in their respective fields. As the largest prof
LinkedIn has long been the dominant platform for professional networking, offering a wealth of opportunities for individuals and organizations alike to expand their reach, engage with relevant industry contacts, and stay informed about key developments in their respective fields. As the largest professional networking platform in the world, LinkedIn provides businesses and professionals with an unparalleled opportunity to enhance their visibility, track industry trends, and discover potential business opportunities.
For organizations aiming to stay competitive, LinkedIn offers a treasure trove of valuable insights. By following relevant companies, users can stay updated on important industry developments, track new trends, monitor competitor activities, and uncover potential collaboration opportunities. However, manually following hundreds or thousands of companies can be time-consuming and inefficient, particularly for businesses that need to track multiple industries or sectors simultaneously.
That’s where TexAu's LinkedIn Company Auto Follow feature comes into play. TexAu simplifies the process by automating the company-following task, allowing users to effortlessly track industry leaders, competitors, potential collaborators, and even future clients with minimal effort. This automation helps users stay informed in real time, giving them the upper hand in fast-moving industries. Let’s dive deeper into how TexAu transforms the process of company tracking and engagement.
Key Features of TexAu LinkedIn Company Auto Follow
TexAu’s LinkedIn Company Auto Follow feature offers a variety of key features designed to maximize efficiency and provide valuable insights. By automating the process of following relevant companies, TexAu allows users to scale their outreach and engagement efforts, track industry movements, and gain actionable data to support their professional and business goals.
Automated Following: Effortlessly Stay Updated
One of the standout features of TexAu is its ability to automatically follow multiple companies at once, based on a variety of criteria such as industry, location, company size, and more. This feature eliminates the manual effort typically required to search for and follow each company individually, allowing users to automate the process and focus on more strategic tasks.
Example Scenario: A business development team in a growing fintech startup wants to stay updated on emerging trends and new opportunities within the fintech industry. Using TexAu’s LinkedIn Company Auto Follow feature, they automate the process of following all fintech startups in North America. This helps them stay informed on key developments, product launches, and hiring trends without manually tracking each company. By following these companies, the team receives real-time updates on the latest industry advancements, allowing them to quickly adapt to changes and find new opportunities.
Customizable Filters: Refine Your Targeting
TexAu’s customizable filters provide users with the ability to tailor their company-following process to fit their specific business needs. Filters such as industry, company size, location, and even growth stage allow users to narrow down their list of companies to those that align with their goals.
Example Scenario: A marketer working in the SaaS industry wants to focus on smaller companies within the sector that have 50-200 employees. Using TexAu, they apply custom filters to automatically follow only those SaaS companies that fit this size range. By doing so, they can stay informed about the latest developments in companies that may be more agile and open to collaboration, making them ideal targets for partnership opportunities or marketing campaigns.
Customizable filters ensure that users aren’t overwhelmed with irrelevant data, making the information they receive more valuable and actionable. Whether you’re tracking competitors or identifying potential business partners, the ability to refine your search helps optimize your LinkedIn engagement strategy.
Bulk Auto-Follow: Scale Your Engagement Efforts
TexAu makes it incredibly easy to scale your outreach efforts by allowing you to automatically follow hundreds or even thousands of companies at once. The bulk-following feature saves you time, increases your reach, and ensures that you don’t miss any important updates from relevant companies within your industry or sector.
Example Use Case: A sales team looking to track their competitors and potential collaborators within the tech industry uses TexAu to follow hundreds of tech companies, from well-established industry leaders to up-and-coming startups. By setting up bulk auto-follow for these companies, the sales team can efficiently track important updates, such as new product launches, hiring announcements, and changes in leadership. This level of insight helps the team stay one step ahead of competitors and identify emerging opportunities for collaboration or lead generation.
Additionally, they can automate interactions using LinkedIn Auto Like & Comment, ensuring their engagement strategy remains consistent and efficient.
Real-Time Updates: Stay Informed Instantly
TexAu provides real-time updates on the companies you follow, ensuring that you stay informed about the latest developments and industry news. By enabling real-time notifications, you can quickly react to important changes in your sector or among your competitors. Whether it's a new product release, a company merger, or a hiring announcement, TexAu ensures you are always up to date with minimal effort.
Example Scenario: A recruiter is focused on hiring new talent for a software development company. Using TexAu’s real-time update feature, they follow all companies within the software development sector. When a competitor announces a large round of hiring or a major new product launch, the recruiter is immediately notified. This provides the recruiter with an opportunity to identify new talent pools or potential candidates, allowing them to reach out and engage quickly.
Real-time updates not only save time but also allow users to react promptly to market changes, creating an opportunity for timely outreach, engagement, and decision-making.
Challenges Addressed by TexAu’s LinkedIn Company Auto Follow
The LinkedIn Company Auto Follow feature solves several challenges that professionals and businesses often face when manually following companies on LinkedIn.
1. Manual Following Limitations
Manually following companies on LinkedIn can be time-consuming and inefficient, especially when trying to track multiple companies across various industries. TexAu automates this process, saving valuable time and allowing users to focus on more high-level tasks such as strategy and decision-making.
2. Lack of Targeted Engagement
Without automated tools like TexAu, it can be difficult to ensure that you are only following the companies that align with your business goals or industry. TexAu’s customizable filters ensure that you are following the most relevant companies, enabling you to engage with the right entities and stay informed on the right topics.
3. Scalability Issues
As your network grows or your industry becomes more complex, manually following hundreds or thousands of companies becomes impractical. TexAu’s bulk-follow feature allows users to scale their engagement efforts, automating the process of following large numbers of companies across multiple sectors, ensuring that they stay informed without manual effort.
Benefits of Using TexAu’s LinkedIn Company Auto Follow
The TexAu LinkedIn Company Auto Follow feature offers several key benefits for professionals and businesses looking to streamline their LinkedIn engagement, track industry trends, and uncover new opportunities.
1. Industry Insights
By following relevant companies, you gain a bird’s-eye view of industry trends, competitive movements, and emerging opportunities. With TexAu, you can stay on top of the latest news, product releases, and leadership changes within your target industries.
Example Scenario: A business owner in the AI space uses TexAu to follow all companies in AI research and development. By tracking these companies, they stay informed about the latest advancements, technological breakthroughs, and potential competitors. This allows them to adapt their business strategy and stay ahead of the curve in the fast-evolving AI industry.
2. Competitor Tracking
Tracking competitor activities is essential for staying competitive in today’s fast-paced market. TexAu helps users monitor key competitors, track product launches, hiring trends, and other significant developments, enabling them to make data-driven business decisions.
Example Scenario: A marketing team uses TexAu to follow competitor companies in their industry. By tracking new product launches or significant hires at competitor companies, they adjust their own marketing strategies accordingly, ensuring that their campaigns remain competitive and aligned with industry trends.
3. Lead Generation
Identifying potential leads becomes easier when you follow companies that match your ideal customer profile. TexAu helps you track companies in specific industries or locations, enabling you to identify leads that are actively hiring, launching new products, or undergoing growth.
Example: A SaaS company uses TexAu to track all companies in the healthcare sector that are actively hiring. When these companies post job openings, the SaaS company reaches out with personalized pitches for their solutions, generating high-quality leads from companies in need of software tools.
4. Business Opportunities
TexAu also helps identify potential business opportunities by following companies that are expanding, launching new products, or forming new partnerships. This real-time information opens doors for strategic collaborations and joint ventures.
Example: A digital marketing agency uses TexAu to follow companies in the e-commerce sector. When a competitor in the e-commerce space announces an expansion into a new region, the agency sees this as an opportunity for collaboration, offering their services to help the company expand their digital presence in the new market.
Best Practices for Maximizing the Use of LinkedIn Company Auto Follow
To get the most out of TexAu’s LinkedIn Company Auto Follow feature, users should follow these best practices:
1. Define Target Companies
Before using TexAu to follow companies, clearly define your target companies based on your business objectives. Identify industries, locations, or company sizes that align with your goals to ensure you’re following the most relevant companies.
2. Use Advanced Filters
TexAu’s advanced filters allow you to fine-tune your company-following process. Narrow down your list to companies that closely align with your needs. Whether you’re tracking competitors or identifying potential partners, filters help ensure you’re following the companies that matter most.
3. Engage with Updates
Simply following companies isn’t enough. Actively engage with the posts and updates from the companies you follow to enhance visibility, build relationships, and stay top-of-mind. Like, comment, or share their content when relevant to increase engagement and establish a presence.
Tips for Maximizing Results
1. Engage with Followed Companies
Actively engaging with the companies you follow on LinkedIn can significantly enhance your visibility and presence. Instead of passively following, interact with their posts by liking, commenting, or sharing. Meaningful comments that add value or ask insightful questions can help you stand out to the company and its network.
For example:
- Like: Acknowledge interesting updates such as product launches or company milestones.
- Comment: Share your expertise by commenting on posts with professional insights. For instance, if a company shares a market trend report, respond with your thoughts or experiences in that area.
- Share: Amplify their content by sharing it with your own network, adding a personal note about why it’s relevant.
This consistent engagement positions you as a thoughtful and informed professional, increasing the likelihood of reciprocal interest from companies or their employees.
2. Focus on Active Accounts
Not all followed companies are equally valuable to your LinkedIn strategy. Prioritize those that regularly update their pages with posts about industry insights, job openings, or other engaging content.
Signs of an active account include:
- Frequent posts about their achievements, products, or events.
- Regular updates on hiring activity or open positions.
- High interaction rates on their content, such as likes, comments, and shares.
By focusing on active accounts, you increase your chances of engaging with companies that are genuinely looking to connect with professionals or build partnerships.
3. Pair with Other TexAu Tools
TexAu offers a range of tools that can complement the Auto Follow feature. For instance, pairing it with the Post Scraper can provide deeper insights into a company’s activity.
- How it works: Use the Post Scraper to analyze the frequency, type, and engagement metrics of a company’s posts.
- Benefits: This data helps you tailor your interactions to align with their content strategy. For example, if a company consistently shares posts about sustainability, you can engage with relevant insights or share similar content from your profile.
By combining TexAu tools, you can streamline your efforts and make more informed decisions about which companies to prioritize.
Metrics and Tracking
1. Follower Growth Tracking
Following companies on LinkedIn doesn’t just help you engage with them—it can also impact your personal profile growth. By monitoring your follower count and profile views before and after engaging with these companies, you can evaluate the effectiveness of your strategy.
Key metrics to track:
- Profile Views: Check how many professionals from followed companies view your profile after you interact with their posts.
- Connection Requests: Note any increase in connection requests from employees of followed companies.
- Follower Growth: Analyze whether engaging with popular company accounts attracts new followers to your network.
You can set up regular reports to monitor these changes and adjust your strategy for maximum impact.
2. Engagement Metrics
Measuring your engagement with posts from followed companies is crucial for understanding what works best. Track how your interactions—such as likes, comments, or shares—affect your relationship with those companies.
What to track:
- Post Interactions: Measure the response to your comments or shares. Do they get likes or replies?
- Company Response: Monitor whether companies acknowledge your efforts through likes, comments, or even direct messages.
- Network Expansion: Check if engaging with specific companies helps you connect with their employees or partners.
3. Opportunities Identified
The ultimate goal of following companies is to create opportunities, whether they are collaborations, partnerships, or job offers. Keep a record of the leads, partnerships, or hires that stem from following and engaging with companies on LinkedIn.
Steps to measure success:
- Use LinkedIn's Analytics Dashboard to track inbound messages or connection requests from followed companies.
- Note any successful outcomes, such as collaborations initiated through LinkedIn or job offers received after engagement.
- Maintain a log of leads generated, tracking the time taken to convert them into meaningful opportunities.
Pro Tip: Pair your LinkedIn activity with TexAu’s automation tools to gather data more efficiently and streamline the tracking process. This will help you focus on high-value interactions that drive real results.
By implementing these strategies and tracking metrics, you can turn LinkedIn company engagement into a systematic and measurable approach to professional growth.
Conclusion: Transforming LinkedIn Engagement with TexAu
TexAu’s LinkedIn Company Auto Follow feature streamlines the process of following relevant companies, enabling users to stay informed, track industry developments, and uncover new business opportunities—all with minimal effort. Whether you’re in sales, marketing, recruitment, or business development, TexAu helps you automate and scale your LinkedIn engagement, ensuring that you’re always in the know and ready to act on the latest trends.
Ready to optimize your LinkedIn engagement and discover new opportunities? Start using TexAu’s LinkedIn Company Auto Follow feature today and unlock the full potential of LinkedIn for your business.
The LinkedIn Company Auto Follow automation by TexAu allows you to automatically follow LinkedIn company profiles, streamlining engagement with industry leaders and competitors. This tool is ideal for founders, marketers, sales managers, and growth hackers who want to expand their professional network and stay updated on company activities.
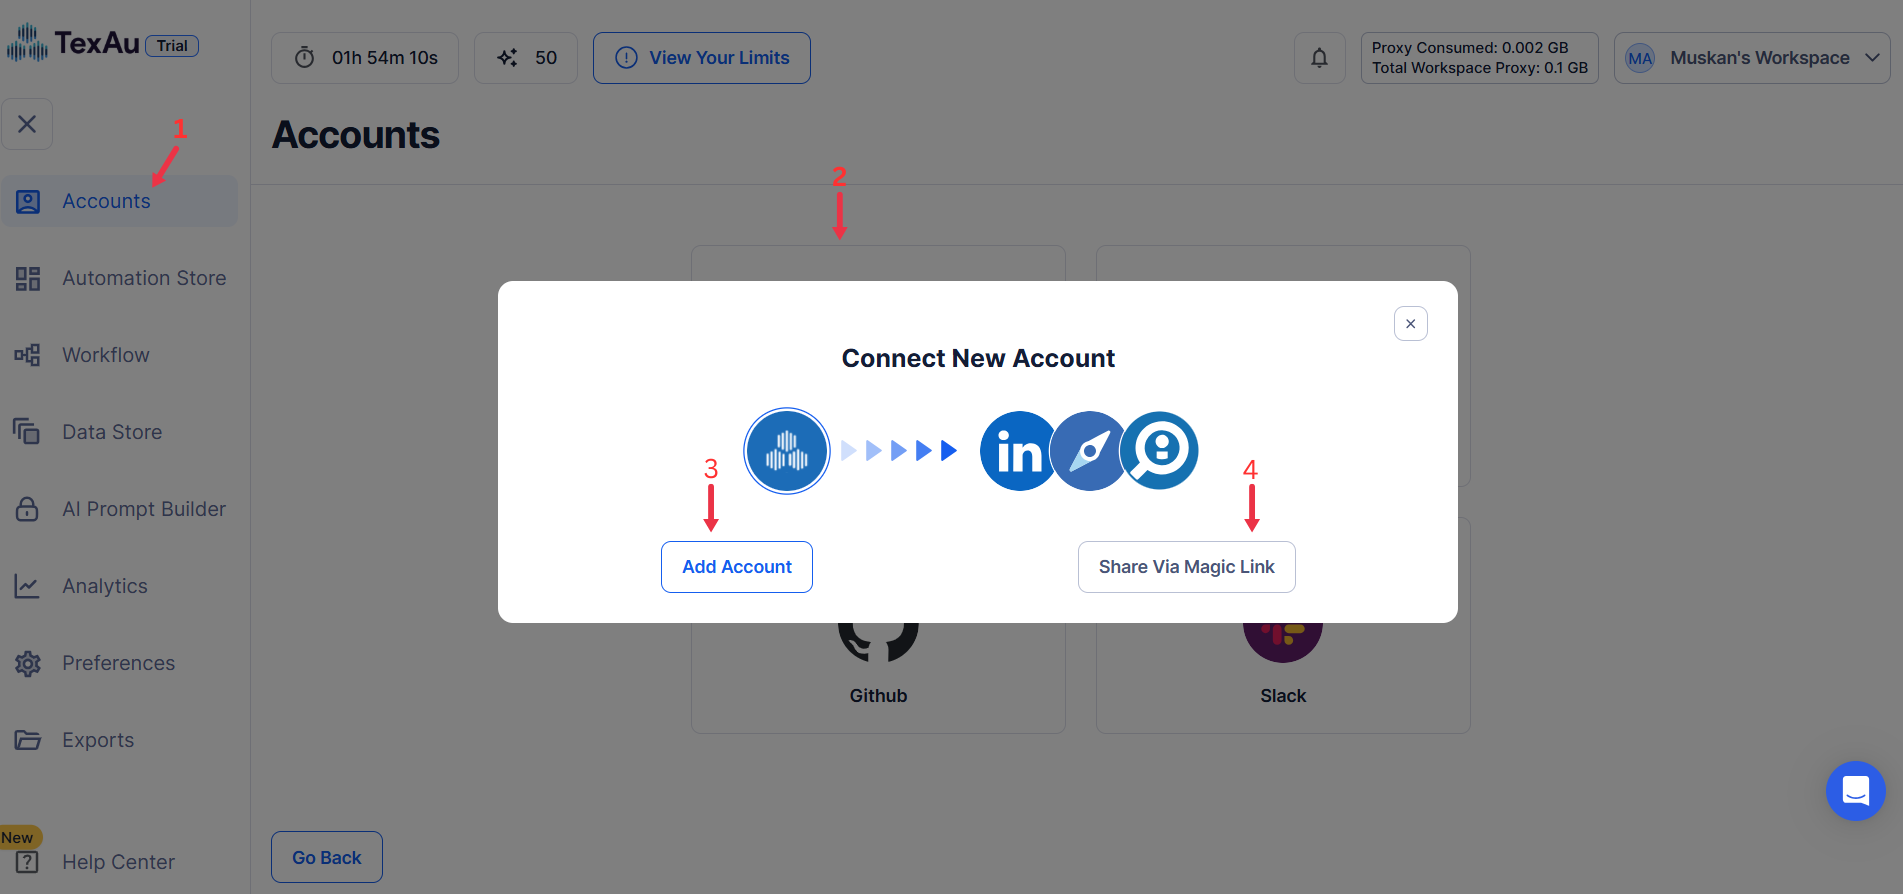
Step 1: Log in to TexAu and Connect LinkedIn
Log in to your TexAu account at v2-prod.texau.com.
Go to Accounts and connect your LinkedIn account. You can choose one of these methods:
- Share via Magic Link: Share the link, copy it to your browser, and follow the steps to integrate your LinkedIn account securely.
- Add Account: Sync cookies and browser data with TexAu for seamless integration.
{% custom-image src="https://v2-web-assets.s3.us-east-1.amazonaws.com/Common/log-in-to-texau-and-connect-linkedin/connect-linkedin.png" alt="connect-linkedin" /%}
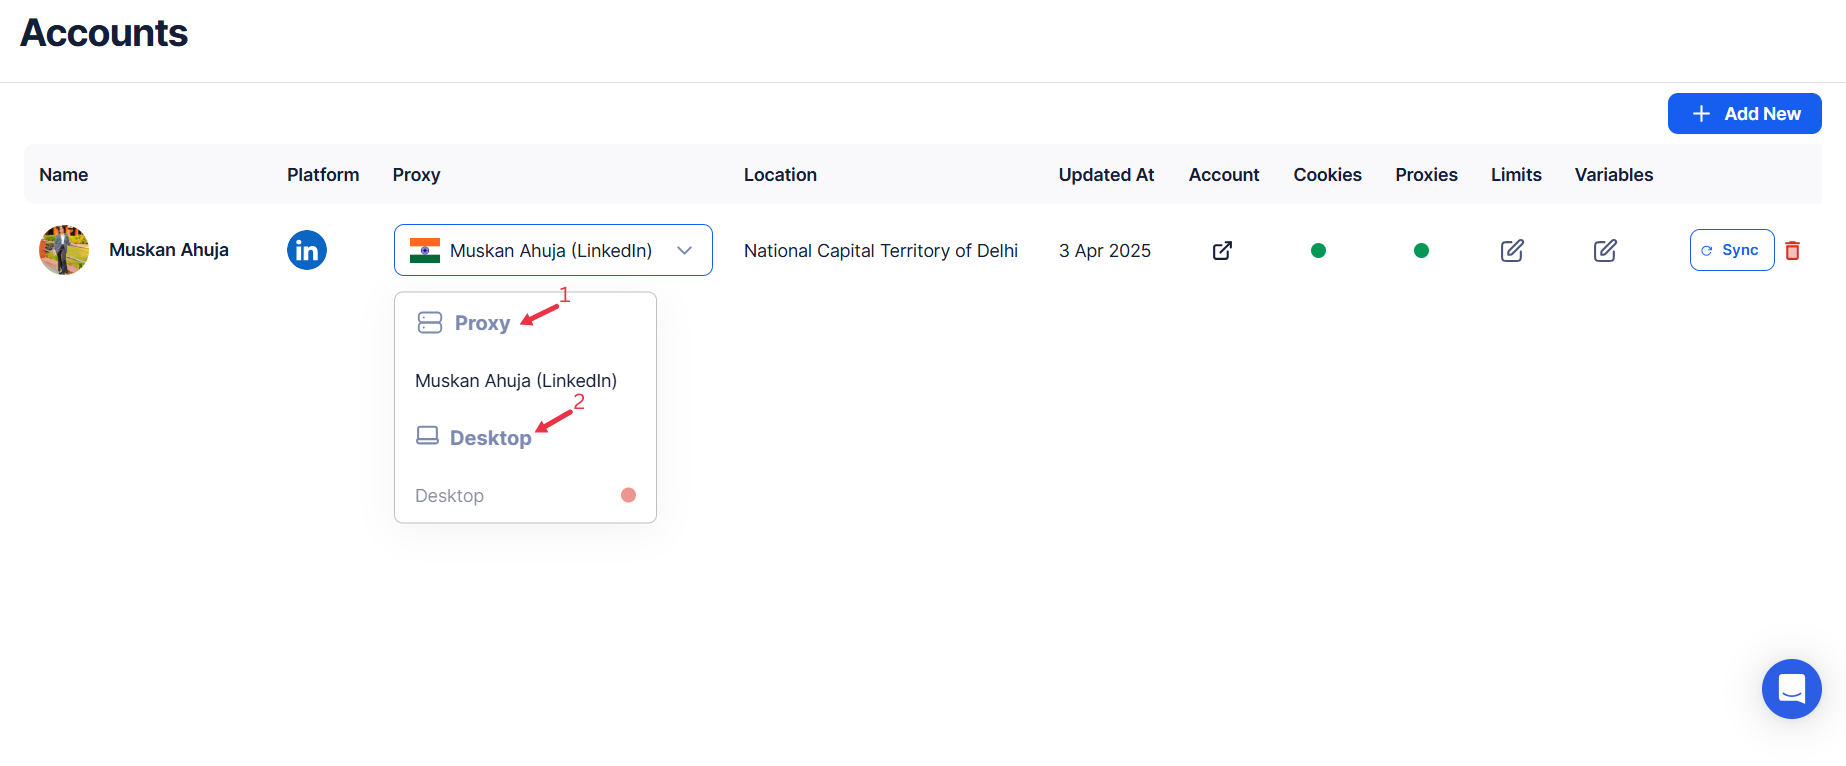
Step 2: Choose Cloud or Desktop Execution
Decide how you want to run the automation:
- Cloud Mode: Automates tasks on TexAu’s servers with built-in proxies. You can add custom proxies via Settings > Preferences > Proxies.
- Desktop Mode: Runs automation on your local device using your IP address.
{% custom-image src="https://v2-web-assets.s3.us-east-1.amazonaws.com/Common/cloud-or-desktop-execution/cloud-or-desktop-execution.png" alt="choose-cloud-or-desktop-execution" /%}
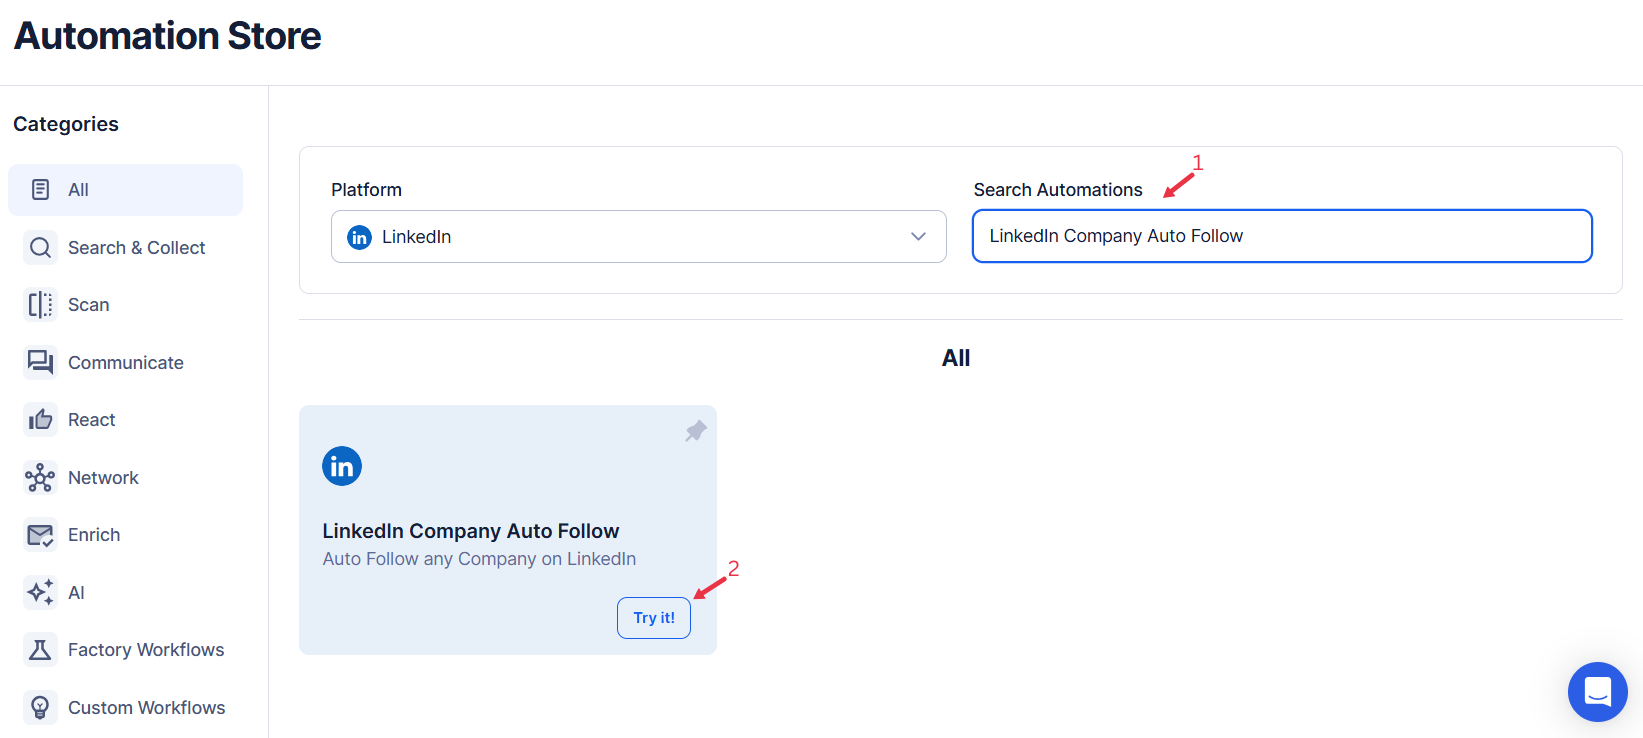
Step 3: Search for the Particular LinkedIn Automation
- Navigate to the Automation Store on TexAu
- Use the search bar to find LinkedIn Company Auto Follow automation.
{% custom-image src="https://v2-web-assets.s3.us-east-1.amazonaws.com/Automations/linkedin-company-auto-follow/linkedin-company-auto-follow.png" alt="search-for-the-particular-LinkedIn-automation" /%}
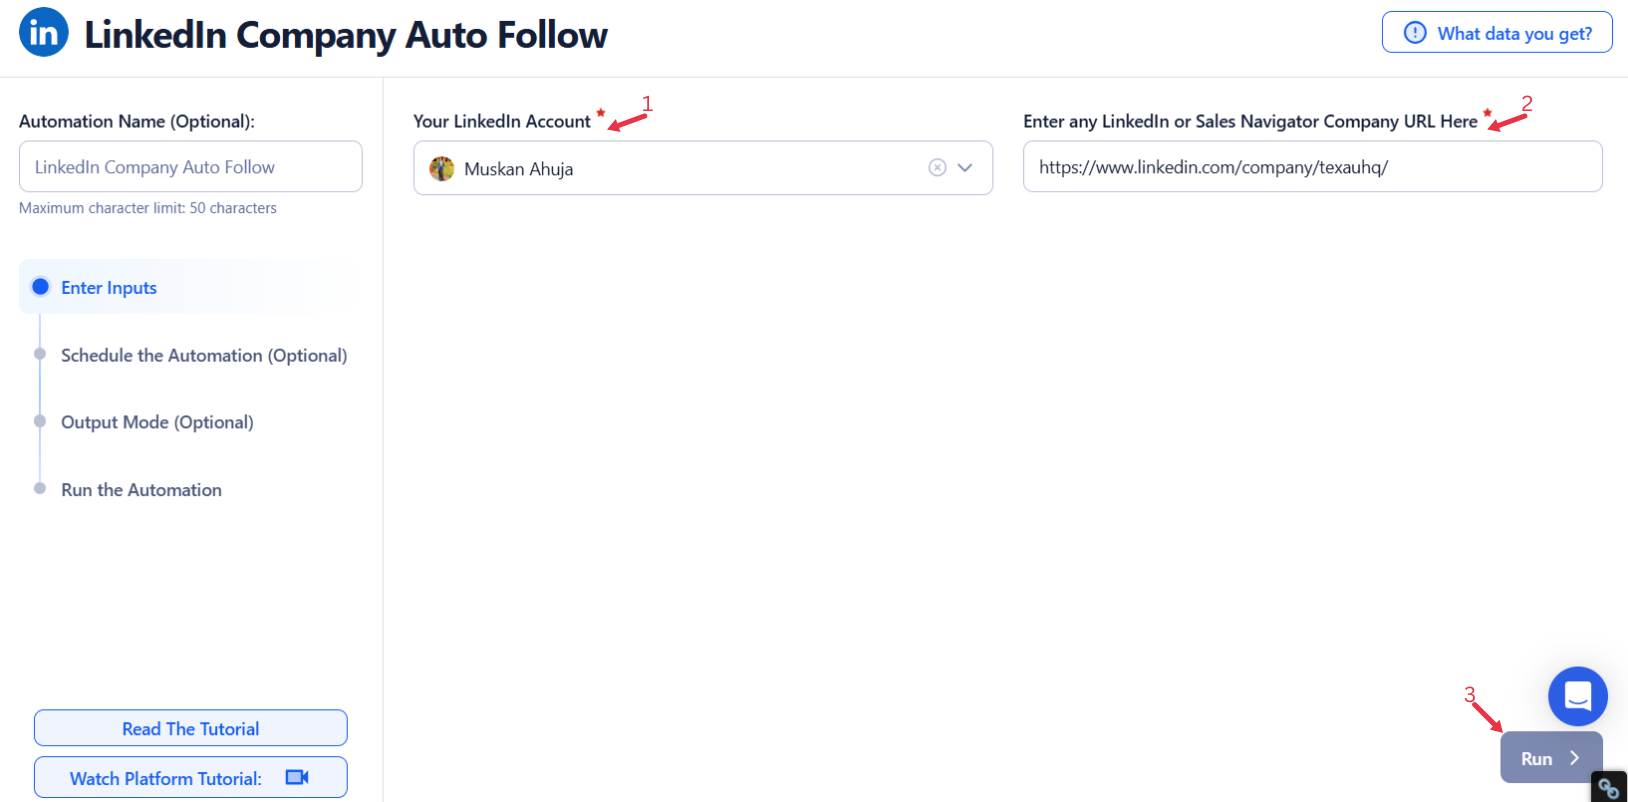
Step 4: Select Your Input Source
Define the input source to specify LinkedIn or Sales Navigator company URLs for the LinkedIn Company Auto Follow automation. Here's how to configure each:
Manually Enter a Single Input
Use this option to follow a single company on LinkedIn. Here’s how to use it:
- LinkedIn Company URL: Enter the LinkedIn or Sales Navigator company URL into the input field.
- This is ideal for targeted engagement with a specific company.
{% custom-image src="https://v2-web-assets.s3.us-east-1.amazonaws.com/Automations/linkedin-company-auto-follow/linkedin-company-auto-follow-single-inputs.png" alt="enter-a-single-input" /%}
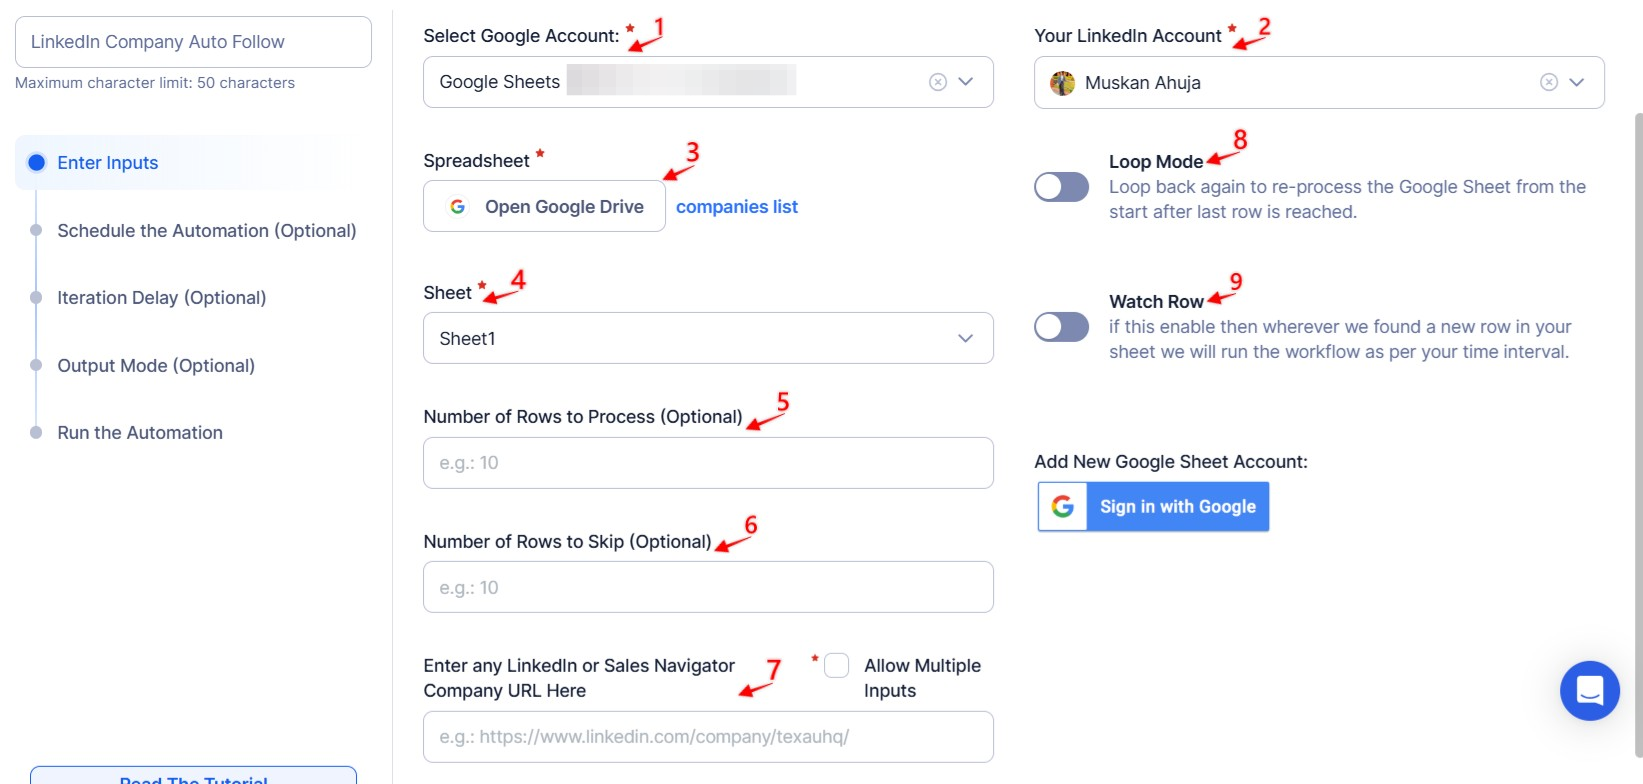
Use Google Sheets for Bulk Input
This option is perfect for following multiple companies efficiently. Follow these steps:
- Connect Your Google Account
- Click Select Google Account to choose your Google account or click Add New Google Sheet Account (you can add multiple Google accounts).
- Select the Spreadsheet
- Click Open Google Drive to locate the Google Sheet containing LinkedIn company URLs.
- Select the spreadsheet and the specific sheet (e.g., "Table") containing the LinkedIn or Sales Navigator company URLs.
- Provide Input Details
- LinkedIn Company URL: Choose the column header containing the company URLs. This step is mandatory for the automation to function correctly.
- Adjust Processing Options
- Number of Rows to Process (Optional): Define the number of rows to process from the sheet. You can input a specific number in the corresponding field.
- Number of Rows to Skip (Optional): Specify rows to skip at the beginning of the sheet to ensure proper data management.
- Click Run in the lower-right corner to start the automation if no advanced settings are needed.
Optional Advanced Feature:
- Loop Mode: Enable Loop Mode to re-process the Google Sheet from the beginning once all rows are completed. This is useful for tasks that require recurring updates.
Watch Row (Optional)
Watch Row feature monitors Google Sheets and automates workflow execution by detecting new data and triggering tasks.
Configure Watch Row by defining an update frequency and selecting a time frame.
Watch Row Schedule
- None
- Scheduling Intervals (e.g., every 15 minutes, every hour)
- One-Time Execution
- Daily Execution
- Weekly Recurrence (e.g., every Tuesday and Friday)
- Monthly Specific Dates (e.g., 11th and 29th)
- Custom Fixed Dates (e.g., April 5)
By default, Watch Row checks every 15 minutes and continues for five days unless modified.
With Watch Row, TexAu keeps workflows running dynamically.
{% custom-image src="https://v2-web-assets.s3.us-east-1.amazonaws.com/Automations/linkedin-company-auto-follow/linkedin-company-auto-follow-google-sheetss.jpeg" alt="use-google-sheets-for-bulk-input" /%}
Process a CSV File
This option allows you to follow multiple companies using a static file. Follow these steps:
- Upload the File
- Click Upload CSV File and browse to locate the file containing LinkedIn or Sales Navigator company URLs.
- Once uploaded, TexAu will display the file name and preview its content. Verify the data to confirm the correct file is selected.
- Provide Input Details
- LinkedIn Company URL: Choose the column header containing the company URLs. This step is mandatory for the automation to function correctly.
- Adjust Processing Options
- Number of Rows to Process (Optional): Specify the number of rows to process from the CSV file.
- Number of Rows to Skip (Optional): Define rows to skip at the beginning of the file.
- Click Run in the lower-right corner to initiate the automation if advanced configurations like scheduling are not required.
{% custom-image src="https://v2-web-assets.s3.us-east-1.amazonaws.com/Common/texau-input-source-options.png" alt="step3" /%}
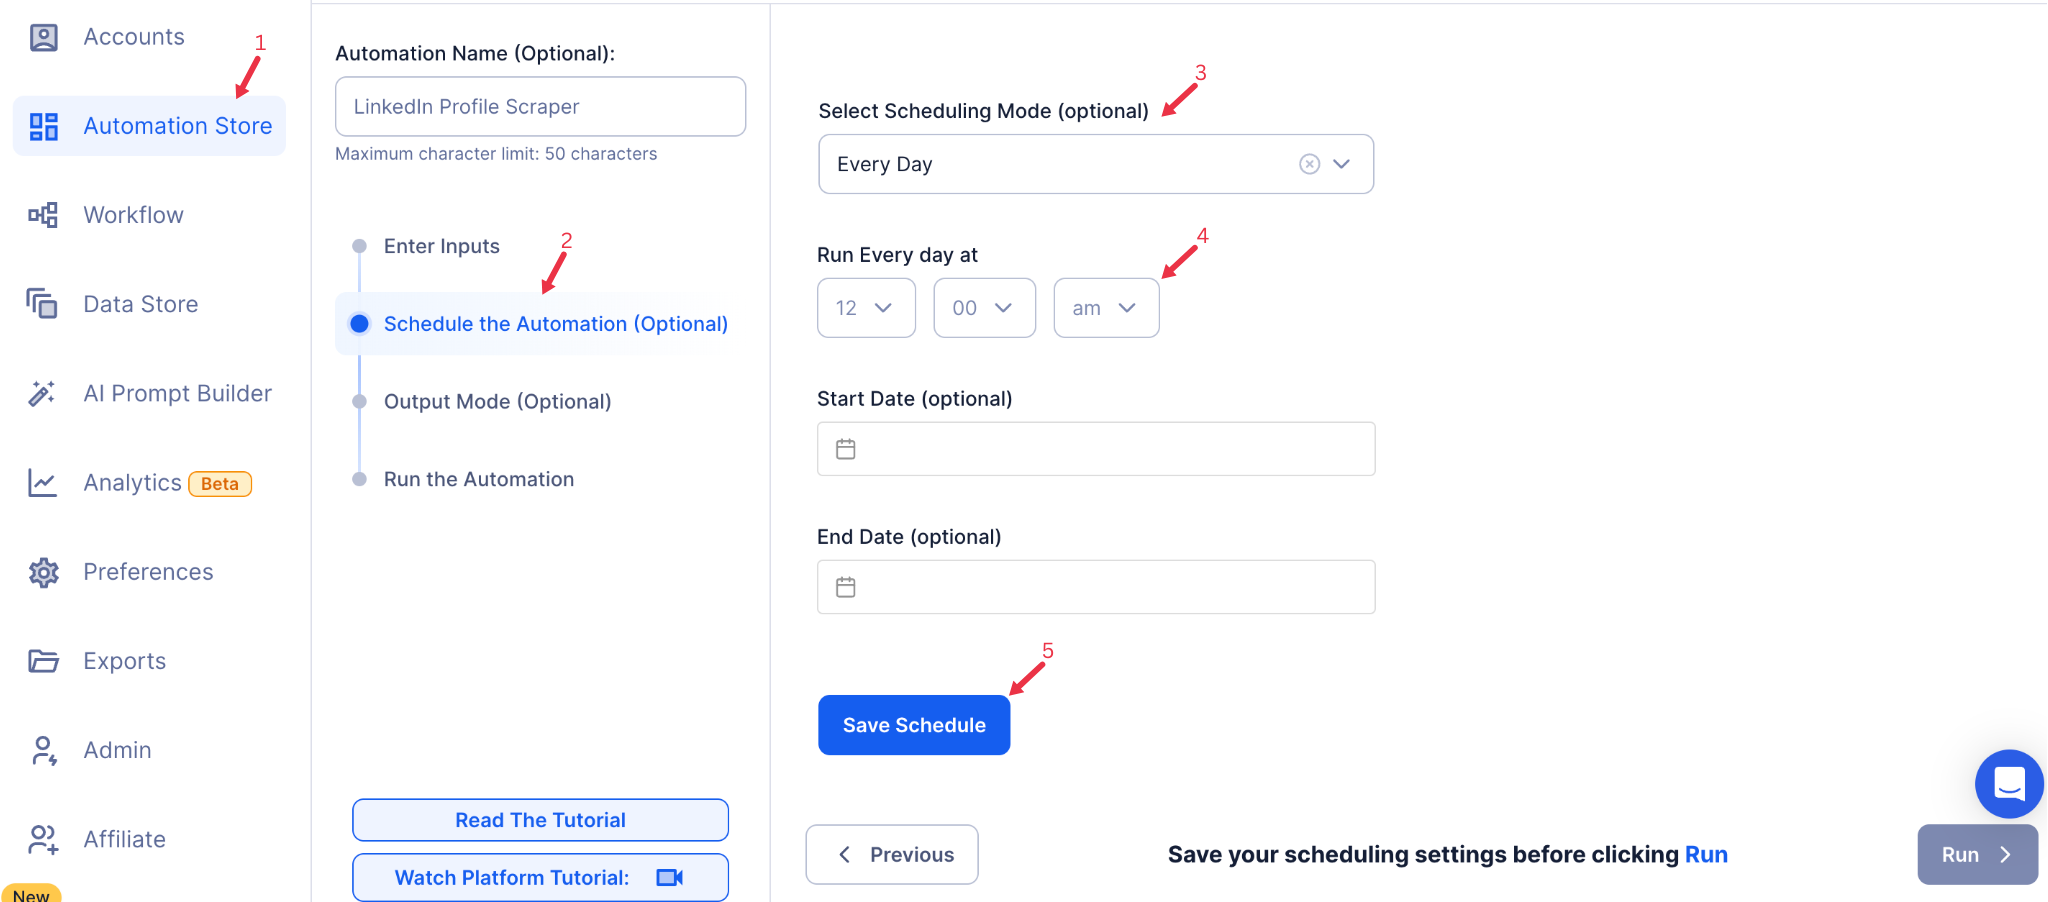
Step 5: Schedule the Automation (Optional)
Schedule the automation to run at specific intervals to keep your following list updated. Select one of the following options:
- None
- At Regular Intervals (e.g., every 12 hours or daily)
- Once
- Every Day
- On Specific Days of the Week (e.g., every Monday)
- On Specific Days of the Month (e.g., the 5th and 20th)
- On Specific Dates (e.g., January 10)
{% custom-image src="https://v2-web-assets.s3.us-east-1.amazonaws.com/Common/schedule-the-automation/schedule-the-automation.png" alt="schedule-the-automation" /%}
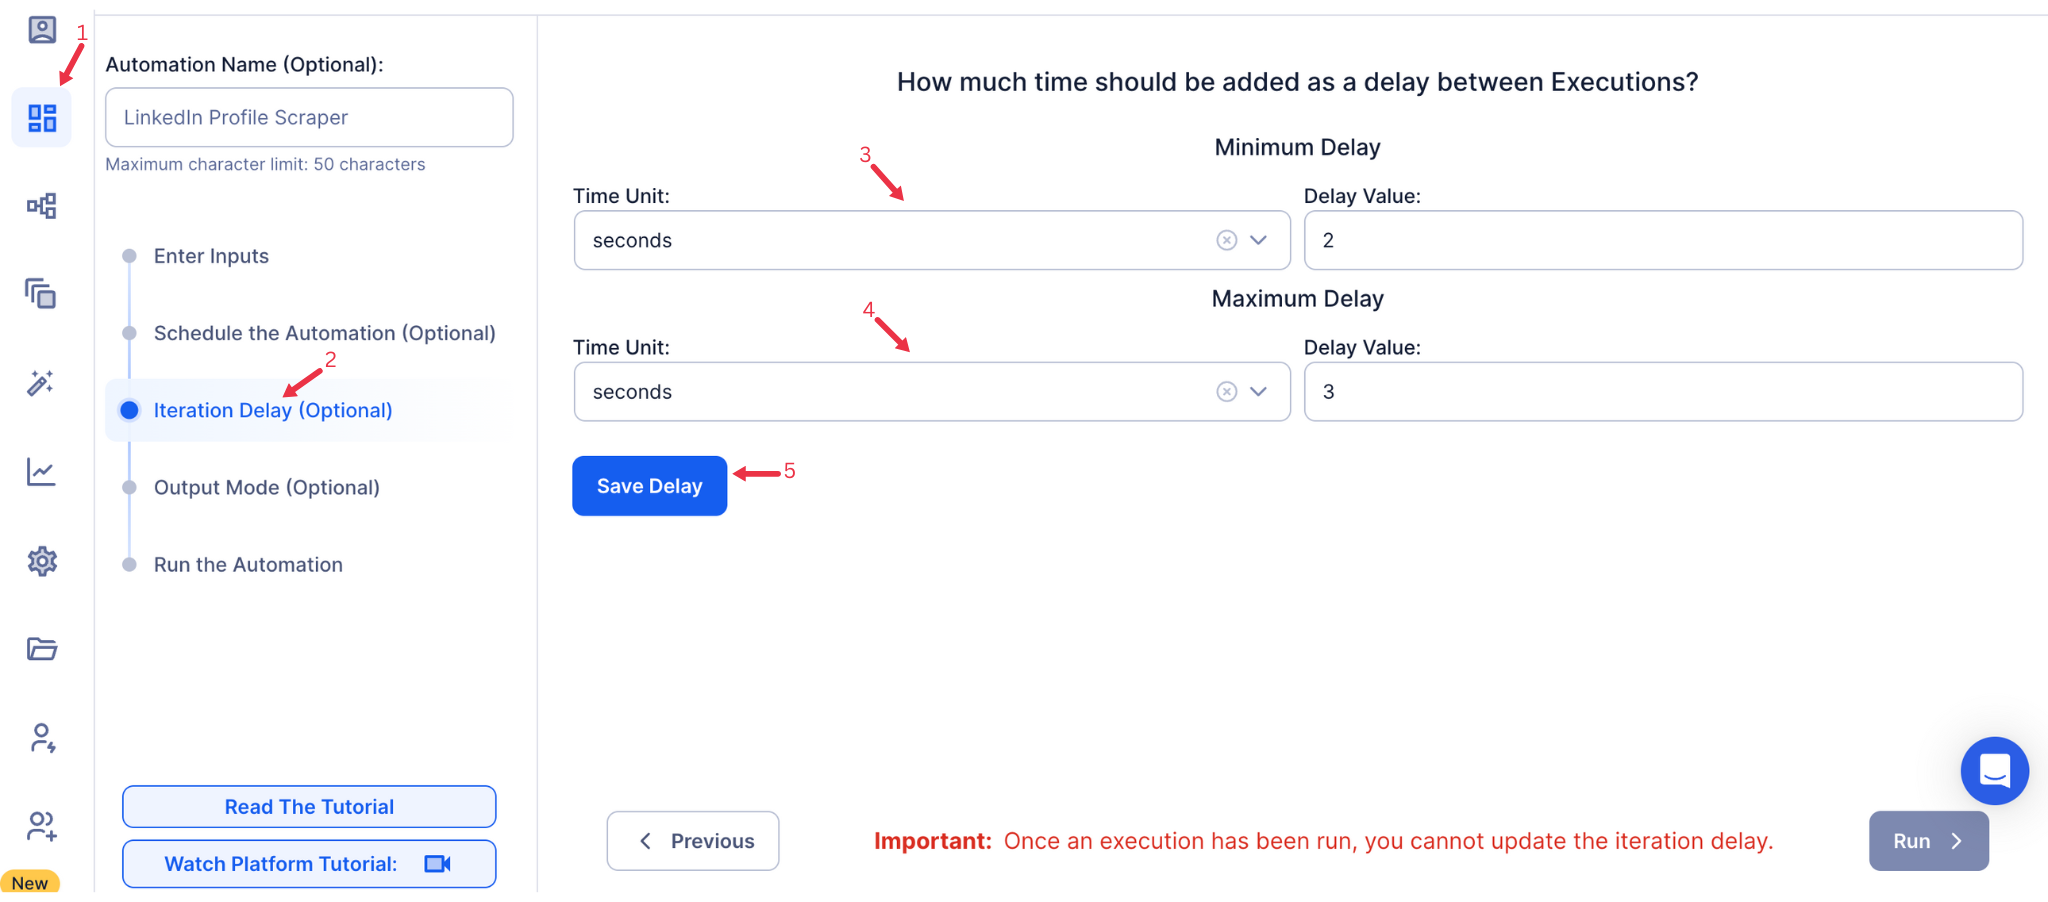
Step 6: Iteration Delay (Optional)
Avoid detection and simulate human-like activity by setting an iteration delay. Choose minimum and maximum time intervals to add randomness between actions. This makes your activity look natural and reduces the chance of being flagged.
- Minimum Delay: Enter the shortest interval (e.g., 10 seconds).
- Maximum Delay: Enter the longest interval (e.g., 20 seconds).
{% custom-image src="https://v2-web-assets.s3.us-east-1.amazonaws.com/Common/iteration-delay/iteration-delay.png" alt="iteration-delay" /%}
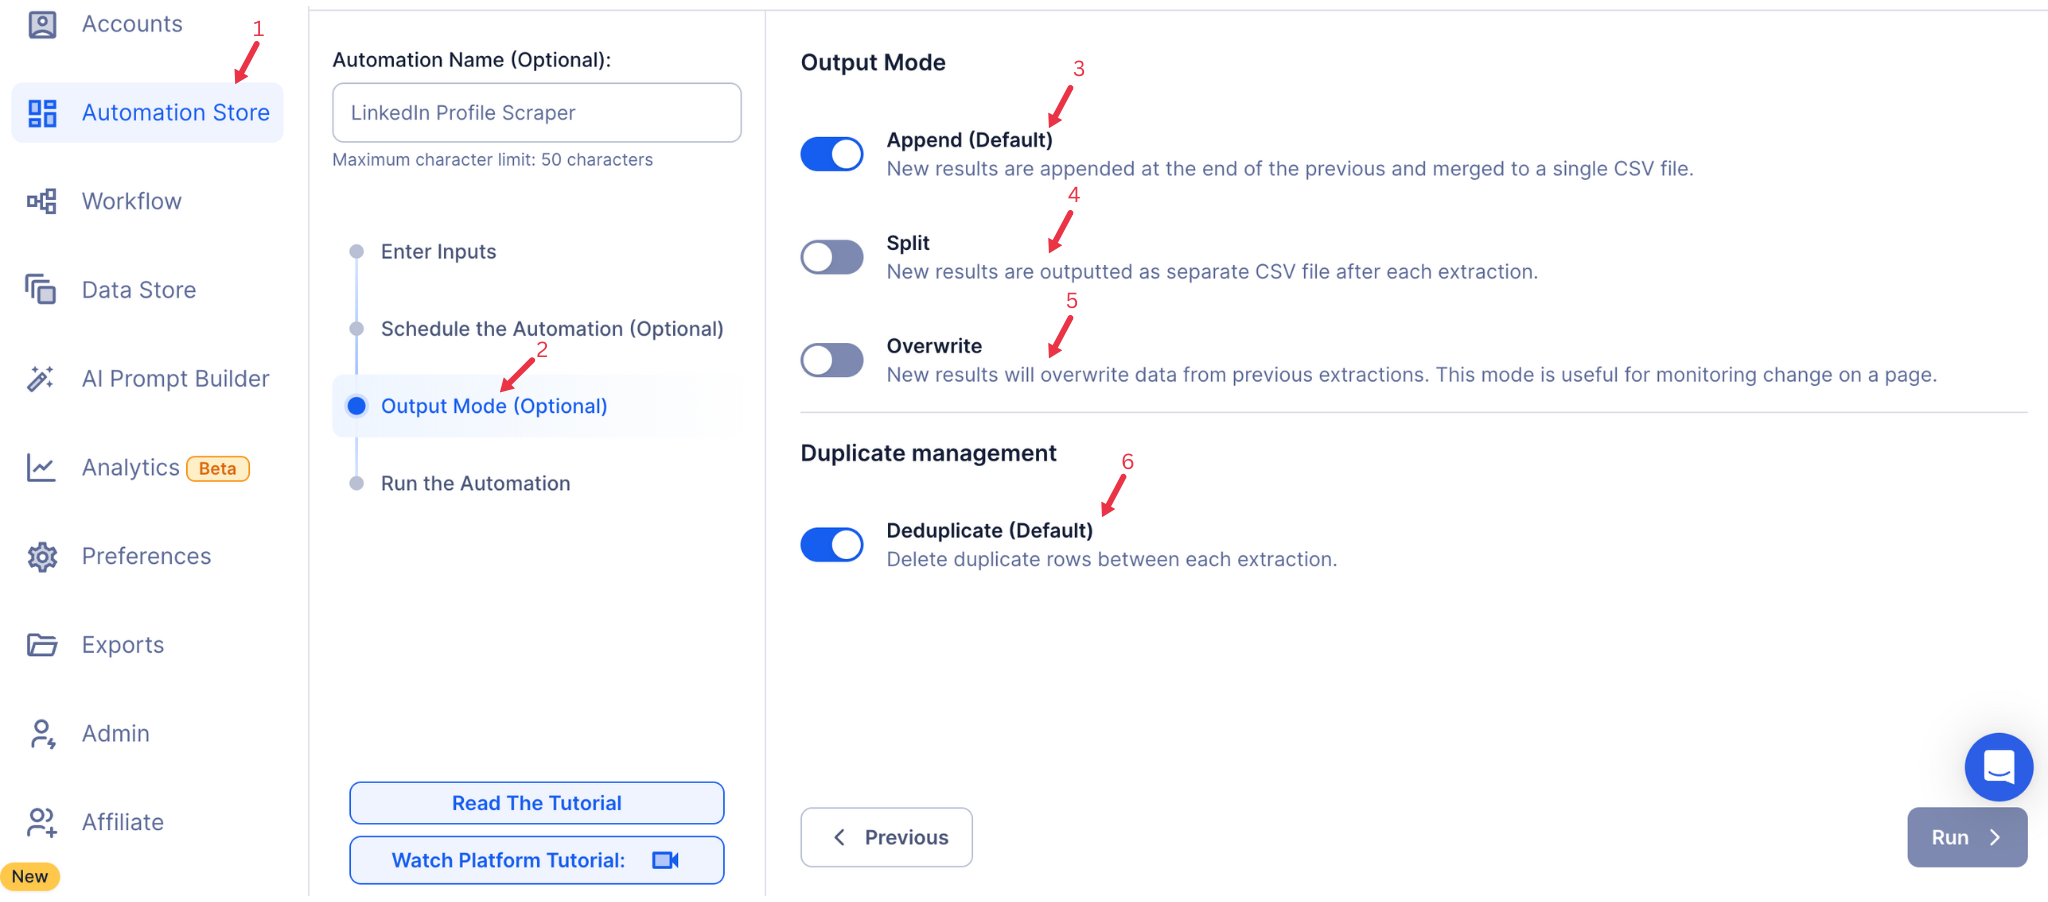
Step 7: Choose Your Output Mode (Optional)
Choose how to save and manage the data of followed company pages. TexAu provides the following options:
- Append (Default): Adds new results to the end of existing data, merging them into a single CSV file.
- Split: Saves new results as separate CSV files for each automation run.
- Overwrite: Replaces previous data with the latest results.
- Duplicate Management: Enable Deduplicate (Default) to remove duplicate rows for clean, organized data.
{% custom-image src="https://v2-web-assets.s3.us-east-1.amazonaws.com/Common/output-mode/output-mode.png" alt="output-mode " /%}
Step 8: Access the Data from the Data Store
After the automation completes, go to the Data Store section in TexAu to access your results. Find the LinkedIn Company Auto Follow automation or the name you’ve entered, click See Data, then choose either Download CSV to export the data or Open to Google Sheet for quick access.
{% custom-image src="https://v2-web-assets.s3.us-east-1.amazonaws.com/Automations/LinkedIn+Job+Scraper/data-store-see-data.png" alt="step8" /%}
The LinkedIn Company Auto Follow automation streamlines the process of following company pages on LinkedIn. It is ideal for founders, marketers, and sales managers looking to expand their networks and gain valuable industry insights. With features like scheduling, iteration delays, and export options, this tool helps you efficiently track and engage with companies on LinkedIn. Save time and grow your network with TexAu.
Run this automation on your own server.
TexAu V3 doesn't host social-platform automations anymore — but the runnable code is yours. Tell us your inputs, outputs, and target environment, and we'll ship you a working version you can deploy and operate yourself.