LinkedIn Company Auto Unfollow
Unfollow LinkedIn company pages in bulk and clean up your feed. Manage what you see with just a few clicks.
Last updated
LinkedIn is an invaluable **social network** for professionals, offering a wealth of opportunities to connect, learn, and grow. One of its standout features is the ability to follow companies and stay updated on their activities, providing insights into industry trends, competitor strategies, and bu
LinkedIn is an invaluable social network for professionals, offering a wealth of opportunities to connect, learn, and grow. One of its standout features is the ability to follow companies and stay updated on their activities, providing insights into industry trends, competitor strategies, and business innovations.
However, as professional goals evolve, your list of followed companies may no longer align with your interests or objectives, similar to how connection lists can include irrelevant connections over time. Managing this list manually can become a time-consuming task, leading to a cluttered feed filled with irrelevant updates.
Enter TexAu’s LinkedIn Company Auto Unfollow, a powerful tool designed to automate the unfollowing process. By leveraging this tool, you can save time, declutter your feed, and ensure that your LinkedIn activity focuses on valuable connections and aligns with your current professional goals. With features like maximum time intervals and control over execution, this tool simplifies feed management, helping you make the most of your LinkedIn experience. Whether you’re a marketer, recruiter, business owner, or content creator, this tool enhances your efficiency and streamlines your professional interactions.
Key Features of LinkedIn Company Auto Unfollow
1. Automated Unfollowing
Manually unfollowing irrelevant connections or companies can be tedious, especially when your connection list spans hundreds. TexAu’s Auto Unfollow feature eliminates this challenge by automating the process. The tool identifies companies that no longer align with your professional interests and removes them from your feed effortlessly.
Example Scenario: A digital marketer has been following dozens of companies in various industries for years. Over time, many of these companies become irrelevant connections as the marketer’s focus shifts to e-commerce. With TexAu, the marketer automates the process of unfollowing companies outside of the e-commerce sector, ensuring their feed is filled with insights that support their current goals and highlight valuable connections.
2. Customizable Filters
TexAu allows you to set specific filters to define which companies should be unfollowed. Filters such as industry, company size, activity level, or geographic location ensure you only remove companies that meet your criteria. This feature offers control over execution and makes the process precise and aligned with your objectives.
Example Scenario: A recruiter focusing on the IT industry uses the tool to unfollow companies that haven’t posted job updates in the past six months. This helps them streamline their connection list to include only companies actively hiring IT professionals, enabling better focus on recruitment efforts.
3. Bulk Unfollow Capability
Reviewing and unfollowing companies one by one can take hours. TexAu’s bulk unfollow feature allows you to clean up your connection list in one action, saving significant time while ensuring efficiency within the social network.
Example Scenario: A business owner follows hundreds of companies for market research. As their business grows, they need to focus only on updates from key clients and partners. TexAu helps them bulk unfollow irrelevant connections, reducing their list from 500 to just 100 valuable connections in minutes.
4. Real-Time Monitoring
TexAu continuously monitors the activity of followed companies. If a company meets your unfollow criteria, such as inactivity or a shift in industry relevance, it is automatically removed from your connection list. This dynamic approach ensures your feed remains relevant without constant manual intervention.
Example Scenario: A content creator wants their feed to feature active companies for fresh ideas. TexAu monitors the profile URLs of their followed companies and automatically unfollows those that have been inactive for over three months. This ensures the feed stays dynamic and inspirational while maintaining control over execution.
Challenges Addressed by LinkedIn Company Auto Unfollow
1. Irrelevant Updates
A cluttered feed filled with irrelevant connections can hinder your ability to focus on meaningful insights. TexAu ensures you only follow valuable connections, eliminating distractions and enhancing the quality of your feed within the social network.
Example: A financial analyst previously followed companies across multiple sectors but now focuses exclusively on renewable energy. TexAu removes irrelevant connections, allowing the analyst to concentrate on updates from green energy leaders and optimize their connection list.
2. Manual Feed Management
Manually unfollowing companies is not only time-consuming but also prone to oversight. TexAu automates the process, saving you hours of work and providing precise control over execution to ensure no irrelevant connections are overlooked.
Example: A recruiter used to spend an hour every week reviewing their connection list. With TexAu, they save this time and focus on sourcing talent instead, ensuring their feed remains focused on valuable connections.
3. Outdated Focus
As your professional goals shift, the companies you follow should reflect your new interests. TexAu ensures your feed evolves with you, removing irrelevant connections and aligning it with your objectives.
Example: A marketing agency pivots from B2C to B2B services. TexAu unfollows irrelevant B2C companies, enabling the agency to focus on insights from B2B firms and curate a feed that matches their evolving connection list.
Benefits of LinkedIn Company Auto Unfollow
1. Streamlined Feed
By decluttering your feed, you can focus on updates from valuable connections that truly matter to your career or business goals. This enhances your ability to stay informed and engaged with relevant industry content within the social network.
Example Scenario: A business consultant ensures their feed is filled with updates from Fortune 500 companies and thought leaders in their niche, helping them stay at the forefront of industry developments by maintaining a refined connection list.
2. Time Efficiency
TexAu automates the review and unfollow process, saving you valuable time. With features like control over execution, you no longer need to sift through your connection list manually.
Example Scenario: A sales manager automates the process of unfollowing inactive companies, freeing up time to focus on prospecting and closing deals. TexAu’s use of maximum time intervals ensures the process is efficient and aligned with their schedule.
3. Improved Engagement
With a curated feed featuring only active and meaningful companies, you can engage more effectively with industry-relevant content. This leads to better networking opportunities and actionable insights from valuable connections.
Example Scenario: A content creator unfollows companies with low-quality posts, ensuring their feed remains a source of inspiration for their own work. By focusing on updates from active and high-impact companies, they maximize the benefits of their social network.
4. Professional Alignment
Your LinkedIn activity should reflect your current goals and professional focus. TexAu helps you maintain a feed that evolves with your priorities, using features like control over execution to align with your objectives.
Example Scenario: A startup founder follows companies in the venture capital space to stay updated on funding opportunities, unfollowing irrelevant ones to focus on valuable connections and actionable insights.
Use Cases for LinkedIn Company Auto Unfollow
1. Marketers: Focus on Competitors and Clients
Marketers can refine their followed companies list to focus on competitors or potential clients, ensuring their feed is a source of actionable insights.
Example Scenario: A marketing strategist unfollows companies outside their target market, concentrating on competitors’ campaigns and client activities for better decision-making.
2. Recruiters: Prioritize Active Employers
Recruiters can manage their feed to highlight companies with active job postings or talent pools, improving their recruitment efficiency.
Example Scenario: A recruiter unfollows companies that haven’t posted jobs in over a year, enabling them to focus on businesses actively hiring in their niche.
3. Business Owners: Streamline Market Research
Business owners can streamline their feed to prioritize updates from partners, clients, and industry leaders, aiding in strategic planning.
Example Scenario: A business owner unfollows competitors that are no longer relevant, focusing instead on updates from their key partners.
4. Content Creators: Enhance Inspiration
Content creators can ensure their feed is filled with high-quality, relevant content, providing inspiration for their posts and campaigns.
Example Scenario: A blogger unfollows companies that post generic updates, focusing on innovative brands that align with their creative vision.
Best Practices for Using LinkedIn Company Auto Unfollow
1. Define Clear Criteria
Setting clear and specific criteria is the foundation for effectively using TexAu’s LinkedIn Company Auto Unfollow tool. These filters ensure that the automation focuses on companies that no longer align with your goals or professional focus. By applying filters based on relevance, activity level, industry, or geographic location, you can create a highly curated and personalized feed.
- Relevance: Unfollow companies that no longer serve your career or business interests. For instance, if your role shifts from B2C to B2B marketing, companies focused on consumer products may no longer provide valuable insights.
- Activity Level: Target companies that are inactive or post infrequently. Inactive companies contribute to feed clutter without offering meaningful updates.
- Industry: Narrow your focus to industries that are critical to your goals. For example, if your career transitions to the renewable energy sector, prioritize following companies in this industry and unfollow unrelated ones.
Example Scenario: A recruiter specializing in the tech sector sets a filter to unfollow companies outside the IT and software development industries. This ensures their feed showcases updates from businesses that align with their recruitment focus, such as hiring trends and industry news.
2. Combine with Manual Review
While automation is incredibly efficient, it’s still beneficial to periodically conduct a manual review of your followed companies. This review allows you to identify companies that might not meet the filter criteria but are still irrelevant to your goals.
- Periodic Checks: Schedule a manual review of your followed companies list quarterly or semi-annually to fine-tune your feed.
- Spot Exceptions: Identify companies that may not post frequently but provide valuable insights or opportunities when they do.
- Refine Filters: Use insights from manual reviews to update and improve your automation filters.
Example Scenario: A content creator manually reviews their followed companies and notices that a few infrequent posters consistently share high-quality content. They refine their filters to exclude these companies from being automatically unfollowed, maintaining their feed quality.
3. Engage Actively
After curating your feed with the Auto Unfollow tool, it’s essential to actively engage with the updates from companies that remain. A well-curated feed is only valuable if you leverage it to build meaningful connections, gain insights, and enhance your professional presence.
- Interact with Posts: Like, comment, or share posts from companies that provide valuable content. This increases visibility and fosters engagement with your network.
- Stay Updated: Regularly check for updates from companies in your feed to stay informed about industry trends and opportunities.
- Strengthen Relationships: Use company updates as conversation starters for networking with employees or industry leaders.
Example Scenario: A marketer follows companies in the e-commerce industry. After curating their feed, they actively engage with thought leadership posts and product announcements, building relationships with key professionals in the sector.
Metrics and Tracking
1. Unfollow Trends
Tracking the number of companies unfollowed over time is an excellent way to measure the tool’s impact on your LinkedIn feed. Monitoring these trends ensures that your feed cleanup aligns with your objectives.
- Measure Impact: Keep a record of unfollowed companies over weeks or months to evaluate how the tool improves your feed’s focus.
- Identify Patterns: Analyze patterns to understand which criteria (e.g., industry or activity level) contribute most to decluttering.
- Assess Alignment: Compare the state of your feed before and after using the tool to ensure alignment with your professional goals.
Example Scenario: A professional notices that within three months of using TexAu, they’ve unfollowed 200 irrelevant companies. This reduces clutter by 50%, allowing them to focus more effectively on updates from key industry players.
2. Feed Quality Metrics
Improved engagement and relevance in your feed are key indicators of success. By comparing interaction levels on posts before and after unfollowing irrelevant companies, you can measure how much more aligned your feed has become.
- Engagement Levels: Track the number of posts you engage with (likes, comments, shares) before and after the cleanup.
- Content Relevance: Monitor how frequently valuable insights appear in your feed.
- Interaction Frequency: Assess whether you’re interacting more with high-quality content, signaling an improvement in feed quality.
Example Scenario: A content creator tracks their feed engagement levels and finds a 30% increase in meaningful interactions after unfollowing irrelevant companies. This shows that their curated feed is providing more value and inspiration for their work.
3. Professional Focus
Another critical metric is how well your feed aligns with your current professional objectives. A decluttered feed should amplify visibility for updates from relevant companies, industry leaders, or potential collaborators.
- Goal Alignment: Measure how often updates from key industries or companies appear in your feed post-cleanup.
- Industry Insights: Track the volume of industry-specific content available in your feed after using TexAu.
- Opportunities: Assess whether the curated feed has led to more networking or business opportunities.
Example Scenario: A recruiter notices that after decluttering their feed, they see more job updates and hiring announcements from tech companies. This helps them identify new recruitment opportunities faster.
Tips for Maximizing Results
1. Combine with Follow Automation
While unfollowing irrelevant companies is essential, it’s equally important to ensure your feed remains balanced and up-to-date. Use TexAu’s Follow Automation tool alongside the Auto Unfollow feature to maintain a dynamic and relevant list of followed companies.
- How It Works: Follow new companies that align with your current goals while unfollowing those that don’t.
- Benefits: This combination ensures your feed evolves with your professional needs, keeping it both focused and diversified.
Example Scenario: A sales professional uses Follow Automation to track new prospects while using the Auto Unfollow tool to remove companies that are no longer potential leads. This balance ensures a feed optimized for lead generation.
2. Prioritize Active Companies
Inactive companies add no value to your feed and dilute its overall relevance. Use TexAu’s filters to prioritize companies that post regularly and contribute meaningful content.
- Activity Filters: Set criteria to unfollow companies that haven’t posted updates in the past 3-6 months.
- Content Value: Focus on companies that consistently share thought leadership, insights, or industry news.
Example Scenario: A business owner prioritizes following companies that post at least twice a month, ensuring their feed is always populated with fresh and relevant updates.
3. Regularly Update Criteria
As your goals, industry focus, or professional interests evolve, it’s essential to adjust your unfollow filters. This ensures your feed remains aligned with your current priorities.
- Monitor Changes: Review your career goals or business strategy regularly to identify any shifts.
- Adjust Filters: Update your TexAu settings to reflect new industries, roles, or geographies of interest.
- Continuous Improvement: Keep refining your automation criteria for maximum impact.
Example Scenario: A recruiter specializing in finance transitions to recruiting for the tech industry. They update their unfollow filters to remove companies in banking and prioritize tech-focused organizations.
TexAu’s LinkedIn Company Auto Unfollow tool empowers professionals to maintain a clean, relevant, and engaging LinkedIn feed. By automating the unfollow process and offering robust tracking and customization options, the tool saves time, enhances productivity, and ensures alignment with evolving professional goals.
Whether you’re a marketer, recruiter, business owner, or content creator, TexAu helps you focus on what truly matters. Pair it with Follow Automation and adopt best practices for maximum results. Take control of your LinkedIn experience today and unlock the potential of a streamlined, high-quality feed!
Conclusion: Simplify Your LinkedIn Feed Management
TexAu’s LinkedIn Company Auto Unfollow is an essential tool for professionals seeking to maintain a relevant and streamlined LinkedIn feed. By automating the unfollow process, it saves time, declutters your feed, and ensures alignment with your professional goals. Whether you’re a marketer, recruiter, business owner, or content creator, this tool enhances your LinkedIn experience and helps you stay focused on what truly matters.
Start using TexAu today to take control of your LinkedIn feed and unlock the full potential of your professional network!
Log in to your TexAu account at v2-prod.texau.com. Navigate to the Automation Store and enter LinkedIn Company Auto Unfollow in the search bar to locate the automation.
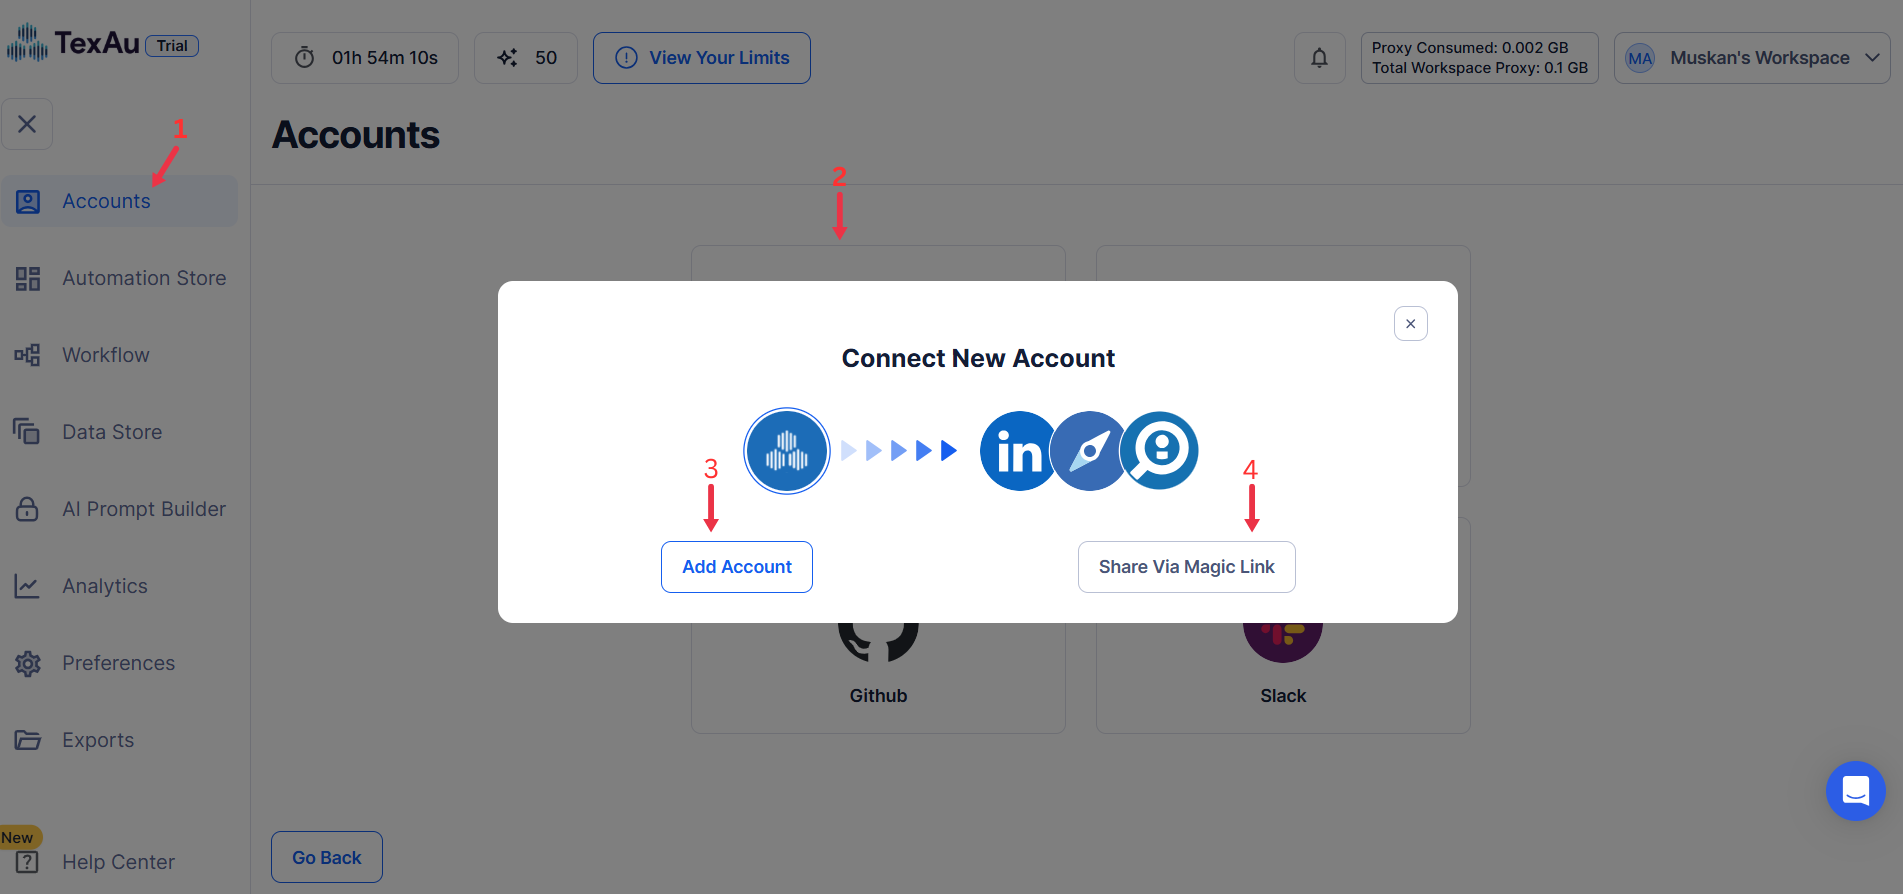
Step 1: Log in to TexAu and Connect LinkedIn
Log in to your TexAu account at v2-prod.texau.com.
Go to Accounts and connect your LinkedIn account. You can choose one of these methods:
- Share via Magic Link: Share the link, copy it to your browser, and follow the steps to integrate your LinkedIn account securely.
- Add Account: Sync cookies and browser data with TexAu for seamless integration.
Tip: Use Magic Link for an easy and secure connection.
{% custom-image src="https://v2-web-assets.s3.us-east-1.amazonaws.com/Common/log-in-to-texau-and-connect-linkedin/connect-linkedin.png" alt="connect-linkedin" /%}
Step 2: Choose Cloud or Desktop Execution
Decide how you want to run the automation:
- Cloud Mode: Automates tasks on TexAu’s servers with built-in proxies. You can add custom proxies via Settings > Preferences > Proxies.
- Desktop Mode: Runs automation on your local device using your IP address.
Tip: Desktop mode saves cloud runtime credits and gives more control over the process.
{% custom-image src="https://v2-web-assets.s3.us-east-1.amazonaws.com/Common/add-account.png" alt="step2" /%}
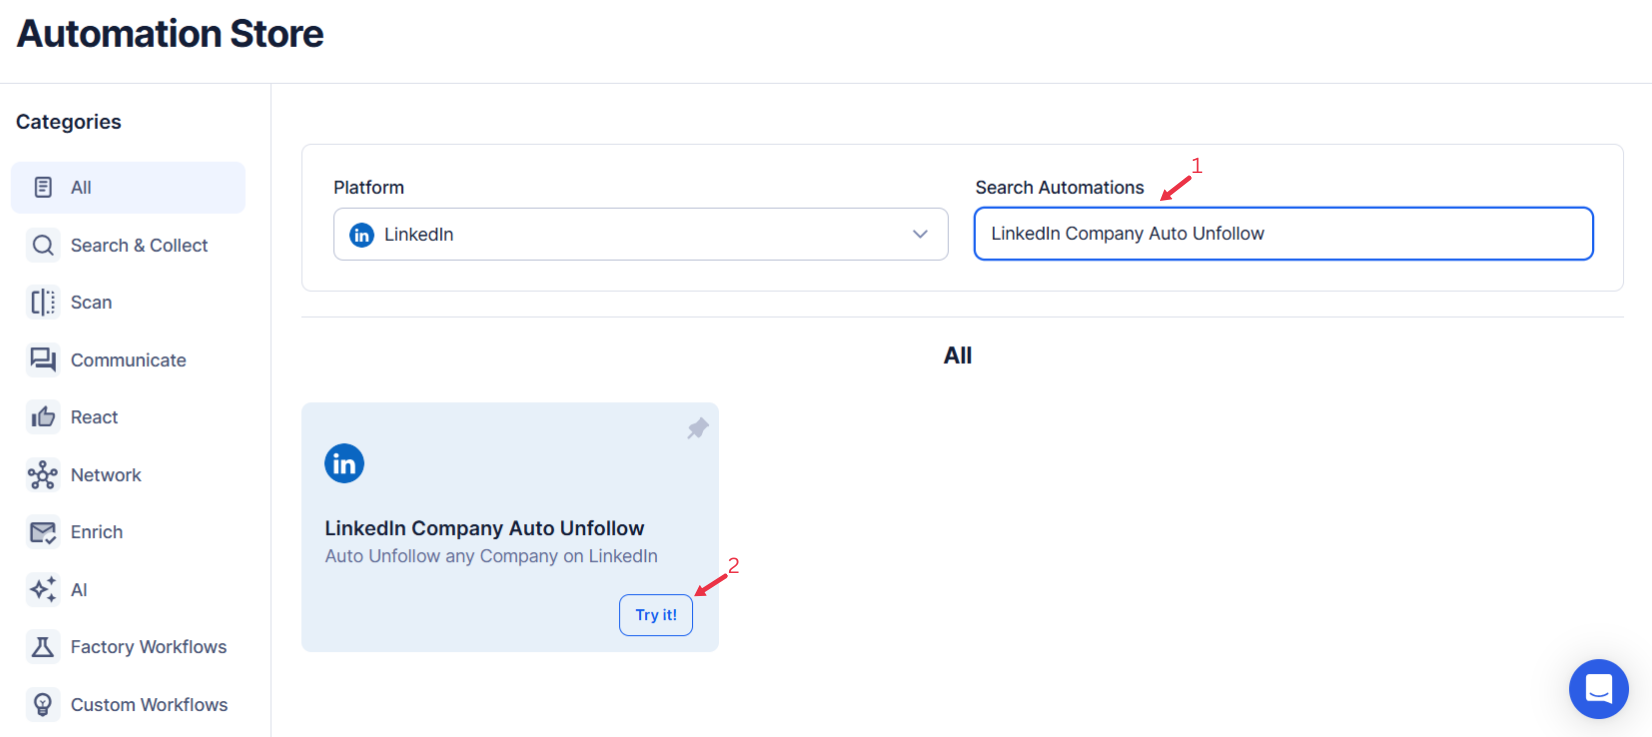
Step 3: Search for the Particular LinkedIn Automation
- Navigate to the Automation Store on TexAu.
- Use the search bar to find LinkedIn Company Auto Unfollow automation.
{% custom-image src="https://v2-web-assets.s3.us-east-1.amazonaws.com/Automations/linkedin-company-auto-unfollow/linkedin-company-auto-unfollow.png" alt="search-for-the-particular-LinkedIn-automation" /%}
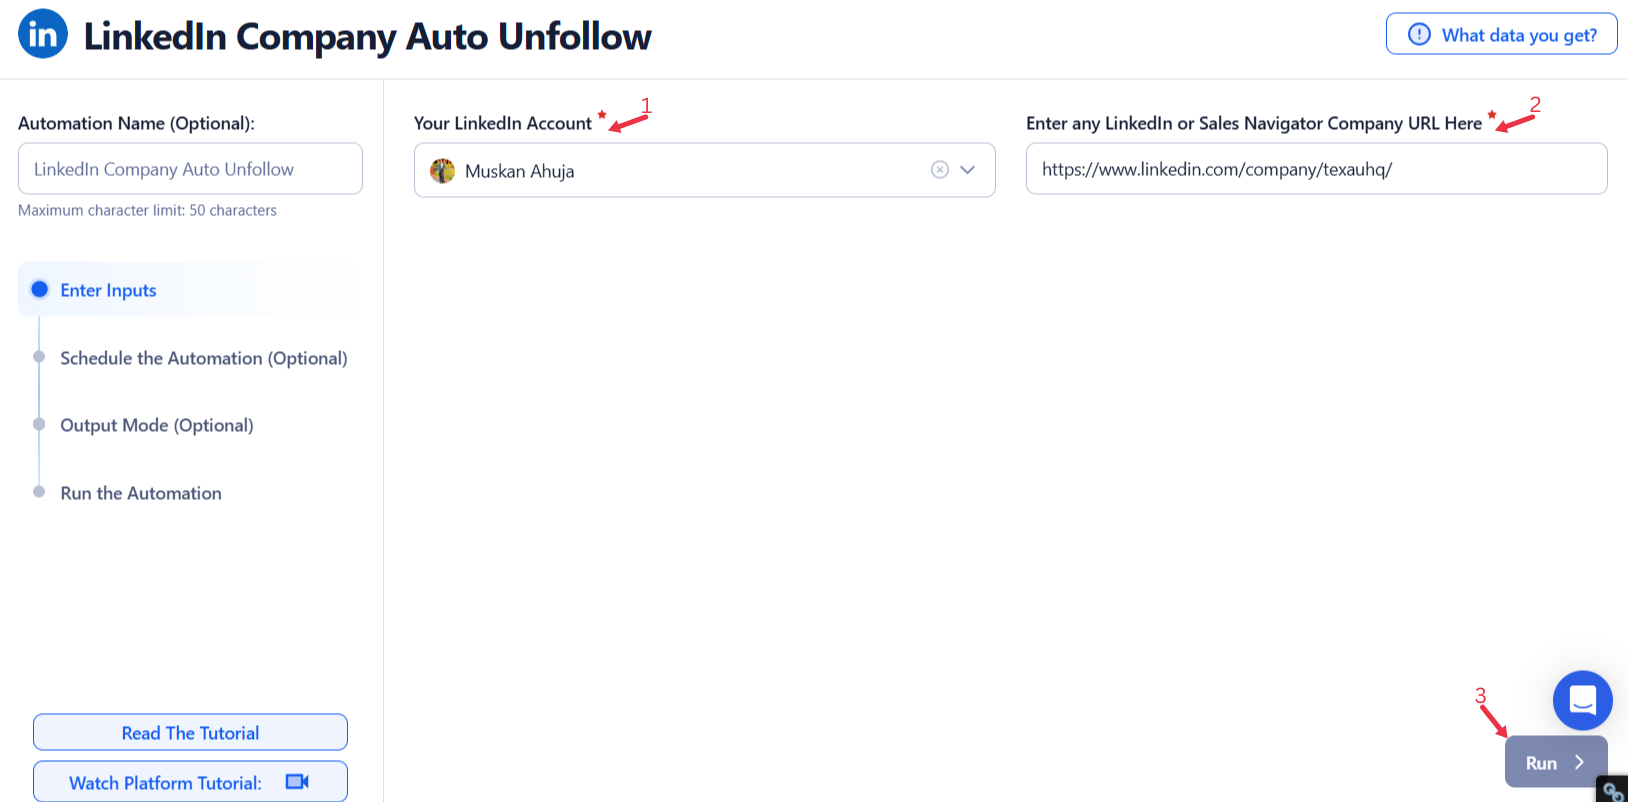
Step 4: Select Your Input Source
Define the input source to specify LinkedIn or Sales Navigator company URLs for the LinkedIn Company Auto Unfollow automation. Here's how to configure each:
Manually Enter a Single Input
Use this option to unfollow a single company on LinkedIn. Here’s how to use it:
- LinkedIn Company URL: Enter the LinkedIn or Sales Navigator company URL into the input field.
- This is ideal for quickly managing your follow list by targeting a specific company.
{% custom-image src="https://v2-web-assets.s3.us-east-1.amazonaws.com/Automations/linkedin-company-auto-unfollow/linkedin-company-auto-unfollow-single-inputs.png" alt="enter-a-single-input" /%}
Use Google Sheets for Bulk Input
This option is ideal for unfollowing multiple companies efficiently. Follow these steps:
-
Connect Your Google Account
-
Click Select Google Account to choose your Google account or click Add New Google Sheet Account (you can add multiple Google accounts).
-
Select the Spreadsheet
-
Click Open Google Drive to locate the Google Sheet containing LinkedIn company URLs.
- Select the spreadsheet and the specific sheet (e.g., "Sheet1") containing the LinkedIn or Sales Navigator company URLs.
-
Provide Input Details
-
LinkedIn Company URL: Choose the column header containing the company URLs. This step is mandatory for the automation to function correctly.
-
Adjust Processing Options
-
Number of Rows to Process (Optional): Define the number of rows to process from the sheet. You can input a specific number in the corresponding field.
- Number of Rows to Skip (Optional): Specify rows to skip at the beginning of the sheet to ensure proper data management.
-
Click Run in the lower-right corner to start the automation if no advanced settings are needed.
Optional Advanced Feature:
- Loop Mode: Enable Loop Mode to re-process the Google Sheet from the beginning once all rows are completed. This is useful for tasks that require recurring updates.
Watch Row (Optional)
Watch Row feature lets you automate workflow execution by detecting new Google Sheet rows and executing tasks automatically.
Configure Watch Row by defining an update interval and specifying an execution period.
Watch Row Schedule
- None
- Scheduling Intervals (e.g., every 15 minutes, every hour)
- One-Time Execution
- Daily Execution
- Weekly Recurrence (e.g., every Wednesday and Saturday)
- Monthly Specific Dates (e.g., 7th and 28th)
- Custom Fixed Dates (e.g., May 6)
By default, Watch Row scans every 15 minutes and runs for five days unless changed.
With Watch Row, TexAu keeps workflows active and data-driven.
{% custom-image src="https://v2-web-assets.s3.us-east-1.amazonaws.com/Automations/linkedin-company-auto-unfollow/linkedin-company-auto-unfollow-google-sheet.jpeg" alt="use-google-sheets-for-bulk-input" /%}
Process a CSV File
This option allows you to unfollow multiple companies using a static file. Follow these steps:
- Upload the File
- Click Upload CSV File and browse to locate the file containing LinkedIn or Sales Navigator company URLs.
- Once uploaded, TexAu will display the file name and preview its content. Verify the data to confirm the correct file is selected.
- Provide Input Details
- LinkedIn Company URL: Choose the column header containing the company URLs. This step is mandatory for the automation to function correctly.
- Adjust Processing Options
- Number of Rows to Process (Optional): Specify the number of rows to process from the CSV file.
- Number of Rows to Skip (Optional): Define rows to skip at the beginning of the file.
- Click Run in the lower-right corner to initiate the automation if advanced configurations like scheduling are not required.
Screenshot Suggestion: Show the Input Source selection screen, highlighting the CSV file upload feature, file preview, rows to process/skip fields, and the LinkedIn Company URL option.
{% custom-image src="https://v2-web-assets.s3.us-east-1.amazonaws.com/Common/texau-input-source-options.png" alt="step3" /%}
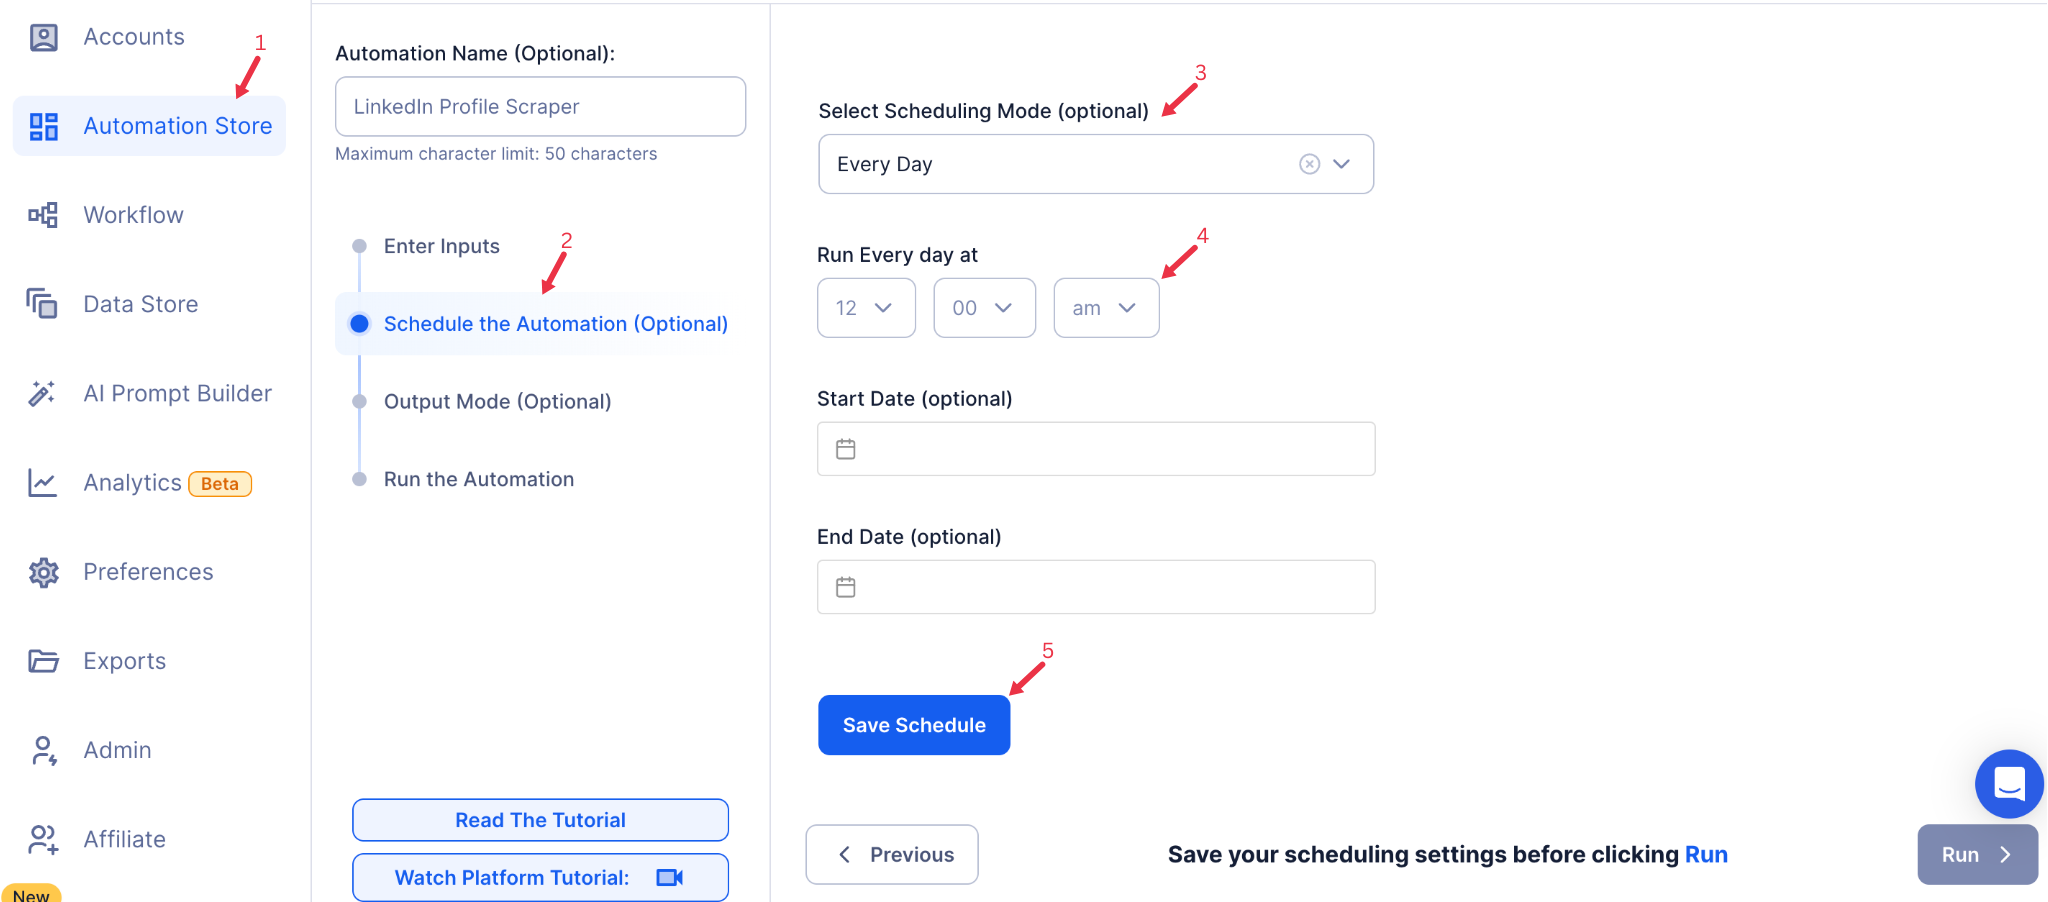
Step 5: Schedule the Automation (Optional)
Schedule the automation to run at specific intervals to keep your followed companies list updated. Select one of the following options:
- None
- At Regular Intervals (e.g., every 12 hours or daily)
- Once
- Every Day
- On Specific Days of the Week (e.g., every Monday)
- On Specific Days of the Month (e.g., the 5th and 20th)
- On Specific Dates (e.g., January 10)
{% custom-image src="https://v2-web-assets.s3.us-east-1.amazonaws.com/Common/schedule-the-automation/schedule-the-automation.png" alt="schedule-the-automation" /%}
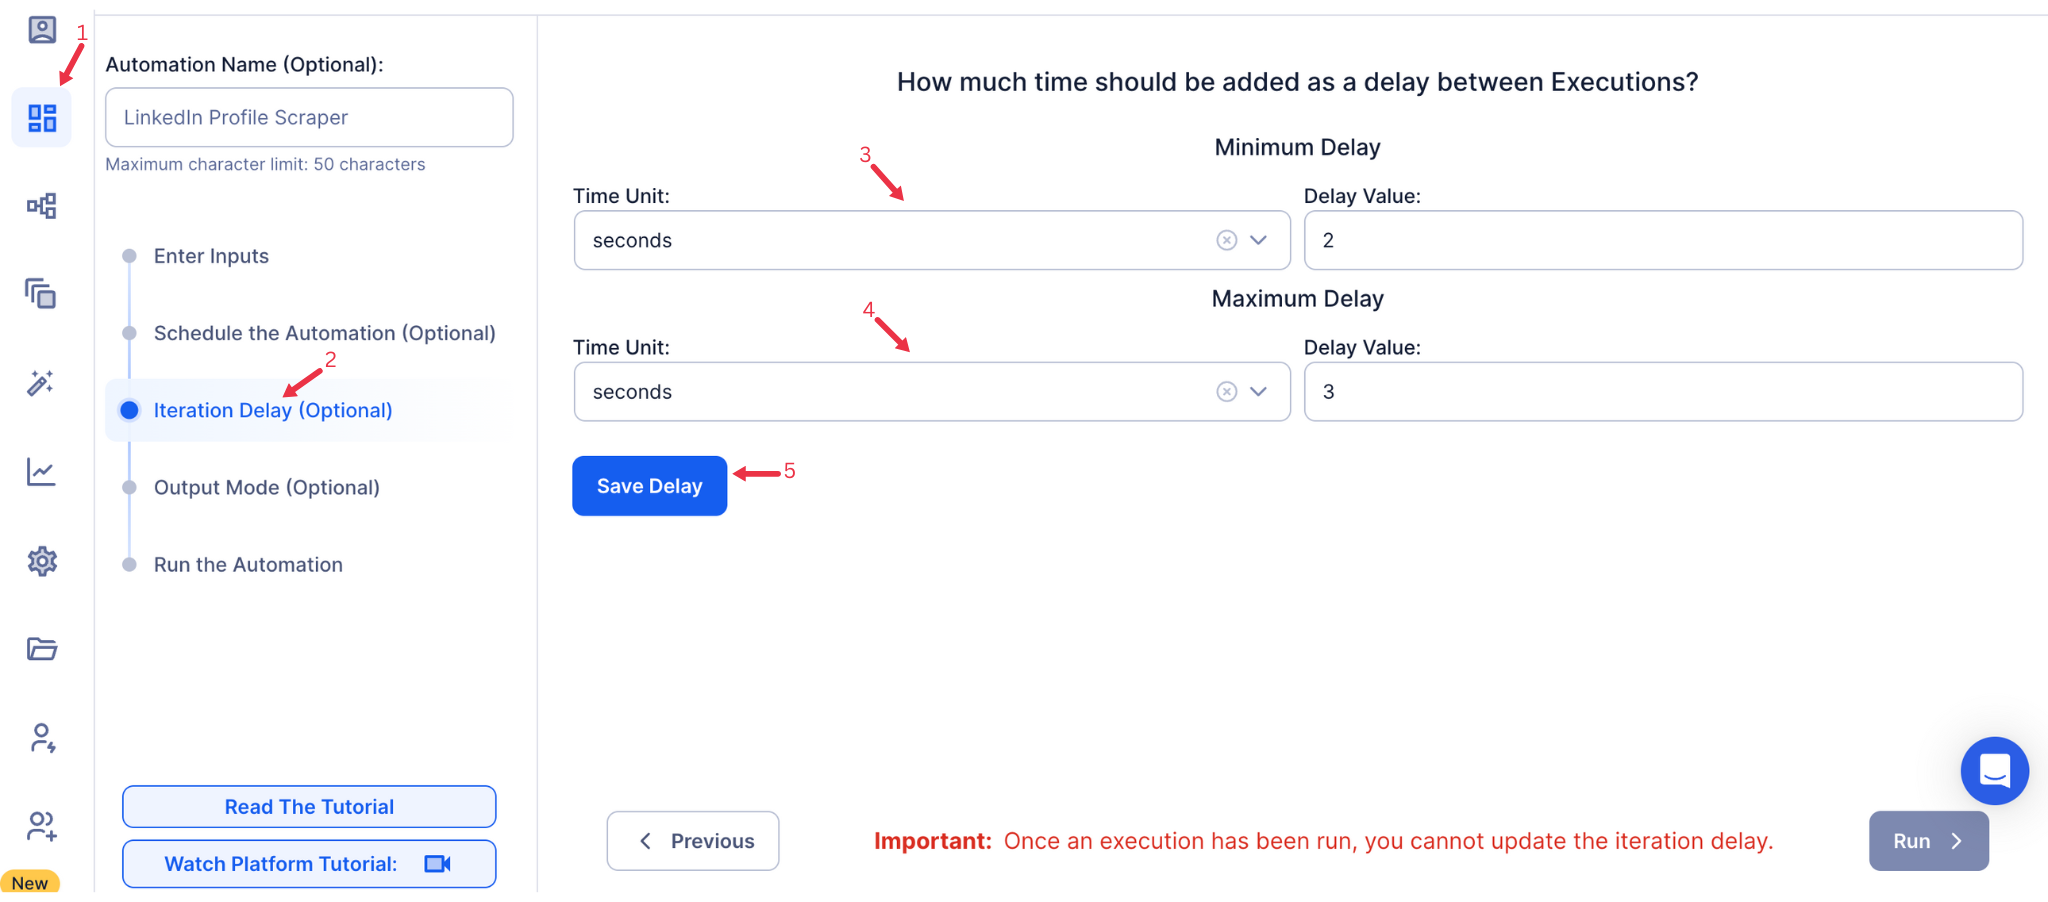
Step 6: Set an Iteration Delay (Optional)
Avoid detection and simulate human-like activity by setting an iteration delay. Choose minimum and maximum time intervals to add randomness between actions. This makes your activity look natural and reduces the chance of being flagged.
- Minimum Delay: Enter the shortest interval (e.g., 10 seconds).
- Maximum Delay: Enter the longest interval (e.g., 20 seconds).
Tip: Random delays keep your automation safe and reliable.
{% custom-image src="https://v2-web-assets.s3.us-east-1.amazonaws.com/Common/iteration-delay/iteration-delay.png" alt=" iteration-delay" /%}
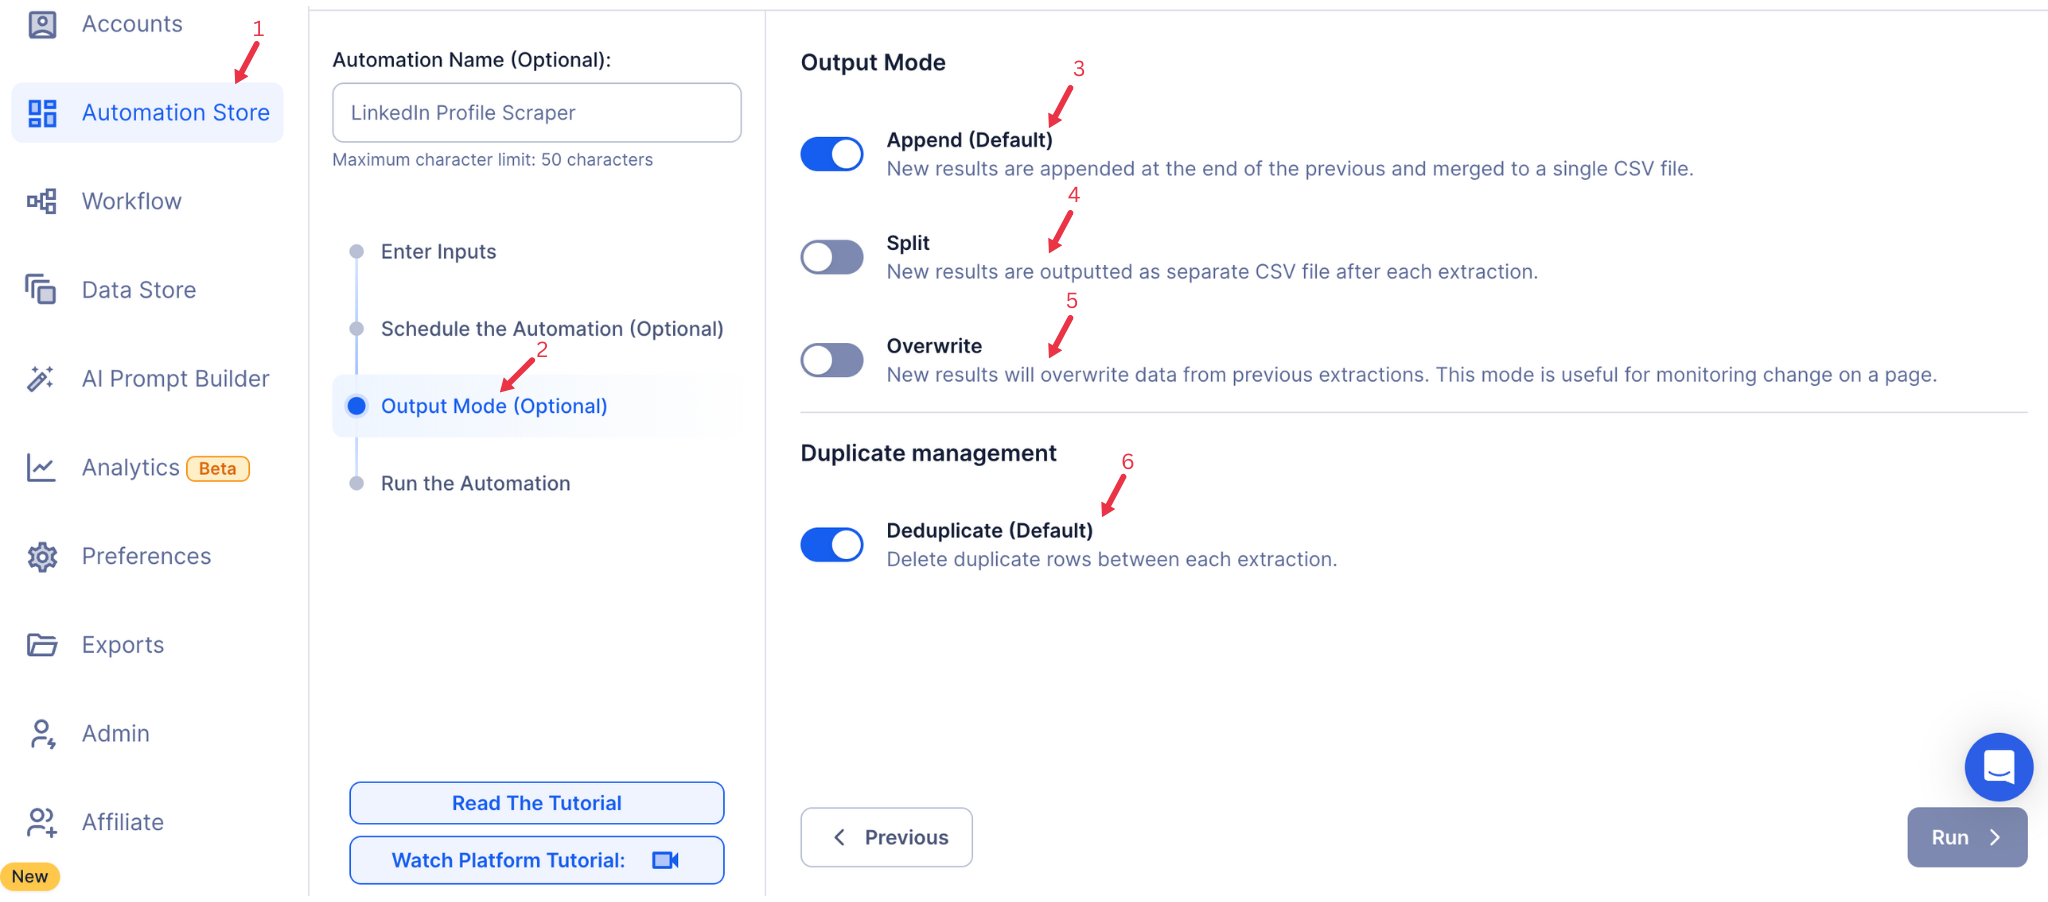
Step 7: Choose Your Output Mode (Optional)
Choose how to save and manage the data of unfollowed companies. TexAu provides the following options:
- Append (Default): Adds new results to the end of existing data, merging them into a single CSV file.
- Split: Saves new results as separate CSV files for each automation run.
- Overwrite: Replaces previous data with the latest results.
- Duplicate Management: Enable Deduplicate (Default) to remove duplicate rows for clean, organized data.
{% custom-image src="https://v2-web-assets.s3.us-east-1.amazonaws.com/Common/output-mode/output-mode.png" alt="output-mode " /%}
Step 8: Access the Data in the Data Store
After the automation completes, go to the Data Store section in TexAu to access your results. Find the LinkedIn Company Auto Unfollow automation or the name you’ve entered, click See Data, then choose either Download CSV to export the data or Open to Google Sheet for quick access.
{% custom-image src="https://v2-web-assets.s3.us-east-1.amazonaws.com/Automations/LinkedIn+Job+Scraper/data-store-see-data.png" alt="step8" /%}
The LinkedIn Company Auto Unfollow automation simplifies the process of decluttering your LinkedIn feed by automatically unfollowing irrelevant companies. It is ideal for founders, marketers, and sales managers looking to improve focus and streamline their LinkedIn experience. With scheduling, iteration delays, and export options, this tool saves time and ensures efficient LinkedIn management. Optimize your feed effortlessly with TexAu.
Run this automation on your own server.
TexAu V3 doesn't host social-platform automations anymore — but the runnable code is yours. Tell us your inputs, outputs, and target environment, and we'll ship you a working version you can deploy and operate yourself.