LinkedIn Event Creator
TexAu helps you create LinkedIn events in seconds. Automate event setup, manage attendees, and boost visibility without manual effort.
Last updated
LinkedIn has evolved into more than just a professional networking platform. It has become a go-to hub for hosting **successful events**, webinars, and workshops that engage **professional audiences**, boost brand visibility, and generate meaningful leads. From virtual summits to in-person workshops
LinkedIn has evolved into more than just a professional networking platform. It has become a go-to hub for hosting successful events, webinars, and workshops that engage professional audiences, boost brand visibility, and generate meaningful leads. From virtual summits to in-person workshops, LinkedIn events provide a platform to connect with your network and expand your reach to a wider audience.
Creating impactful upcoming events on LinkedIn, however, can be a time-consuming task, especially for professionals managing multiple campaigns. That’s where TexAu’s LinkedIn Event Creator comes in. By automating the event creation process, TexAu makes event marketing efficient, scalable, and impactful. This tool allows businesses, marketers, recruiters, and sales teams to seamlessly schedule and manage events while focusing on optimizing the event format, driving engagement, and maximizing attendance.
Key Features: Transforming LinkedIn Event Creation
-
Automated Event Creation
TexAu simplifies the event creation process by automating repetitive tasks. You can use predefined templates to set up LinkedIn upcoming events in minutes. This feature is ideal for businesses hosting recurring successful events, such as weekly webinars or monthly meetups, where consistency in branding and details is essential.
Example Scenario: A marketing agency conducts weekly webinars on digital marketing strategies. Using TexAu, they set up automated templates that include branding elements like logos, event descriptions, and call-to-action links. This ensures consistency across events, helping the agency effectively engage professional audiences while eliminating the need for manual setup every week.
2.Customizable Event Details
Flexibility is key to creating successful events that resonate with your wider audience. TexAu enables you to personalize every aspect of your event, including titles, descriptions, dates, times, and event formats (online or in-person). Adding detailed agendas, speaker lists, and multimedia such as promotional videos enhances the event's appeal.
Example Scenario: A tech startup hosting a “Future of AI” webinar uses TexAu to create a detailed event listing. The description includes the event agenda, names and bios of guest speakers, and a short video teaser. By appealing to professional audiences through this level of customization, the startup attracts more attendees and builds excitement across social media platforms before the event.
3.Bulk Event Creation
Planning multiple upcoming events simultaneously can be overwhelming, especially for campaigns or recurring sessions. TexAu’s bulk event creation feature allows you to schedule several events in one go, saving time and ensuring consistent execution.
Example Scenario: An HR consultancy firm plans a series of employee training sessions over six months. Instead of creating each event manually, they use TexAu to bulk schedule all sessions at once. This efficient process ensures the sessions are ready for promotion across social media platforms, aligning with their broader event marketing goals.
4.Integration with Invitations
Maximizing your event’s reach is critical to its success. TexAu integrates the event creation process with automated invitations, allowing you to invite your network or a targeted professional audience. This ensures your event garners maximum visibility and engagement.
Example Scenario: A leadership coach hosting a workshop on “Building Resilient Teams” uses TexAu to send invitations to HR managers and team leaders in their network. By targeting relevant connections and promoting across social media platforms, the coach ensures higher attendance from the right audience, significantly enhancing the event marketing strategy.
5.Data Export for Analysis
Tracking and analyzing successful events is crucial for improving future campaigns. TexAu allows you to export event creation and registration data, providing insights into attendee trends, registration rates, and audience preferences.
Example Scenario: A SaaS company analyzes data from its product launch events to identify the most popular topics and highest-performing promotional strategies. This helps them refine their content strategy for upcoming events and engage a wider audience effectively.
Challenges Addressed: Simplifying Event Management
1. Limited Audience Reach
Manually inviting attendees to your events or relying solely on organic reach can limit your audience. LinkedIn offers immense potential for event promotion, but tapping into its full network effectively can be challenging without automation.
How TexAu Solves This: TexAu automates invitations, enabling you to target specific audiences based on job titles, industries, locations, or your existing network. Additionally, the tool allows you to share event details in LinkedIn groups and pages, ensuring broader visibility and a higher turnout.
Example Scenario: A software company hosting a product launch event uses TexAu to send invitations to decision-makers, such as CTOs and heads of IT, within their target audience. TexAu also automates sharing the event in LinkedIn groups focused on technology innovation. This approach maximizes visibility and ensures that attendees are relevant to the company’s objectives, leading to better engagement and higher conversion rates.
2. Inefficient Planning
When managing multiple events or campaigns, planning can quickly become chaotic. Ensuring consistency across events, scheduling at optimal times, and handling last-minute changes can overwhelm even the most organized professionals.
How TexAu Solves This: TexAu’s bulk creation and scheduling features streamline event planning, making it easy to manage large-scale campaigns or recurring events. With the ability to create multiple events simultaneously and set strategic schedules, TexAu ensures consistency and efficiency across all your LinkedIn event planning efforts.
Example Scenario: An educational institution organizes a global webinar series for students in different time zones. Using TexAu, they schedule events in advance for various regions, ensuring all sessions are timed appropriately. The automation eliminates the need for manual adjustments, enabling the institution to focus on delivering high-quality content to a global audience.
Benefits: Why to Use TexAu for LinkedIn Event Creation?
1. Streamlined Event Management
TexAu simplifies event management by automating repetitive tasks, allowing professionals to focus on creative and strategic aspects. Whether it’s organizing recurring meetups or large-scale campaigns, TexAu ensures efficiency and consistency.
Example Scenario: A community manager for a startup uses TexAu to automate the creation of monthly networking events. By setting up templates, they ensure each event includes consistent branding, agendas, and speaker information. This automation saves hours each month and ensures the events maintain a professional and polished appearance.
2. Improved Visibility
One of LinkedIn’s strengths is its ability to connect professionals across industries and regions. TexAu enhances this by automating invitations and sharing event details, ensuring your events gain maximum exposure.
Example Scenario: A software company planning a product launch leverages TexAu to promote their event in LinkedIn groups focused on SaaS and innovation. Invitations are automatically sent to industry leaders and potential clients in the company’s network. As a result, the event attracts a high number of relevant attendees, boosting awareness and generating qualified leads.
3. Enhanced Audience Engagement
Engaging event descriptions and multimedia elements are essential for attracting attendees. TexAu enables you to personalize event content by adding interactive elements like videos, speaker bios, and detailed agendas, ensuring your events stand out from the competition.
Example Scenario: A nonprofit organization creates an event to raise awareness about climate change. They use TexAu to include a compelling video about the issue, a list of expert guest speakers, and an interactive agenda. These engaging elements not only drive registrations but also ensure attendees are excited about participating.
4. Scalable Event Planning
As businesses grow, managing multiple events becomes increasingly challenging. TexAu’s automation features make scaling up your event planning efforts seamless. Bulk creation and scheduling allow you to manage large-scale campaigns without being overwhelmed.
Example Scenario: An HR consultancy firm organizes a six-month series of virtual workshops for HR professionals worldwide. Using TexAu, they schedule all events in one go, ensuring consistent branding and accurate timing for each region. This scalable approach allows the team to focus on delivering high-value content without being bogged down by logistics.
5. Data-Driven Improvements
Analyzing event data is critical for refining strategies and improving future outcomes. TexAu’s data export feature provides detailed insights into attendee demographics, registration trends, and engagement metrics. This helps businesses identify what works and optimize their event strategies accordingly.
Example Scenario: A recruitment agency tracks attendee data from a virtual career fair organized using TexAu. By analyzing the registration trends, they discover that mid-level software engineers were the most engaged audience. This insight allows the agency to tailor future events to target similar candidates, improving attendance and hiring success rates.
TexAu’s LinkedIn Event Creator is the ultimate tool for professionals looking to streamline event planning, maximize visibility, and drive engagement. By automating repetitive tasks, targeting the right audience, and providing actionable insights, TexAu empowers users to make the most of LinkedIn’s vast network. Whether you’re hosting a small webinar or managing a global event series, TexAu ensures efficiency, scalability, and measurable results.
Use Cases: Who Can Benefit from TexAu’s LinkedIn Event Creator?
1. Marketers: Amplifying Brand Awareness and Engagement
Marketers can leverage LinkedIn events to promote their products, services, and brand initiatives effectively. TexAu’s automation streamlines event creation, helping marketers reach their target audience effortlessly. The tool ensures that event details are optimized, invitations are sent promptly, and registrations are tracked for impactful follow-ups.
Example Scenario: A marketing team is launching a new software solution aimed at streamlining project management for mid-sized companies. To generate interest, they host a live demo showcasing the product’s features and benefits. Using TexAu, the team automates the event creation process, ensuring consistent branding across the event title, description, and multimedia. Invitations are sent to project managers and business owners within their LinkedIn network, driving targeted attendance. After the event, the team exports the registration data to identify attendees and send personalized follow-up emails, resulting in over 500 qualified leads.
2. Recruiters: Building Talent Pipelines with Virtual Events
Recruiters can utilize LinkedIn events to connect with top talent through job fairs, industry discussions, and recruitment webinars. TexAu simplifies the process by automating the creation and promotion of events, ensuring recruiters can focus on engaging with candidates rather than administrative tasks.
Example Scenario: A recruiter at a tech company organizes a virtual career fair to attract software engineers and data scientists. Using TexAu, they set up the event with a detailed description, agenda, and speaker lineup. Invitations are automatically sent to candidates with relevant skills and job titles, ensuring the right audience attends. The event attracts over 300 qualified professionals, streamlining the company’s hiring process and filling key roles within weeks.
3. Sales Teams: Showcasing Solutions and Driving Conversions
Sales teams can host informative events like webinars, Q&A sessions, or product launches to showcase their solutions to potential clients. TexAu ensures a seamless process, from creating the event to sending invitations and tracking attendee engagement.
Example Scenario: A SaaS company’s sales team plans a Q&A session to address common client concerns about their software’s implementation process. Using TexAu, they automate the creation of the event, ensuring the title, description, and multimedia highlight the session’s value. Invitations are sent to decision-makers like CTOs and IT managers. During the session, attendees engage in a live Q&A, and the sales team follows up with personalized demos, converting many attendees into paying customers.
4. Business Owners: Establishing Industry Authority
Business owners can use LinkedIn events to build brand authority, expand their network, and foster meaningful connections. TexAu’s automation enables them to plan and promote impactful events without overwhelming manual effort.
Example Scenario: A business owner in the renewable energy sector organizes a panel discussion featuring industry leaders to discuss sustainable energy solutions. TexAu automates the event setup, ensuring every detail aligns with the company’s branding. Invitations are sent to relevant connections and groups, driving high attendance. During the event, the owner establishes credibility as an industry thought leader, resulting in 10 new partnerships and increased visibility for their business.
Best Practices for Maximizing TexAu
1. Personalize Event Details
Tailored event details can significantly impact attendance and engagement. Ensure the title, description, and multimedia resonate with your target audience. Highlight the event’s value proposition, such as solving a specific problem or providing actionable insights. Include engaging elements like teaser videos, speaker bios, or event agendas to pique interest.
Example Tip: If you’re hosting a webinar on “Future Trends in E-Commerce,” include a short video introducing the speakers and their expertise, along with a clear agenda detailing topics to be covered. This personalization demonstrates professionalism and encourages registrations.
2. Schedule Strategically
Timing is everything when planning LinkedIn events. Research your audience's activity patterns on LinkedIn to determine the best days and times for hosting events. Consider time zones if you’re targeting a global audience to maximize attendance.
Example Tip: A marketer targeting professionals in the U.S. schedules a webinar for 11 AM PST on a Wednesday, knowing it’s a peak engagement time for LinkedIn users. For a global audience, they schedule multiple sessions to cater to different time zones, ensuring maximum participation.
3. Engage Before the Event
Building excitement before the event is crucial for driving registrations and ensuring high attendance rates. Share promotional posts, teasers, and speaker announcements on LinkedIn. Encourage your network to share the event details to broaden its reach.
Example Tip: A business owner hosting a leadership workshop shares a series of LinkedIn posts highlighting key takeaways from the event, alongside testimonials from past attendees. These posts generate interest and encourage more people to register.
Real-Life Applications: Success Stories with TexAu
1. Marketing Campaign Success
A marketing team promoting a new product launch uses TexAu to create and manage 10 LinkedIn events targeting different regions and industries. The tool automates the creation process, ensures consistent branding, and tracks registrations. As a result, the campaign generates over 500 leads, with many attendees converting into customers after personalized follow-ups.
2. Recruitment Efficiency
A recruiter at a multinational corporation uses TexAu to host a virtual job fair for engineering graduates. Invitations are sent to candidates based on skills and job titles, ensuring the event attracts a qualified audience. Over 300 attendees join the event, and the recruiter successfully fills multiple positions while building a robust talent pipeline for future roles.
3. Business Networking
A small business owner in the fintech space organizes five industry-specific events using TexAu. These events feature panel discussions and networking opportunities, attracting professionals and decision-makers. The events result in 10 new partnerships, helping the business owner expand their network and enhance their brand authority.
Tips for Maximizing Results
1. Promote Effectively
Promotion is key to maximizing your event’s reach. Share event details on LinkedIn posts, groups, and pages. Consider integrating your promotion strategy with email campaigns to target attendees outside your LinkedIn network.
Example Tip: A SaaS company promoting a product demo shares LinkedIn posts highlighting key benefits of attending the demo. They also send email invitations to their existing customer base, ensuring a mix of new and loyal attendees.
2. Engage During the Event
Interactive activities during the event can boost attendee engagement and leave a lasting impression. Use live polls, Q&A sessions, or breakout rooms to foster participation and encourage conversations.
Example Tip: During a leadership workshop, the host uses LinkedIn’s live poll feature to gather attendee opinions on leadership styles. This interaction not only keeps the audience engaged but also provides valuable insights for post-event discussions.
3. Follow Up Post-Event
The post-event phase is crucial for nurturing relationships and driving conversions. Send thank-you messages to attendees and provide additional resources, such as recordings, presentations, or whitepapers. Use surveys to gather feedback and identify areas for improvement.
Example Tip: After hosting a product launch webinar, a marketing team sends personalized thank-you emails to attendees, along with an exclusive discount code for the new product. They also include a survey to collect feedback, which helps refine future events.
TexAu’s LinkedIn Event Creator simplifies and enhances the event creation process, making it an essential tool for marketers, recruiters, sales teams, and business owners. By automating event setup, streamlining promotions, and enabling data-driven insights, TexAu helps professionals create impactful events that drive engagement, leads, and brand authority.
Conclusion: Elevate Your Event Strategy with TexAu
TexAu’s LinkedIn Event Creator is a game-changing tool for efficient, scalable, and impactful event planning. By automating event creation, maximizing audience reach, and providing data-driven insights, TexAu helps professionals achieve their goals effortlessly. Start using TexAu today to simplify your LinkedIn event creation process and unlock new growth opportunities.
The LinkedIn Event Creator automation allows you to automatically create LinkedIn events, helping you quickly set up events for networking, marketing, or community engagement. This tool is ideal for event organizers, marketers, and community managers aiming to save time on event creation while increasing visibility on LinkedIn. Follow this guide to configure the automation, with options to track created events in Google Sheets or CSV.
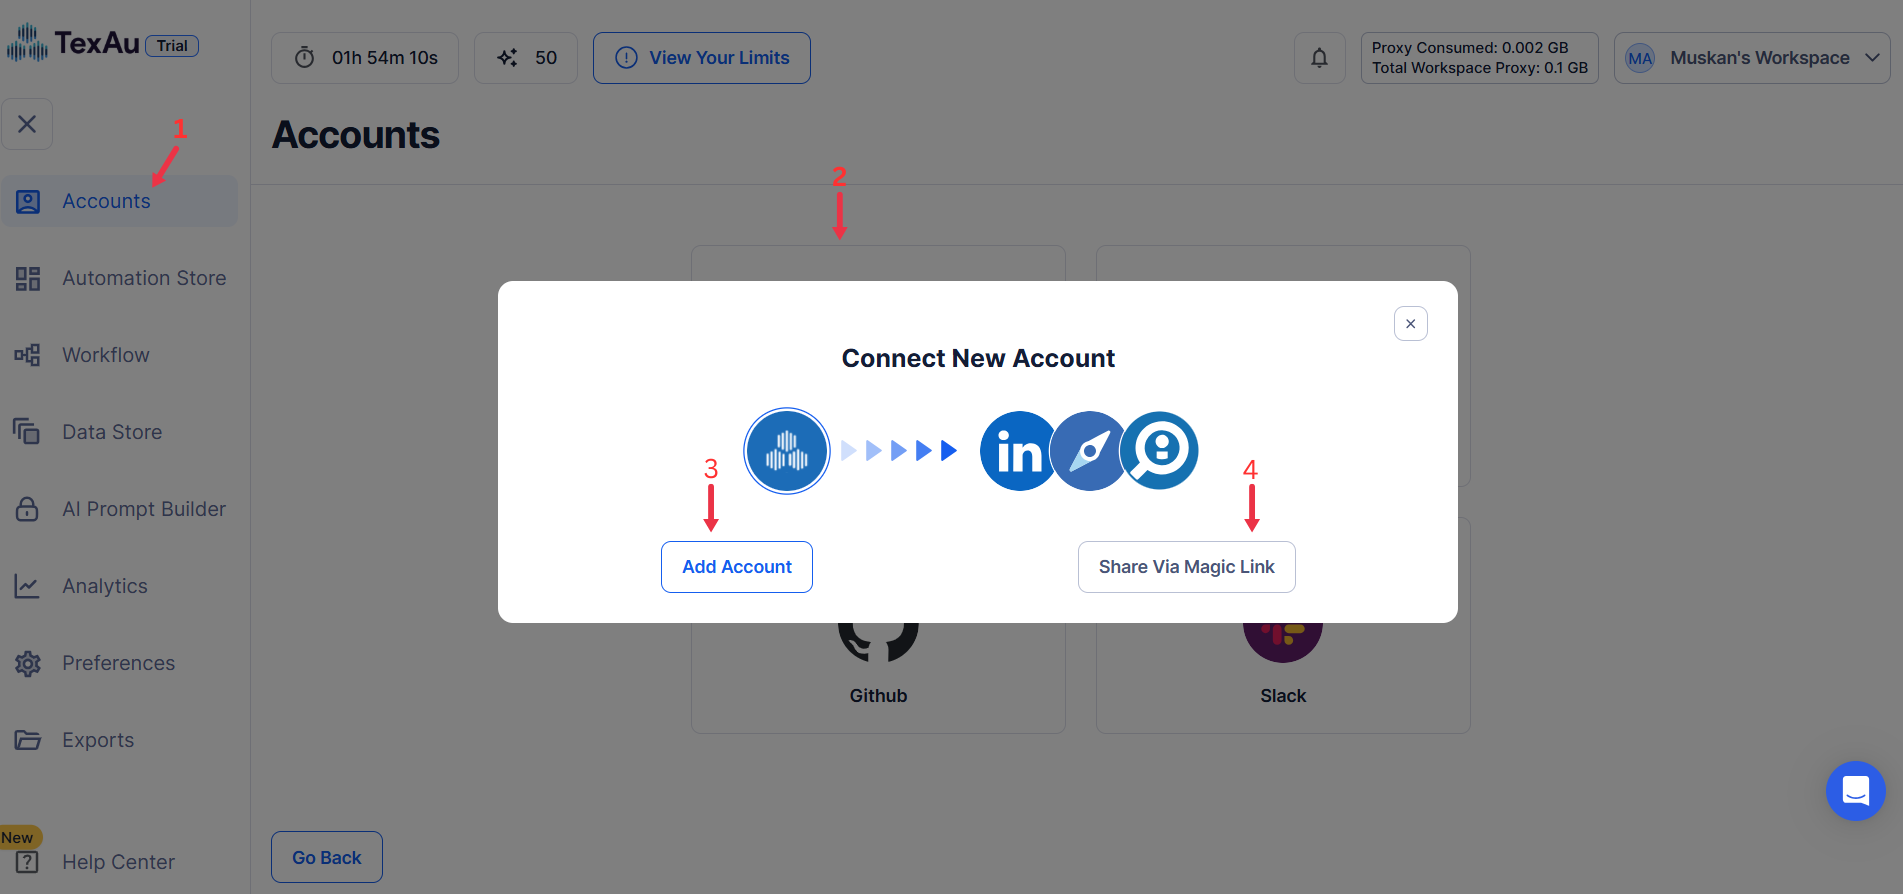
Step 1: Log in to TexAu and Connect LinkedIn
Log in to your TexAu account at v2-prod.texau.com.
Go to Accounts and connect your LinkedIn account. You can choose one of these methods:
- Share via Magic Link: Share the link, copy it to your browser, and follow the steps to integrate your LinkedIn account securely.
- Add Account: Sync cookies and browser data with TexAu for seamless integration.
Tip: Use Magic Link for an easy and secure connection.
{% custom-image src="https://v2-web-assets.s3.us-east-1.amazonaws.com/Common/log-in-to-texau-and-connect-linkedin/connect-linkedin.png" alt="connect-linkedin" /%}
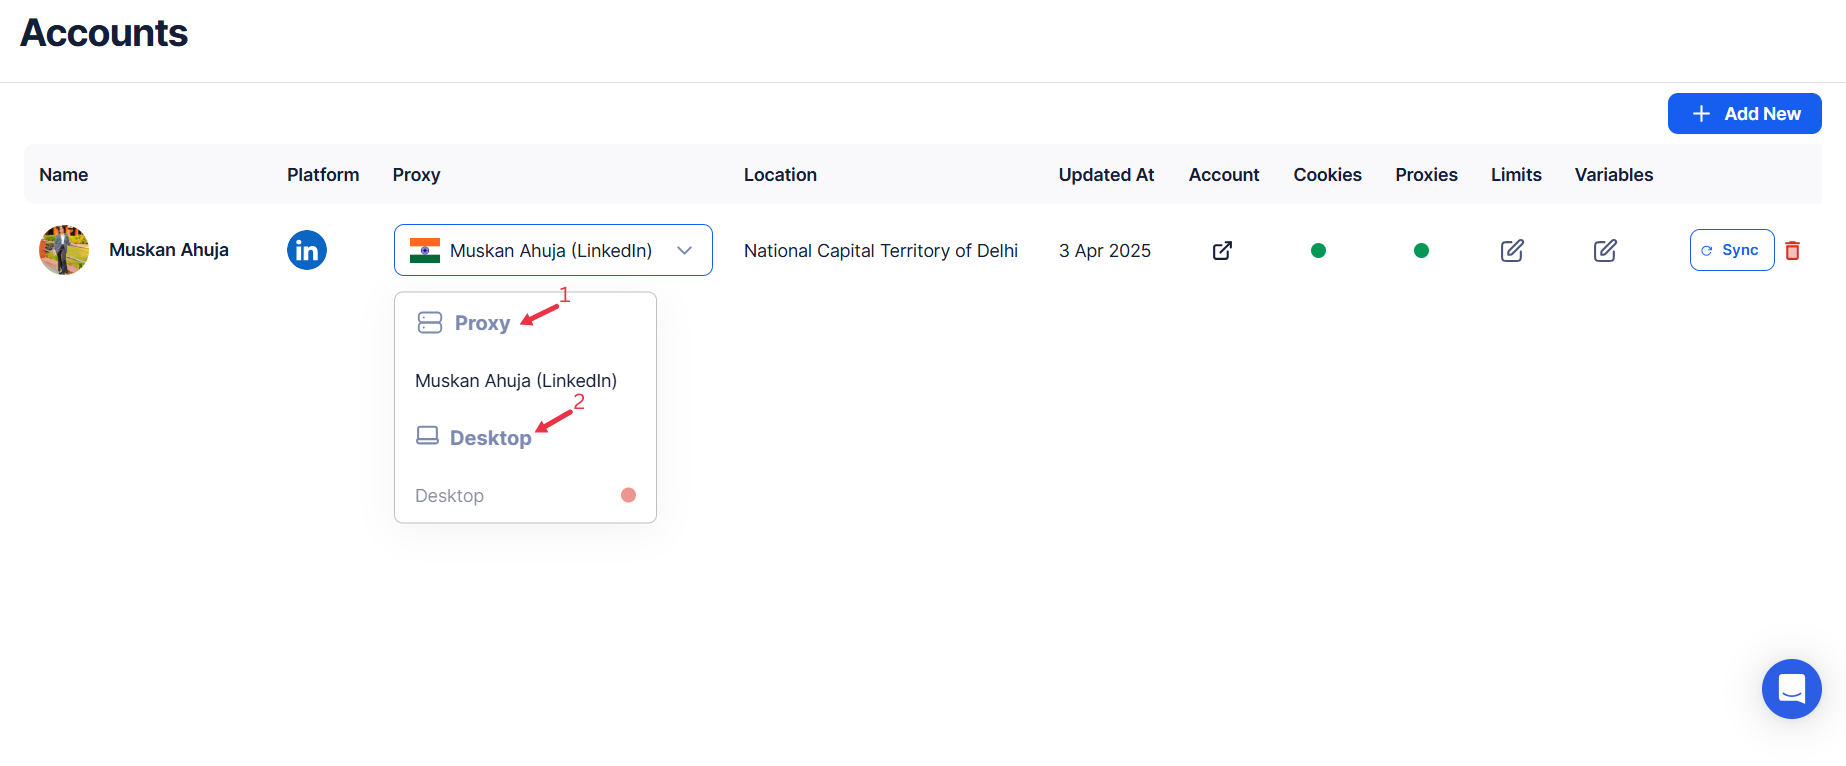
Step 2: Choose Cloud or Desktop Execution
Decide how you want to run the automation:
- Cloud Mode: Automates tasks on TexAu’s servers with built-in proxies. You can add custom proxies via Settings > Preferences > Proxies.
- Desktop Mode: Runs automation on your local device using your IP address.
Tip: Desktop mode saves cloud runtime credits and gives more control over the process.
{% custom-image src="https://v2-web-assets.s3.us-east-1.amazonaws.com/Common/cloud-or-desktop-execution/cloud-or-desktop-execution.png" alt="choose-cloud-or-desktop-execution" /%}
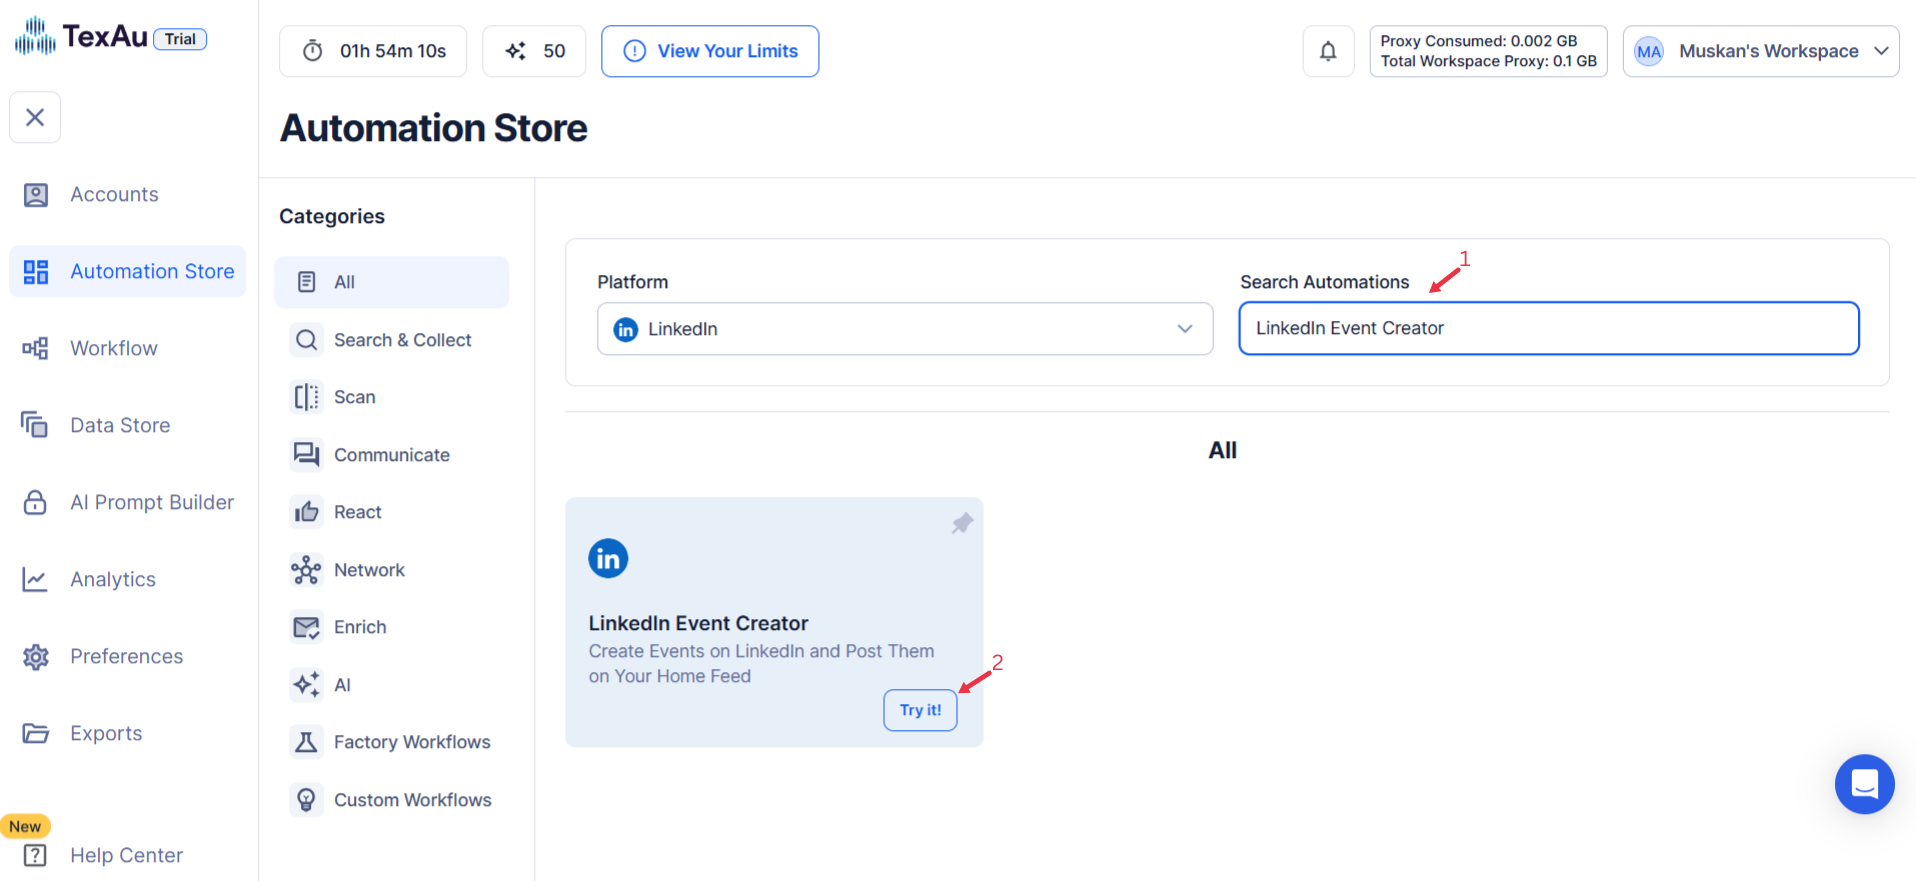
Step 3: Search for the Particular LinkedIn Automation
- Navigate to the Automation Store on TexAu.
- Use the search bar to find LinkedIn Event Creator automation.
{% custom-image src="https://v2-web-assets.s3.us-east-1.amazonaws.com/Automations/linkedin-event-creator/linkedin-event-creator.png" alt="search-for-the-particular-LinkedIn-automation" /%}
Step 4: Set Up Event Details
Follow these steps to configure the input and settings for creating LinkedIn events using TexAu. This automation does not require Google Sheets or CSV files as input sources.
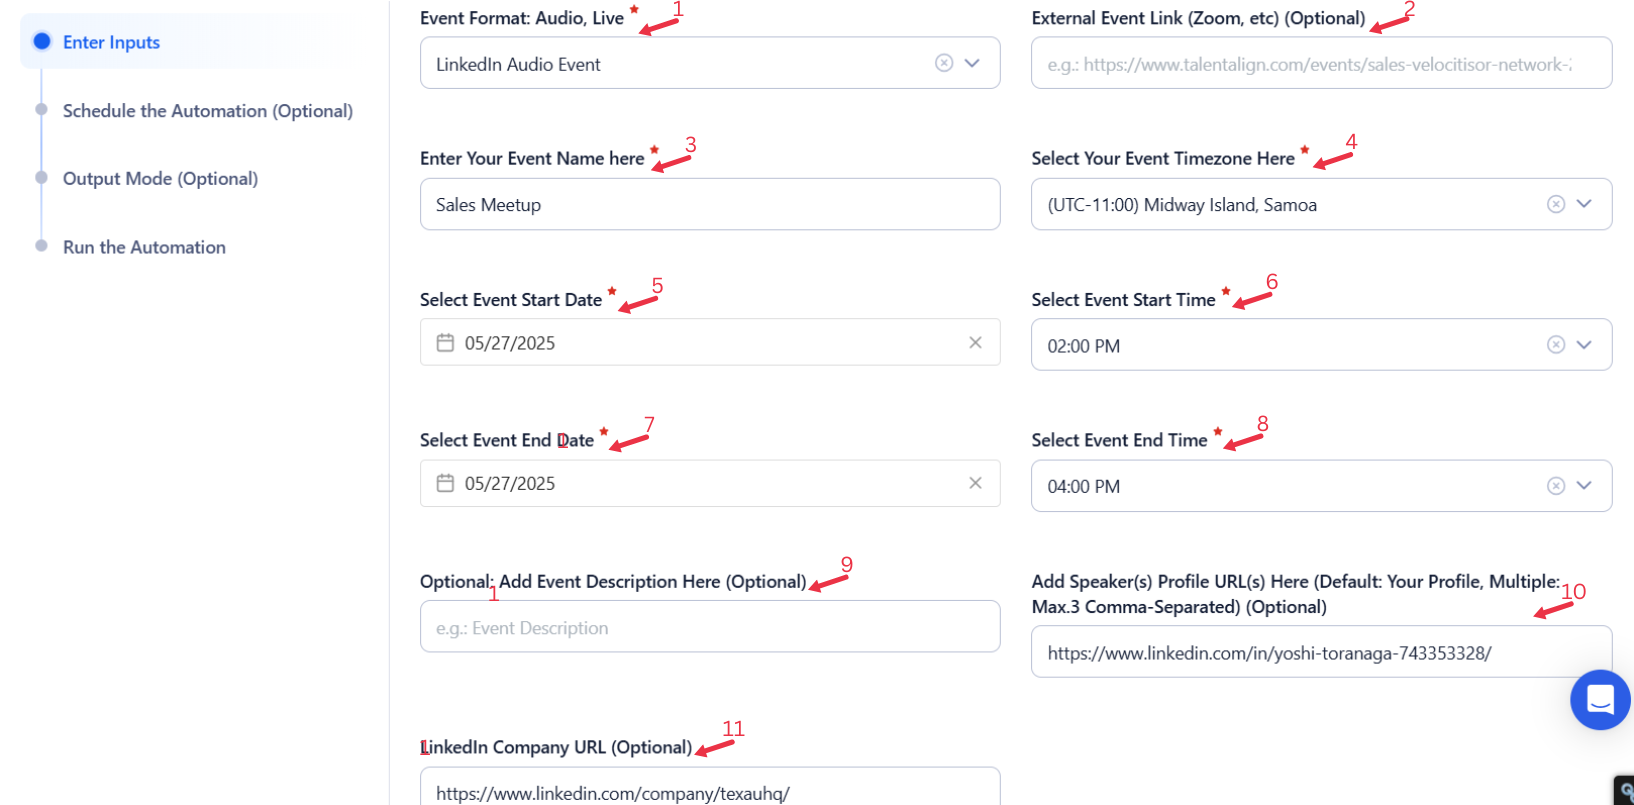
Manually Enter a Single Input
This option allows you to create a LinkedIn event for a specific account. Follow these steps:
- Account: Select your LinkedIn account.
- Event Format: Choose the format of the event (e.g., Audio or Live).
- Event Name: Enter the name of the event.
- Event Link (Optional): Provide an external link for the event (e.g., Zoom or other webinar platforms).
- Event Background Image (Optional): Upload a background image for the event.
- Timezone: Select the timezone for the event.
- Start Date and Time: Select the date and time when the event will start.
- End Date and Time: Select the date and time when the event will end.
- Description (Optional): Add a description of the event to provide details for attendees.
- Speaker Profile URL (Optional): Provide the LinkedIn profile URLs of speakers (up to 3 profiles separated by commas). By default, your profile will be added as a speaker.
- Company URL (Optional): Add the LinkedIn URL of the company hosting the event.
- Click Run in the lower-right corner to initiate the automation.
{% custom-image src="https://v2-web-assets.s3.us-east-1.amazonaws.com/Automations/linkedin-event-creator/linkedin-event-creator-single-inputs.png" alt="enter-a-single-input" /%}
Use Google Sheets for Bulk Input
This option is ideal for creating multiple LinkedIn events efficiently. Follow these steps:
-
Click Select Google Account to choose your Google account or click on Add New Google Sheet Account to link additional accounts.
-
Click Accounts to select LinkedIn as the platform.
-
Click Open Google Drive to locate the Google Sheet containing LinkedIn event details.
-
Select the spreadsheet and the specific sheet containing the event details.
-
Event Details: Provide the columns containing event data such as event name, format, start and end times, and optional fields like description, speaker profile URLs, and company URL.
-
Configure additional options:
-
Number of Rows to Process (Optional): Define the number of rows to process from the Google Sheet.
- Number of Rows to Skip (Optional): Specify rows to skip at the beginning of the sheet.
-
Click Run in the lower-right corner to start the automation.
Optional Advanced Feature:
- Loop Mode: Enable Loop Mode to re-process the Google Sheet from the beginning once all rows are completed. This is useful for tasks that require recurring updates.
Watch Row (Optional)
Watch Row feature ensures workflows run automatically when new data is detected in Google Sheets.
Configure Watch Row by defining an update interval and selecting an execution timeframe.
Watch Row Schedule
- None
- Scheduling Intervals (e.g., every 15 minutes, every hour)
- One-Time Execution
- Daily Execution
- Weekly Recurrence (e.g., every Thursday and Sunday)
- Monthly Specific Dates (e.g., 10th and 30th)
- Custom Fixed Dates (e.g., March 20)
By default, Watch Row checks every 15 minutes and continues for five days unless modified.
With Watch Row, TexAu automates real-time workflow execution.
Process a CSV File
This option allows you to create LinkedIn events using a static file. Follow these steps:
- Click Upload CSV File and browse to locate the file containing LinkedIn event details.
- Once uploaded, TexAu will display the file name and preview its content. Verify the data to ensure accuracy.
- Event Details: Provide the columns containing event data such as event name, format, start and end times, and optional fields like description, speaker profile URLs, and company URL.
- Configure additional options:
- Number of Rows to Process (Optional): Define the number of rows to process from the CSV file.
- Number of Rows to Skip (Optional): Specify rows to skip at the beginning of the file.
- Click Run in the lower-right corner to initiate the automation.
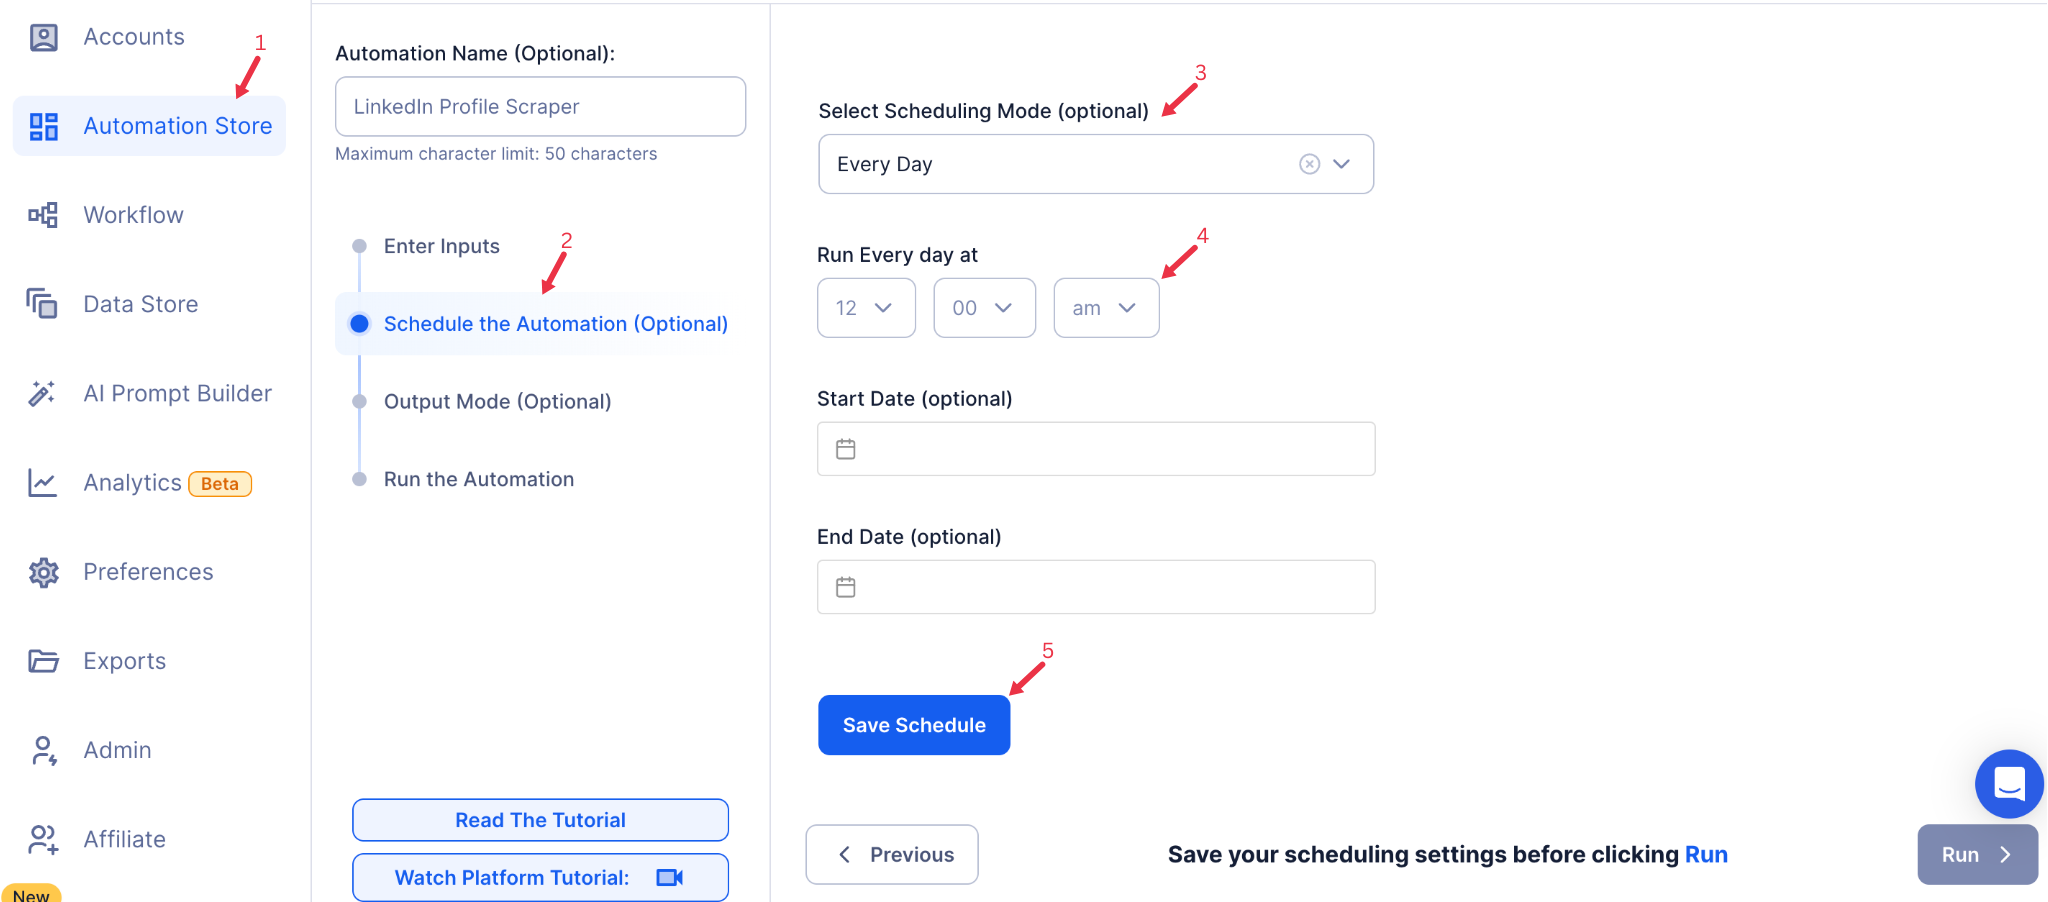
Step 5: Schedule the Automation (Optional)
Automate event creation by configuring the schedule settings. Select a start time or recurrence frequency:
- None
- At Regular Intervals (e.g., daily or weekly)
- Once
- Every Day
- On Specific Days of the Week (e.g., every Monday)
- On Specific Days of the Month (e.g., the 1st and 15th)
- On Specific Dates (e.g., February 10)
{% custom-image src="https://v2-web-assets.s3.us-east-1.amazonaws.com/Common/schedule-the-automation/schedule-the-automation.png" alt="schedule-the-automation" /%}
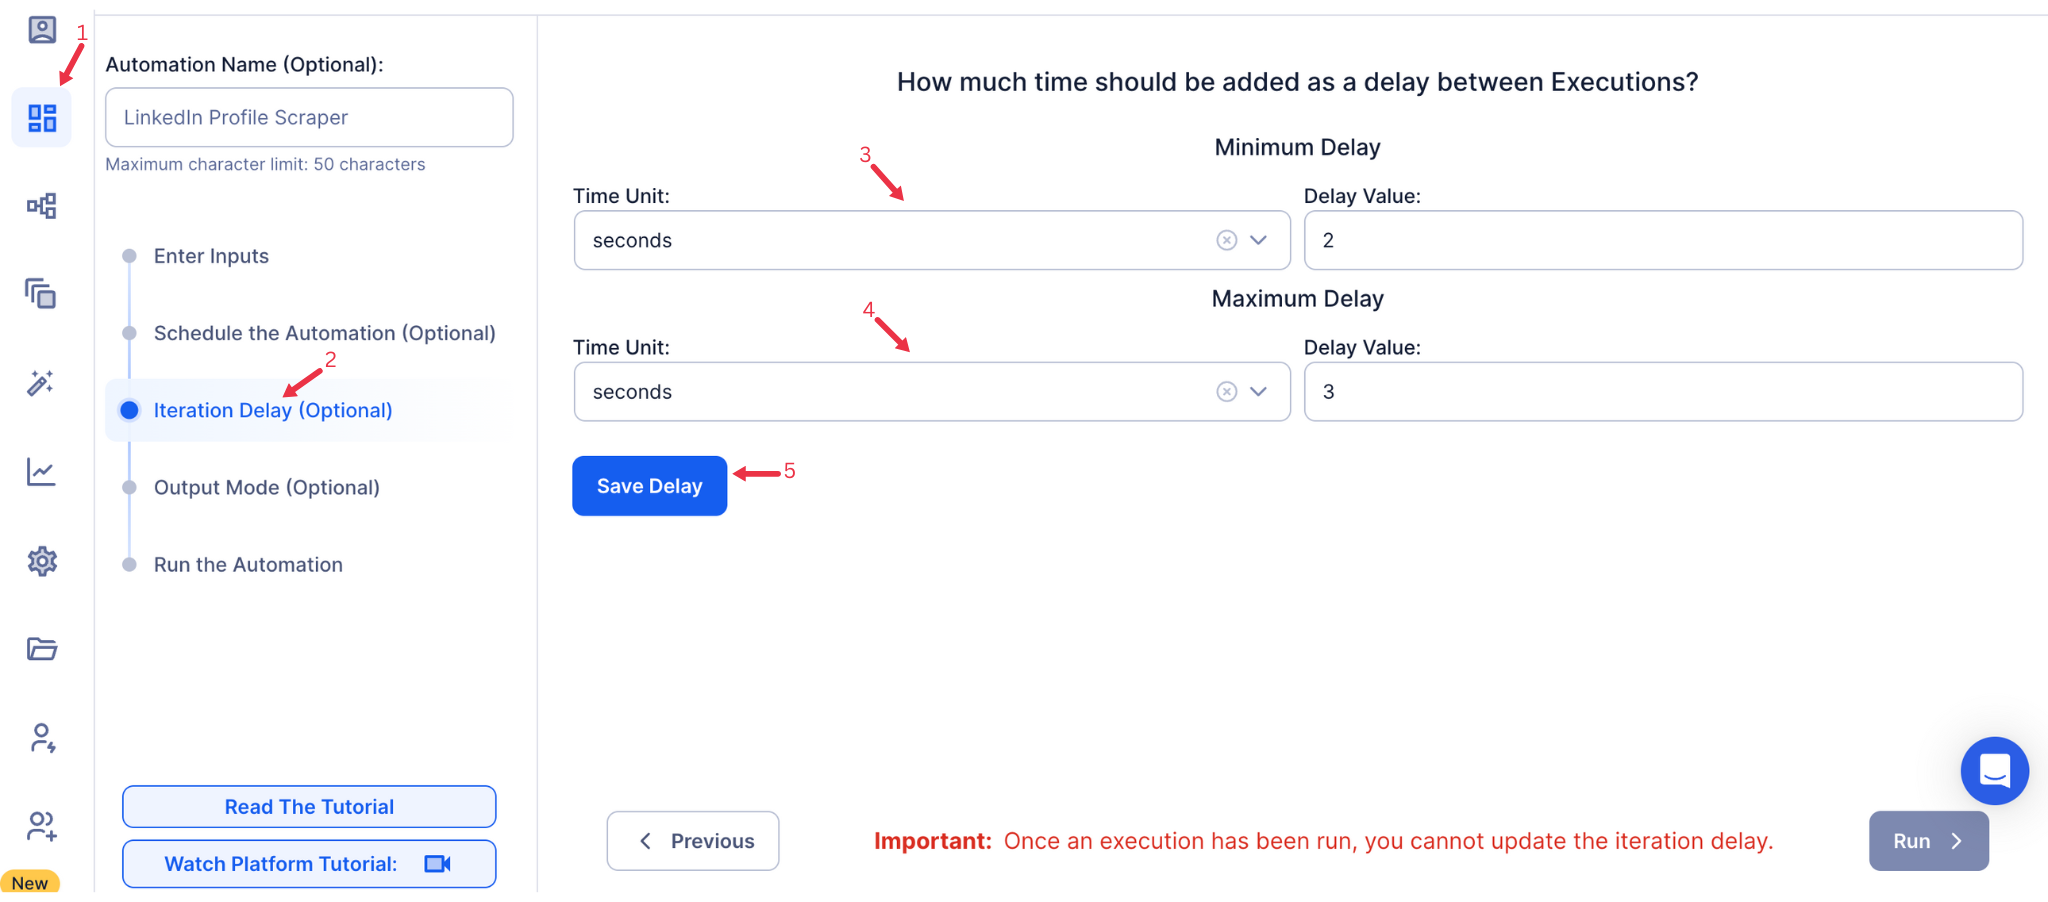
Step 6: Set an Iteration Delay (Optional)
Avoid detection and simulate human-like activity by setting an iteration delay. Choose minimum and maximum time intervals to add randomness between actions. This makes your activity look natural and reduces the chance of being flagged.
- Minimum Delay: Enter the shortest interval (e.g., 10 seconds).
- Maximum Delay: Enter the longest interval (e.g., 20 seconds).
Tip: Random delays keep your automation safe and reliable.
{% custom-image src="https://v2-web-assets.s3.us-east-1.amazonaws.com/Common/iteration-delay/iteration-delay.png" alt="iteration-delay" /%}
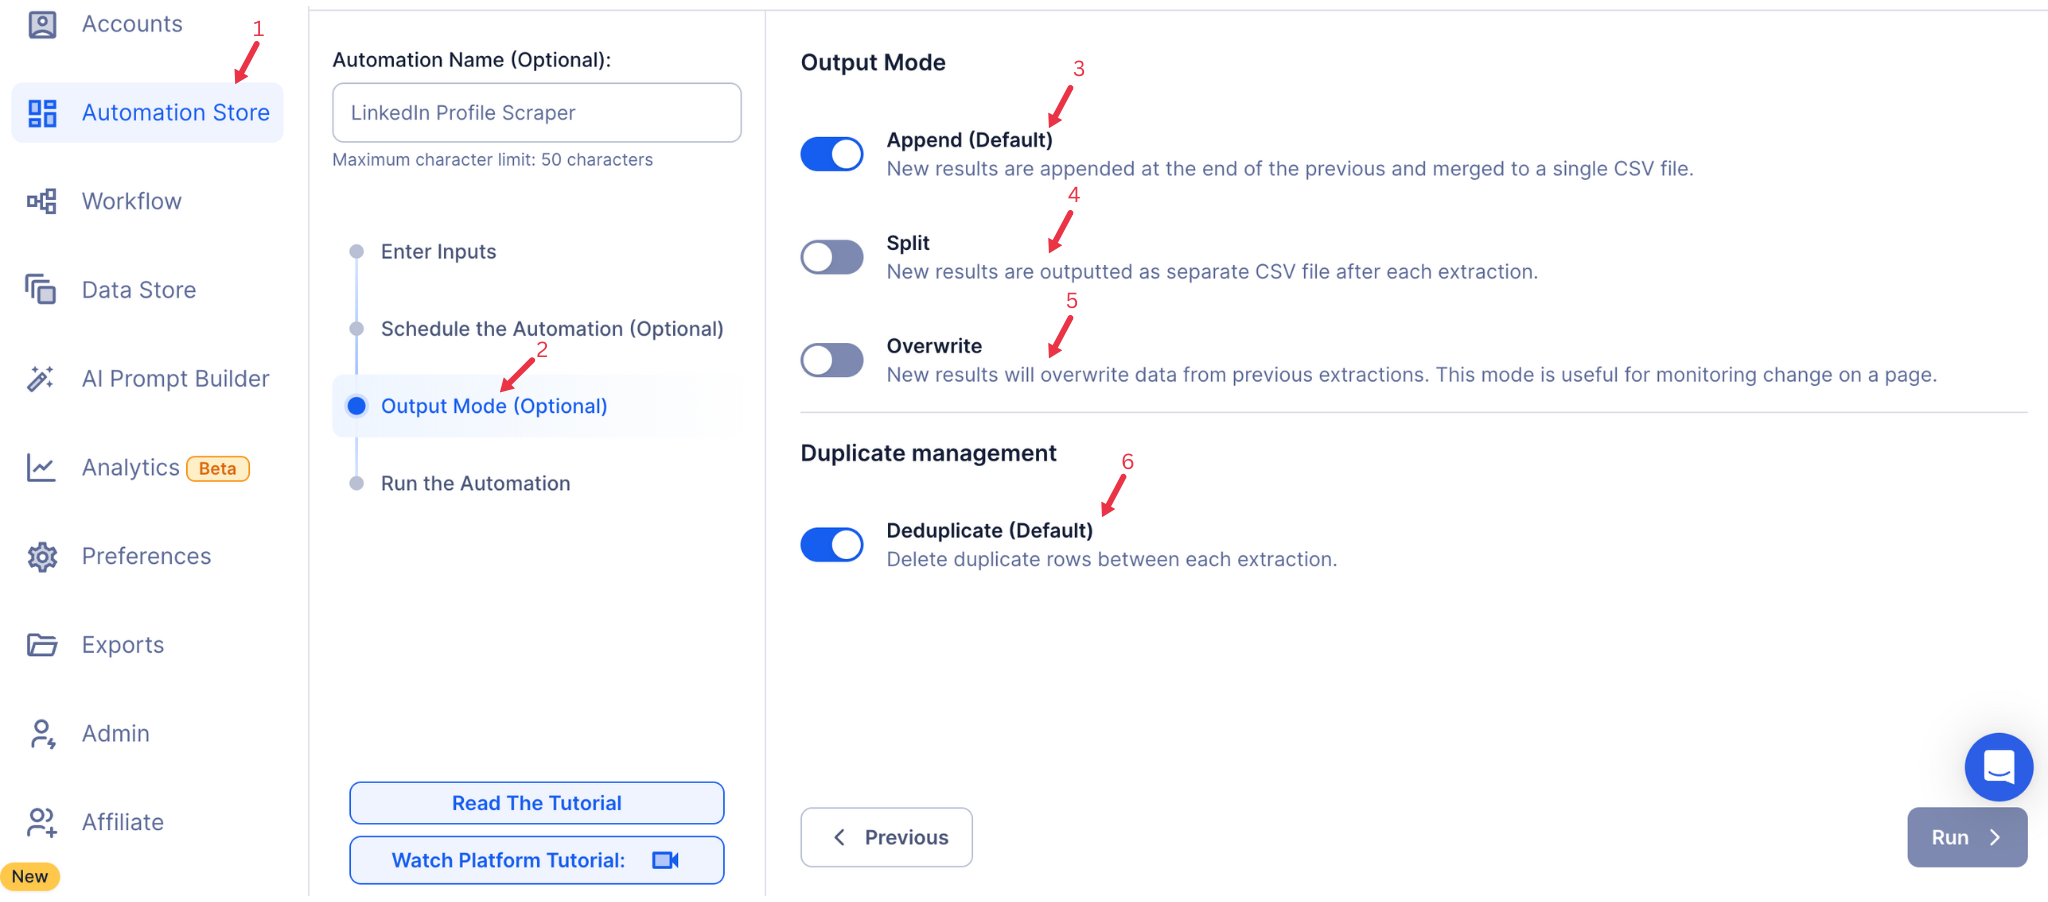
Step 7: Choose Your Output Mode (Optional)
Determine how to manage and organize the data generated from the event creation process. TexAu provides flexible options to suit your needs:
- Append: Add new event details to the existing file, ensuring all data is consolidated into one place for streamlined tracking.
- Split: Save each run’s results in a separate file, making it easier to distinguish between different automation sessions.
- Overwrite: Replace old data with the latest results, ensuring you always have the most up-to-date event information.
- Deduplicate: Automatically remove duplicate entries, keeping your data clean and well-structured for analysis.
{% custom-image src="https://v2-web-assets.s3.us-east-1.amazonaws.com/Common/output-mode/output-mode.png" alt="output-mode" /%}
Step 8: Access the Data from the Data Store
Once the automation completes, go to the Data Store section in TexAu to access your event creation results. Locate the LinkedIn Event Creator automation or the name you used:
- Click See Data to review the details directly within TexAu.
- Choose Download CSV to export results for offline analysis or reporting.
- Select Open to Google Sheet for real-time access and collaboration.
{% custom-image src="https://v2-web-assets.s3.us-east-1.amazonaws.com/Automations/LinkedIn+Event+Creator/data-store-see-data.png" alt="step8" /%}
The LinkedIn Event Creator automation helps professionals streamline event promotion on LinkedIn, saving time while scaling outreach efforts. With TexAu’s scheduling, iteration delays, and export options, you can create and manage events efficiently. Export data to Google Sheets or CSV for better collaboration and tracking. Boost engagement and reach with automated event creation using TexAu.
Run this automation on your own server.
TexAu V3 doesn't host social-platform automations anymore — but the runnable code is yours. Tell us your inputs, outputs, and target environment, and we'll ship you a working version you can deploy and operate yourself.