LinkedIn Group Auto Message
Send auto messages to LinkedIn group members using automation. Save time, boost engagement, and personalize outreach effortlessly.
Last updated
LinkedIn Groups serve as dynamic platforms where professionals from diverse industries engage in discussions, share insights, and foster connections. Whether it's exchanging knowledge, networking with industry peers, or building niche communities, LinkedIn Groups are pivotal for career and business
LinkedIn Groups serve as dynamic platforms where professionals from diverse industries engage in discussions, share insights, and foster connections. Whether it's exchanging knowledge, networking with industry peers, or building niche communities, LinkedIn Groups are pivotal for career and business growth. However, maintaining active engagement in these groups can be a challenge, especially when managing multiple conversations with members.
Personalized messaging is a key component of building meaningful connections within LinkedIn Groups. A custom message tailored to the target audience shows that you value the recipient’s time and contributions, fostering a sense of connection and opening doors to business opportunities. Direct communication can also encourage participation in group activities, increasing overall engagement and creating a foundation for actionable insights.
However, sending individual messages to group members can be time-intensive. TexAu’s LinkedIn Group Auto Message tool simplifies this process by automating personalized communication. The automation tool supports outreach campaigns by enabling users to send message sequences that align with their messaging strategy, ensuring efficient outreach while maintaining a professional yet personal touch.
Why Personalized Messaging Matters in LinkedIn Groups
Relationship Building
A custom message tailored to the recipient’s contributions shows that you value their time, fostering rapport and creating opportunities for long-term connections.
Example: Sending a personalized thank-you message to a group member for sharing valuable resources can help establish trust and collaboration.
Enhanced Engagement
Strategically crafted automated messages can encourage participation in group activities, driving engagement and interaction within the group.
Example: Inviting group members to participate in a webinar tailored to their interests can lead to higher interaction rates and spark meaningful discussions.
Targeted Outreach
Messaging relevant members based on their roles, activity, or contributions ensures higher success rates in achieving your outreach strategy goals. By using TexAu’s automation tool, you can send messages efficiently and maintain focus on the most impactful opportunities.
Example: Connecting with active contributors discussing challenges that align with your offerings allows you to align your messaging strategy with group dynamics effectively.
With the ability to extract insights and automate personalized outreach, TexAu’s LinkedIn Group Auto Message tool helps streamline outreach campaigns while driving engagement and building meaningful connections.
Key Features of TexAu’s LinkedIn Group Auto Message
Automated Messaging: Save Time and Maximize Outreach
Manually messaging group members is a time-consuming process, especially for large groups. TexAu’s automated messaging feature eliminates this bottleneck by enabling you to send bulk messages to multiple members simultaneously, without compromising personalization.
Example:
A community manager of a digital marketing group uses TexAu to send a personalized welcome message to new members. The message includes group guidelines, resources, and upcoming events, creating a warm and professional first impression while saving valuable time.
Customizable Message Templates: Add a Personal Touch
With TexAu, you can create custom message templates that include placeholders for personalization, such as the recipient’s name, role, or company. These templates ensure every message feels unique and relevant, even when sent in bulk.
Example:
A business owner in a SaaS-focused group uses the following template to engage members discussing product development challenges:
"Hi [First Name], I noticed your post in the [Group Name] about [Topic]. I’d love to share how our [Product/Service] can address those challenges. Let’s connect!"
This tailored outreach strategy not only starts a meaningful conversation but also positions the business owner as a helpful resource.
Targeted Member Selection: Focus on Relevant Connections
Not all group members are equally relevant to your outreach campaigns. TexAu allows you to filter members based on criteria such as job title, activity level, location, or specific interests. By targeting the right audience, you can maximize the impact of your outreach efforts.
Example:
A recruiter focuses on messaging tech leads and software developers in an IT group to promote open positions. By targeting those in leadership roles or with specific skill sets, the recruiter ensures their outreach aligns with their hiring goals.
Bulk Messaging: Efficient Communication at Scale
TexAu’s bulk messaging feature allows you to send messages to multiple group members simultaneously while maintaining message personalization. This ensures consistent communication without losing the human touch.
Example:
A marketing team promoting a webinar on “AI in Digital Marketing” sends a personalized invitation to all active members in their LinkedIn Group. By using TexAu’s bulk group messages, they reach over 300 members in a single operation, significantly increasing attendance rates.
Scheduled Messaging: Engage at Optimal Times
Timing plays a crucial role in the success of messaging campaigns. TexAu enables you to schedule messages to be sent at times when recipients are most likely to respond, such as during working hours or in specific time zones.
Example:
A content creator schedules messages to group members in the education sector during lunch breaks or late afternoons. This ensures higher engagement and an improved reply rate.
Benefits of LinkedIn Group Auto Message
Improved Group Engagement: Foster Active Participation
Engagement is the lifeblood of LinkedIn Groups, and fostering active participation among members can transform a group into a thriving community. Direct outreach efforts to members helps strengthen relationships and encourages meaningful contributions. Personalized messages, tailored to group discussions or specific topics, demonstrate your genuine interest and encourage members to take an active role.
Example: A community manager overseeing a leadership-focused LinkedIn Group identifies a popular discussion thread on leadership strategies. Using TexAu’s LinkedIn Group Auto Message tool, they send a personalized message to group members:"Hi [First Name], I noticed you’re interested in leadership strategies. We’ve started a discussion thread in [Group Name] where members are sharing their insights and best practices. Your input would be invaluable—here’s the link: [Insert Link]."
Outcome: This targeted effort sparks valuable conversations, strengthens member relationships, and increases group activity by 30% within a month. Members feel valued and are more likely to continue participating, knowing their contributions are encouraged.
Time Efficiency: Eliminate Repetitive Tasks
Manually reaching out to multiple group members is tedious, especially if you’re managing a large group or running a time-sensitive campaign. Automating the messaging process with TexAu saves countless hours, enabling professionals to focus on higher-value tasks such as outreach strategies, content creation, or business opportunities.
Example: A marketer promoting a content marketing campaign spends hours every week messaging group members individually. By automating their outreach with TexAu, they save over 10 hours per week, freeing up time to refine messaging strategies and create engaging content.
Outcome: With the time saved, the marketer can focus on enhancing their campaigns, resulting in a 15% increase in engagement rates from group members. The streamlined messaging process allows them to scale their efforts while maintaining a personal touch.
Enhanced Networking Opportunities: Build Meaningful Relationships
Networking is one of the primary benefits of LinkedIn Groups, and personalized outreach helps you connect with influential members who can open doors to new opportunities. By focusing on top contributors and thought leaders, you can build relationships that lead to collaborations, partnerships, or even career advancements.
Example: A freelancer specializing in graphic design identifies the most active contributors in a design-focused LinkedIn Group using TexAu’s advanced filters. They send a tailored message to these individuals:"Hi [First Name], I’ve admired your contributions in [Group Name], especially your insights on [Topic]. I’d love to connect and explore ways we could collaborate on design projects. Let me know if you’re interested!"
Outcome: The freelancer secures collaborations with two industry leaders on high-profile design projects. This approach not only enhances their portfolio but also strengthens their professional reputation within the design community.
Event Promotion: Maximize Participation
Promoting events, webinars, or workshops to group members can drive higher attendance and engagement. TexAu’s bulk message feature simplifies this process, ensuring your event invitations reach a targeted audience while maintaining a personal touch.
Example: A training provider organizes a workshop on HR analytics and uses TexAu to send personalized invitations to members of a LinkedIn HR group:"Hi [First Name], I noticed your interest in HR analytics in [Group Name]. We’re hosting a workshop on ‘Leveraging Data for Smarter HR Decisions’ next week. Here’s the registration link: [Insert Link]. We’d love to have you join us!"
Outcome: The training provider doubles attendance rates for the workshop, with several attendees becoming long-term clients. This streamlined approach to event promotion not only saves time but also ensures that the invitations reach the most relevant audience.
Lead Generation: Find Potential Clients or Collaborators
LinkedIn Groups are rich with professionals actively discussing industry challenges and opportunities. By messaging individuals who align with your goals, you can identify potential leads or collaborators. Personalized messaging ensures your messages resonate, increasing the likelihood of positive responses.
Example: A B2B SaaS founder uses TexAu to identify members of a tech-focused LinkedIn Group discussing process automation challenges. They send a tailored message to these individuals:"Hi [First Name], I noticed your post in [Group Name] about process automation. Our SaaS platform is designed to address similar challenges by simplifying workflows and improving efficiency. I’d love to offer you a free demo—let me know if you’re interested!"
Outcome: The founder generates five high-quality leads, with two converting into long-term clients. This personalized approach ensures that the outreach is relevant and adds value to the conversation, building trust with potential customers.
TexAu’s LinkedIn Group Auto Message tool empowers professionals to enhance group engagement, save time, network effectively, promote events, and generate leads with ease. By leveraging automation tools and targeted messaging, you can achieve impactful results while maintaining a professional and genuine connection with group members.
Use Cases of LinkedIn Group Auto Message
Marketers: Boost Visibility and Engagement
Marketers can leverage LinkedIn Groups to share valuable resources, campaign updates, or insights with a target audience. By directly messaging group members, marketers increase their visibility, drive traffic to their resources, and spark meaningful engagement.
Example: A content marketer working for a digital marketing agency shares a whitepaper on content marketing trends with members of a LinkedIn Group focused on marketing professionals. By using TexAu’s personalized message templates, they craft a message like:"Hi [First Name], I thought you might find our latest whitepaper on ‘Emerging Trends in Content Marketing 2025’ insightful. It addresses some key challenges discussed in this group. Here’s the link: [Insert Link]. Let me know your thoughts!"
Outcome:
- Group members find the shared content valuable and engage by commenting or sharing the resource.
- The marketer drives significant traffic to the company’s website, increasing downloads of the whitepaper and generating new leads.
Recruiters: Engage Top Talent
Recruiters can tap into LinkedIn Groups to find and engage qualified candidates for specific roles. Using TexAu’s automated message feature, they can directly reach out to active participants in industry-specific groups, saving time and increasing response rates.
Example: A recruiter for a blockchain startup uses TexAu to filter and message developers in a blockchain-focused group. The recruiter sends a personalized message to candidates discussing topics like smart contracts or decentralized finance (DeFi):"Hi [First Name], I noticed your insightful comments about blockchain scalability in the [Group Name]. We’re hiring blockchain developers, and your expertise aligns perfectly with what we’re looking for. Let’s connect and discuss this opportunity!"
Outcome:
-
The recruiter receives multiple responses from interested candidates, filling the open roles quickly.
-
This approach reduces the hiring cycle and improves the quality of hires.
Business Owners: Announce Product Launches or Partnerships
Business owners can use LinkedIn Groups to share updates about their products, partnerships, or special offers with a relevant audience. By targeting specific members within groups, they can generate early interest, valuable feedback, and even sales.
Example: A tech entrepreneur launching a SaaS product sends a personalized message to members of a tech innovations group:"Hi [First Name], I saw your recent post about productivity tools in [Group Name]. I’d like to share our newly launched SaaS platform designed to streamline workflows for tech professionals. Would you be interested in an early access trial? Let me know!"
Outcome:
- Members engage with the entrepreneur, with some signing up as early adopters and providing feedback to refine the product.
- The entrepreneur builds brand awareness within a niche audience.
Community Managers: Foster Member Engagement
Community managers can use TexAu’s LinkedIn Group Auto Message tool to welcome new members, share group resources, and encourage participation in group discussions. Personalized messages create a warm and professional atmosphere, increasing member activity.
Example: A community manager sends a welcome message to all new members of a LinkedIn Group for entrepreneurs:"Hi [First Name], welcome to [Group Name]! We’re excited to have you here. Feel free to introduce yourself and share your goals in our ‘Welcome New Members’ thread. Here’s a quick guide to the group’s resources: [Insert Link]. Let us know how we can support you!"
Outcome:
- The message creates a positive first impression, encouraging new members to engage actively in the group.
- The group’s overall participation rate increases by 30%, creating a more dynamic and valuable community.
TexAu’s LinkedIn Group Auto Message tool empowers professionals across various roles to engage effectively, save time, and drive meaningful results through automated, personalized outreach.
Best Practices: Maximize the Impact of Your Messaging
Personalize Messages: Make Every Message Relevant
Personalization is key to effective communication. Using placeholders like the recipient’s name, role, or group activity ensures your messages feel tailored and engaging rather than generic.
Example:
A consultant reaching out to group members discussing remote work challenges might use this personalized message:“Hi [First Name], I noticed your post in [Group Name] about remote work productivity. I’ve worked with businesses to implement successful remote work strategies, and I’d love to share some insights with you. Let me know if you’d like to connect!”
Benefits:
- Personalized messages are more likely to be read and responded to.
- They build rapport and establish trust with the recipient.
Target Strategically: Focus on Relevant Members
Not all group members are equally relevant to your objectives. By targeting specific members—such as active contributors, thought leaders, or individuals discussing topics aligned with your goals—you can increase the impact of your outreach.
Example:
A digital transformation consultant filters a group to focus on C-suite executives discussing technology adoption. Their message might look like this:“Hi [First Name], I came across your comment about digital transformation challenges in [Group Name]. I’ve helped organizations overcome similar hurdles and would love to explore how I can assist you. Let’s connect!”
Benefits:
- Strategic targeting ensures your message reaches members who are more likely to respond and engage.
- It maximizes the efficiency of your efforts, focusing on high-value connections.
Respect Group Etiquette: Maintain Professionalism
While LinkedIn Groups are excellent for outreach, overly promotional or spammy messages can harm your reputation and credibility. Always ensure your messages align with the group’s culture and guidelines.
Example:
Instead of directly pitching a product, a software vendor in a project management group might share a resource:“Hi [First Name], I saw your discussion about task prioritization in [Group Name]. We recently published a guide on optimizing project workflows. Here’s the link: [Insert Link]. Let me know your thoughts!"
Benefits:
- Maintaining professionalism helps build trust and ensures you remain a respected member of the group.
- It increases the likelihood of positive responses and future engagement.
Advanced Features: Take Messaging to the Next Level
Keyword-Based Targeting: Focus on Relevant Discussions
TexAu allows you to target members who recently discussed specific keywords or topics in the group. This feature ensures your message is highly relevant and timely.
Example:
A HR professional notices members discussing “employee retention strategies” in a group for HR leaders. They send this message:“Hi [First Name], I noticed your interest in employee retention strategies. I’ve successfully implemented retention programs for businesses in [Industry]. Let’s connect to exchange ideas!"
Activity-Level Filters: Engage Active Members
Targeting members who regularly post or comment increases the likelihood of engagement. TexAu’s activity-level filters allow you to focus on contributors who are already involved in group discussions.
Example:
A community manager messages active contributors in a nonprofit group to encourage them to participate in an upcoming group poll:“Hi [First Name], thank you for your contributions in [Group Name]! We’re running a poll to understand nonprofit challenges, and we’d love your input. Here’s the link: [Insert Link]."
Scheduled Follow-Ups: Keep the Conversation Going
Following up is a crucial part of outreach, especially if your initial message didn’t receive a response. TexAu’s scheduling feature lets you automate follow-ups, ensuring consistency.
Example:
A webinar organizer sends a reminder to members who didn’t respond to the initial invitation:“Hi [First Name], I’m following up on my previous message about our webinar on [Topic]. Seats are filling up quickly, and we’d love to have you join us. Here’s the registration link: [Insert Link]."
Benefits:
- Automated follow-ups increase response rates without requiring manual effort.
- They show persistence and professionalism, encouraging recipients to engage.
TexAu’s LinkedIn Group Auto Message tool is a powerful solution for streamlining outreach, enhancing engagement, and building meaningful connections. By automating personalized messaging, targeting strategically, and respecting group etiquette, you can maximize the impact of your communication efforts.
Whether you’re a marketer, recruiter, business owner, or community manager, TexAu enables you to save time and achieve your professional goals effectively.
Conclusion: Transform Group Messaging with TexAu
TexAu’s LinkedIn Group Auto Message tool simplifies personalized communication, allowing you to save time, engage meaningfully, and achieve your professional goals. Whether you’re a marketer, recruiter, business owner, or community manager, this tool helps you connect with group members efficiently and effectively.
Start using TexAu today to elevate your LinkedIn Group messaging and build impactful relationships!
The LinkedIn Group Auto Message automation helps founders, companies, sales managers, marketers, and growth hackers automate personalized messages to members of LinkedIn groups. Use this automation to streamline outreach, nurture leads, or promote services effectively. Export results to Google Sheets or CSV for easy tracking and integration into your campaigns. Leverage TexAu’s scheduling, iteration delay, and output mode options to optimize your messaging strategy.
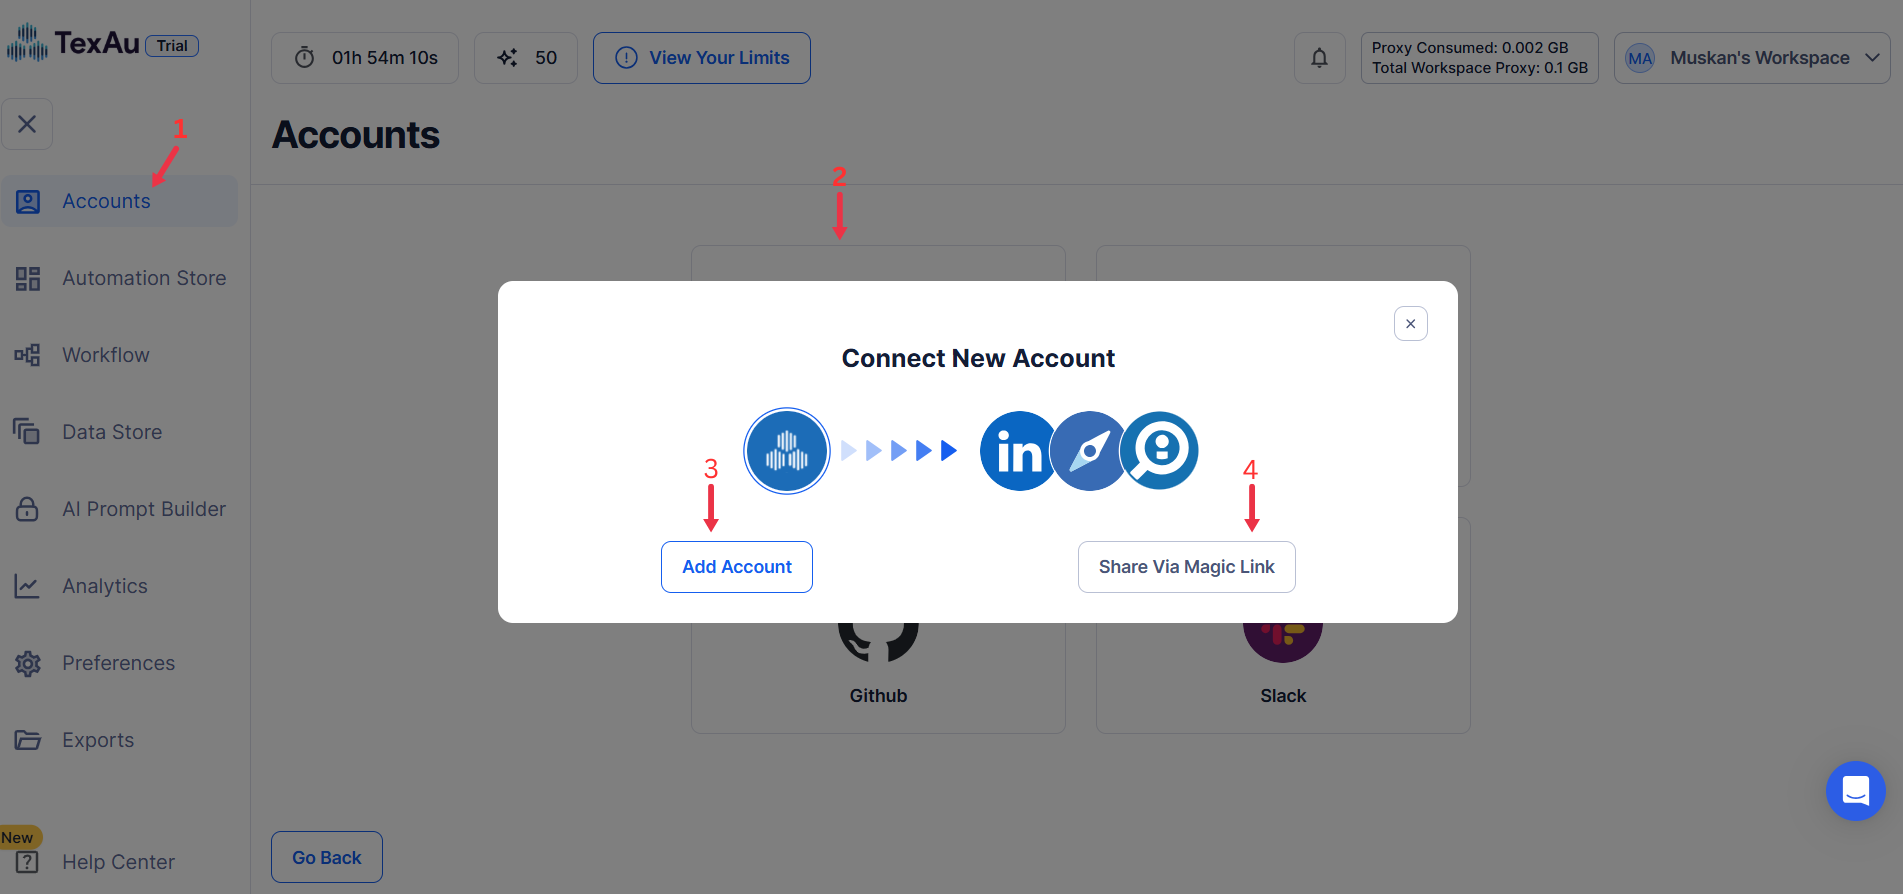
Step 1: Log in to TexAu and Connect LinkedIn
Log in to your TexAu account at v2-prod.texau.com.
Go to Accounts and connect your LinkedIn account. You can choose one of these methods:
- Share via Magic Link: Share the link, copy it to your browser, and follow the steps to integrate your LinkedIn account securely.
- Add Account: Sync cookies and browser data with TexAu for seamless integration.
{% custom-image src="https://v2-web-assets.s3.us-east-1.amazonaws.com/Common/log-in-to-texau-and-connect-linkedin/connect-linkedin.png" alt="connect-linkedin" /%}
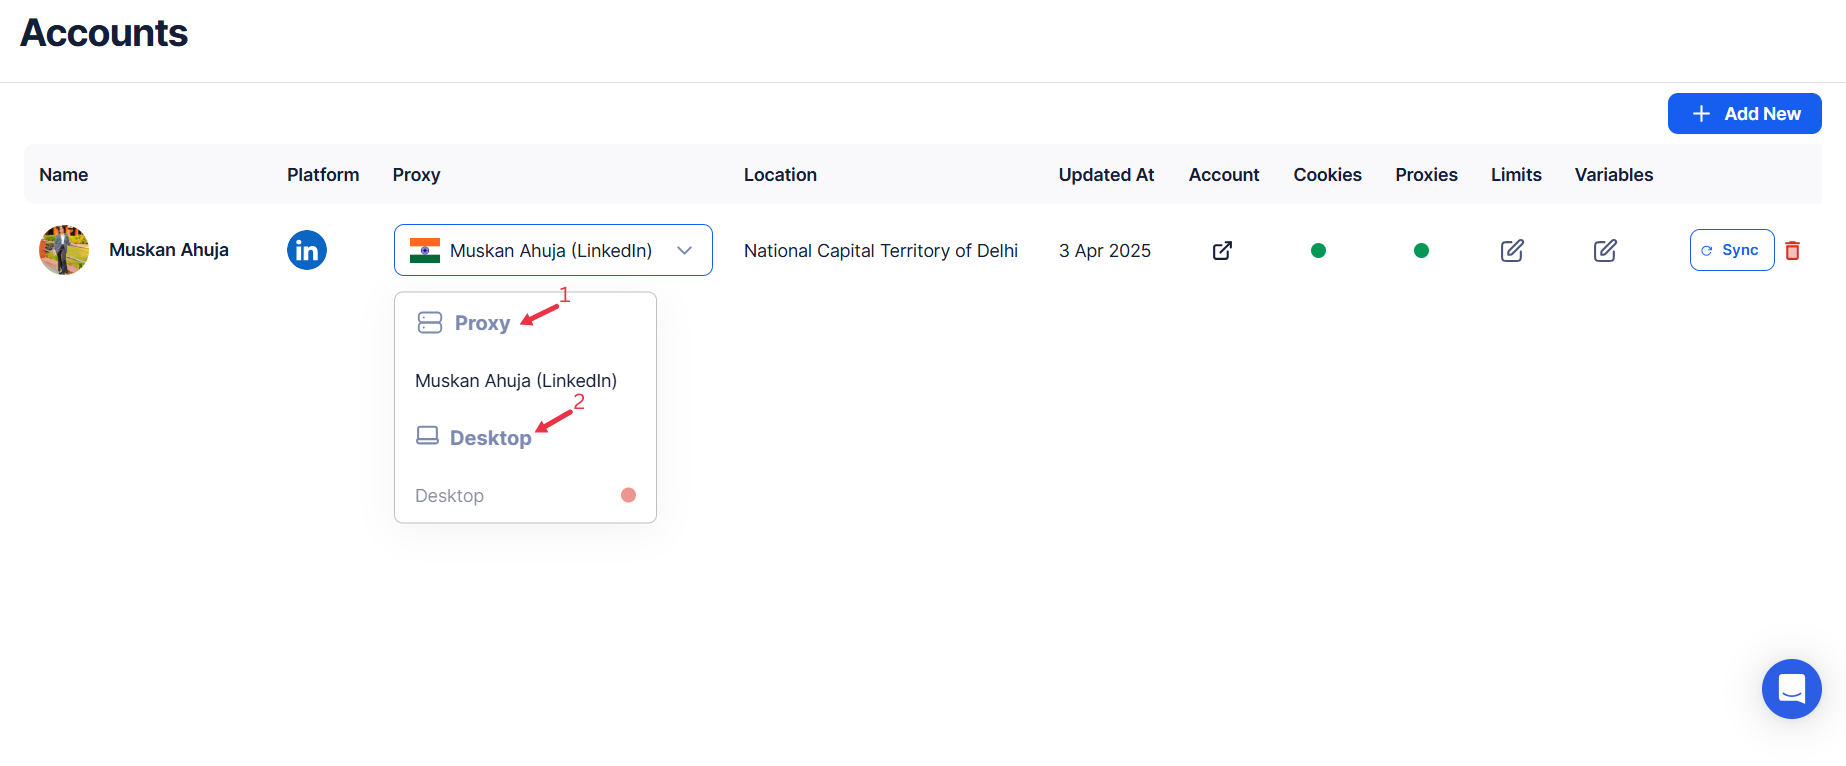
Step 2: Choose Cloud or Desktop Execution
Decide how you want to run the automation:
- Cloud Mode: Automates tasks on TexAu’s servers with built-in proxies. You can add custom proxies via Settings > Preferences > Proxies.
- Desktop Mode: Runs automation on your local device using your IP address.
{% custom-image src="https://v2-web-assets.s3.us-east-1.amazonaws.com/Common/cloud-or-desktop-execution/cloud-or-desktop-execution.png" alt="choose-cloud-or-desktop-execution" /%}
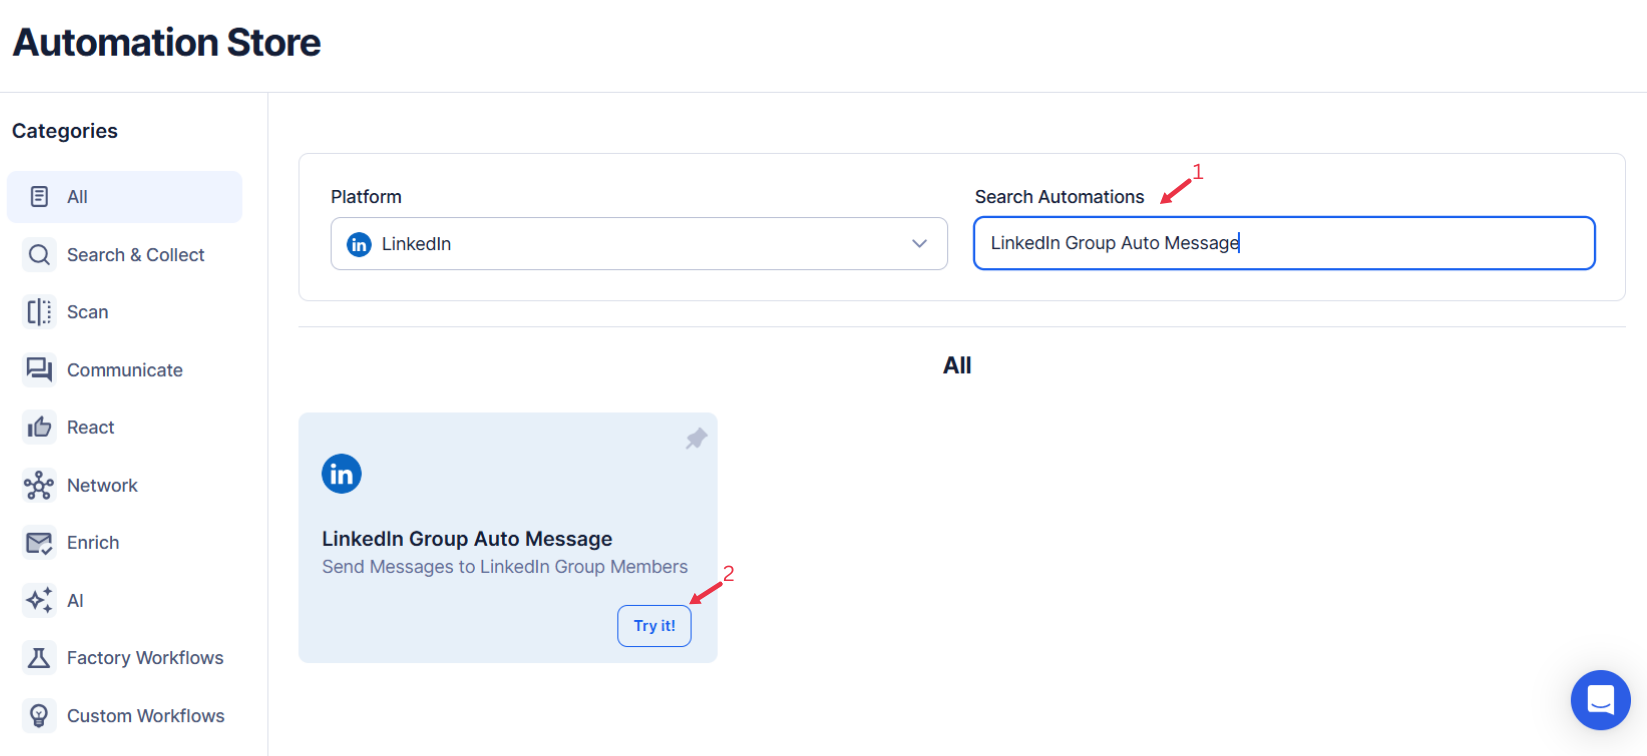
Step 3: Search for the Particular LinkedIn Automation
- Navigate to the Automation Store on TexAu.
- Use the search bar to find LinkedIn Group Auto Message automation.
{% custom-image src="https://v2-web-assets.s3.us-east-1.amazonaws.com/Automations/linkedin-group-auto-message/linkedin-group-auto-message.png" alt="search-for-the-particular-LinkedIn-automation" /%}
Step 4: Select Your Input Source
Here’s how to configure your input source for the LinkedIn Group Auto Message automation:
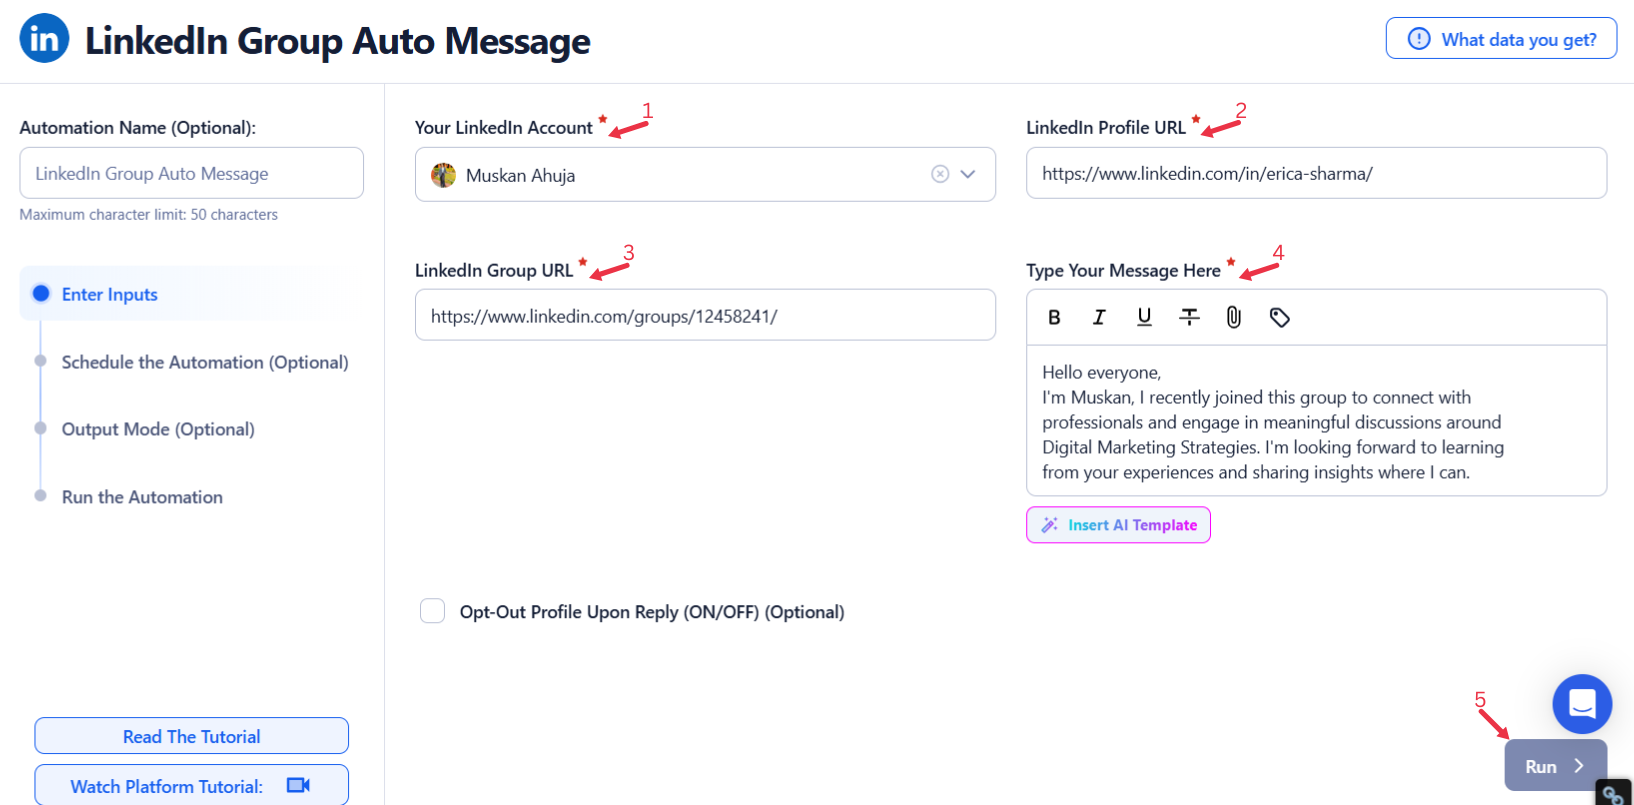
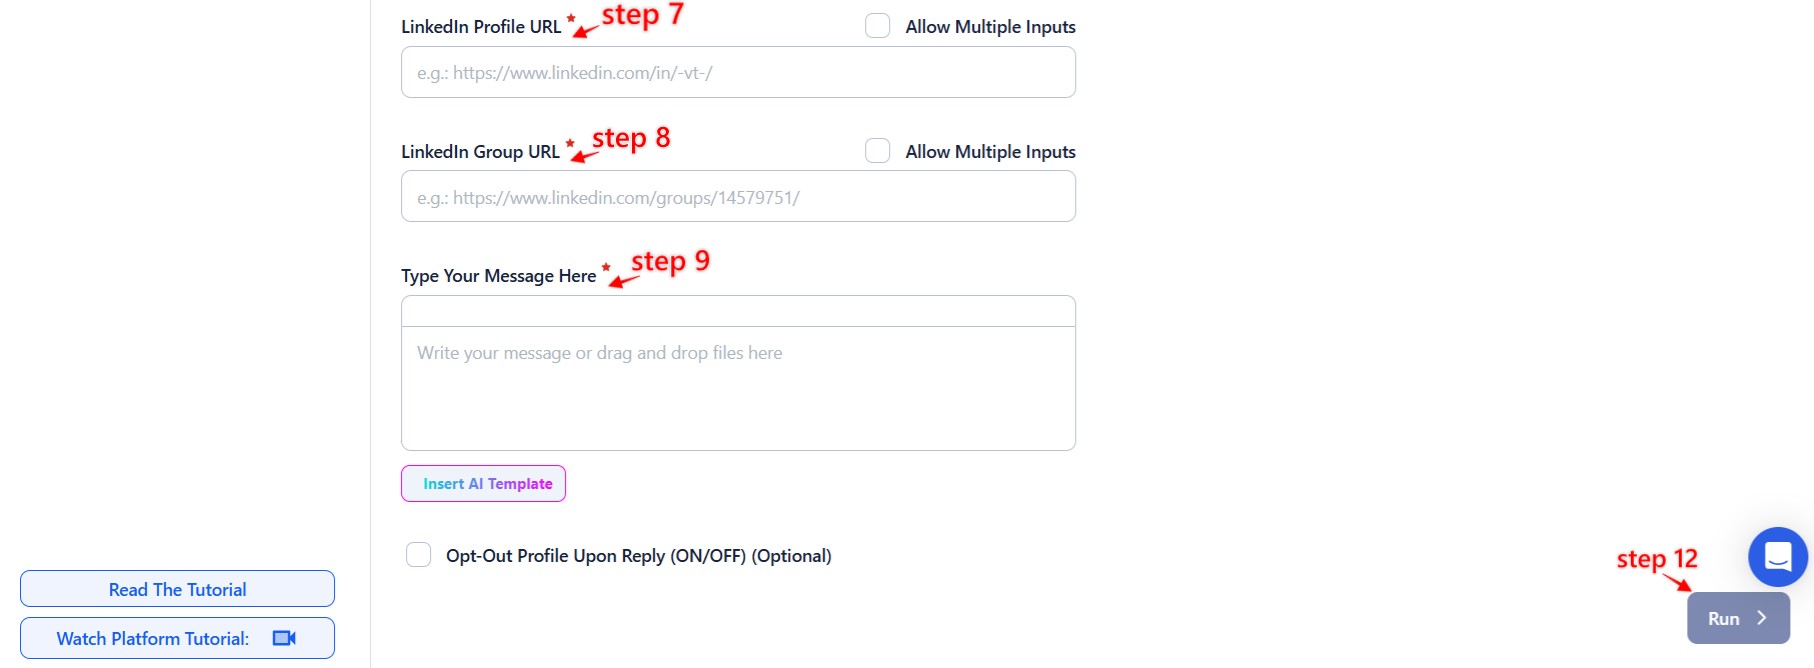
Manually Enter a Single Input
Use this option to message participants in one specific LinkedIn group. Follow these steps:
- Enter the LinkedIn Profile Page URL of the person you want to message.
- Enter the LinkedIn Group URL for the group to which the person belongs.
- Message Input: In all cases, enter your message in the Message input field. You can use plain text, insert an AI-generated template, or drag and drop files for attachments.
- Reply Detection (Optional): Enable this to detect replies and automatically opt profiles out of the messaging sequence.
- Click Run in the lower-right corner to start the automation.
{% custom-image src="https://v2-web-assets.s3.us-east-1.amazonaws.com/Automations/linkedin-group-auto-message/linkedin-group-auto-message-single-inputs.png" alt="enter-a-single-input" /%}
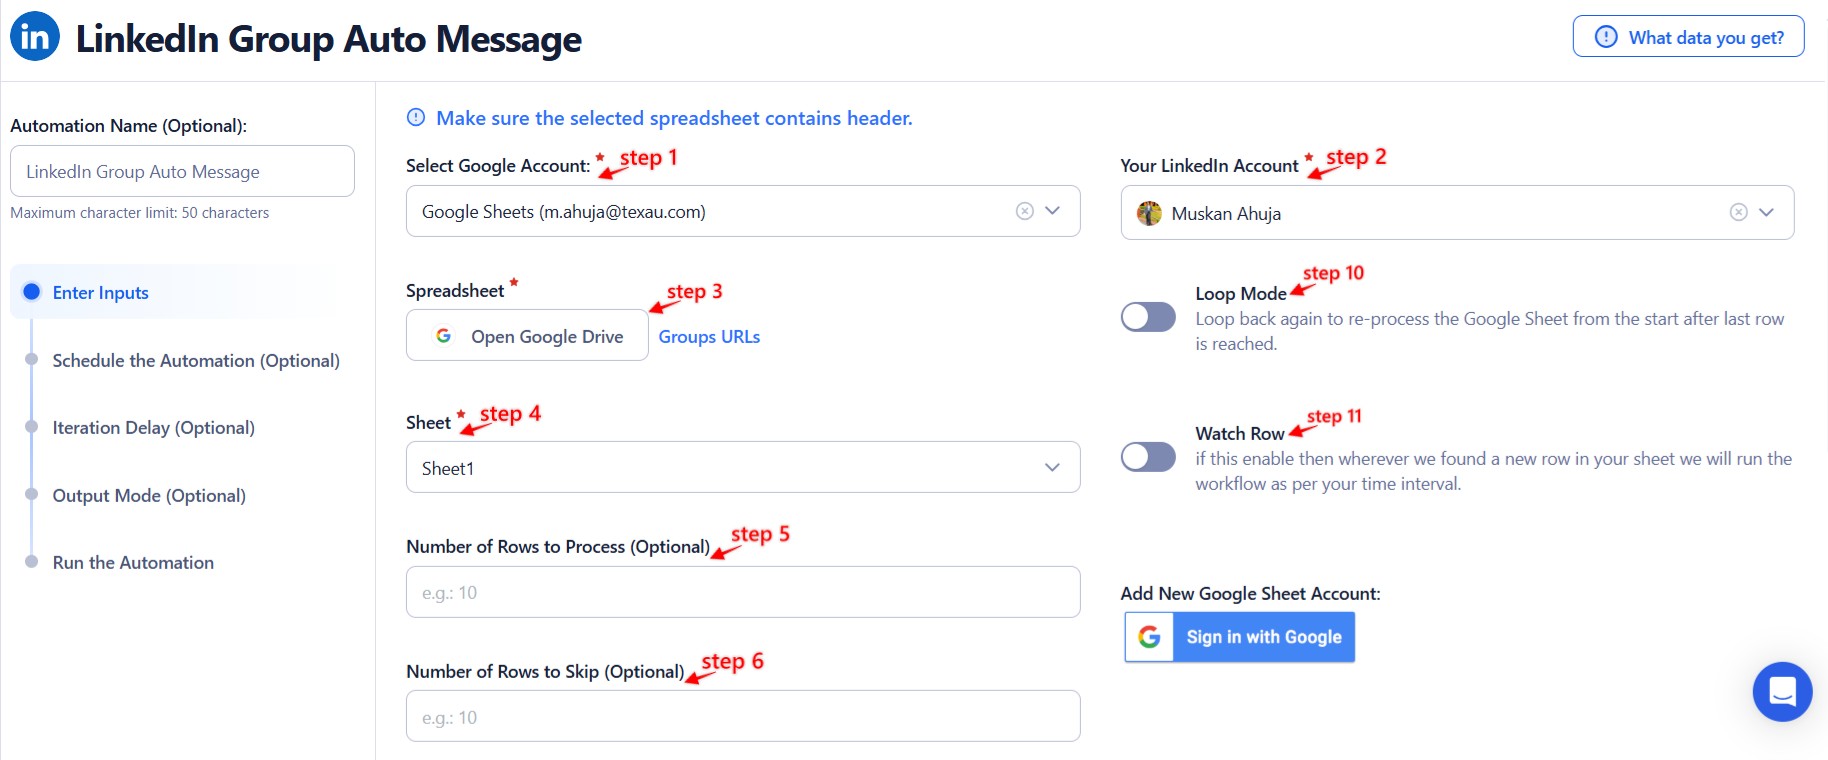
Google Sheets
This option is perfect for messaging participants in multiple LinkedIn groups. Follow these steps to use Google Sheets:
- Click Select Google Account to choose your Google account or click Add New Google Sheet Account (you can add multiple Google accounts).
- Click Accounts to select LinkedIn as the platform.
- Click Open Google Drive to locate the Google Sheet containing LinkedIn profile and group URLs. A pop-up will display your Google Drive files.
- Select the spreadsheet and the specific sheet (e.g., "Sheet1") containing the LinkedIn profile and group URLs.
- Profile URL: Choose the column header containing LinkedIn Profile URLs.
- Group URL: Choose the column header containing LinkedIn Group URLs. These steps are mandatory for the automation to function correctly.
- Configure additional options:
- Number of Rows to Process (Optional): Define how many rows to process from the sheet.
- Number of Rows to Skip (Optional): Specify how many rows to skip at the beginning of the sheet.
- Loop Mode (Optional): Enable this to re-process the Google Sheet from the beginning once all rows are completed. This is useful for recurring updates or new entries in the sheet.
- Message Input: In all cases, enter your message in the Message input field. You can use plain text, insert an AI-generated template, or drag and drop files for attachments.
- Reply Detection (Optional): Enable this to detect replies and automatically opt profiles out of the messaging sequence.
- Click Run in the lower-right corner to start the automation.
Optional Advanced Feature:
- Loop Mode: Enable Loop Mode to re-process the Google Sheet from the beginning once all rows are completed. This is useful for tasks that require recurring updates.
Watch Row (Optional)
Watch Row feature helps automate workflows by detecting new Google Sheet entries and running workflows without manual action.
Define Watch Row settings by selecting an update frequency and an execution timeframe.
Watch Row Schedule
- None
- Scheduling Intervals (e.g., every 15 minutes, every hour)
- One-Time Execution
- Daily Execution
- Weekly Recurrence (e.g., every Tuesday and Thursday)
- Monthly Specific Dates (e.g., 10th and 27th)
- Custom Fixed Dates (e.g., September 18)
By default, Watch Row scans every 15 minutes and runs for five days unless changed.
With Watch Row, workflows stay dynamic and data-driven.
{% custom-image src="https://v2-web-assets.s3.us-east-1.amazonaws.com/Automations/linkedin-group-auto-message/linkedin-group-auto-message-1-google-sheet.jpeg" alt="use-google-sheets-for-bulk-input" /%}
{% custom-image src="https://v2-web-assets.s3.us-east-1.amazonaws.com/Automations/linkedin-group-auto-message/linkedin-group-auto-message-2-google-sheet.jpeg" alt="use-google-sheets-for-bulk-input" /%}
CSV File
This option allows you to send messages using a static list of LinkedIn profile and group URLs. Follow these steps:
- Click Upload CSV File and browse to locate the file containing LinkedIn profile and group URLs.
- Once uploaded, TexAu will display the file name and preview its content. Verify the data to ensure it’s correct.
- Profile URL: Choose the column header containing LinkedIn Profile URLs.
- Group URL: Choose the column header containing LinkedIn Group URLs. These steps are mandatory for the automation to work properly.
- Configure additional options:
- Number of Rows to Process (Optional): Specify how many rows to process from the CSV file.
- Number of Rows to Skip (Optional): Set how many rows to skip from the beginning of the file.
- Message Input: In all cases, enter your message in the Message input field. You can use plain text, insert an AI-generated template, or drag and drop files for attachments.
- Reply Detection (Optional): Enable this to detect replies and automatically opt profiles out of the messaging sequence.
- Click Run in the lower-right corner to start the automation.
{% custom-image src="https://v2-web-assets.s3.us-east-1.amazonaws.com/Common/texau-input-source-options.png" alt="step3" /%}
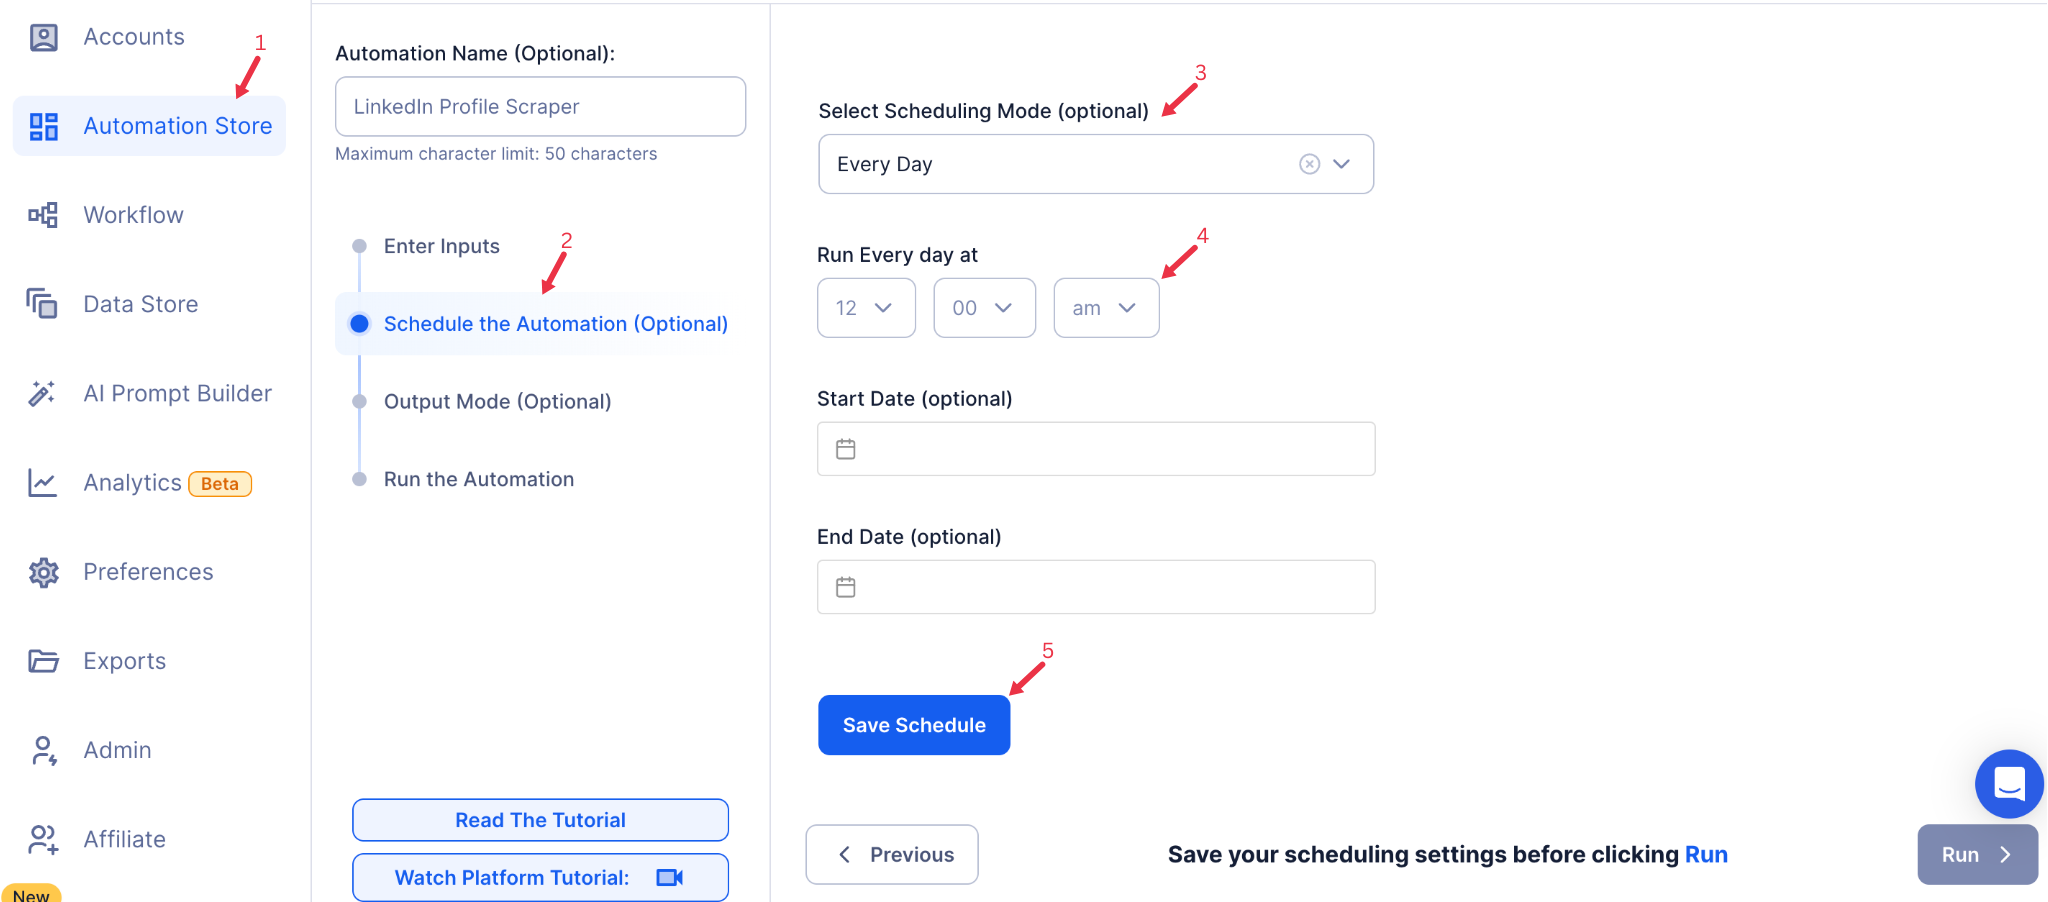
Step 5: Schedule the Automation (Optional)
Schedule the automation to send messages at specific times for consistent outreach. Click Select Scheduling Mode and choose one of the following options:
- None: Runs the automation immediately without a schedule.
- At Regular Intervals: Set a recurring frequency such as daily or weekly.
- Once: Schedule the automation to run at a single specified time.
- Every Day: Configure the automation to run daily.
- On Specific Days of the Week: Choose specific days, like Monday and Wednesday.
- On Specific Days of the Month: Select dates such as the 15th and 30th.
- On Specific Dates: Pick custom dates like March 1 or April 10.
{% custom-image src="https://v2-web-assets.s3.us-east-1.amazonaws.com/Common/schedule-the-automation/schedule-the-automation.png" alt="schedule-the-automation" /%}
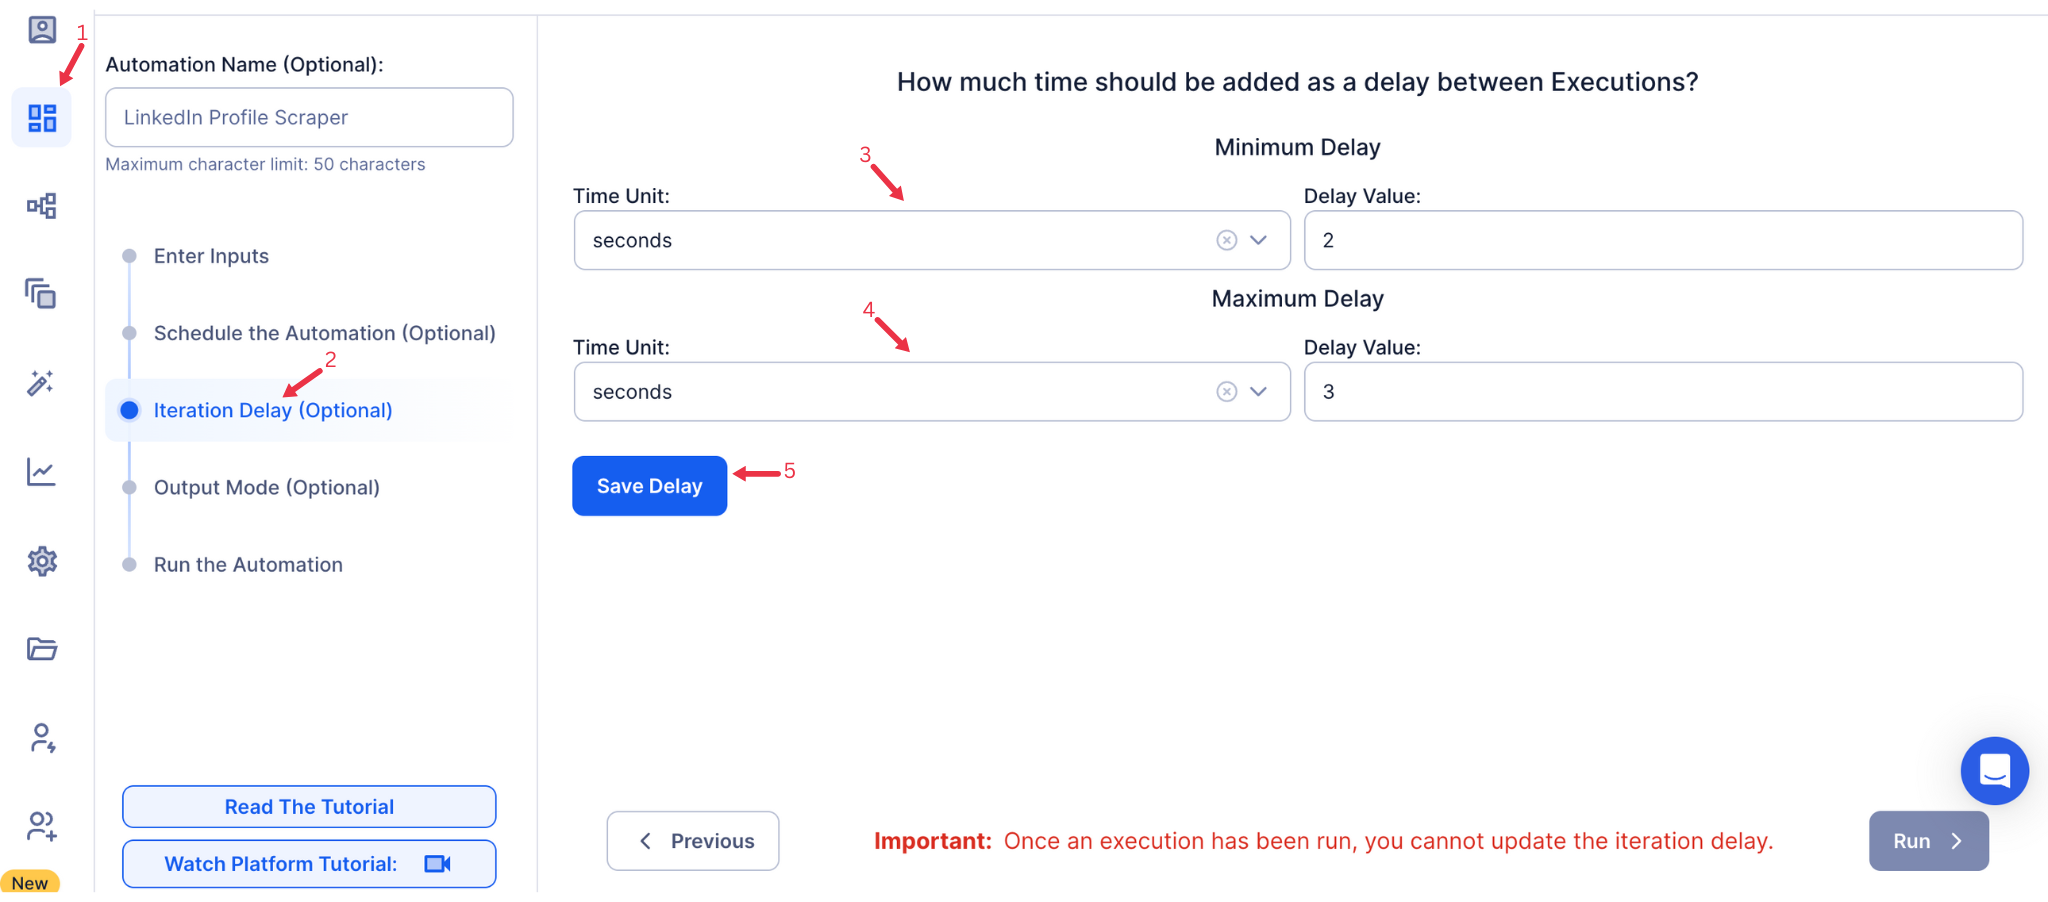
Step 6: Set an Iteration Delay (Optional)
Avoid detection and simulate human-like activity by setting an iteration delay. Choose minimum and maximum time intervals to add randomness between actions. This makes your activity look natural and reduces the chance of being flagged.
- Minimum Delay: Enter the shortest interval (e.g., 10 seconds).
- Maximum Delay: Enter the longest interval (e.g., 20 seconds).
{% custom-image src="https://v2-web-assets.s3.us-east-1.amazonaws.com/Common/iteration-delay/iteration-delay.png" alt="iteration-delay" /%}
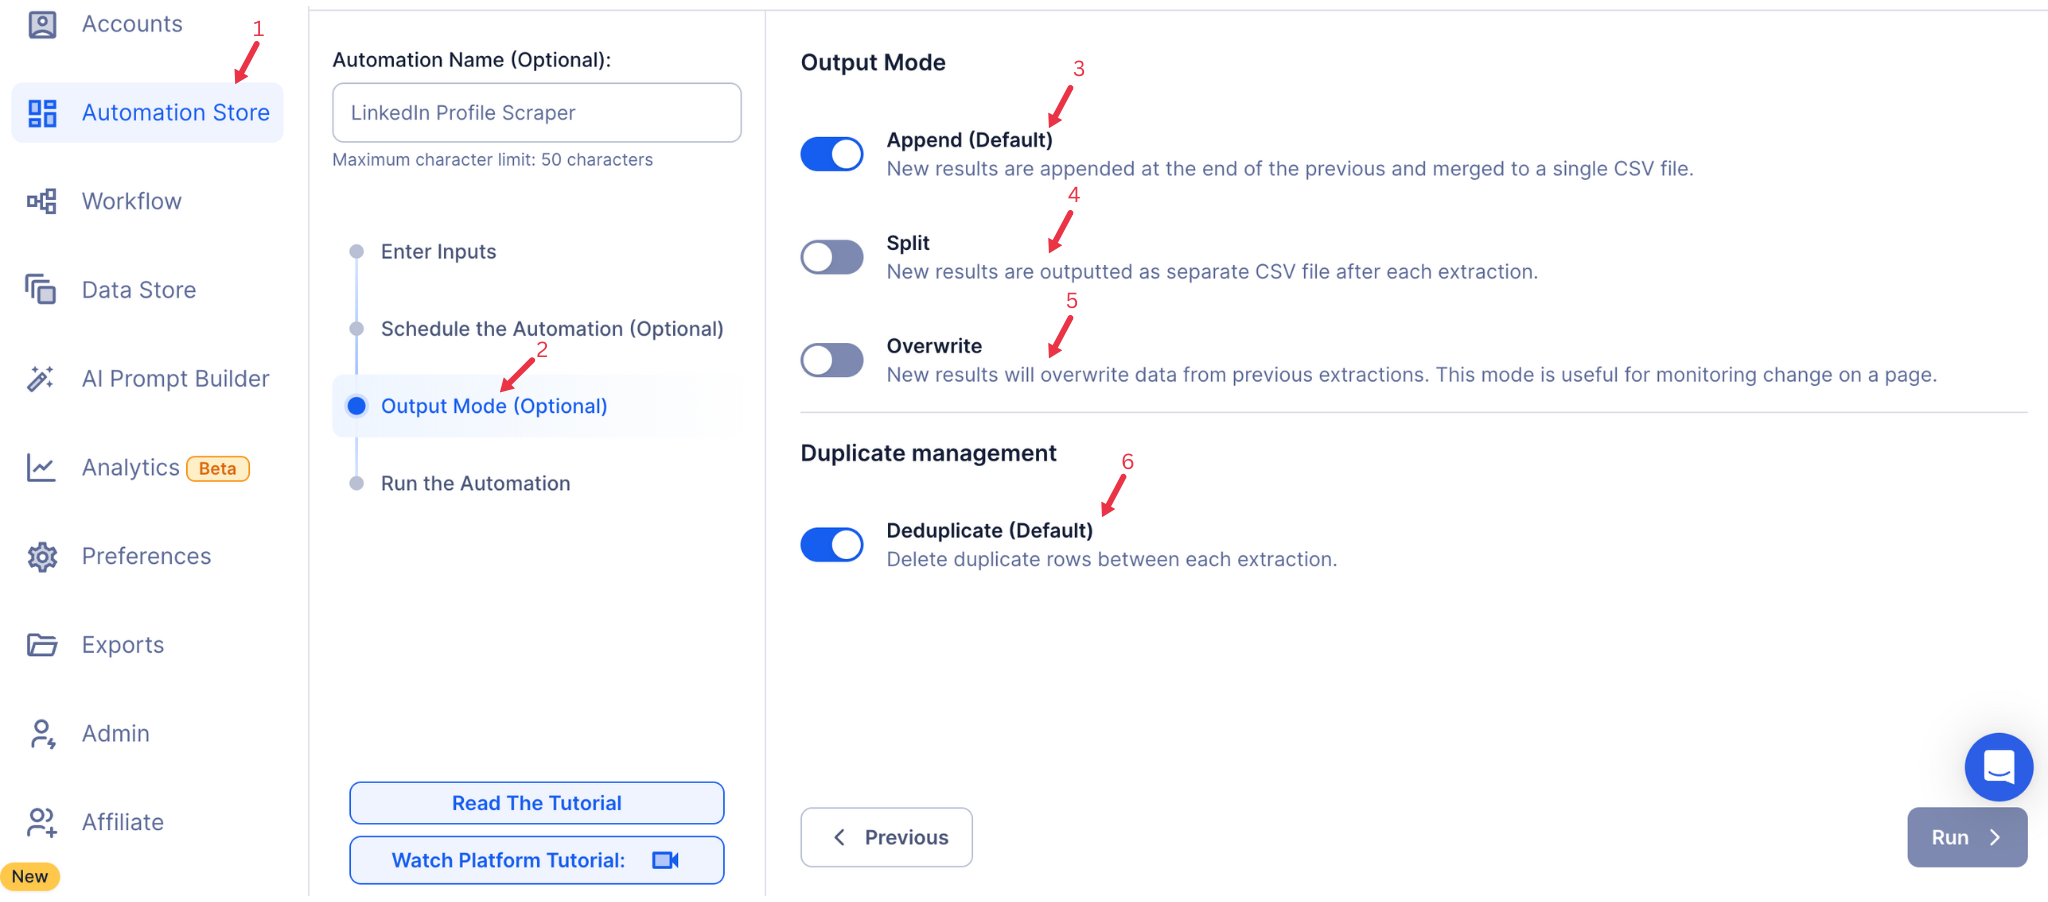
Step 7: Choose Your Output Mode (Optional)
Choose how to save and organize your automation results:
- Append (Default): Adds new results to existing data in a single file.
- Split: Creates a new file for each automation run.
- Overwrite: Replaces previous data with the latest results.
- Duplicate Management: Enable Deduplicate (Default) to remove duplicate entries automatically.
{% custom-image src="https://v2-web-assets.s3.us-east-1.amazonaws.com/Common/output-mode/output-mode.png" alt="output-mode" /%}
Step 8: Access the Data from the Data Store
Once the automation completes, navigate to the Data Store section in TexAu. Locate the LinkedIn Group Auto Message automation or the custom name you provided, then click See Data. Choose to Download CSV for offline analysis or Open to Google Sheet for real-time updates.
{% custom-image src="https://v2-web-assets.s3.us-east-1.amazonaws.com/Automations/LinkedIn+Job+Scraper/data-store-see-data.png" alt="step8" /%}
The LinkedIn Group Auto Message automation helps professionals scale personalized outreach within LinkedIn groups. Founders, marketers, and sales teams can save time, engage leads effectively, and measure campaign success by exporting data to Google Sheets or CSV files. Optimize your efforts with TexAu’s flexible scheduling, iteration delays, and output management features.
Run this automation on your own server.
TexAu V3 doesn't host social-platform automations anymore — but the runnable code is yours. Tell us your inputs, outputs, and target environment, and we'll ship you a working version you can deploy and operate yourself.