LinkedIn Post Scraper
Use TexAu’s LinkedIn Post Scraper to extract posts, comments, likes, and shares from any public profile or search result. Fast and powerful for lead gen.
Last updated
LinkedIn is more than a professional networking platform; it's a hub for **thought leadership**, industry updates, and community engagement. With over 900 million users globally, LinkedIn has become an essential space for businesses, marketers, recruiters, and sales professionals to share **dynamic
LinkedIn is more than a professional networking platform; it's a hub for thought leadership, industry updates, and community engagement. With over 900 million users globally, LinkedIn has become an essential space for businesses, marketers, recruiters, and sales professionals to share dynamic content, network, and drive meaningful conversations. Posts on LinkedIn, whether they’re text-based, videos, or images, provide a wealth of valuable insights into trending topics, audience preferences, and competitor strategies.
Extracting LinkedIn post data is crucial for several reasons. Content analysis helps businesses refine their messaging and strategies, while trend identification ensures they stay ahead of industry changes. Competitor insights allow companies to benchmark their performance and adjust tactics for growth. However, manually collecting this data is time-consuming and inefficient.
TexAu simplifies this process with its LinkedIn Data Scraper, a powerful tool designed to efficiently and accurately extract data from public profiles and LinkedIn posts at scale. By automating the scraping process, TexAu empowers users to make informed decisions, optimize their content creation, and stay competitive in their industries.
Key Features of TexAu’s LinkedIn Post Scraper
Comprehensive Data Extraction
TexAu’s LinkedIn Data Scraper allows users to collect an extensive range of data points, including:
- Post content (text, images, or videos).
- Author name and profile information, including job titles and company details.
- Engagement metrics such as likes, comments, and shares.
- Hashtags and keywords for trend analysis.
- Post URLs for easy referencing and analysis.
Example: A digital marketing agency looking to understand the success factors behind popular posts can scrape detailed data from high-performing content. By analyzing engagement metrics, they can identify which types of content (e.g., infographics, opinion pieces) resonate most with audiences, enabling them to refine their content creation and outreach strategies.
Customizable Filters
With customizable filters, TexAu allows users to refine their data scraping to focus on the most relevant posts. Filters can be applied based on:
- Keywords and hashtags.
- Date range to target specific periods.
- Engagement levels, such as posts with over 100 likes or comments.
Example: A SaaS company launching an AI-powered tool can scrape posts containing the hashtag “#AIinMarketing” from the past month. This provides insights into audience conversations, trends, and pain points, helping the company craft targeted content and refine their outreach strategy.
Bulk Post Scraping
Manually analyzing posts one by one is inefficient, especially for large-scale projects. TexAu enables users to scrape data from multiple posts simultaneously, saving time and effort.
Example: A competitor analysis project may involve scraping all posts from a rival company’s LinkedIn Company Profile. The scraped data can reveal content themes, posting frequency, and engagement levels, helping businesses identify gaps or opportunities in their social media strategy. Additionally, LinkedIn Event Scraper can be used to track engagement in industry-specific LinkedIn events, further enriching competitive insights.
{% cta buttonText="Start free trial" title="Scrape LinkedIn Posts, Comments & Engagement Data" description="Extract posts, likes, shares, and comments from any profile. Track trends, gather insights, and export data built for marketers, researchers, and outreach teams." /%}
Export Formats
TexAu supports multiple export formats, such as CSV and Excel, for seamless data analysis. Users can easily import this data into business intelligence (BI) tools, CRMs, or Google Sheets to create visual reports and actionable insights.
Example: A marketing manager can export scraped data into Excel, segment it by engagement levels, and create pivot tables to identify trends. This information can then be used to optimize future campaigns, ensuring that valuable insights lead to efficient lead generation.
Benefits of Using TexAu for LinkedIn Post Scraping
Content Strategy Insights: Refining Your Approach to LinkedIn Content
Content strategy is a cornerstone of effective LinkedIn marketing. TexAu’s LinkedIn Post Scraper empowers businesses to refine their approach by identifying high-performing content trends, such as popular topics, engaging formats, and optimal posting times. These insights help optimize strategies to align with audience preferences and boost engagement.
How It Works
TexAu scrapes LinkedIn posts to extract detailed data, including engagement metrics (likes, shares, comments) and content themes. Businesses can analyze this data to determine what resonates most with their audience.
Example: A healthcare company discovers through TexAu that patient recovery stories outperform posts on industry statistics in terms of engagement. This insight leads them to focus on creating more customer testimonials, positioning their brand as relatable and compassionate.
Scenario: A SaaS startup analyzes engagement data and realizes that short demo videos drive higher interaction than static image posts. Shifting their focus to video content increases their engagement rates by 20%.
Competitor Analysis: Gaining a Competitive Edge
Monitoring competitors on LinkedIn provides valuable insights into market trends, messaging tactics, and engagement strategies. TexAu enables businesses to scrape competitor pages and analyze their content themes, audience engagement, and strategic approaches.
How It Works
TexAu automates data collection from competitors' LinkedIn posts, providing details like post content, engagement levels, and audience feedback. Businesses can use these insights to benchmark performance and refine their strategies.
Example: A financial services firm uses TexAu to analyze competitor posts and discovers that client testimonials generate more engagement than purely promotional content. They incorporate customer stories into their campaigns, significantly improving results. To enhance their competitive intelligence, they also leverage LinkedIn Message Thread Scraper to analyze LinkedIn conversations related to their industry, helping them refine their direct engagement strategies.
Scenario: An e-commerce brand scrapes data from a rival’s LinkedIn page and identifies that behind-the-scenes posts have higher engagement. Inspired, they launch a series showcasing their product creation process, increasing audience interaction.
Lead Generation: Identifying and Connecting with Prospects
LinkedIn post engagements are a goldmine for identifying potential leads. By analyzing likes, comments, and shares, TexAu helps businesses uncover individuals or companies interested in specific topics or solutions.
How It Works
TexAu captures data on who engages with LinkedIn posts, including names, job titles, and companies. This allows businesses to create personalized outreach strategies and nurture leads effectively.
Example: A cybersecurity firm scrapes posts about data breaches and identifies IT managers engaging with these discussions. They send tailored outreach messages, offering solutions to protect sensitive company data.
Scenario: A marketing consultant observes small business owners frequently commenting on posts about digital marketing strategies. By reaching out with customized service offerings, they convert these interactions into new clients.
{% cta buttonText="Start free trial" title="Scrape LinkedIn Posts, Comments & Engagement Data" description="Extract posts, likes, shares, and comments from any profile. Track trends, gather insights, and export data built for marketers, researchers, and outreach teams." /%}
Use Cases for Different Professionals
For Marketers: Refining Content Strategies with TexAu
Marketers rely on data-driven strategies to create content that resonates with their audience. LinkedIn’s wealth of professional discussions and engagements offers a goldmine for understanding audience preferences. TexAu’s LinkedIn Post Scraper equips marketers with the ability to extract and analyze LinkedIn post data, helping them fine-tune their content strategies for maximum impact.
How It Works
TexAu collects detailed data on post formats, topics, and engagement metrics like likes, comments, and shares. This insight enables marketers to identify trends and optimize their content strategies.
Example: A content marketer in the SaaS industry discovers through TexAu that short, engaging videos explaining product features outperform infographics and long-form posts in terms of views and shares. By focusing on video content, they achieve a 25% increase in engagement.
Scenario: A marketing agency for a healthcare client analyzes competitor posts and finds that patient success stories drive the highest engagement rates. Incorporating similar narratives into the client’s campaigns boosts their overall performance.
For Sales Teams: Discovering Leads Through Audience Interactions
For sales teams, LinkedIn post engagements offer a direct pathway to discovering potential leads. By analyzing who interacts with posts on industry challenges or relevant topics, sales professionals can identify prospects actively seeking solutions.
How It Works
TexAu automates the process of scraping LinkedIn posts, capturing engagement data like comments and likes. This data is then organized into actionable formats, enabling sales teams to reach out to warm leads effectively.
Example: A sales representative targeting HR managers scrapes posts about employee engagement challenges. They identify individuals commenting on these posts and connect with them, offering tailored solutions to improve workplace culture, leading to higher conversion rates.
Scenario: A cybersecurity sales team scrapes posts about data breaches, identifying IT managers engaging with these discussions. They initiate personalized outreach, offering solutions to strengthen their organizations’ data security, leading to meaningful conversations.
For Recruiters: Identifying Top Talent Through Content Analysis
Recruiters can streamline their search for qualified candidates by analyzing content and discussions on LinkedIn. Posts in targeted groups or under relevant hashtags often reveal engaged professionals who actively contribute to their fields.
How It Works
TexAu scrapes data from posts in industry-specific groups, hashtags, or influential profiles, enabling recruiters to identify candidates who are both skilled and professionally active.
Example: A recruiter specializing in software engineering tracks posts in Python or JavaScript-focused groups. By analyzing engagement patterns, they identify top candidates who actively discuss industry trends and demonstrate current expertise.
Scenario: A recruiter at a marketing agency scrapes posts under hashtags like #ContentMarketing and identifies individuals sharing insightful posts or commenting on discussions. These active participants are targeted as ideal hires for their organization.
Best Practices for Using TexAu’s LinkedIn Post Scraper
TexAu’s LinkedIn Post Scraper offers a wealth of opportunities for businesses, marketers, and recruiters. To ensure efficient use and actionable results, users should follow these best practices:
1. Define Objectives
Start with a clear understanding of your scraping goals, whether it’s for content analysis, lead generation, or competitor monitoring. Having well-defined objectives helps ensure that the extracted data aligns with your business needs.
Why It Matters: Without clear objectives, the data extracted may lack focus, making analysis more challenging and less effective. By defining goals upfront, users can streamline the scraping process and gather relevant insights.
Example:
- A B2B sales team focuses on generating leads and scrapes posts discussing remote work tools to identify potential customers for their software solution. By leveraging LinkedIn Message Thread Scraper, they can also track conversations within LinkedIn’s direct messages for a deeper understanding of their prospects' needs.
Scenario:
- A B2B sales team focuses on generating leads and scrapes posts discussing remote work tools to identify potential customers for their software solution.
2. Use Filters
Leverage TexAu’s advanced filtering options to focus your scraping efforts. Filters can be applied to narrow the scope based on keywords, hashtags, engagement levels, or specific timeframes.
Why It Matters: Filters help eliminate irrelevant data, allowing users to focus on posts that provide the most value. This targeted approach ensures efficient analysis and actionable results.
Example:
- A sustainability-focused company filters posts with hashtags like #GreenEnergy or #ClimateAction, ensuring they only extract posts relevant to their niche.
Scenario:
- An e-commerce brand filters posts with keywords like holiday shopping during November and December. This helps them analyze consumer behavior and craft targeted campaigns for the holiday season.
3. Schedule Scrapes
Regularly updating data is crucial for staying relevant. Use TexAu’s automation to schedule recurring scrapes, ensuring fresh insights without requiring constant manual input.
Why It Matters: Business strategies evolve quickly, and having up-to-date data keeps users ahead of trends and competitors. Scheduling scrapes saves time while maintaining relevance.
Example:
- A recruiter automates monthly scrapes of posts in industry-specific groups, keeping a fresh pool of qualified candidates for ongoing hiring needs. To further refine their hiring pipeline, they incorporate LinkedIn Job Scraper to track job openings and tailor outreach strategies.
Scenario:
- A recruiter automates monthly scrapes of posts in industry-specific groups, keeping a fresh pool of qualified candidates for ongoing hiring needs.
4. Optimize Data Use
Once the data is scraped, it’s essential to process and analyze it effectively. Export the data in formats like CSV or Excel for seamless integration into CRM systems or analytics tools.
Example:
- A sales team imports scraped post data into a CRM like HubSpot to track leads and measure conversion rates.
Scenario:
- A market research firm uses Excel to categorize posts based on engagement levels, identifying topics that consistently drive high interaction rates.
Key Takeaways
By defining clear objectives, applying filters, and scheduling scrapes, users can maximize TexAu’s LinkedIn Post Scraper to extract relevant, actionable data. Whether for creating impactful content, generating leads, or monitoring competitors, these best practices ensure TexAu is used to its full potential.
{% cta buttonText="Start free trial" title="Scrape LinkedIn Posts, Comments & Engagement Data" description="Extract posts, likes, shares, and comments from any profile. Track trends, gather insights, and export data built for marketers, researchers, and outreach teams." /%}
Challenges Addressed by TexAu
Manual Content Research
Manually browsing LinkedIn posts for insights is a tedious and time-intensive process. TexAu automates this task, enabling professionals to extract large volumes of data in minutes.
How It Helps: Instead of spending hours searching through posts, users can scrape data effortlessly and focus on analyzing results. This improves efficiency and allows professionals to allocate their time to strategic decision-making.
Scenario: A digital marketing specialist who previously spent several hours manually reviewing competitor posts now uses TexAu to scrape and organize the data automatically, saving significant time and effort.
Inconsistent Data Accuracy
When extracting data manually, there’s a high chance of inconsistencies or incomplete information. TexAu ensures structured and accurate data extraction, eliminating errors.
How It Helps: By providing clean and organized data, TexAu allows users to derive meaningful insights without the risk of inaccuracies.
Scenario: An analyst using manual methods often missed key engagement metrics while reviewing posts. With TexAu, they receive comprehensive data, enabling better analysis and reporting.
Scaling Limitations
Extracting data at scale is challenging without the right tools. TexAu’s automation suite is designed to handle large-scale data scraping, making it ideal for businesses with extensive requirements.
How It Helps: TexAu can scrape data from hundreds or even thousands of LinkedIn posts simultaneously, ensuring scalability and efficiency.
Scenario: An enterprise-level marketing team uses TexAu to analyze engagement patterns across posts from 50 competitors. The tool provides actionable insights at a scale that would be impossible to achieve manually.
TexAu’s LinkedIn Post Scraper streamlines content analysis, lead generation, and recruitment by automating the extraction of valuable LinkedIn data. By adopting best practices and leveraging its features, professionals can unlock actionable insights, save time, and scale their operations effectively.
Advanced Features for Deeper Insights
Sentiment Analysis: Understanding Audience Tone and Reactions
Sentiment analysis is a crucial feature for businesses aiming to gauge public perception of their brand, campaigns, or industry topics. By analyzing the tone of comments on LinkedIn posts, organizations can understand whether their audience’s reactions are positive, negative, or neutral. This insight allows businesses to adjust their messaging or approach to better align with audience expectations.
How It Works
TexAu scrapes comments and engagement data from LinkedIn posts, which can then be processed using sentiment analysis tools. These tools categorize text into positive, negative, or neutral sentiments based on word choices, tone, and context.
Example: A PR agency managing a tech company’s LinkedIn presence launches a post about a new AI-powered tool. By analyzing the comments, they discover a mix of reactions—some praising the tool’s innovation and others expressing concerns about data privacy. With this insight, the agency crafts follow-up posts addressing privacy concerns, reinforcing trust, and improving overall sentiment.
Scenario: A non-profit organization running a fundraising campaign analyzes comments on their LinkedIn posts. They notice overwhelmingly positive sentiments about their mission but also spot concerns about donation transparency. This feedback prompts them to publish a post detailing how donations are utilized, increasing trust and engagement.
Engagement Metrics: Uncovering Drivers of Post Success
Understanding what drives engagement on LinkedIn posts—likes, comments, and shares—is key to replicating success. Engagement metrics reveal the effectiveness of specific content formats, topics, or posting times, helping businesses optimize their strategies.
How It Works
TexAu extracts detailed engagement data from LinkedIn posts, including the number of likes, comments, and shares. Businesses can analyze this data to identify patterns and understand what resonates with their audience.
Example: A fashion brand notices that posts featuring behind-the-scenes content, such as the creation of a new clothing line, consistently generate higher engagement than standard promotional posts. Using this insight, they allocate more resources to creating authentic, behind-the-scenes content for future campaigns.
Scenario: A B2B SaaS company analyzes engagement metrics across their posts and finds that posts with customer success stories receive 50% more comments than posts showcasing product features. They decide to increase the frequency of success stories to build trust and demonstrate value.
Hashtag Analysis: Tracking Trends and Boosting Visibility
Hashtags are essential for content discoverability and trend monitoring on LinkedIn. Analyzing hashtags used in posts can provide insights into what topics are trending, what your competitors are focusing on, and how you can position your content for greater reach.
How It Works
TexAu’s LinkedIn Post Scraper extracts hashtags from posts, allowing businesses to analyze their popularity and relevance. By identifying high-performing hashtags, businesses can optimize their own content for better visibility and engagement.
Example: A tech startup analyzing LinkedIn posts discovers that hashtags like “#AIinBusiness” and “#FutureOfWork” are trending in AI discussions. They incorporate these hashtags into their posts, resulting in a 20% increase in post reach.
Scenario: A digital marketing agency monitors hashtags used by competitors in the e-commerce industry. They notice increased usage of “#EcoFriendlyPackaging.” By integrating this hashtag into their client’s content strategy, they align with a growing trend and attract more engagement.
Historical Data Collection: Analyzing Trends Over Time
Historical data collection allows businesses to track changes in content themes, audience preferences, and engagement patterns over a specific period. This is especially valuable for identifying long-term trends and planning future campaigns.
How It Works
TexAu enables users to scrape LinkedIn posts from specific date ranges. By analyzing this historical data, businesses can identify shifts in industry trends, audience behavior, and competitor strategies.
Example: A researcher studying the evolution of remote work trends scrapes LinkedIn posts from 2020 to 2023. Their analysis reveals that discussions initially focused on productivity tools during the pandemic but later shifted to hybrid work models and employee wellness. This insight helps them recommend targeted solutions to their clients.
Scenario: An event management company reviews posts from the past two years to identify seasonal engagement trends. They discover that engagement peaks in the months leading up to the holiday season, allowing them to plan campaigns and outreach efforts more effectively.
Tips for Optimizing Scraping Results
1. Focus on Relevant Hashtags
Using targeted hashtags ensures that the scraped data aligns with your business goals. Hashtags act as identifiers for specific topics or communities, helping you zero in on relevant discussions.
Example: A sustainability-focused business might use hashtags like “#GreenTech” or “#ClimateAction” to scrape posts related to their niche. This ensures they gain insights from the right audience and content.
2. Monitor Key Influencers
Influencers and thought leaders often shape industry trends and discussions. Analyzing their posts and engagement can provide valuable insights into emerging topics and audience interests.
Example: A marketing agency monitors posts from influential figures in digital marketing. By analyzing their content and engagement metrics, the agency identifies trending topics like AI-driven advertising and adapts its strategies accordingly.
3. Target Niche Communities
LinkedIn groups and niche communities often contain highly targeted and valuable content. Scraping posts from these sources allows businesses to gain insights specific to their audience or industry.
Example: A recruiter looking for finance professionals scrapes content from LinkedIn groups like “Finance Professionals Network” or “Chartered Accountants Community.” This helps them identify active and engaged candidates within these groups.
TexAu’s advanced features—sentiment analysis, engagement tracking, hashtag analysis, and historical data collection—empower businesses to make informed decisions based on actionable LinkedIn insights. By focusing on targeted scraping, monitoring influencers, and analyzing niche communities, professionals can enhance their strategies, boost engagement, and stay ahead of industry trends.
Conclusion: Take Your LinkedIn Strategy to the Next Level
The LinkedIn Post Scraper by TexAu is a game-changing tool for marketers, sales teams, and recruiters. By automating the data extraction process, it enhances content strategies, accelerates lead generation, and provides a competitive edge through detailed competitor analysis.
With features like sentiment analysis, engagement tracking, and customizable filters, TexAu ensures users can derive meaningful insights from LinkedIn data. Leverage TexAu’s LinkedIn Post Scraper to make data-driven decisions, stay ahead of trends, and achieve your professional goals—efficiently and ethically.
Ready to transform your LinkedIn strategy? Start using TexAu today!
The LinkedIn Post Scraper automation allows you to extract data from LinkedIn posts, including post content, engagement metrics (likes, comments, shares), and post dates. This tool is ideal for marketers, sales teams, and social media managers who want to analyze trends, monitor competitors, or track engagement. Follow this guide to configure the automation, with options to export data to Google Sheets or CSV for easy review and analysis.
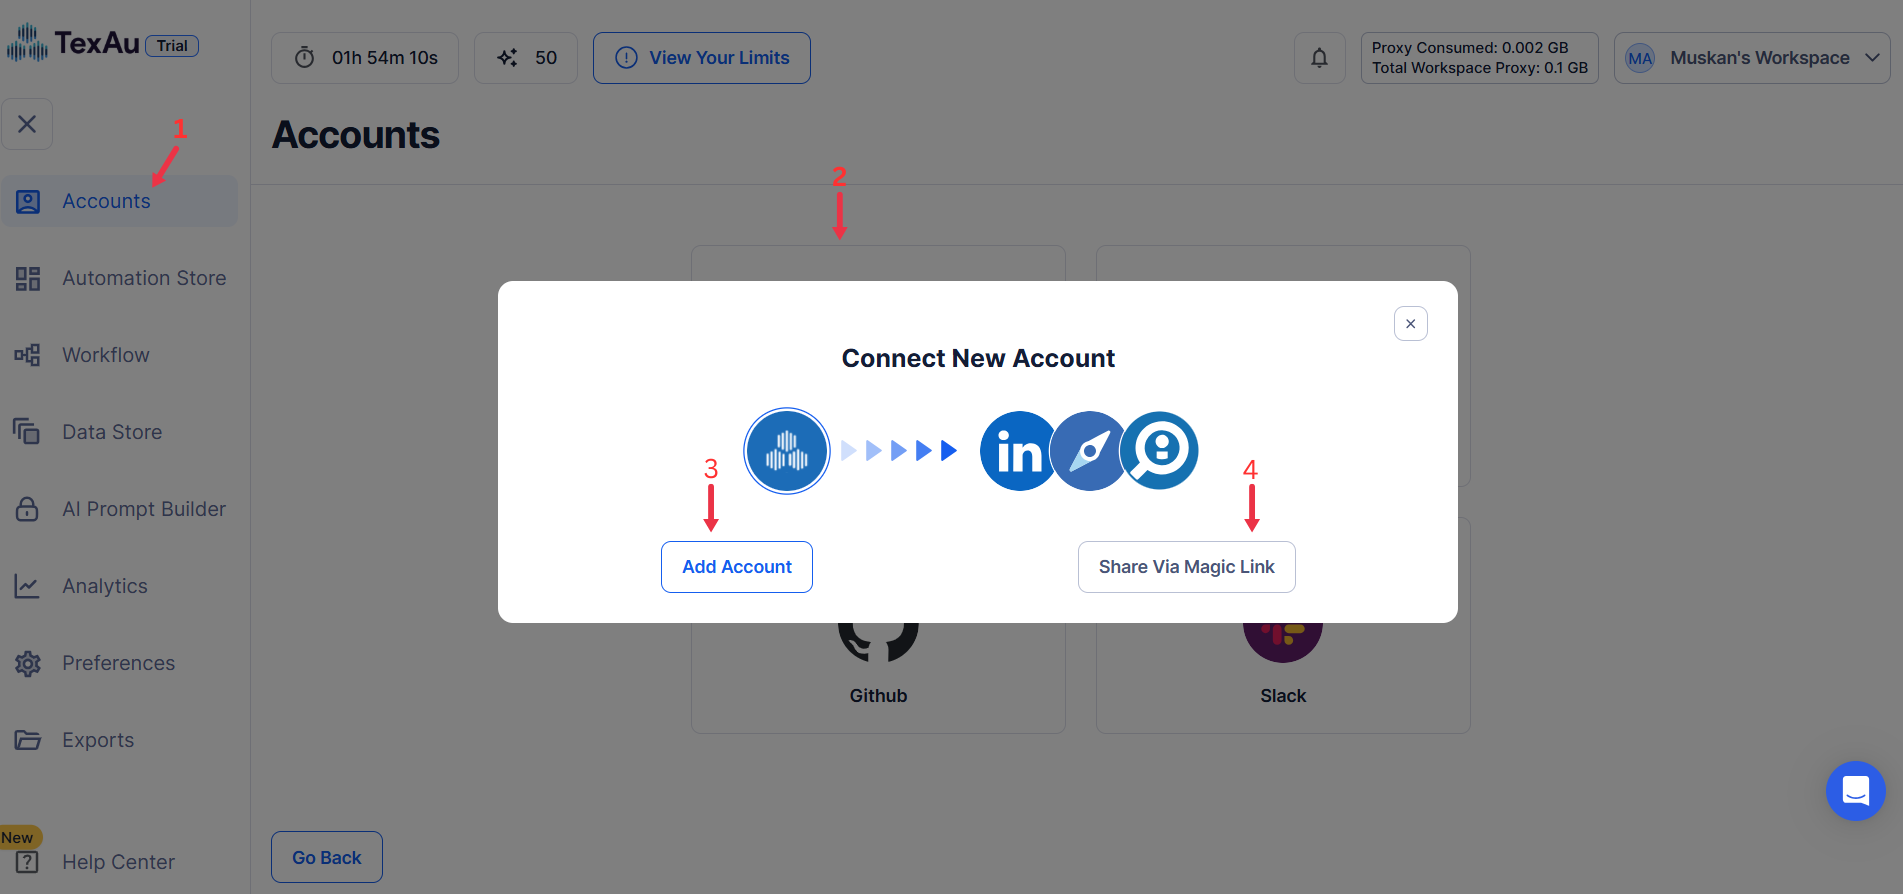
Step 1: Log in to TexAu and Connect LinkedIn
- Log in to your TexAu account at v2-prod.texau.com.
- Go to Accounts and connect your LinkedIn account. You can choose one of these methods:
- Share via Magic Link: Share the link, copy it to your browser, and follow the steps to integrate your LinkedIn account securely.
- Add Account: Sync cookies and browser data with TexAu for seamless integration.
Tip: Use Magic Link for an easy and secure connection.
{% custom-image src="https://v2-web-assets.s3.us-east-1.amazonaws.com/Common/log-in-to-texau-and-connect-linkedin/connect-linkedin.png" alt="connect-linkedin" /%}
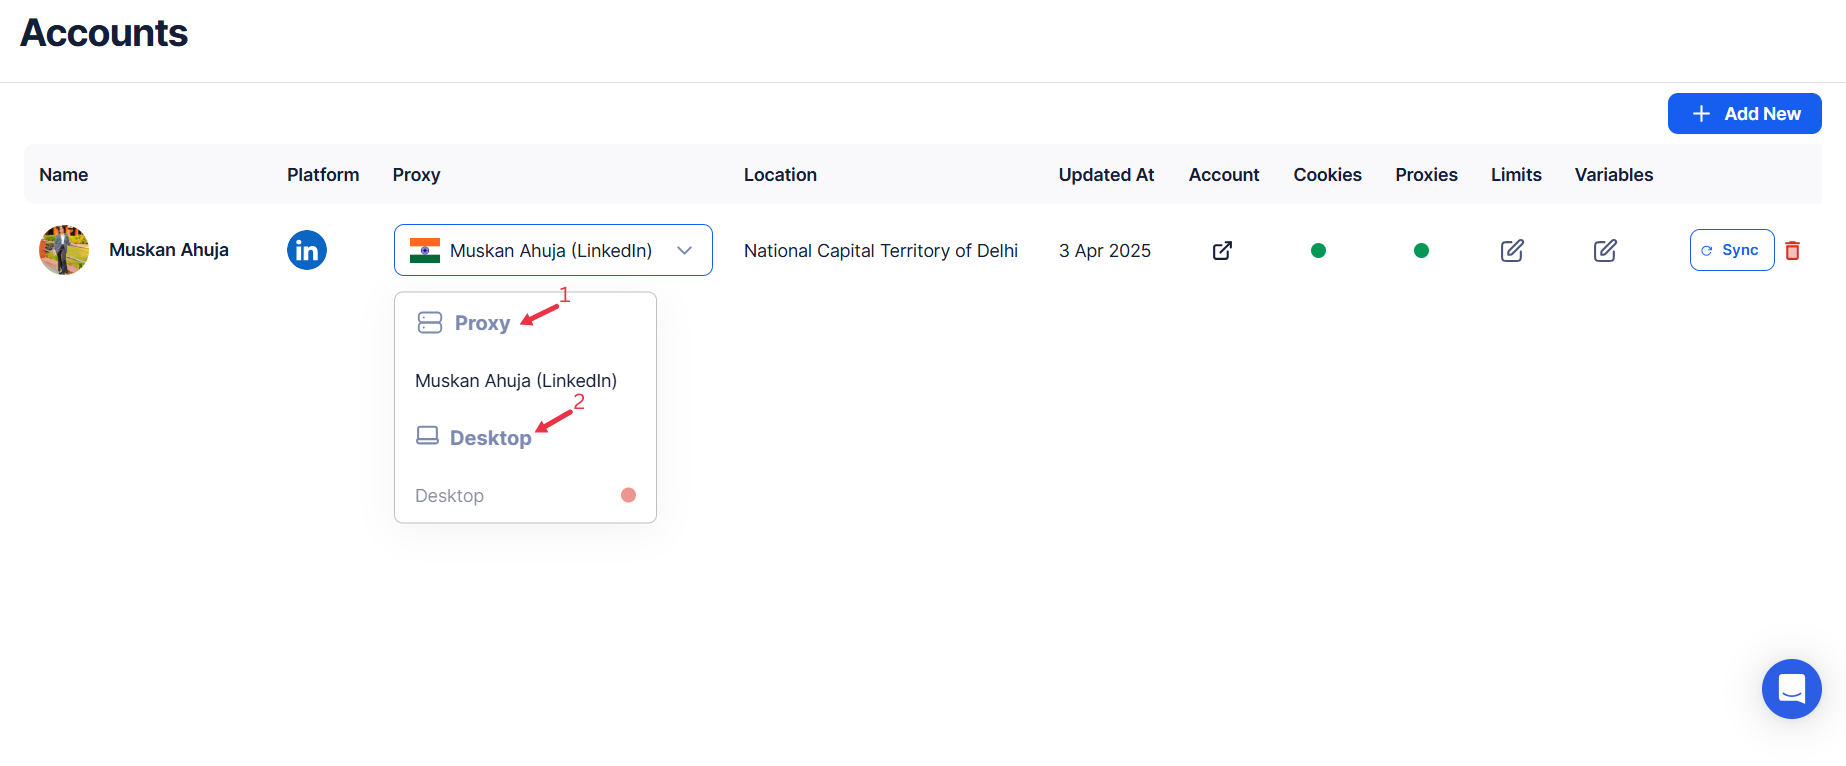
Step 2: Choose Cloud or Desktop Execution
Decide how you want to run the automation:
- Cloud Mode: Automates tasks on TexAu’s servers with built-in proxies. You can add custom proxies via Settings > Preferences > Proxies.
- Desktop Mode: Runs automation on your local device using your IP address.
Tip: Desktop mode saves cloud runtime credits and gives more control over the process.
{% custom-image src="https://v2-web-assets.s3.us-east-1.amazonaws.com/Common/cloud-or-desktop-execution/cloud-or-desktop-execution.png" alt="choose-cloud-or-desktop-execution" /%}
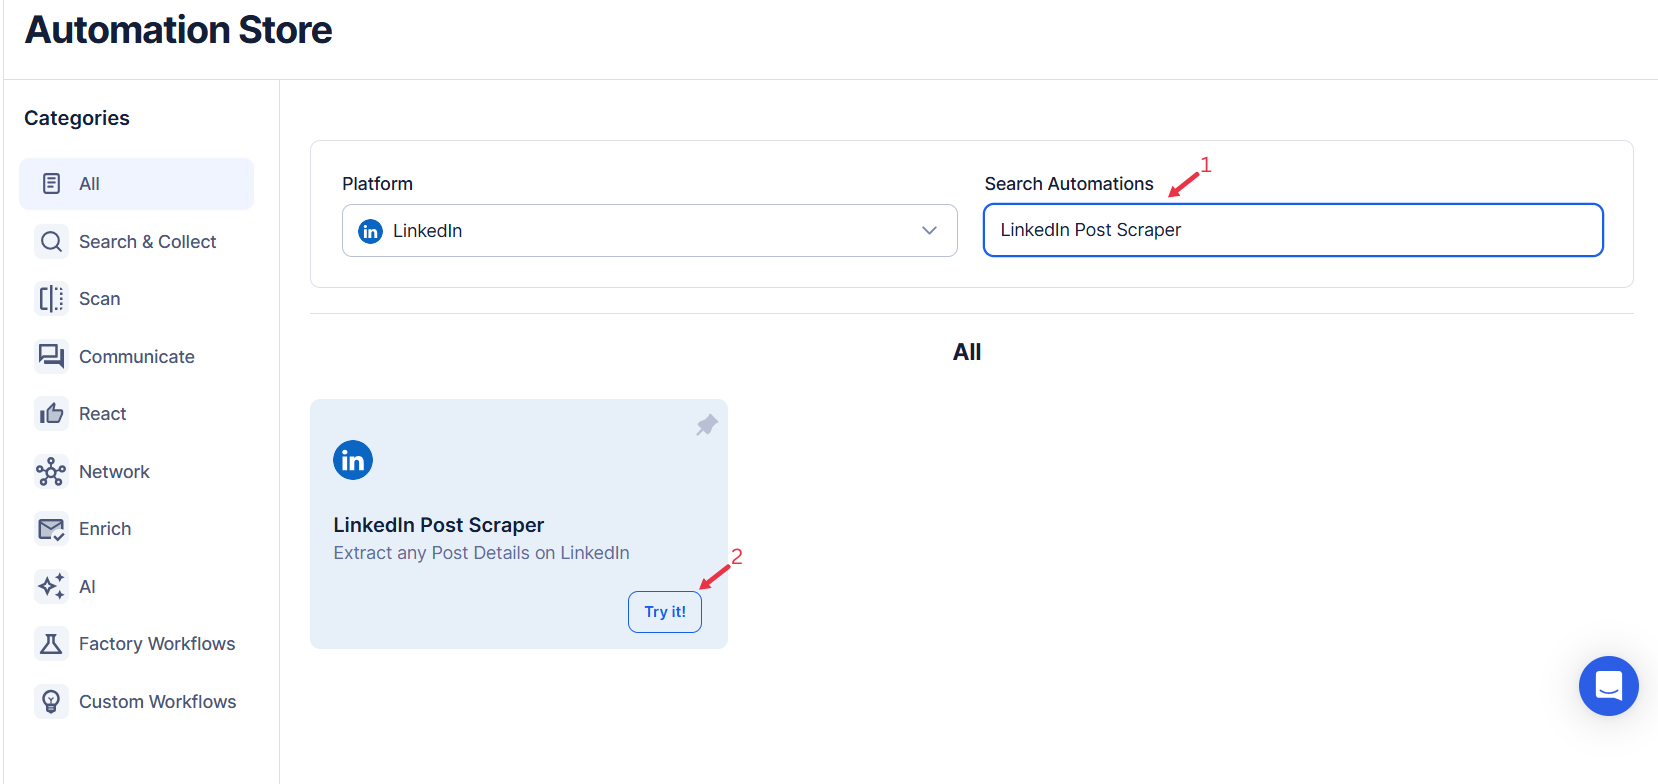
Step 3: Search for the Particular LinkedIn Automation
- Navigate to the Automation Store on TexAu.
- Use the search bar to find LinkedIn Post Scraper automation.
{% custom-image src="https://v2-web-assets.s3.us-east-1.amazonaws.com/Automations/linkedin-post-scraper/linkedin-post-scraper.png" alt="search-for-the-particular-LinkedIn-automation" /%}
{% cta buttonText="Start free trial" title="Scrape LinkedIn Posts, Comments & Engagement Data" description="Extract posts, likes, shares, and comments from any profile. Track trends, gather insights, and export data built for marketers, researchers, and outreach teams." /%}
Step 4: Select Your Input Source
Define the input source to specify LinkedIn posts for the LinkedIn Post Scraper automation. TexAu provides multiple options to suit the needs of founders, sales managers, marketers, and growth hackers. Here's how to configure each:
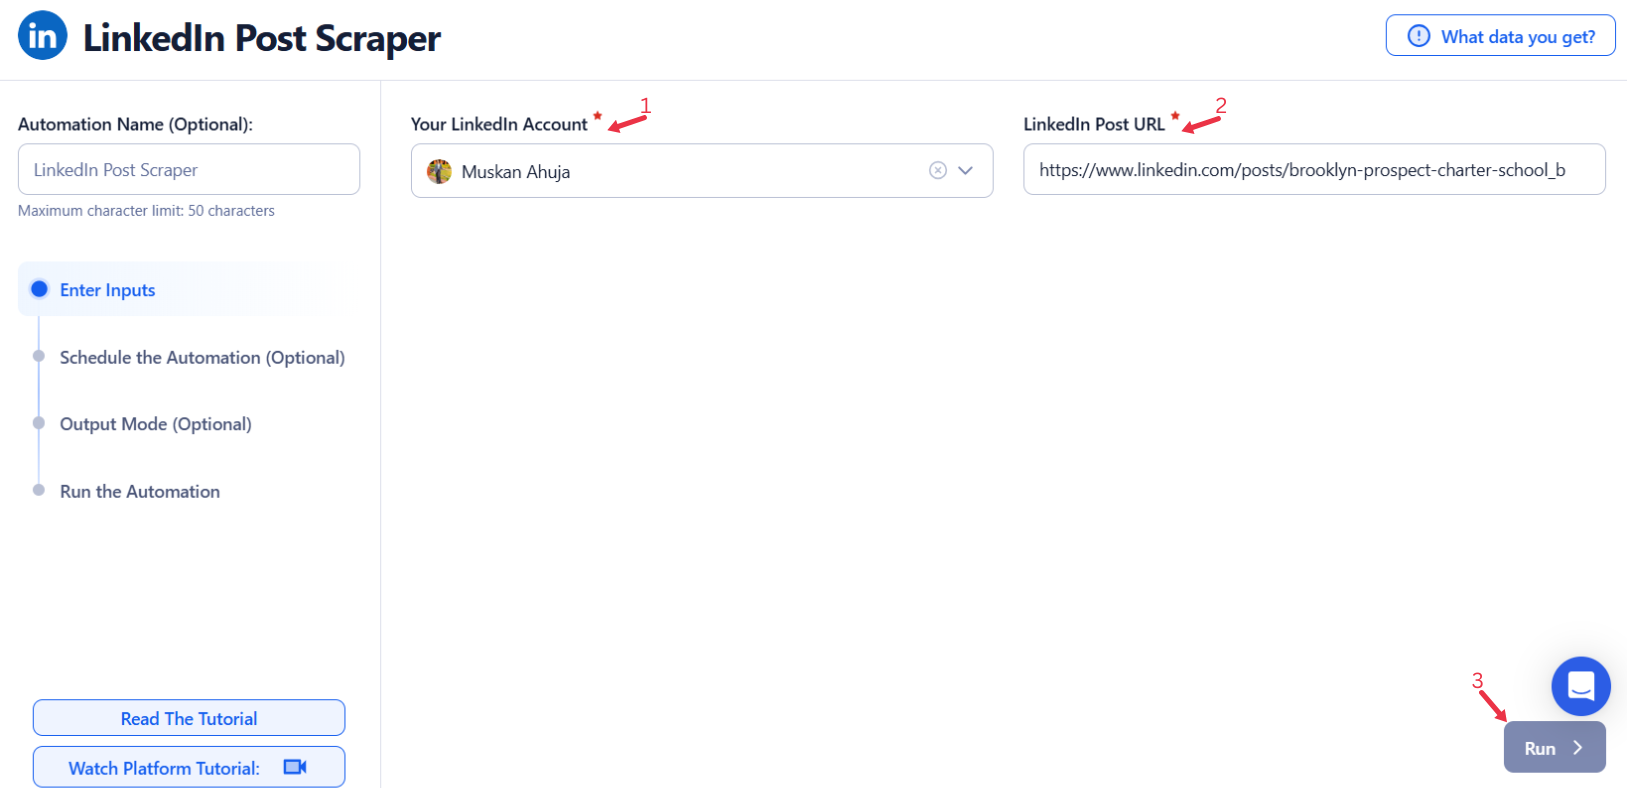
Manually Enter a Single Input
Use this option to scrape data from a specific LinkedIn post. Simply enter the LinkedIn post URL into the input field to process one post at a time. This is ideal for targeted post data collection.
- Post URL: Enter the LinkedIn post URL (e.g., "https://www.linkedin.com/posts/xyz").
- After entering the post URL, click Run in the lower-right corner to initiate the automation.
{% custom-image src="https://v2-web-assets.s3.us-east-1.amazonaws.com/Automations/linkedin-post-scraper/linkedin-post-scraper-single-inputs.png" alt="enter-a-single-input" /%}
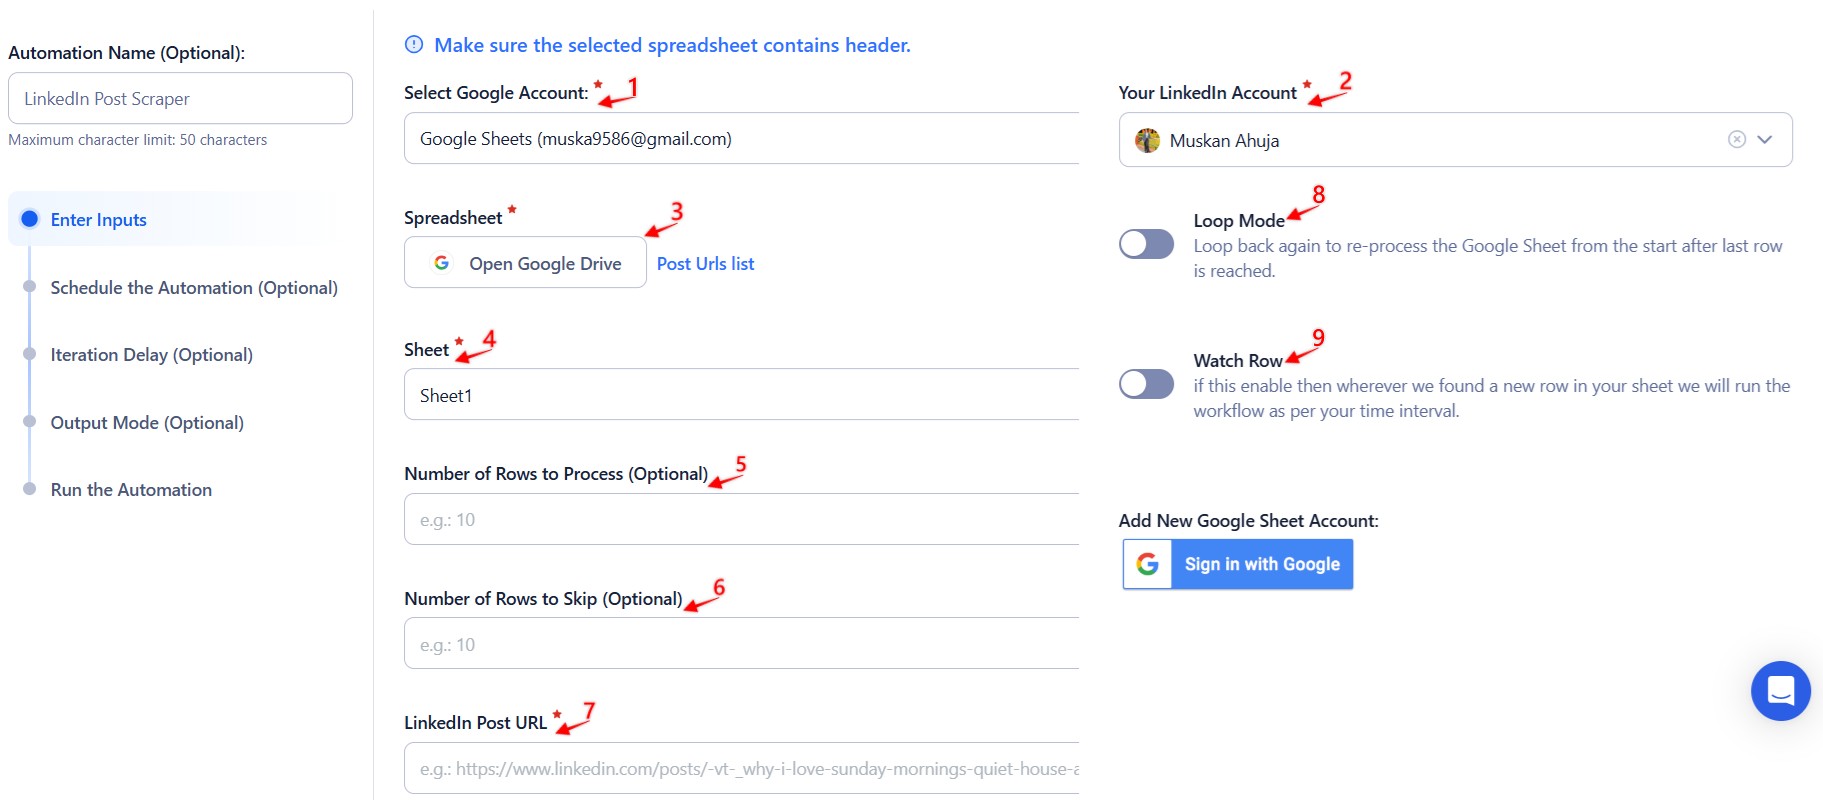
Google Sheets
This option is ideal for scraping data from multiple LinkedIn posts efficiently. Follow these steps to use Google Sheets:
- Click Select Google Account to choose your Google account or click on Add New Google Sheet Account (you can add multiple Google accounts).
- Click Accounts to select LinkedIn as the platform.
- Click Open Google Drive to locate the Google Sheet containing LinkedIn post URLs. A pop-up will display your Google Drive files.
- Select the spreadsheet and the specific sheet containing LinkedIn post URLs. Confirm the correct sheet selection to ensure the data is accurate.
- Configure additional options:
- Number of Rows to Process (Optional): Define the number of rows you want to process from the sheet.
- Number of Rows to Skip (Optional): Specify rows to skip at the beginning of the sheet.
- Post URL: Ensure the column contains LinkedIn post URLs.
- After configuring the Google Sheet, click Run in the lower-right corner to initiate the automation.
Optional Advanced Feature:
-
Loop Mode: Enable Loop Mode to re-process the Google Sheet from the beginning once all rows are completed. This is useful for tasks that require recurring updates.
-
Watch Row (Optional)
Watch Row feature monitors Google Sheets and automates workflow execution by detecting new data and triggering tasks.
Configure Watch Row by defining an update frequency and selecting a time frame.
Watch Row Schedule
- None
- Scheduling Intervals (e.g., every 15 minutes, every hour)
- One-Time Execution
- Daily Execution
- Weekly Recurrence (e.g., every Monday and Friday)
- Monthly Specific Dates (e.g., 11th and 29th)
- Custom Fixed Dates (e.g., September 5)
By default, Watch Row checks every 15 minutes and continues for five days unless modified.
With Watch Row, TexAu keeps workflows running dynamically.
{% custom-image src="https://v2-web-assets.s3.us-east-1.amazonaws.com/Automations/linkedin-post-scraper/linkedin-post-scraper-google-sheetss.jpeg" alt="use-google-sheets-for-bulk-input" /%}
CSV File
This option allows you to process LinkedIn post URLs from a static file. Follow these steps:
- Click Upload CSV File and browse to locate the file containing LinkedIn post URLs.
- Once uploaded, TexAu will display the file name and preview its content. Verify the data to confirm the correct file is selected.
- Configure additional options:
- Number of Rows to Process (Optional): Specify the number of rows to process from the CSV file.
- Number of Rows to Skip (Optional): Define rows to skip at the beginning of the file.
- Post URL: Ensure the column contains LinkedIn post URLs.
- After uploading the CSV file and configuring the options, click Run in the lower-right corner to initiate the automation.
Optional Advanced Feature:
-
Loop Mode: Enable Loop Mode to re-process the Google Sheet from the beginning once all rows are completed. This is useful for tasks that require recurring updates.
-
TexAu’s Watch Row feature enables workflow automation by detecting new Google Sheet entries and executing linked processes immediately.
Configure Watch Row by choosing an execution frequency and setting a monitoring time frame.
Watch Row Schedule
- None
- Scheduling Intervals (e.g., every 15 minutes, every hour)
- One-Time Execution
- Daily Execution
- Weekly Recurrence (e.g., every Tuesday and Saturday)
- Monthly Specific Dates (e.g., 10th and 30th)
- Custom Fixed Dates (e.g., August 22)
By default, Watch Row scans every 15 minutes and continues for five days unless adjusted.
With Watch Row, TexAu ensures automated task execution without manual input.
Screenshot Suggestion:
- Show the manual input fields for "Post URL" with example values (e.g., "https://www.linkedin.com/posts/xyz").
- Display the Google Sheets selection screen, emphasizing the setup for LinkedIn post URLs.
- Include a preview of a CSV upload, highlighting the file name and LinkedIn post URLs.
This ensures efficient LinkedIn post data extraction, whether for targeted posts or bulk processing.
{% custom-image src="https://v2-web-assets.s3.us-east-1.amazonaws.com/Automations/LinkedIn+Post+Scraper/Step3.png" alt="step3" /%}
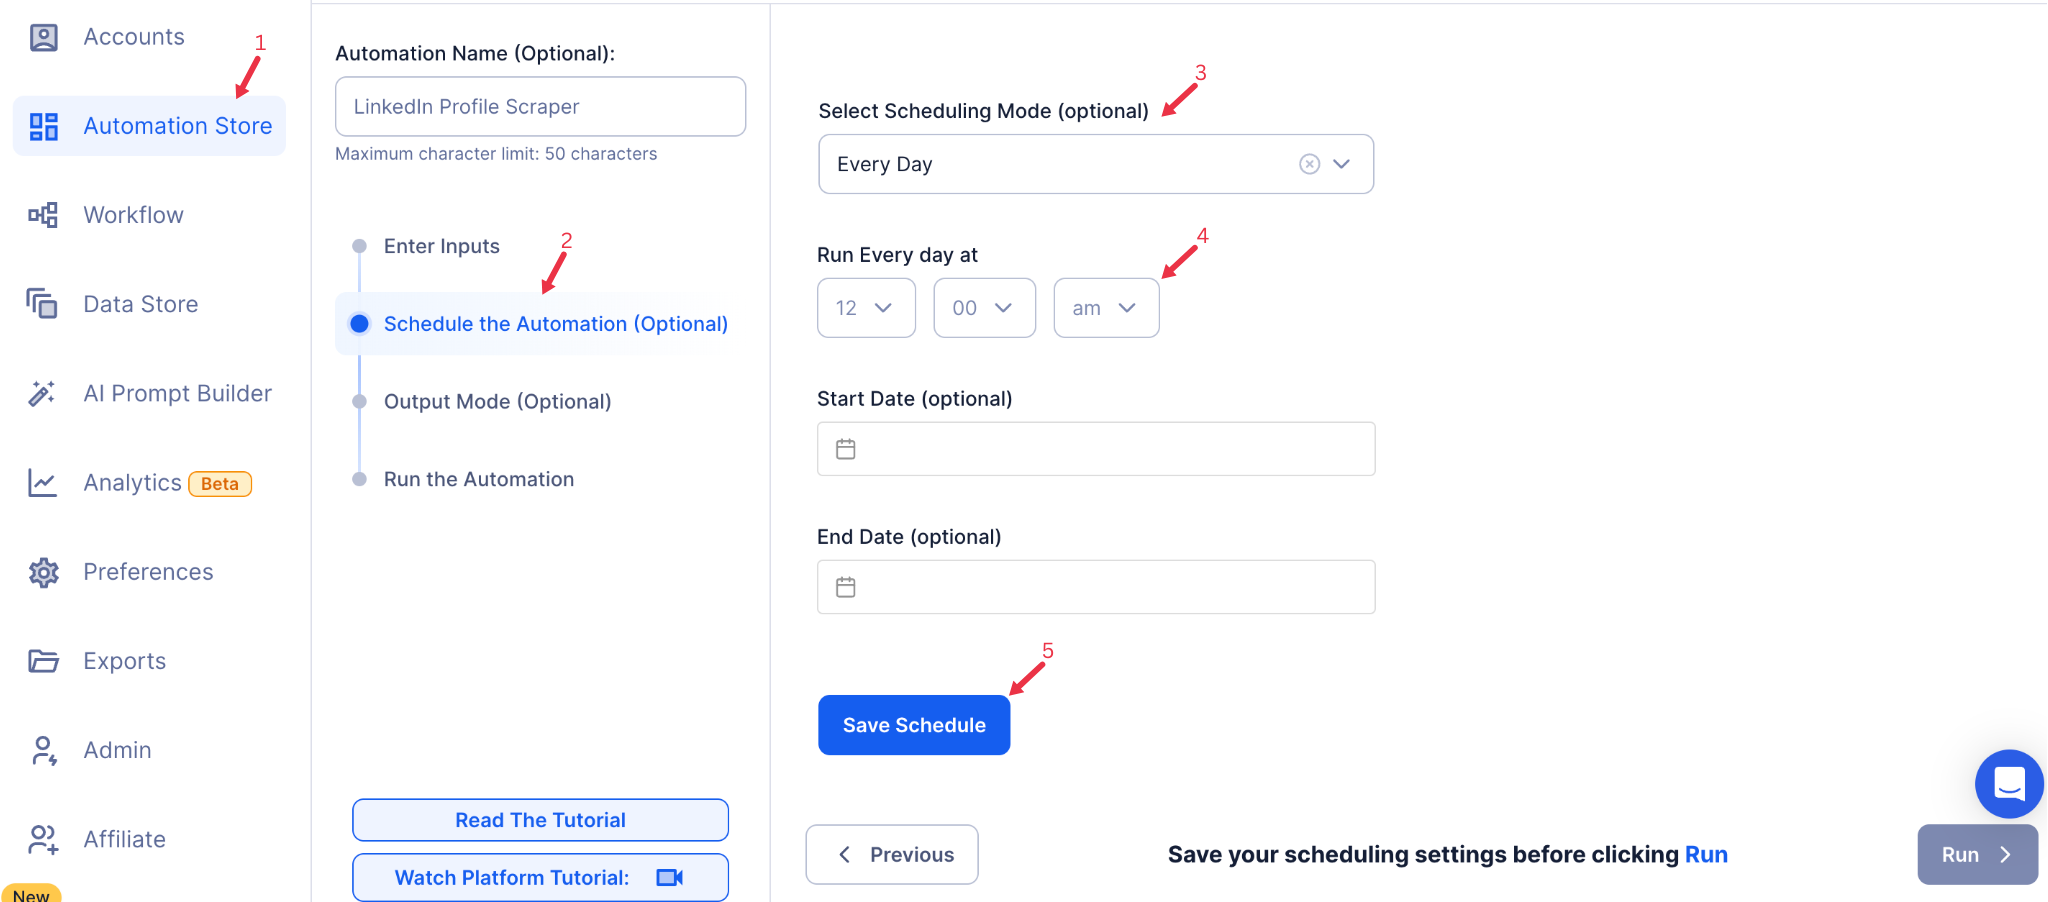
Step 5: Schedule the Automation (Optional)
If you want to run the automation periodically, configure the Schedule settings. Click Schedule to set the start date and time, or choose a Recurrence Frequency to repeat the automation:
- At Regular Intervals (e.g., every day or every week)
- Once
- Every Day
- On Specific Days of the Week (e.g., every Monday and Thursday)
- On Specific Days of the Month (e.g., the 5th and 20th)
- On Specific Dates (e.g., March 1)
Scheduling is ideal for monitoring posts regularly, helping you stay updated on trends and engagement metrics.
{% custom-image src="https://v2-web-assets.s3.us-east-1.amazonaws.com/Common/schedule-the-automation/schedule-the-automation.png" alt="schedule-the-automation" /%}
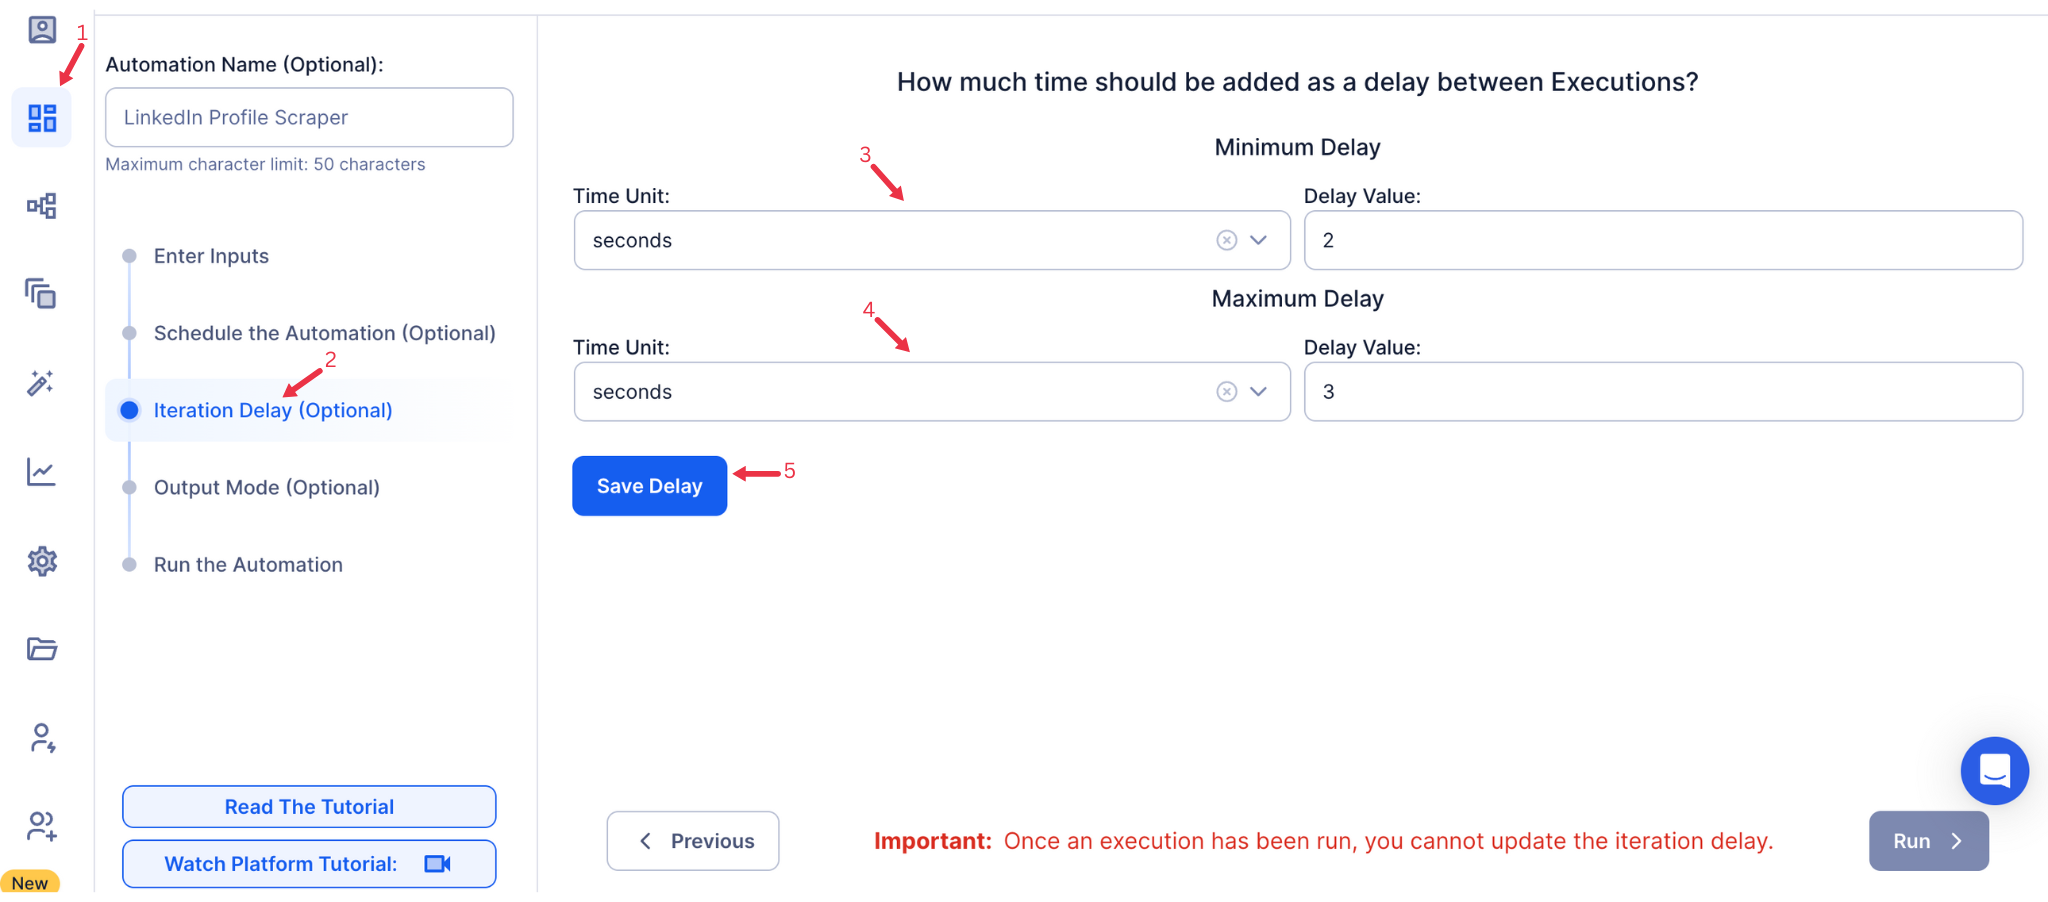
Step 6: Set an Iteration Delay (Optional)
To avoid LinkedIn’s rate limits, set an Iteration Delay to control the interval between each post extraction. Configure Minimum Delay and Maximum Delay values to introduce variability, simulating natural usage. Adjust the delay in seconds, minutes, hours, or days as needed.
{% custom-image src="https://v2-web-assets.s3.us-east-1.amazonaws.com/Common/iteration-delay/iteration-delay.png" alt="iteration-delay" /%}
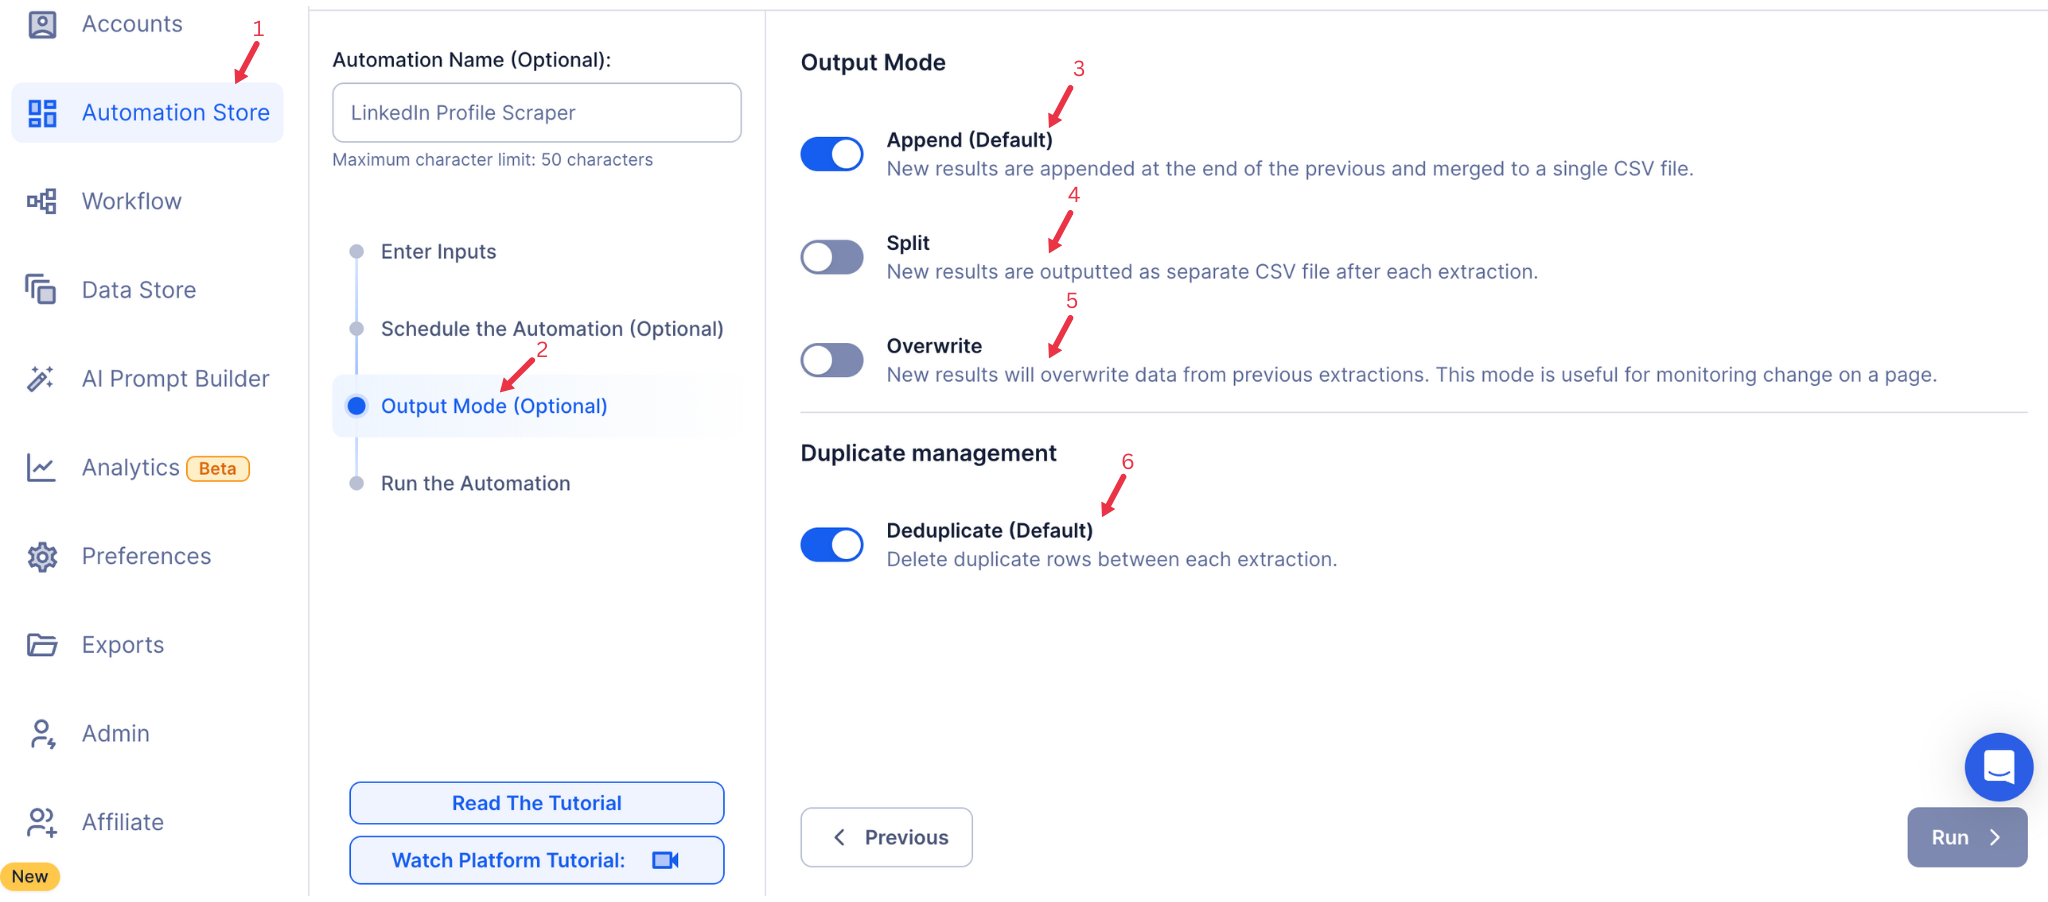
Step 7: Choose Your Output Mode (Optional)
In Output Mode, select how you’d like to save and organize the extracted post data. Export data to Google Sheets or CSV file for straightforward analysis and sharing.
- Export Options: Choose Google Sheets or CSV file as your output destination. Link your Google account if you select Google Sheets, enabling direct export to Google Drive.
- Output Management:
- Append (Default): Adds each new extraction to the end of the existing file, creating a cumulative list of posts.
- Split: Each automation run generates a new file, ideal for organizing data by session.
- Overwrite: Replaces previous data with the latest extraction, suitable if you only need recent post data.
- Duplicate Management: Use Deduplicate to automatically remove duplicate entries, ensuring data remains clean and organized.
Tip: Google Sheets export is ideal for collaborative projects, allowing team members to access post data in real-time.
{% custom-image src="https://v2-web-assets.s3.us-east-1.amazonaws.com/Common/output-mode/output-mode.png" alt="output-mode" /%}
Step 8: Access the Data from the Data Store
After the automation completes, go to the Data Store section in TexAu to access the scraped post data. Locate the LinkedIn Post Scraper automation and click See Data to view or download the results.
{% custom-image src="https://v2-web-assets.s3.us-east-1.amazonaws.com/Automations/LinkedIn+Post+Scraper/step8.png" alt="step8" /%}
The LinkedIn Post Scraper automation makes it easy to collect and analyze data from LinkedIn posts, providing insights into engagement and content trends. With scheduling, bulk input options, and export to Google Sheets or CSV, this tool is valuable for marketers, social media managers, and sales professionals looking to monitor and leverage LinkedIn content effectively.
Run this automation on your own server.
TexAu V3 doesn't host social-platform automations anymore — but the runnable code is yours. Tell us your inputs, outputs, and target environment, and we'll ship you a working version you can deploy and operate yourself.