LinkedIn has long been the cornerstone of professional networking, career development, and business growth. With millions of users across industries, the platform is a rich source of valuable content. From industry news and job postings to thought leadership and personal updates, LinkedIn offers a unique blend of professional discussions and business insights.
For businesses, marketers, and professionals, LinkedIn serves as more than just a place to network; it is also an essential tool for content strategy, market research, and competitive analysis. Posts on LinkedIn provide rich data that can help organizations understand what topics are trending, gauge audience sentiment, and even uncover opportunities for growth. TexAu’s advanced LinkedIn Searches feature allows users to refine their data collection based on specific search criteria, ensuring they focus on the most relevant posts and insights.
Searching and exporting LinkedIn post data is an important step in leveraging this valuable resource. With LinkedIn Search Export capabilities, TexAu enables businesses to create a detailed list of leads or uncover insights into potential customers, saving hours of manual effort. However, manually collecting and analyzing this data can be incredibly time-consuming and inefficient. By automating the search and export process, TexAu empowers professionals to bypass limitations on manual searches, delivering precise searches that align with their goals.
TexAu automates the process of searching and exporting LinkedIn posts, providing businesses and professionals with a streamlined solution to gather the insights they need to stay ahead in their respective industries. With TexAu, users can quickly extract data from LinkedIn posts, analyze trends, and refine their content strategies or competitive insights. The tool’s integration of automation tools ensures users can seamlessly export search results into actionable formats, making it easier to identify opportunities, such as new job postings, qualified candidates, or potential customers.
Whether you’re looking to understand audience preferences, track competitors, or generate new leads, TexAu simplifies the process, ensuring that your efforts are as efficient and effective as possible.
Key Features of TexAu's LinkedIn Post Search Export Tool
Advanced Search Filters
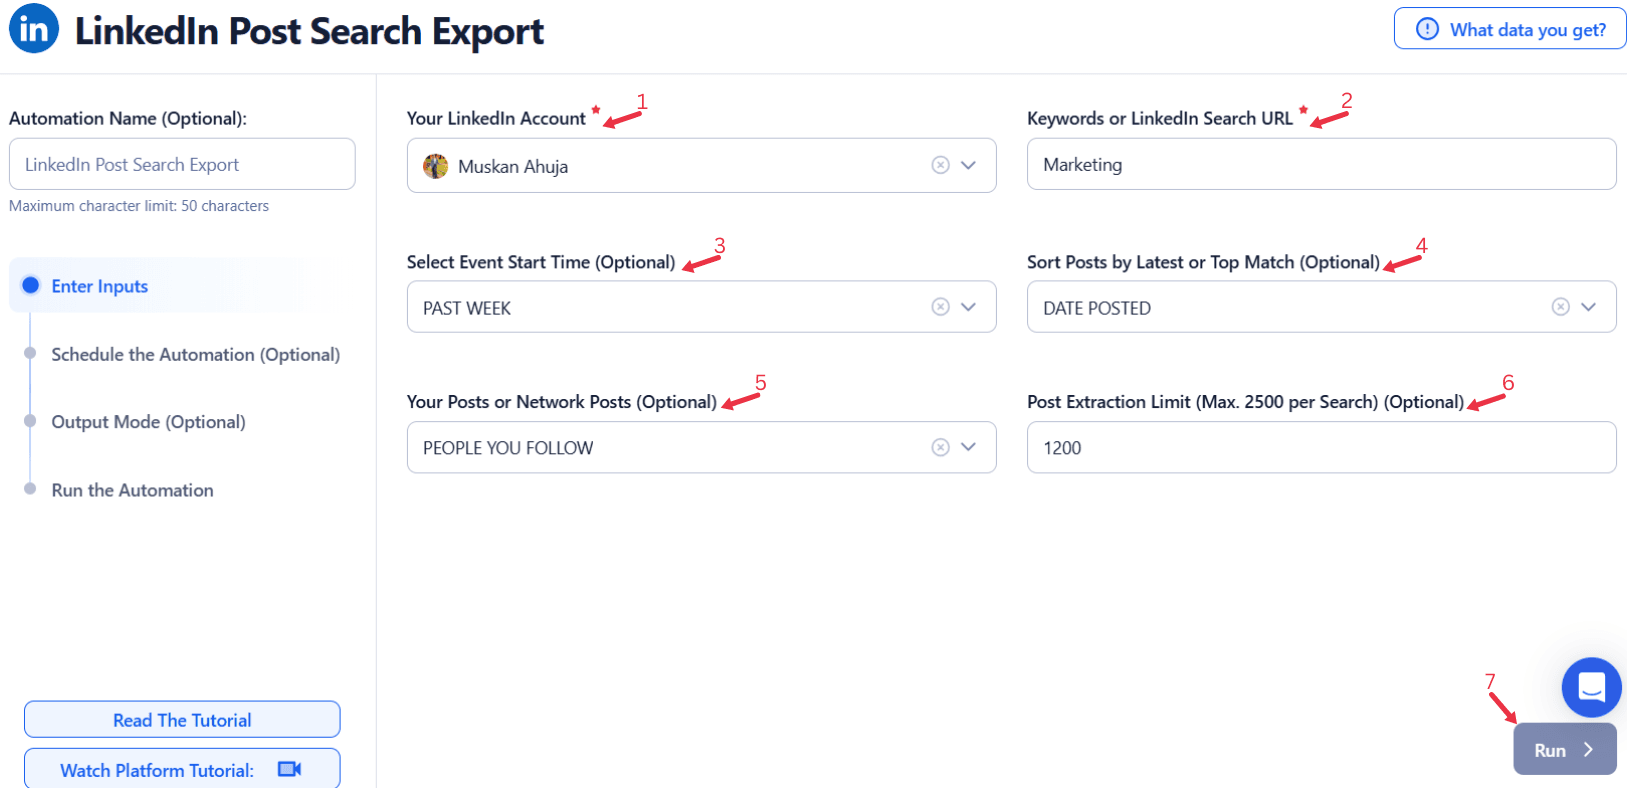
TexAu’s LinkedIn Post Search Export tool includes advanced search filters that allow users to search for posts based on a variety of parameters such as keywords, hashtags, date ranges, and engagement metrics. These filters help users pinpoint the most relevant posts related to their industry, target audience, or strategic goals.Why It Matters: The power of TexAu’s search filters lies in their ability to zero in on highly relevant content. By customizing your search, you can avoid wasting time sifting through irrelevant posts and instead focus on content that aligns with your goals.Example: If you're interested in trends around remote work, you could use TexAu to search for posts mentioning “remote work trends” within the last six months. This refined search would give you a collection of posts that focus specifically on your desired topic, providing you with valuable insights for analysis. For those looking to analyze audience engagement and sentiment, TexAu’s LinkedIn Post Likers Export helps users extract valuable insights on the people interacting with industry-specific content.
Comprehensive Data Export
TexAu not only allows users to search for posts but also enables the export of detailed data, including:
- Post Content
- Author Information
- Likes
- Comments
- Shares
- Hashtags
- Post URLs
Why It Matters: Comprehensive data export is key for in-depth analysis. By extracting a complete set of information, TexAu provides users with a holistic view of a post’s performance and engagement. This enables businesses to track content trends, measure the success of posts, and identify influential authors.
Example: A content strategist at a tech company wants to analyze posts about “B2B marketing strategies.” Using TexAu, they export detailed information on posts discussing this topic, including engagement metrics (likes, comments, shares) and associated hashtags. This comprehensive data enables them to identify what content resonates most with their audience and why.
Bulk Export
TexAu’s bulk export feature allows users to export multiple LinkedIn posts at once, saving considerable time and effort. Rather than manually exporting posts one by one, users can quickly gather large datasets for more extensive analysis.
Why It Matters: Bulk export is particularly beneficial for projects requiring the analysis of a large volume of data, such as market research, competitor analysis, or lead generation. It ensures that users can work at scale without getting bogged down in repetitive tasks. For professionals tracking industry insights through LinkedIn articles, TexAu’s LinkedIn Profile Articles Export makes it easier to extract and analyze expert-published content.
Example: A marketing team analyzing a competitor's content strategy can use TexAu to export posts from that competitor over the past year. This bulk scraping capability enables them to track patterns, identify content gaps, and refine their own content strategies.
Customizable Parameters
TexAu offers users the flexibility to set specific parameters for post searches, such as minimum engagement levels (e.g., posts with more than 100 likes or shares), industry focus, or specific keywords/hashtags.
Why It Matters: Customizable parameters allow users to refine their results even further, ensuring they only export posts that meet specific criteria. This helps streamline analysis and ensures that data is not overwhelming or irrelevant.
Example: A B2B marketer wants to identify high-performing content in the tech industry. Using TexAu, they set a filter to only show posts with more than 100 likes related to “cloud computing,” ensuring that they only analyze the most impactful content.
Export Formats
TexAu allows you to export LinkedIn post data in CSV or Excel formats, both of which are ideal for further analysis. These formats make it easy to import the data into tools like Google Sheets, Excel, or business intelligence platforms such as Tableau.
Why It Matters: Exporting data into easily accessible formats ensures that the insights you extract can be seamlessly integrated into your workflow, whether you’re generating reports, conducting further analysis, or presenting data to stakeholders.
Example: A content manager exports posts discussing “remote work” into an Excel sheet to create an engagement report. By analyzing likes, shares, and comments, they identify which types of remote work posts generate the highest engagement, guiding future content creation.
Challenges Addressed by TexAu
Manual Search Limitations
The manual process of searching LinkedIn posts can be tedious and time-consuming. Additionally, without automated tools, it’s easy to miss posts or overlook trends that could have significant implications for your business.
How TexAu Helps: TexAu automates the searching process, allowing you to gather data in bulk, based on refined search parameters, without the need for constant manual effort. This efficiency helps professionals and businesses stay on top of trends in real time.
Example: A social media manager looking for posts about “social media algorithms” can automate the search, saving time and ensuring they don't miss key conversations happening in the industry.
Data Overload
Exporting large volumes of data without clear filters or criteria can lead to information overload, making it difficult to extract actionable insights.
How TexAu Helps: TexAu’s customizable filters ensure that only relevant posts are exported, preventing data overload and streamlining the analysis process. For organizations seeking structured, topic-specific insights from expert-authored content, TexAu’s LinkedIn Profile Articles Export ensures businesses can track and extract professional articles relevant to their industry.
Example: A market researcher can focus on posts with specific hashtags, dates, and engagement levels, avoiding the collection of irrelevant data and making the analysis more focused.
Scalability Issues
As your business or research needs grow, so does the amount of data you need to process. Manually collecting data or using inefficient tools can cause slowdowns and hinder scalability.
How TexAu Helps: TexAu easily handles large-scale post searches and exports, making it suitable for businesses of any size. Whether you need data from hundreds or thousands of posts, TexAu ensures that the process remains smooth and efficient.
Example: A global marketing team analyzing regional content trends can export posts from different countries over the past year. With TexAu’s automation, they can process large datasets without slowing down their workflow.
Benefits of TexAu's LinkedIn Post Search Export
Content Strategy Development
By analyzing trends and engagement metrics, TexAu helps businesses refine their content strategies, focusing on topics that resonate with their audience.
Example: A content strategist analyzing posts related to “AI innovations” finds that these posts generate higher engagement compared to others. This insight allows them to create more content around AI, appealing to their audience's interests.
Competitor Insights
Monitoring your competitors' posts provides invaluable insights into their content strategy, audience engagement, and market positioning.
Example: A sales manager analyzes competitor posts and identifies which posts attract the most engagement. This helps them fine-tune their own sales content and outreach strategy to better compete in the market.
Market Research
Understanding audience sentiment and preferences is crucial for adapting your marketing efforts. By analyzing comments and reactions to posts, TexAu helps businesses gain deeper insights into market demands.
Example: A product manager reviewing posts about "CRM solutions" gains insights from comments discussing product features that users wish were included, helping to guide their product development strategy.
Lead Generation
TexAu’s post search export helps identify leads based on engagement with posts about specific products, services, or pain points.
Example: A B2B marketer can export posts mentioning “data security issues” and identify users who actively engage with these posts, then target them for personalized outreach campaigns.
Use Cases for TexAu's LinkedIn Post Search Export
TexAu’s LinkedIn Post Search Export tool offers versatile applications across various professional roles. By automating the extraction of LinkedIn post data, TexAu allows users to efficiently gather and analyze content to derive insights that support their objectives. Below are detailed use cases for different user groups:
Marketers
Marketers can leverage TexAu to enhance their content strategies by identifying trends and analyzing high-performing content. By exporting data on popular posts, marketers can refine their campaigns, create content that resonates with their audience, and improve engagement rates.
Why It Matters: The ability to track content trends and engagement metrics allows marketers to stay ahead of the curve. With TexAu, they can make data-driven decisions about which topics to focus on, which formats to use, and when to publish for maximum reach.
Example: A digital marketing team for a SaaS company can use TexAu to search for posts about “B2B SaaS growth” and export data on the most liked, shared, and commented posts over the past six months. By analyzing this data, they can uncover which topics are resonating most with their target audience—whether it's product updates, customer success stories, or industry news—and incorporate these elements into their next campaign.
Key Benefits for Marketers:
- Identify high-performing content formats and topics.
- Adjust marketing strategies based on engagement insights.
- Streamline content planning by tracking trending discussions in real-time.
Sales Teams
Sales teams can use TexAu’s LinkedIn Post Search Export to identify potential leads by analyzing posts that discuss specific pain points or solutions their product addresses. By searching for posts where potential prospects have actively engaged with content, sales teams can focus on leads that are already familiar with the industry challenges their product solves.
Why It Matters: By automating the search for posts discussing industry pain points or specific solutions, sales teams can save time and zero in on prospects who are likely to benefit from their product or service. This targeted approach increases the likelihood of successful outreach and conversion.
Example: A sales team offering cybersecurity solutions can use TexAu to search for posts discussing “data security concerns” or “cyber threats”. By exporting posts with the most engagement (e.g., likes, comments, and shares), the sales team can focus their outreach on prospects who are actively discussing these issues. These individuals are more likely to respond positively to a sales pitch focused on cybersecurity solutions.
Key Benefits for Sales Teams:
- Identify prospects discussing pain points relevant to your solution.
- Focus outreach efforts on highly engaged leads.
- Personalize communication based on insights gathered from LinkedIn posts.
Recruiters
Recruiters can use TexAu to stay on top of hiring trends, monitor job market changes, and identify in-demand skills across industries. By searching for posts discussing job openings, skill sets, or industry shifts, recruiters can identify talent gaps, adjust their hiring strategies, and stay competitive in sourcing top talent.
Why It Matters: In a constantly evolving job market, recruiters need to track real-time conversations about hiring trends and skills in demand. TexAu’s automated data extraction enables recruiters to stay ahead of the curve, quickly identifying the most relevant posts for their talent acquisition strategies. For tracking LinkedIn-published articles on talent trends and recruitment strategies, TexAu’s LinkedIn Profile Articles Export allows recruiters to identify expert perspectives on hiring and career development.
Example: A recruiter specializing in tech roles can use TexAu to search for posts related to “Python developer jobs”. By exporting posts that mention Python as a skill in high-demand job descriptions, they can create a list of companies hiring for Python developers. This helps the recruiter focus on active talent pools and companies looking to fill these roles.
Key Benefits for Recruiters:
- Monitor job market changes and emerging talent demands.
- Stay ahead of the competition by tracking in-demand skills.
- Build a pipeline of candidates based on active job-related posts.
Best Practices for Maximizing Results with TexAu’s LinkedIn Post Search Export
To get the most out of TexAu’s LinkedIn Post Search Export tool, it's important to implement best practices that align with your goals. These strategies will help you make the most efficient use of the data, ensuring that your efforts yield meaningful insights.
Set Clear Objectives
Before beginning any search, it is crucial to define the specific goals you want to achieve. Whether you’re looking to refine your content strategy, gather competitor insights, or generate leads, having a clear objective will guide your searches and help you focus on the most relevant posts.
Why It Matters: Setting clear objectives helps streamline the search process. Without a clear purpose, you may end up with a large amount of irrelevant data that doesn’t help you reach your goals.
Example: If your goal is to improve content strategy, your objective might be to understand which B2B marketing topics are trending on LinkedIn. By setting this objective, you can filter posts related to B2B marketing, saving time and narrowing your focus to posts that will provide the insights needed to enhance your strategy.
Use Precise Keywords
To ensure you’re extracting the most relevant posts, it's crucial to narrow your search using specific, industry-related keywords. The more focused your search terms are, the more likely you are to get accurate and useful results.
Why It Matters: Using precise keywords prevents irrelevant posts from cluttering your results, making the data export process more efficient and allowing for deeper insights.
Example: Instead of searching for generic terms like “marketing”, a marketer looking to understand trends in the SaaS industry might search for “SaaS customer acquisition strategies”. This ensures that the results are highly relevant and specific to their niche.
Automate Regular Searches
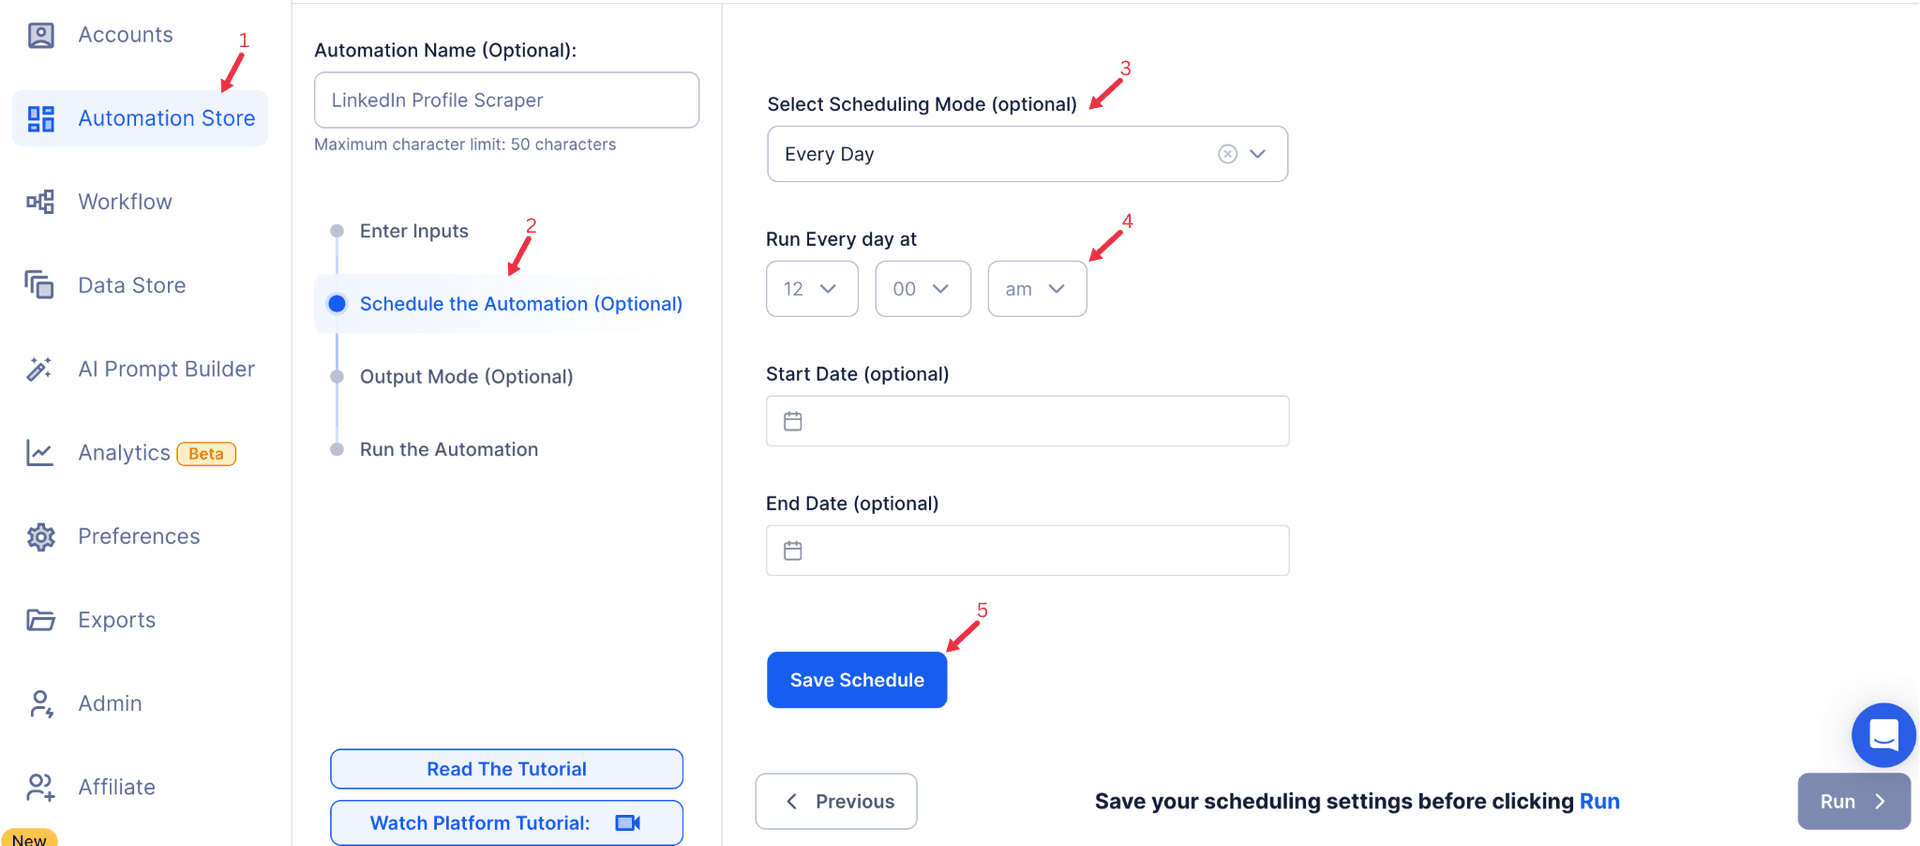
Markets, trends, and hiring demands are always changing. To ensure you’re staying current, schedule regular searches with TexAu to keep your data up-to-date. Automating this process eliminates the need to manually repeat searches, saving you time and ensuring that you don’t miss new trends or posts.
Why It Matters: Regular updates ensure that your analysis is always based on the most current data, providing you with real-time insights that are critical for decision-making.
Example: A content team might schedule weekly searches for posts related to “AI in marketing”. This ensures they are always aware of the latest developments in the industry and can quickly adapt their content strategies to reflect these changes.
Tips for Optimizing Data Exports
Narrow Your Search
To ensure you’re getting the most relevant results, use keywords, hashtags, and time filters to refine your search. This will help you focus on posts that align directly with your goals.
Why It Matters: A narrower search prevents data overload, ensuring that only the most valuable posts are included in your export.
Example: If you’re a content marketer looking to track trends in SEO, use filters like “#SEO trends” and specify a time range (e.g., last six months) to get more targeted results.
Focus on High-Impact Posts
Prioritize posts that have high engagement (likes, shares, comments), as these are the most likely to provide actionable insights. High-engagement posts are often indicative of trending topics or significant industry discussions.
Why It Matters: Focusing on high-engagement posts allows you to derive insights from content that has already captured significant attention, making your analysis more impactful.
Example: A business analyst searching for “cloud computing solutions” can filter for posts that have received over 500 likes or 100 comments. This ensures they are analyzing content that has sparked substantial conversation in the field.
Combine Insights
To enhance your analysis, combine the insights gained from TexAu’s LinkedIn post exports with other data sources, such as LinkedIn profile scrapers or industry reports. This provides a more comprehensive view of trends, competitors, or potential leads.
Why It Matters: By combining different data sources, you gain a fuller understanding of the market, competitors, and prospects, leading to better-informed decisions.
Example: A product manager can combine LinkedIn post insights with customer feedback from surveys to refine their product strategy based on both qualitative and quantitative data.
TexAu’s LinkedIn Post Search Export tool provides businesses, marketers, sales teams, and recruiters with a powerful way to extract and analyze valuable LinkedIn content. By automating the process of searching and exporting data, TexAu saves time, increases efficiency, and empowers users to make data-driven decisions.
Conclusion: Simplifying LinkedIn Post Data Extraction with TexAu
TexAu’s LinkedIn Post Search Export tool provides businesses, marketers, and professionals with an efficient way to analyze LinkedIn post data, uncover market trends, and generate leads. By automating data extraction and offering powerful search filters, TexAu enables you to stay ahead of the competition and make data-driven decisions. Start using TexAu today to optimize your content strategies, gain valuable market insights, and identify actionable leads.


