Recruiter Lite
LinkedIn Recruiter Auto Message
Use TexAu to automate LinkedIn Recruiter messaging, save hours weekly and engage top talent faster. Perfect for founders and hiring teams.
Last updated
The **LinkedIn Recruiter Auto Message** automation enables you to send personalized messages to candidates or connections on LinkedIn at scale, helping you save time and streamline your outreach efforts. This tool is highly beneficial for recruiters, HR professionals, and hiring managers looking to
The LinkedIn Recruiter Auto Message automation enables you to send personalized messages to candidates or connections on LinkedIn at scale, helping you save time and streamline your outreach efforts. This tool is highly beneficial for recruiters, HR professionals, and hiring managers looking to connect with the right talent efficiently.
Step 1: Log in to TexAu and Connect LinkedIn
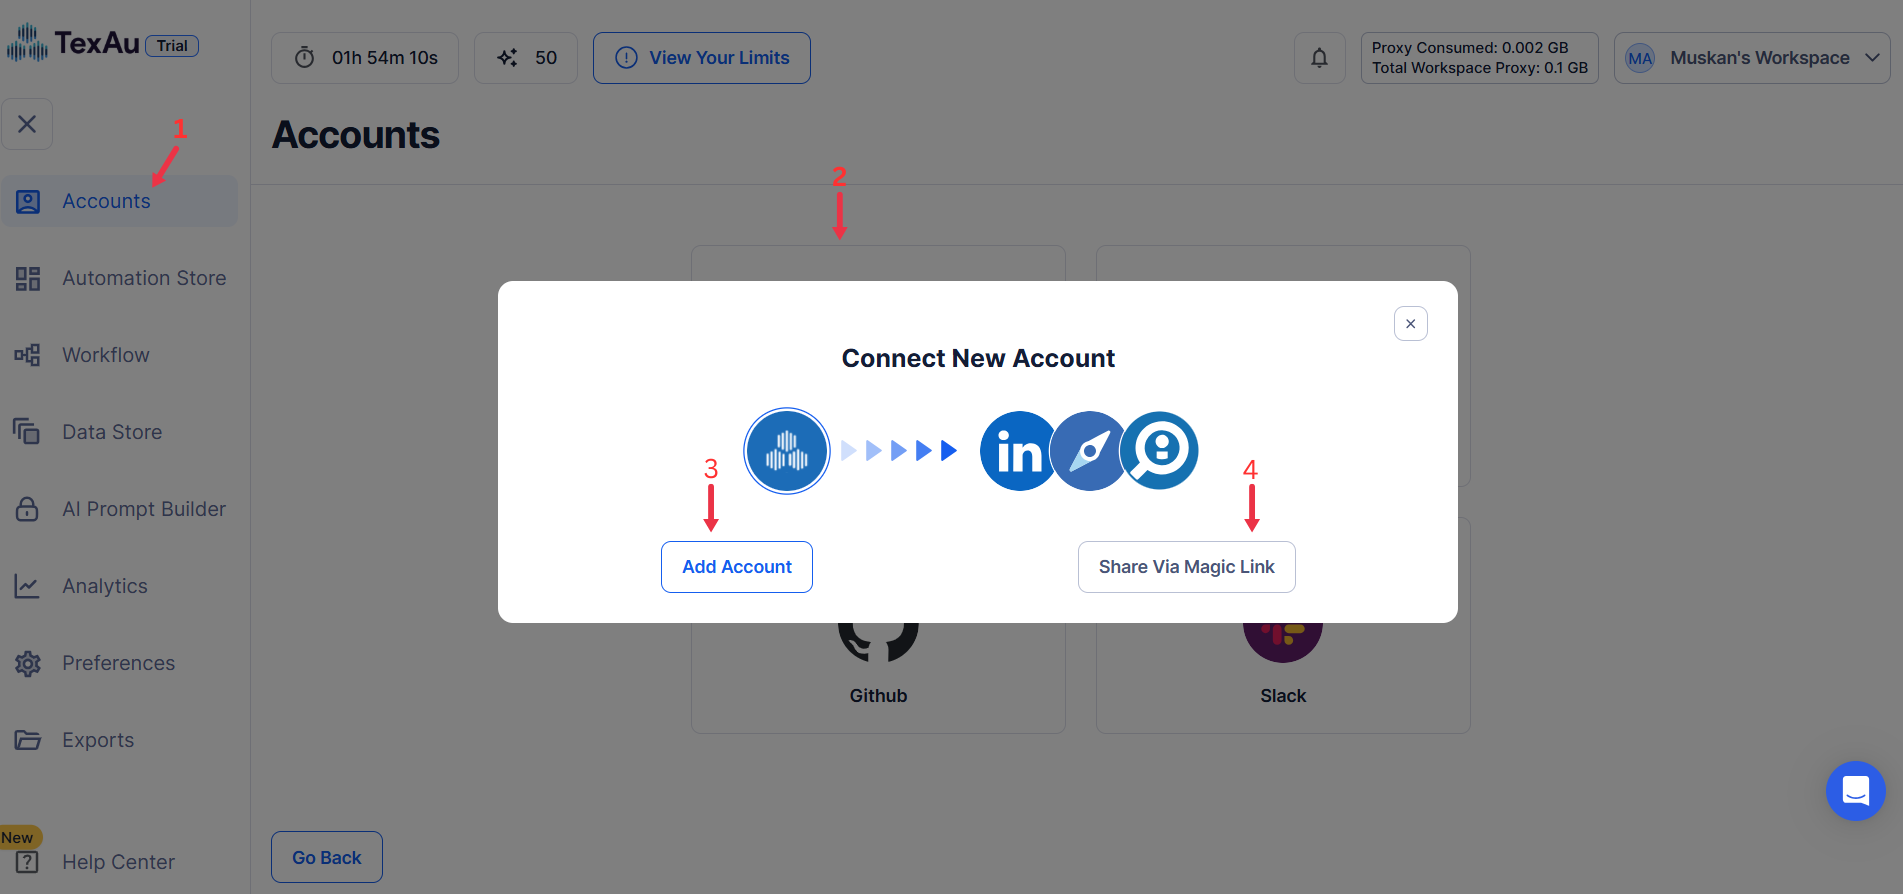
- Log in to your TexAu account at v2-prod.texau.com.
- Go to Accounts and connect your LinkedIn account. You can choose one of these methods:
- Share via Magic Link: Share the link, copy it to your browser, and follow the steps to integrate your LinkedIn account securely.
- Add Account: Sync cookies and browser data with TexAu for seamless integration.
Tip: Use Magic Link for an easy and secure connection.
{% custom-image src="https://v2-web-assets.s3.us-east-1.amazonaws.com/Common/log-in-to-texau-and-connect-linkedin/connect-linkedin.png" alt="connect-linkedin" /%}
Step 2: Choose Cloud or Desktop Execution
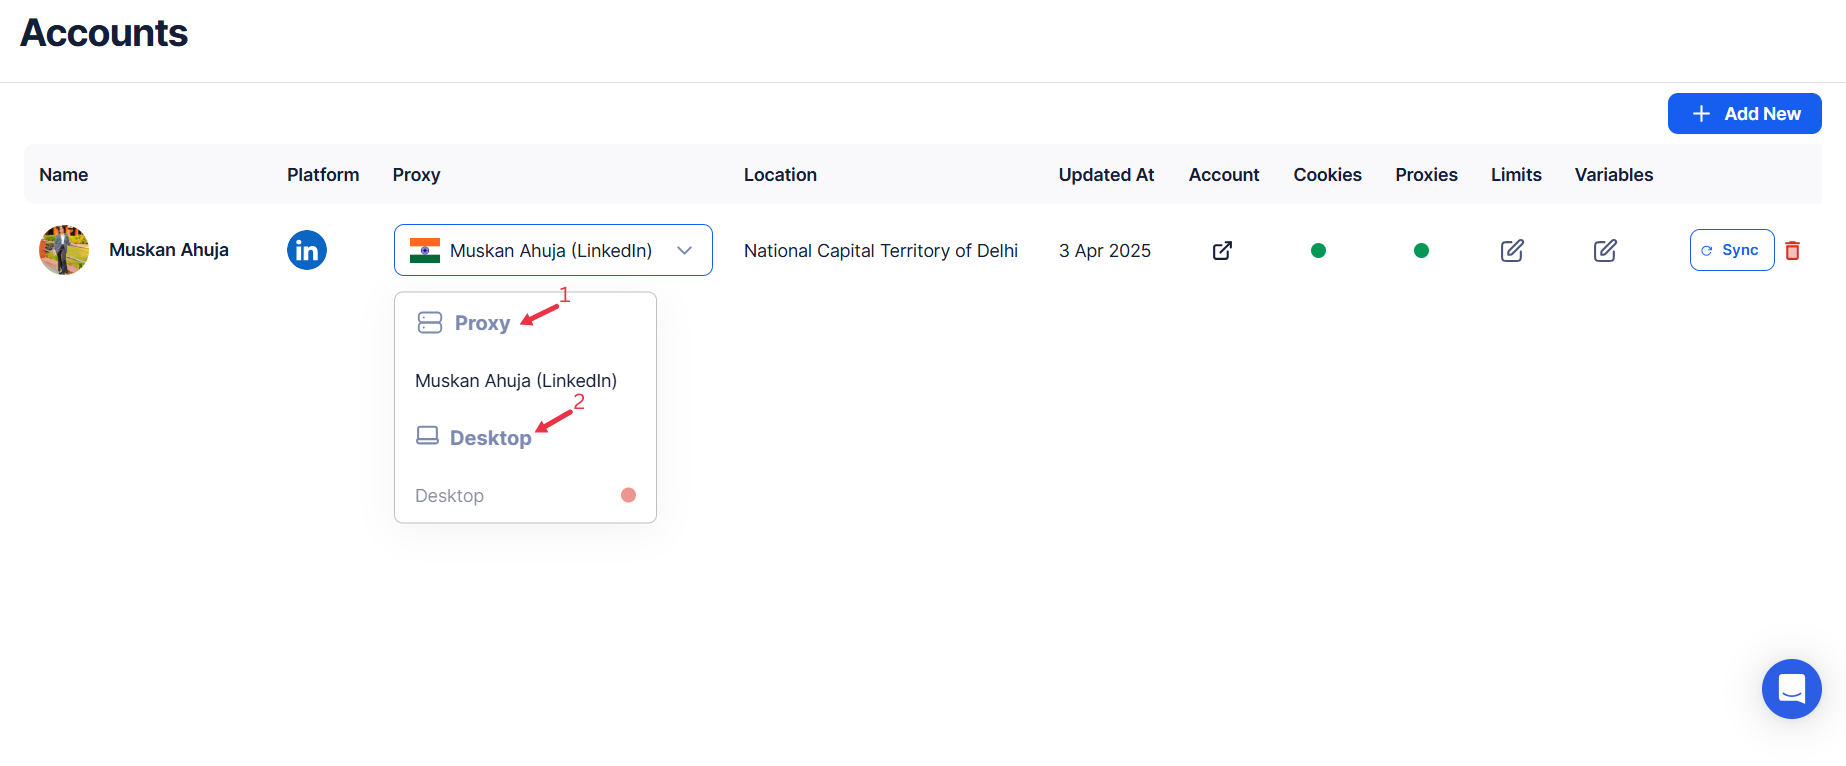
- Decide how you want to run the automation:
- Cloud Mode: Automates tasks on TexAu’s servers with built-in proxies. You can add custom proxies via Settings > Preferences > Proxies.
- Desktop Mode: Runs automation on your local device using your IP address.
Tip: Desktop mode saves cloud runtime credits and gives more control over the process.
{% custom-image src="https://v2-web-assets.s3.us-east-1.amazonaws.com/Common/cloud-or-desktop-execution/cloud-or-desktop-execution.png" alt=" choose-cloud-or-desktop-execution" /%}
Step 3: Search for the Particular LinkedIn Automation
- Navigate to the Automation Store on TexAu.
- Use the search bar to find LinkedIn Recruiter Auto Message automation.
{% custom-image src="https://v2-web-assets.s3.us-east-1.amazonaws.com/Automations/linkedin-recruiter-auto-message/linkedin-recruiter-auto-message.png" alt="search-for-the-particular-recruiter-automation" /%}
Step 4: Configure Input Sources
Define the input source for the LinkedIn Recruiter Auto Message automation to specify the recipients and messages. TexAu offers three options:
Single Input Details:
This option allows you to automate personalized messages to LinkedIn users via LinkedIn Recruiter Lite.
Account: Select the LinkedIn Recruiter Lite account where the messages will be sent from.
LinkedIn Recruiter Profile URL: Add the profile URL(s) for the target individuals.
Subject: Specify the subject of the activity or message.
Message: Personalize your message using tags like First Name, Last Name, or Full Name. Use Insert AI Template to craft dynamic message bodies.
Signature: Include a predefined signature or custom text for all messages.
{% custom-image src="https://v2-web-assets.s3.us-east-1.amazonaws.com/Automations/linkedin-recruiter-auto-message/linkedin-recruiter-auto-message-single-inputs.png" alt="enter-a-single-input" /%}
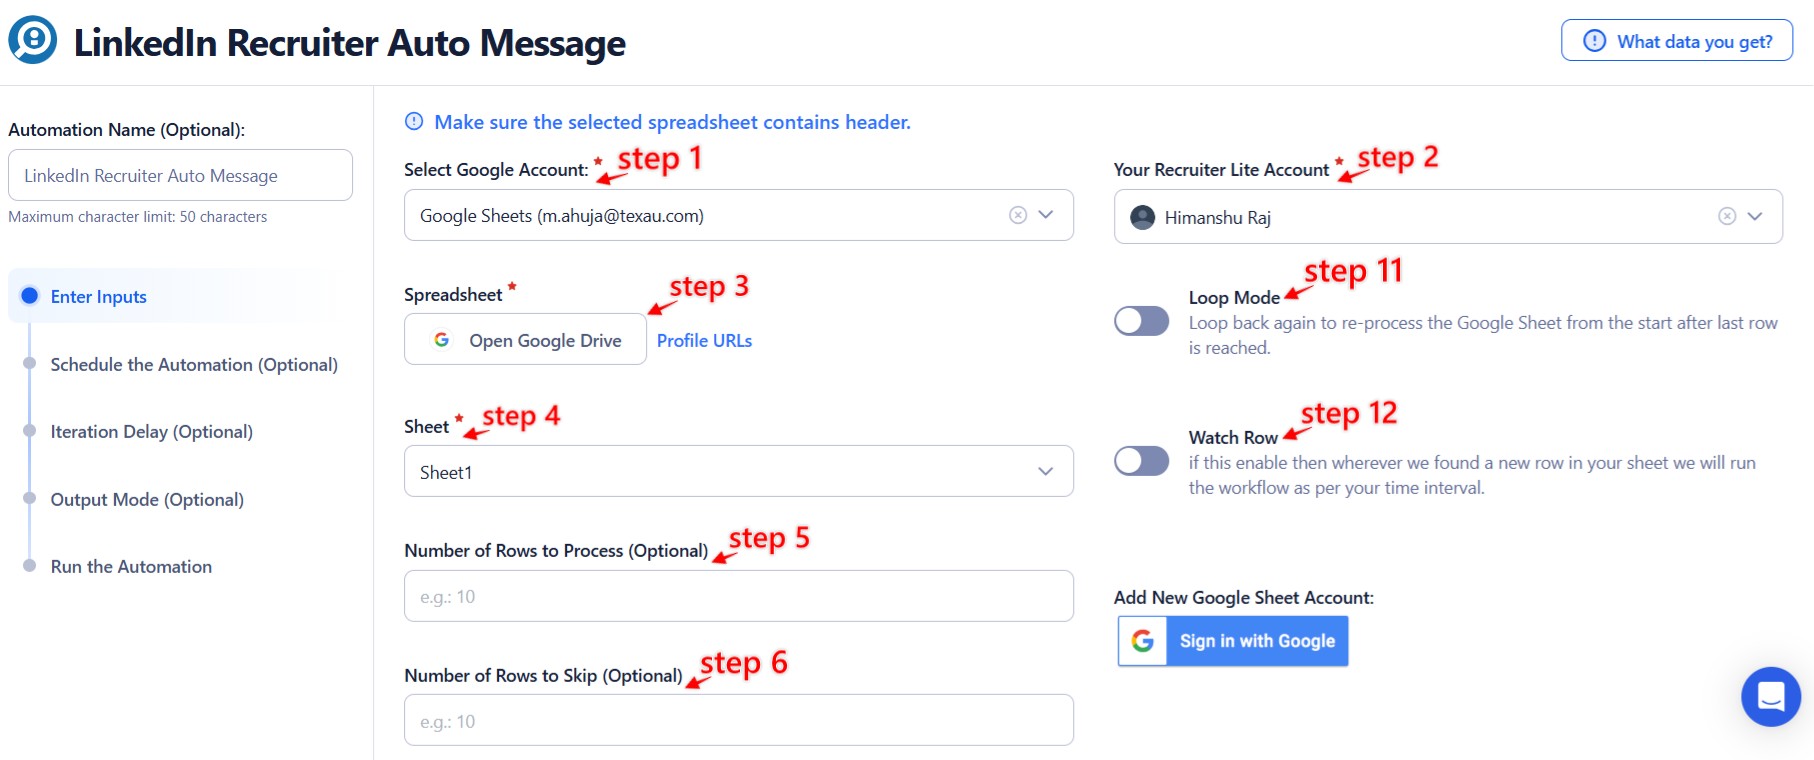
Google Sheets:
Use this method for sending personalized messages to multiple profiles listed in a Google Sheet.
- Select Google Account
- Link your Google account or select an already connected one.
- Example:
Google Sheets ([email protected]).
- Select Your Spreadsheet
- Locate the file in Google Drive. For example:
- Spreadsheet:
Texau - SEO Tracker. - Sheet:
Tracker - SEO.
- Spreadsheet:
- Locate the file in Google Drive. For example:
- Number of Rows to Process (Optional)
- Specify how many rows should be processed.
- Number of Rows to Skip (Optional)
- Define how many rows to skip before processing.
- LinkedIn Recruiter Profile URL
- Extract profile URLs directly from the selected Google Sheet.
- Check the "Allow Multiple Inputs" option if applicable.
- Subject
- Automatically assign a subject line for each message based on data from Google Sheets.
- Example: "Invitation to Connect - {{First Name}}."
- Message
- Create personalized messages with Personalization Tags like:
- First Name.
- Last Name.
- Full Name.
- Insert AI Template to generate tailored messages dynamically.
- Create personalized messages with Personalization Tags like:
- Signature
- Use a predefined signature or custom text for the messages.
Insert AI Template and Personalization Tags
- Personalization Tags
- First Name, Last Name, Full Name: Automatically populate names from your data.
- Inputs Section
Add any necessary inputs dynamically, such as:
-
Task.
-
Metric/Impact on.
-
Support Needed.
Optional Advanced Feature:
-
Loop Mode: Enable Loop Mode to re-process the Google Sheet from the beginning once all rows are completed. This is useful for tasks that require recurring updates.
-
Watch Row (Optional)
Watch Row feature monitors Google Sheets for new data and automatically executes workflows when updates are detected.
Customize Watch Row by selecting a frequency and defining an execution period.
Watch Row Schedule
- None
- Scheduling Intervals (e.g., every 15 minutes, every hour)
- One-Time Execution
- Daily Execution
- Weekly Recurrence (e.g., every Wednesday and Saturday)
- Monthly Specific Dates (e.g., 10th and 27th)
- Custom Fixed Dates (e.g., June 6)
By default, Watch Row executes every 15 minutes and remains active for five days unless adjusted.
With Watch Row, TexAu simplifies workflow execution.
{% custom-image src="https://v2-web-assets.s3.us-east-1.amazonaws.com/Automations/linkedin-recruiter-auto-message/linkedin-recruiter-auto-message-1-google-sheet.jpeg" alt="use-google-sheets-for-bulk-input" /%}
{% custom-image src="https://v2-web-assets.s3.us-east-1.amazonaws.com/Automations/linkedin-recruiter-auto-message/linkedin-recruiter-auto-message-2-google-sheet.jpeg" alt="use-google-sheets-for-bulk-input" /%}
CSV Upload Details:
- Static Lists:
- Upload CSV File: Select the file containing LinkedIn Recruiter Profile URLs. Ensure the file includes mandatory columns like profile URLs or identifiers.
- Processing Settings: Adjust the rows to process or skip as required.
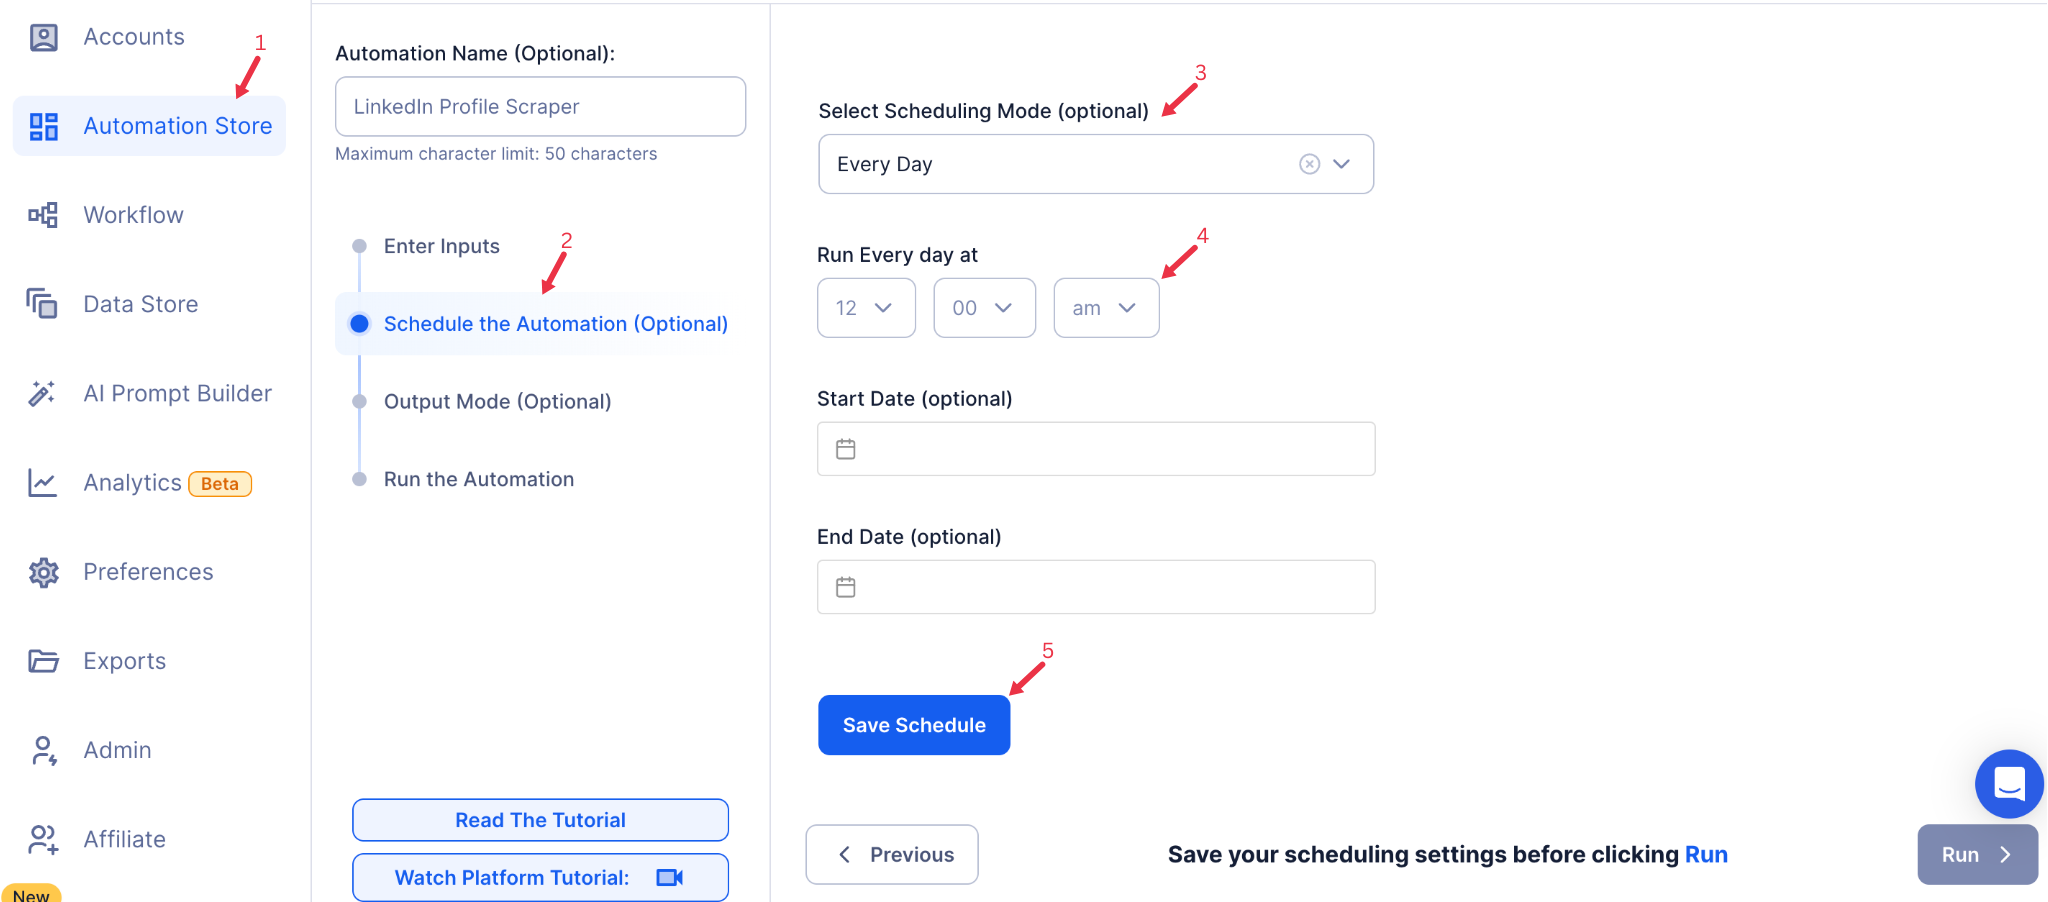
Step 5: Schedule the Automation (Optional)
Schedule the automation to send messages at specific times or intervals. Click Schedule and choose from the following options:
- None
- At Regular Intervals (e.g., every 6 hours or daily)
- Once
- Every Day
- On Specific Days of the Week (e.g., every Monday and Wednesday)
- On Specific Dates (e.g., the 10th and 25th of the month)
Tip: Scheduling allows you to send messages consistently without manual intervention.
{% custom-image src="https://v2-web-assets.s3.us-east-1.amazonaws.com/Common/schedule-the-automation/schedule-the-automation.png" alt="schedule-the-automation" /%}
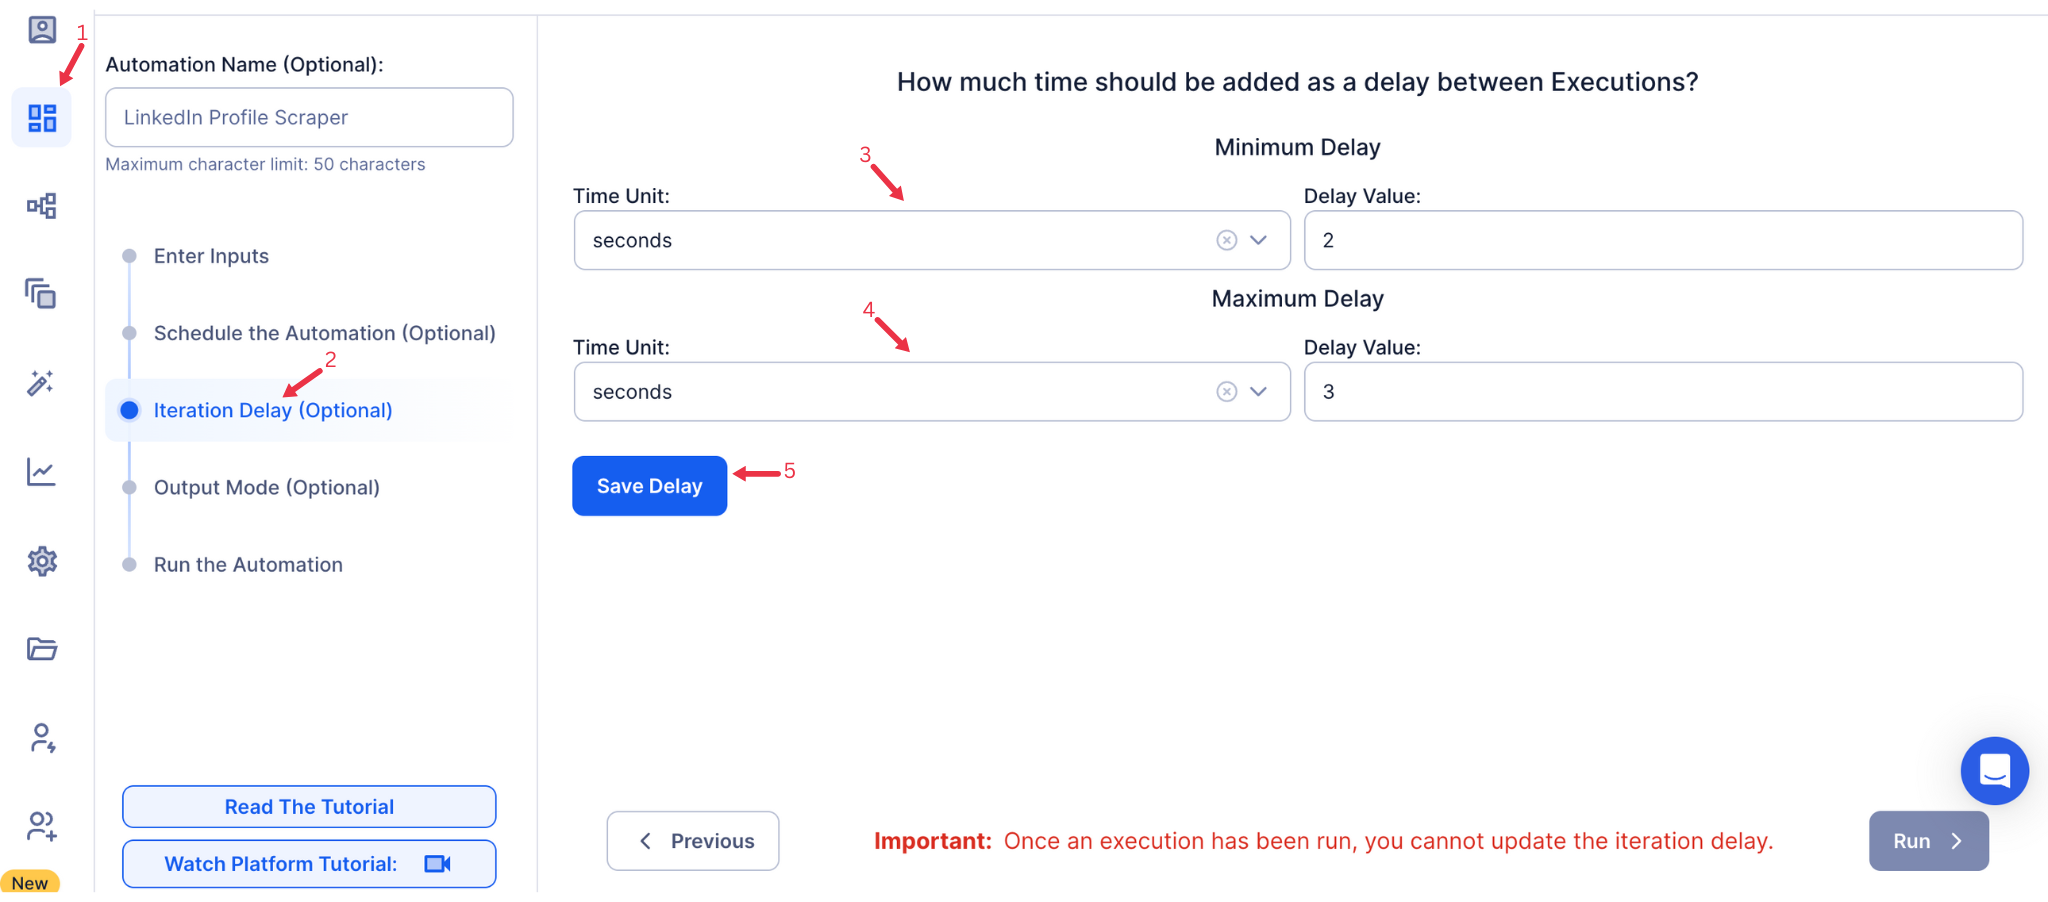
Step 6: Set an Iteration Delay (Optional)
Avoid detection and simulate human-like activity by setting an iteration delay. Choose minimum and maximum time intervals to add randomness between actions. This makes your activity look natural and reduces the chance of being flagged.
- Minimum Delay: Enter the shortest interval (e.g., 10 seconds).
- Maximum Delay: Enter the longest interval (e.g., 20 seconds).
Tip: Random delays keep your automation safe and reliable.
{% custom-image src="https://v2-web-assets.s3.us-east-1.amazonaws.com/Common/iteration-delay/iteration-delay.png" alt="iteration-delay" /%}
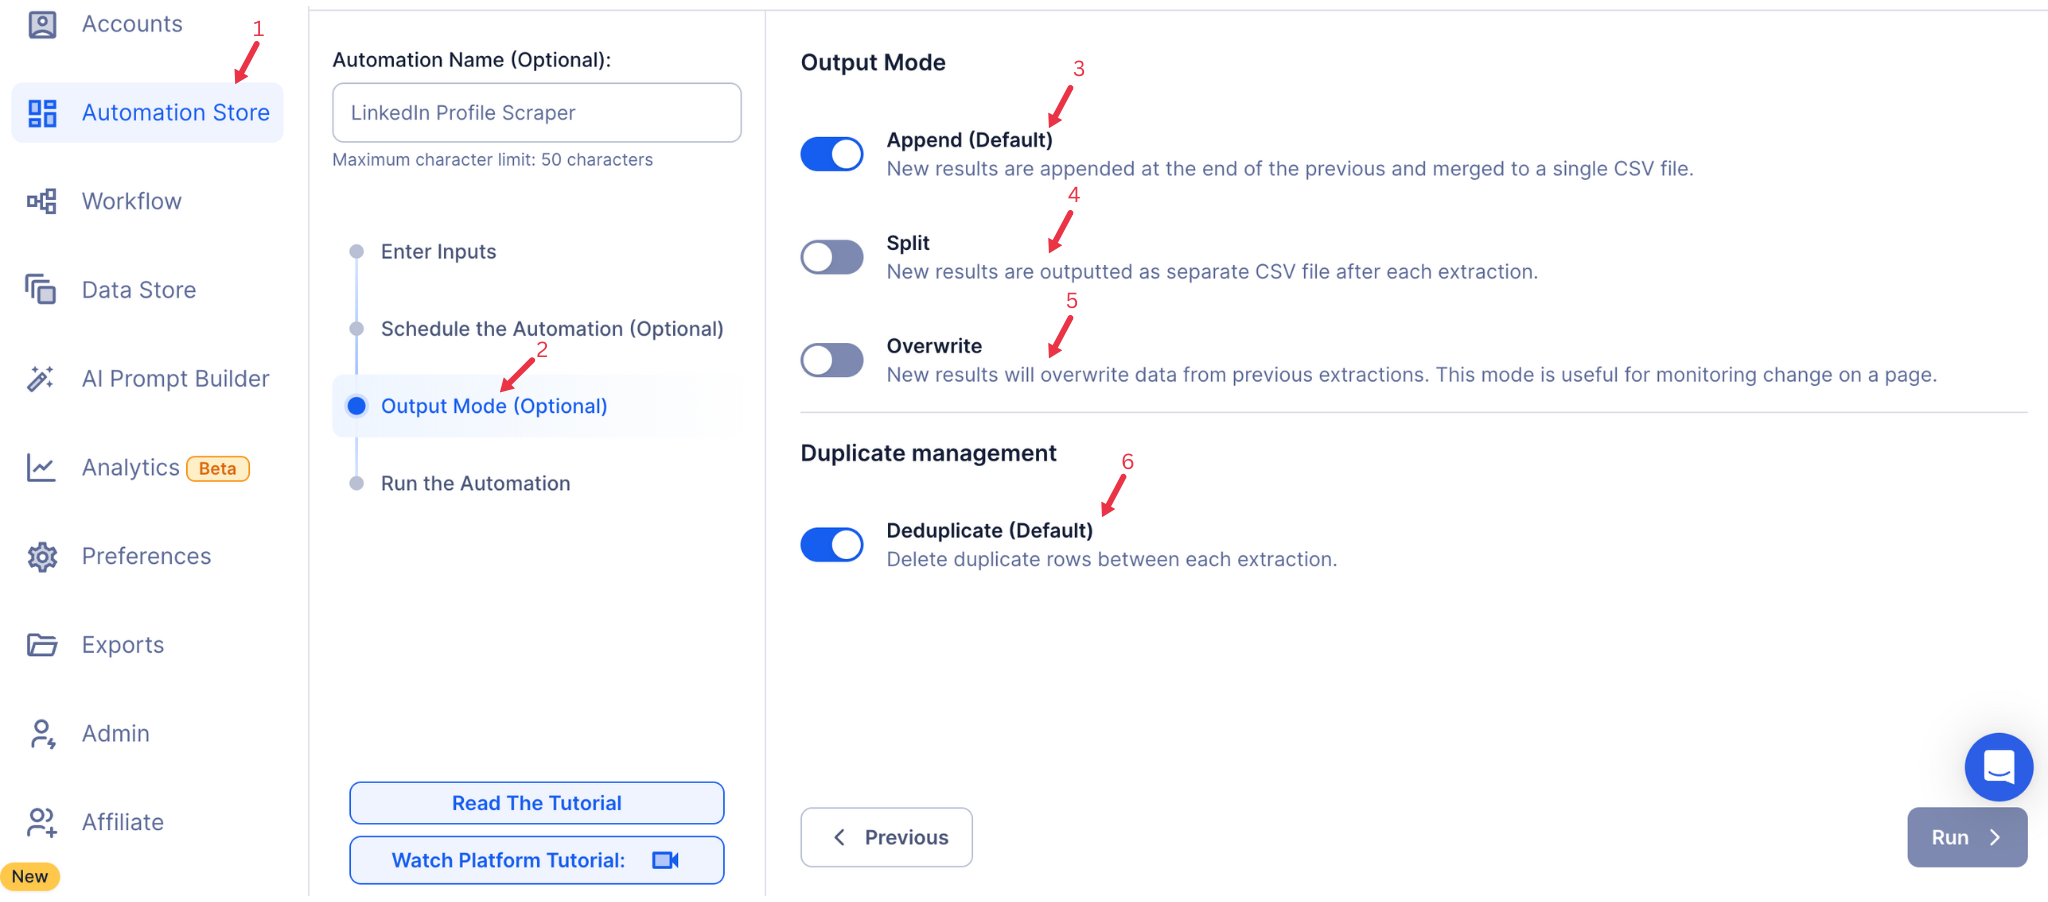
Step 7: Choose Your Output Mode (Optional)
Choose how to save and manage the results of your messaging campaign. TexAu provides the following options:
- Append (Default): Adds new results to the end of existing data, merging them into a single CSV file.
- Split: Saves new results as separate CSV files for each automation run.
- Overwrite: Replaces previous data with the latest results.
- Duplicate Management: Enable Deduplicate (Default) to remove duplicate rows.
Tip: Google Sheets export makes it easy to collaborate with your team in real time, particularly useful for managing outreach campaigns and follow-ups.
{% custom-image src="https://v2-web-assets.s3.us-east-1.amazonaws.com/Common/output-mode/output-mode.png" alt="output-mode" /%}
Step 8: Access the Data from the Data Store
After the automation completes, go to the Data Store section in TexAu to access messaging campaign data. Locate the LinkedIn Recruiter Auto Message automation and click See Data to view or download the results.
The LinkedIn Recruiter Auto Message automation is an essential tool for scaling LinkedIn outreach, improving candidate engagement, and saving valuable time in your recruitment process. By automating messaging campaigns, it helps you connect with top talent, personalize communication, and manage your hiring pipeline effectively.
Run this automation on your own server.
TexAu V3 doesn't host social-platform automations anymore — but the runnable code is yours. Tell us your inputs, outputs, and target environment, and we'll ship you a working version you can deploy and operate yourself.