Sales Navigator
Sales Navigator Auto Connect
Send LinkedIn connection requests automatically to your Sales Navigator leads. Save time and grow your network faster.
Last updated
LinkedIn has become an essential platform for professionals, especially for sales teams and business development professionals. As the go-to networking site for decision-makers across various industries, LinkedIn allows businesses to find potential clients, partners, and talent. However, while Linke
LinkedIn has become an essential platform for professionals, especially for sales teams and business development professionals. As the go-to networking site for decision-makers across various industries, LinkedIn allows businesses to find potential clients, partners, and talent. However, while LinkedIn offers vast opportunities for sales prospecting, it can be time-consuming and tedious to manually search for leads and send connection requests one by one.
Enter LinkedIn Sales Navigator, a premium tool that enhances the prospecting experience by providing advanced search filters and lead recommendations tailored to specific criteria. One of its standout features is the ability to automate connection requests and outreach efforts. TexAu’s Sales Navigator Auto Connect enhances this functionality by streamlining and automating connection requests, ensuring targeted lead generation and improving overall relationship-building efforts.
The ability to automate tasks without sacrificing personalization is invaluable. With TexAu’s Auto Connect, sales professionals, recruiters, marketers, and business owners can scale their outreach efforts while maintaining high engagement rates, thereby boosting their professional networks. In this article, we will explore how this tool works, its key features, and how it addresses challenges faced by professionals in various industries.
Key Features of TexAu’s Sales Navigator Auto Connect
TexAu’s Sales Navigator Auto Connect integrates seamlessly with LinkedIn Sales Navigator, offering a suite of features that transform how users send connection requests and engage with prospects. Let’s delve into the core features of this automation tool:
Automated Connection Requests: Reaching Hundreds of Leads with Minimal Effort
One of the most time-consuming tasks in sales prospecting is sending connection requests. Manually searching for leads, filtering them based on relevant criteria, and sending personalized connection requests can take hours, if not days. TexAu’s Sales Navigator Auto Connect allows users to send automated connection requests at scale, reducing the time spent on these repetitive tasks.
For instance, imagine you are a sales rep in the fintech sector, and you want to connect with C-level executives. Instead of manually identifying these decision-makers, TexAu automatically sends customized connection requests to your selected target audience. You can even personalize each message, increasing the chances of acceptance and initiating a conversation that could lead to a business opportunity.
Customizable Targeting: Zeroing in on the Right Prospects
Customizing outreach is crucial for effective sales prospecting. TexAu lets users apply advanced filters like job title, industry, location, company size, and even specific keywords to identify the most relevant leads. This targeting ensures that connection requests are sent to the right people—those who are likely to be interested in your offer.
For example, if you’re in the SaaS industry and targeting enterprise-level companies, you can apply filters to reach only the decision-makers, such as CTOs or VPs of IT, within those organizations. By narrowing down your outreach to highly targeted prospects, you’re more likely to generate quality connections that can convert into clients.
Personalized Invitation Messages: Boosting Acceptance Rates
Generic connection requests often lead to rejection, especially when sent in bulk. To solve this, TexAu offers the ability to personalize each invitation message with dynamic fields like first name, company name, and mutual connections. By tailoring the message to the recipient, you significantly increase your chances of connection approval.
For example, instead of sending a generic “I’d like to connect” message, you could send something like, “Hi {{first_name}}, I noticed your leadership in the AI space, and I’d love to connect to discuss future opportunities in fintech.” This type of personalization increases the likelihood that your connection request will be accepted and sets the stage for future communication.
Bulk Connection Requests: Scaling Outreach Without Compromising Quality
TexAu’s ability to send bulk connection requests allows users to reach hundreds of prospects in a matter of minutes. With traditional manual outreach, the process is painstakingly slow and error-prone. TexAu’s automation ensures that every connection request is sent to your chosen list of leads, saving you time and effort while still ensuring that each message is personalized.
For example, you could use TexAu to auto-connect with 500+ marketing professionals from a list curated from Sales Navigator search results. This allows you to quickly scale your LinkedIn network and move forward with relationship-building, rather than getting stuck in the manual task of sending individual requests.
Follow-Up Reminders: Keeping the Conversation Alive
Even after sending connection requests, there’s always the risk that prospects will overlook or forget about your invitation. TexAu's follow-up reminders ensure that you don’t lose track of pending requests and can follow up with a timely message. Automated reminders allow you to re-engage leads that haven’t responded after a set period, helping you increase your chances of success.
For example, if someone hasn’t responded to your connection request after 7 days, TexAu will automatically send a follow-up message, keeping the conversation going and nudging the prospect toward action.
Challenges Addressed by TexAu’s Sales Navigator Auto Connect
TexAu’s Auto Connect tool is designed to address several pain points in the manual LinkedIn outreach process. Below are some of the common challenges faced by professionals, along with how TexAu helps resolve them:
Manual Outreach Limitations: Overcoming Time Constraints
Sending personalized connection requests manually is extremely time-consuming, especially for larger prospecting campaigns. Sales teams and business owners often find themselves overwhelmed by the volume of work required to send personalized requests to hundreds of leads. TexAu automates this process, allowing users to scale their outreach without sacrificing personalization or quality.
For example, instead of spending several hours a day manually sending connection requests, a sales representative can leverage TexAu to auto-connect with targeted leads, freeing up valuable time to focus on higher-value tasks like follow-ups and closing deals.
Unstructured Networking Efforts: Streamlining Strategic Outreach
Many professionals struggle with unstructured networking, often sending random connection requests without a clear strategy. This approach leads to poor-quality connections and low engagement rates. TexAu ensures that your networking efforts are targeted and strategic, helping you reach the right people at the right time.
For example, a recruiter might use TexAu to connect with only mid-level data scientists at technology companies, instead of sending connection requests to a broad list of unrelated professionals. This targeted approach not only improves connection rates but also helps build meaningful professional relationships.
Low Engagement Rates: Enhancing Personalization for Better Results
Low engagement rates are a common issue for many LinkedIn users. Sending generic, impersonal connection requests often results in rejection or non-response. TexAu’s ability to personalize messages at scale solves this problem by ensuring that each connection request resonates with the recipient.
For instance, a sales manager trying to connect with VP-level executives in the finance industry may craft a message highlighting shared interests in corporate growth strategies, thus improving the likelihood of engagement.
Benefits of Using TexAu’s Sales Navigator Auto Connect
TexAu’s Sales Navigator Auto Connect delivers several key benefits that make it an indispensable tool for lead generation and outreach efforts. Below, we explore these advantages in greater detail:
Scalable Lead Generation: Expanding Your Network Efficiently
The ability to send personalized connection requests to hundreds of prospects at once allows for scalable lead generation. By leveraging TexAu’s automation, professionals can rapidly expand their LinkedIn network, reaching new leads and prospects in a fraction of the time it would take using manual methods.
For example, a SaaS sales team may use TexAu to grow its network by over 500 targeted connections per month, resulting in a steady stream of new leads and opportunities.
Higher Acceptance Rates: Improving Connection Approval
Personalization is the key to increasing acceptance rates for connection requests. TexAu’s dynamic message personalization features allow users to craft highly relevant and engaging invitations, which typically result in much higher approval rates compared to generic invites.
For instance, sales representatives sending hyper-personalized messages might see a 40% higher acceptance rate than those sending standard, impersonal requests. This leads to faster relationship-building and more opportunities for business growth.
Time-Saving Automation: Focusing on Relationship-Building
Time is one of the most valuable resources for sales professionals, and automation is key to making the most of it. TexAu eliminates the need for repetitive tasks like searching for leads and manually sending requests, allowing professionals to focus on building relationships with new connections, nurturing leads, and closing deals.
For example, a business owner could automate connection requests with potential clients, freeing up time to engage in meaningful conversations and pitch services to interested prospects.
Better Sales & Outreach Performance: Reaching the Right Audience
TexAu ensures that connection requests are sent to the right people, thanks to the advanced targeting filters available within LinkedIn Sales Navigator. By narrowing the focus to decision-makers and other relevant individuals, users can ensure that their outreach efforts are effective and result in quality connections.
For example, a marketing professional can ensure that they are only connecting with growth marketers, leading to better alignment between connections and their content marketing objectives.
Seamless CRM Integration: Smooth Transition from Lead to Opportunity
One of the significant benefits of automating outreach is the ability to integrate new connections into your CRM system. TexAu allows for seamless synchronization with platforms like HubSpot, Salesforce, and Pipedrive, ensuring that no lead slips through the cracks.
For example, new VP-level connections can be automatically added to a sales pipeline in Salesforce, making follow-up and engagement more streamlined and ensuring that prospects are nurtured through the sales funnel.
Use Cases for TexAu’s Sales Navigator Auto Connect
TexAu’s Auto Connect is useful across a wide range of industries and professions. Below are some real-life scenarios showcasing how the tool can benefit various users:
Sales Teams: Automating Outbound Prospecting
For sales teams, outbound prospecting is a critical part of the sales process. The challenge, however, is how to do it efficiently while maintaining a personalized approach. TexAu’s Sales Navigator Auto Connect is a game-changer in this context, automating the process of reaching out to qualified leads while ensuring each connection request is targeted and personalized. This allows sales teams to focus on higher-value activities, like engaging with prospects and closing deals, rather than spending hours manually searching for and sending connection requests.
Example: Connecting with Decision-Makers in Mid-Market Companies
Imagine a sales representative working for a SaaS company that targets mid-market companies in the United States. Using LinkedIn Sales Navigator’s advanced filtering, the sales rep could narrow down their search to decision-makers, such as CEOs, CTOs, or VP-level executives within specific industries, like healthcare, finance, or manufacturing. TexAu’s Auto Connect tool would then automate the process of sending connection requests to these decision-makers.
Instead of spending time finding these leads, crafting individual messages, and sending connection requests manually, TexAu automates the entire process. The tool can even customize each connection request by including a personalized message, making it more likely that the recipient will accept the connection request.
Marketers: Building a Targeted Audience for Content Strategy
For marketers, building a targeted audience is essential for creating high-engagement content and increasing visibility. The process of building a relevant LinkedIn network can be time-consuming, especially if marketers are trying to connect with individuals who align with their specific content strategy. TexAu’s Auto Connect allows marketers to scale their outreach while ensuring they connect with the right people — those who are likely to engage with their content and become part of a larger, more relevant community.
Example: Expanding Reach Among Growth Marketers
Imagine you’re a content marketer working for a company that focuses on product-led growth (PLG). You want to expand your reach among professionals who specialize in growth marketing, particularly those in fast-growing tech companies. TexAu’s targeting filters enable you to narrow your search to growth marketers within specific industries, such as SaaS or eCommerce.
TexAu will then automate the process of sending personalized connection requests to these professionals. Instead of manually identifying potential connections and drafting individual messages, TexAu’s automation allows you to reach hundreds, if not thousands, of relevant professionals with just a few clicks.
Recruiters: Connecting with Potential Candidates
For recruiters, finding qualified candidates is all about reaching out to the right people at the right time. However, sifting through LinkedIn profiles and sending individual connection requests can be an overwhelming process, especially when targeting professionals with niche skills. TexAu’s Sales Navigator Auto Connect helps recruiters streamline this process by automating the connection requests to the most relevant candidates based on their job titles, industries, locations, and other parameters.
Example: Connecting with Data Science Professionals
Suppose a recruiter is looking for data science professionals with specific skills in machine learning and artificial intelligence (AI). Instead of manually going through LinkedIn profiles, TexAu enables the recruiter to apply filters based on keywords such as “data science,” “machine learning,” and “AI” while narrowing the search to relevant industries, like technology or finance. Once the search is set up, TexAu automates the process of sending personalized connection requests to these candidates.
Business Owners & Consultants: Building Relationships with Industry Leaders
For business owners and consultants, LinkedIn is a powerful tool for networking and building relationships with industry leaders and potential clients. However, manually reaching out to decision-makers in large companies or top executives can be a daunting task. TexAu simplifies this by automating connection requests to C-suite executives, founders, and other influential individuals within target industries.
Example: Connecting with C-Suite Executives for Consulting Projects
Suppose a consultant specializing in digital transformation is looking to connect with CEOs and CMOs of mid-sized companies in the healthcare industry. By using TexAu’s Sales Navigator Auto Connect, the consultant can create a highly targeted list of relevant decision-makers and automatically send personalized connection requests. Each message can be customized to highlight the consultant’s expertise in digital transformation, which may be of particular interest to executives in the healthcare space.
Best Practices for Maximizing Results with TexAu
To maximize the effectiveness of TexAu’s Sales Navigator Auto Connect, it’s essential to follow best practices that ensure your outreach remains targeted, personalized, and engaging. Below are some tips for optimizing your outreach efforts:
Personalize Connection Requests:
While automation can make the process faster, personalization is key to improving your connection acceptance rate. Always customize your connection requests by using dynamic placeholders like {{first_name}} or mentioning a common interest or shared connection. For example, instead of sending a generic message like “I’d like to connect,” you could say, “Hi {{first_name}}, I noticed we share an interest in AI innovation, and I’d love to connect and exchange ideas.”
This personalization shows the recipient that you’ve taken the time to review their profile and are genuinely interested in connecting, increasing the chances of them accepting your request.
Limit Daily Requests:
Although TexAu allows you to send connection requests in bulk, it’s important to stay within LinkedIn’s connection limits to avoid account restrictions. LinkedIn has daily limits on how many connection requests you can send, and exceeding these limits could result in temporary or permanent account suspensions.
To avoid this, set daily limits on the number of connection requests TexAu sends, ensuring that your outreach remains consistent without overburdening LinkedIn’s system. TexAu’s settings allow you to control the daily volume of connection requests sent, ensuring that your account remains in good standing.
Engage After Connecting:
Once your connection request is accepted, don’t stop there. The next step is to engage with your new connection. Send a follow-up message thanking them for accepting the connection, introducing yourself, and offering valuable insights or resources.
Engagement doesn’t have to be limited to the initial connection message. Over time, you can keep the conversation going by sharing relevant articles, offering thought leadership, or simply checking in with a friendly message. Building a relationship through continuous engagement is the key to long-term success on LinkedIn.
Real-Life Applications of TexAu’s Sales Navigator Auto Connect
Case Study 1: Sales Growth
A sales team at a SaaS company used TexAu to scale their outreach by 5x. By automating the connection process and sending personalized requests to decision-makers in target industries, they were able to grow their LinkedIn network rapidly and generate qualified leads faster. As a result, their pipeline filled up with high-quality prospects, leading to increased sales and better conversion rates.
Case Study 2: Recruiter Success
A recruiter specializing in tech hires used TexAu to add over 1,200 new candidates to their network in just 3 months. By automating outreach to data scientists and machine learning professionals, the recruiter expanded their talent pool significantly without spending hours manually searching for candidates. The recruiter was able to identify top talent more efficiently, resulting in better hiring outcomes for their clients.
Case Study 3: Marketing Engagement
A content marketer focused on product-led growth strategies used TexAu to increase engagement with their LinkedIn posts by 40%. By targeting growth marketers in the SaaS industry and connecting with them on LinkedIn, the marketer expanded their reach and saw more people interacting with their content. This led to more leads, increased visibility, and a more engaged audience.
TexAu’s Sales Navigator Auto Connect empowers professionals across industries to scale their LinkedIn outreach effectively. Whether you’re in sales, marketing, recruiting, or consulting, TexAu’s automation features allow you to connect with the right people, at the right time, with the right message. By following best practices and leveraging TexAu’s full suite of features, you can maximize the success of your outreach, increase engagement rates, and generate more qualified leads. Start using TexAu today to supercharge your LinkedIn outreach and drive meaningful professional relationships.
Conclusion: Streamline Your Outreach with TexAu’s Sales Navigator Auto Connect
In today’s competitive business landscape, leveraging automation tools like TexAu’s Sales Navigator Auto Connect can significantly improve your LinkedIn outreach efforts. By automating the connection process, personalizing your messages, and targeting the right audience, you can quickly scale your network, improve engagement rates, and generate high-quality leads.
Whether you’re a sales rep, marketer, recruiter, or business owner, TexAu’s Sales Navigator Auto Connect offers an efficient solution to reach the right people and build meaningful professional relationships. Start using TexAu today to automate your LinkedIn outreach and unlock the full potential of your network!
The Sales Navigator Auto Connect automation allows you to send LinkedIn connection requests to potential leads automatically. This tool is ideal for founders, marketers, and sales professionals seeking to expand their LinkedIn network efficiently. Configure the automation with ease, export data to Google Sheets or CSV, and run it via the cloud or desktop.
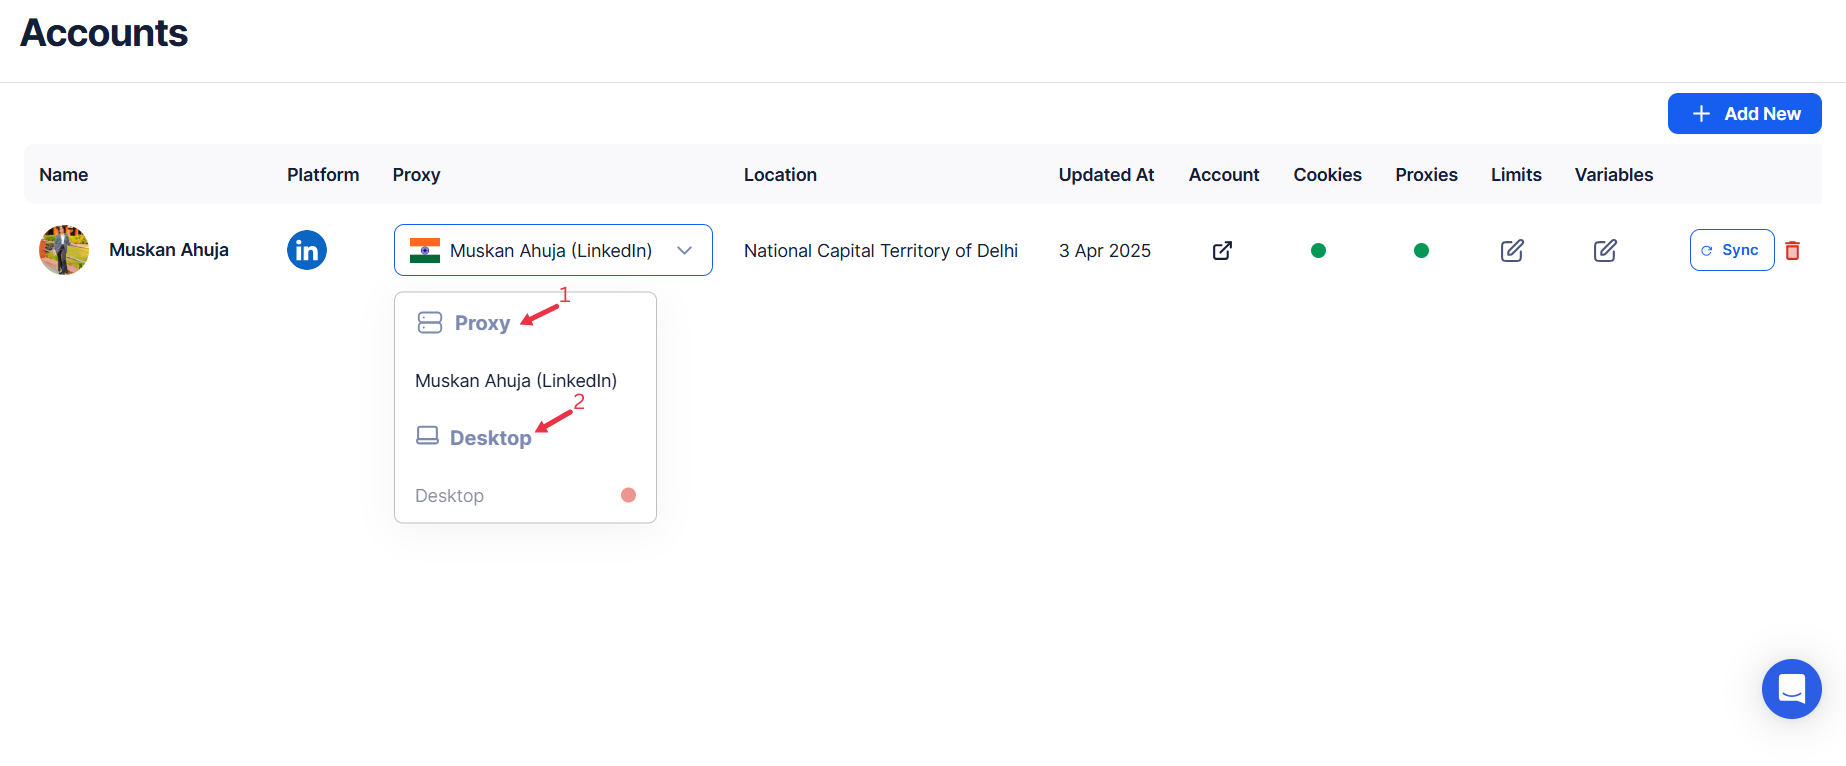
Step 1: Log in to TexAu and Connect Sales Navigator
Log in to your TexAu account at v2-prod.texau.com.
Go to Accounts and connect your LinkedIn account. You can choose one of these methods:
- Share via Magic Link: Share the link, copy it to your browser, and follow the steps to integrate your Sales Navigator account securely.
- Add Account: Sync cookies and browser data with TexAu for seamless integration.
Tip: Use Magic Link for an easy and secure connection.
{% custom-image src="https://v2-web-assets.s3.us-east-1.amazonaws.com/Automations/LinkedIn+Address+Book+Export/l4.png" alt="l4" /%}
Step 2: Choose Cloud or Desktop Execution
Decide how you want to run the automation:
- Cloud Mode: Automates tasks on TexAu’s servers with built-in proxies. You can add custom proxies via Settings > Preferences > Proxies.
- Desktop Mode: Runs automation on your local device using your IP address.
Tip: Desktop mode saves cloud runtime credits and gives more control over the process.
{% custom-image src="https://v2-web-assets.s3.us-east-1.amazonaws.com/Common/cloud-or-desktop-execution/cloud-or-desktop-execution.png" alt="choose-cloud-or-desktop-execution" /%}
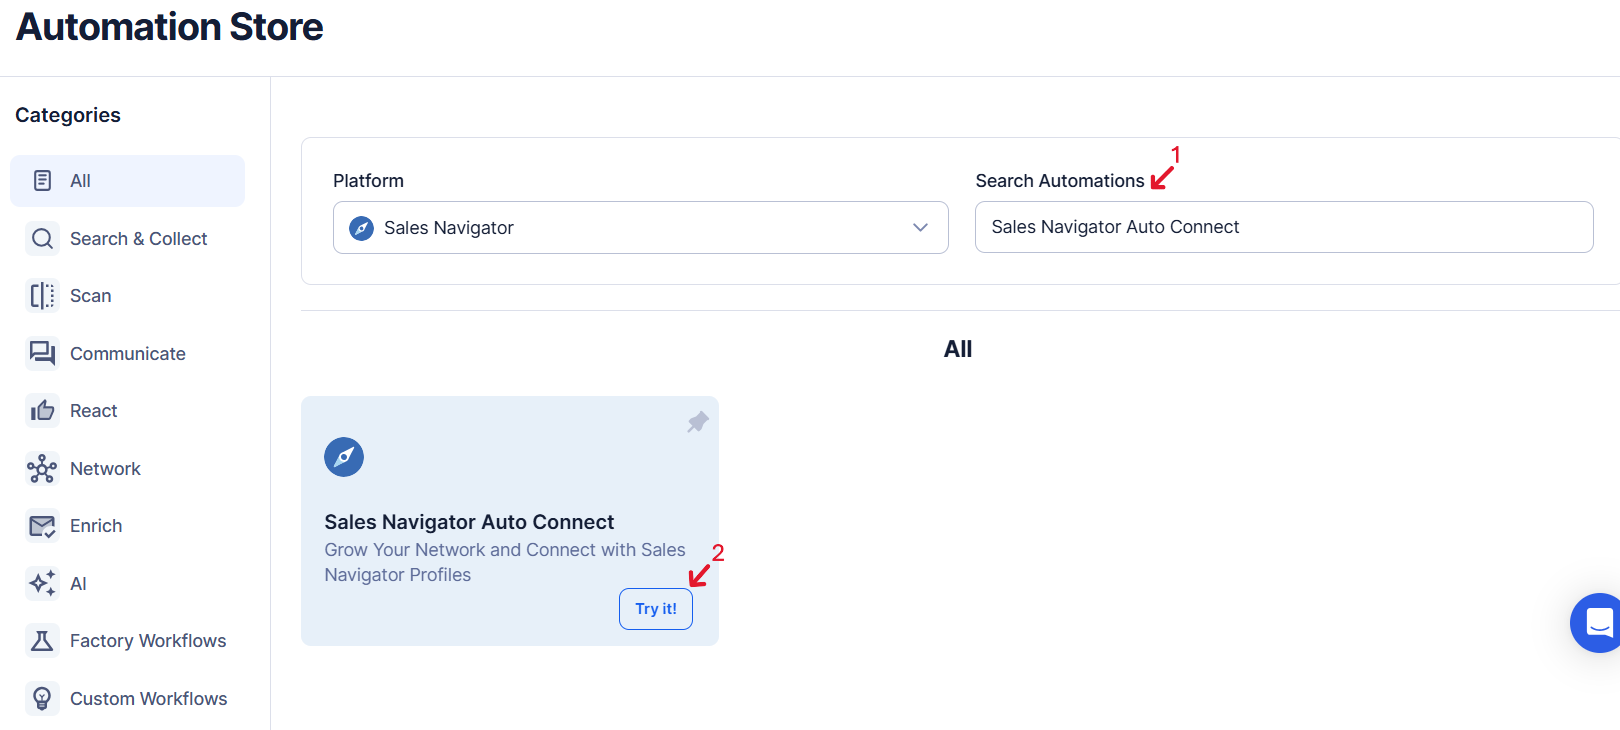
Step 3: Search for the Particular Sales Navigator Automation
- Navigate to the Automation Store on TexAu.
- Use the search bar to find Sales Navigator Auto Connect automation.
{% custom-image src="https://v2-web-assets.s3.us-east-1.amazonaws.com/Automations/sales-navigator-auto-connect/sales-navigator-auto-connect.PNG" alt="search-for-the-particular-sales-navigator-automation" /%}
Step 4: Select Your Input Source
Sales Navigator Auto Connect automation ensures that you expand your LinkedIn network seamlessly while maintaining the human touch in your connection requests. Simply configure your inputs, customize messages, and let TexAu handle the rest!
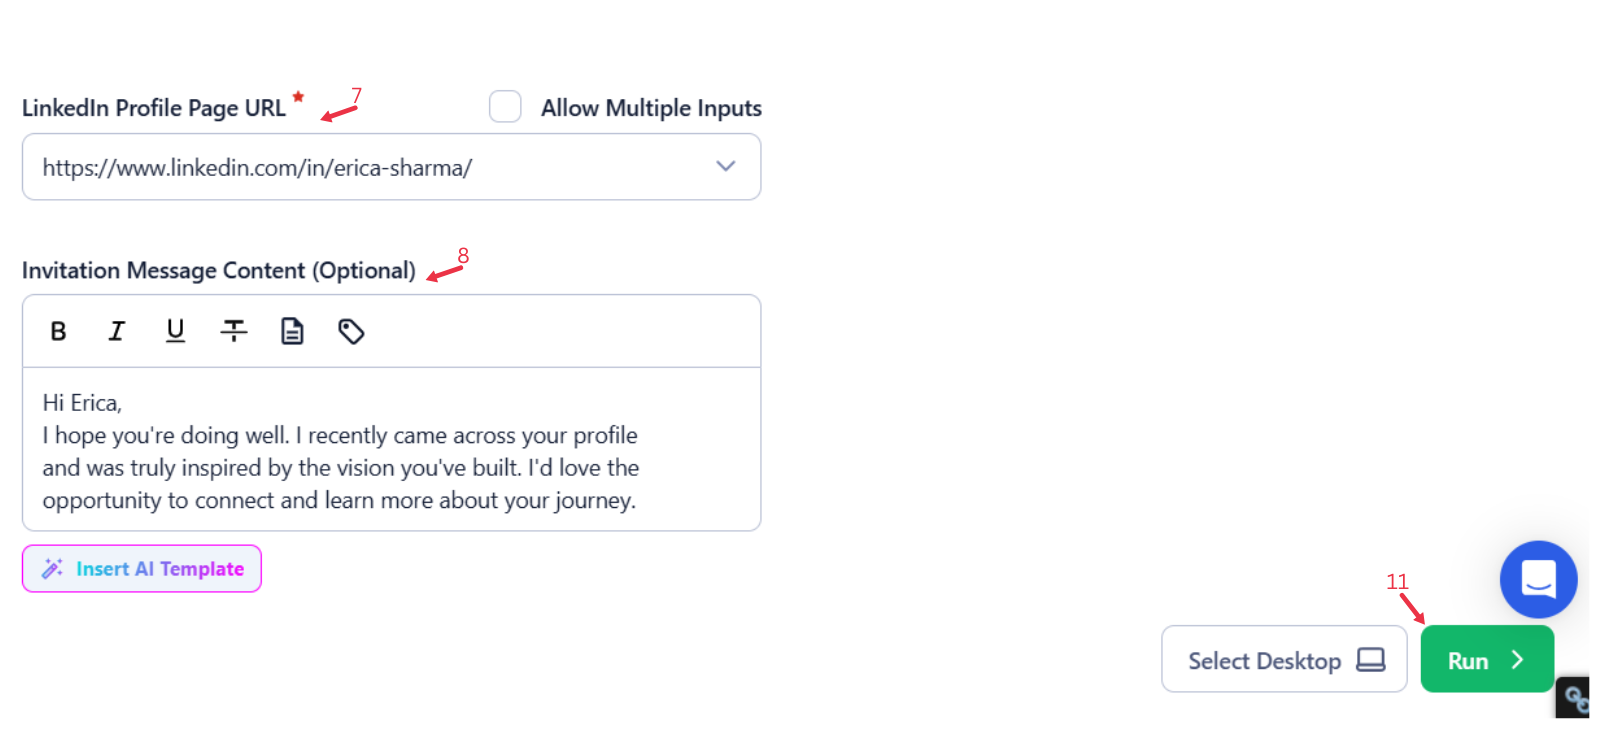
Single Input
- Account: Choose your Sales Navigator account.
- LinkedIn Profile URL: Paste the LinkedIn profile page URL.
- Message (Optional):
- Write a custom invitation message.
- Include Personalization Tags such as First Name, Last Name, and Full Name.
- Utilize Inputs like Company Name, List URL, and SalesNav Company URL.
- Generate AI suggestions using Insert AI Template for effective communication.
{% custom-image src="https://v2-web-assets.s3.us-east-1.amazonaws.com/Automations/sales-navigator-auto-connect/sales-navigator-auto-connect-single-inputs.png" alt="enter-a-single-input" /%}
Google Sheets
-
Connect Google Sheets
- Select a Google account and connect a spreadsheet containing LinkedIn profile URLs.
- Ensure the selected sheet has a header row.
-
Adjust Processing Settings
- Number of Rows to Process (Optional): Define how many rows to process.
- Number of Rows to Skip (Optional): Specify rows to skip, if needed.
-
Provide Input Details
- LinkedIn Profile URL: Choose the column with LinkedIn profile URLs.
- Message (Optional):
- Use Personalization Tags for names.
-
Insert Inputs like Company Name, List URL, or SalesNav Company URL.
-
Add AI-generated templates using Insert AI Template for optimized messaging.
Optional Advanced Feature:
- Loop Mode: Enable Loop Mode to re-process the Google Sheet from the beginning once all rows are completed. This is useful for tasks that require recurring updates.
Watch Row (Optional)
Watch Row feature detects new rows in Google Sheets and triggers workflows automatically, reducing manual workload.
Configure Watch Row by selecting an execution interval and setting an end date.
Watch Row Schedule
- None
- Scheduling Intervals (e.g., every 15 minutes, every hour)
- One-Time Execution
- Daily Execution
- Weekly Recurrence (e.g., every Tuesday and Friday)
- Monthly Specific Dates (e.g., 14th and 30th)
- Custom Fixed Dates (e.g., August 9)
By default, Watch Row runs every 15 minutes and continues for five days unless modified.
With Watch Row, TexAu ensures workflows stay dynamic and automated.
{% custom-image src="https://v2-web-assets.s3.us-east-1.amazonaws.com/Automations/sales-navigator-auto-connect/sales-navigator-auto-connect1-google-sheets.png" alt="use-google-sheets-for-bulk-input" /%}
{% custom-image src="https://v2-web-assets.s3.us-east-1.amazonaws.com/Automations/sales-navigator-auto-connect/sales-navigator-auto-connect2-google-sheets.png" alt="use-google-sheets-for-bulk-input" /%}
Process a CSV File
This option allows you to use a static CSV file for Sales Navigator Auto Connect.
- Upload the File
- Click Upload CSV File and select the file containing Sales Navigator profile URLs.
- TexAu will display the file name and preview its content for verification.
- Adjust Processing Settings
- Number of Rows to Process (Optional): Define how many rows you want to process.
- Number of Rows to Skip (Optional): Specify rows to skip, if needed.
- Provide Input Details
- Sales Navigator Profile URL: Ensure the correct column contains the Sales Navigator profile URLs.
- Message (Optional): Add a personalized message using Personalization Tags (e.g., First Name, Last Name, Company Name).
- Use dynamic inputs like Company Name, List URL, or SalesNav Company URL from your CSV data.
- Utilize the Insert AI Template feature for AI-generated message suggestions.
- Sales Navigator Account
- Select your Sales Navigator Account from the dropdown to run the automation.
{% custom-image src="https://v2-web-assets.s3.us-east-1.amazonaws.com/Common/texau-input-source-options.png" alt="step3" /%}
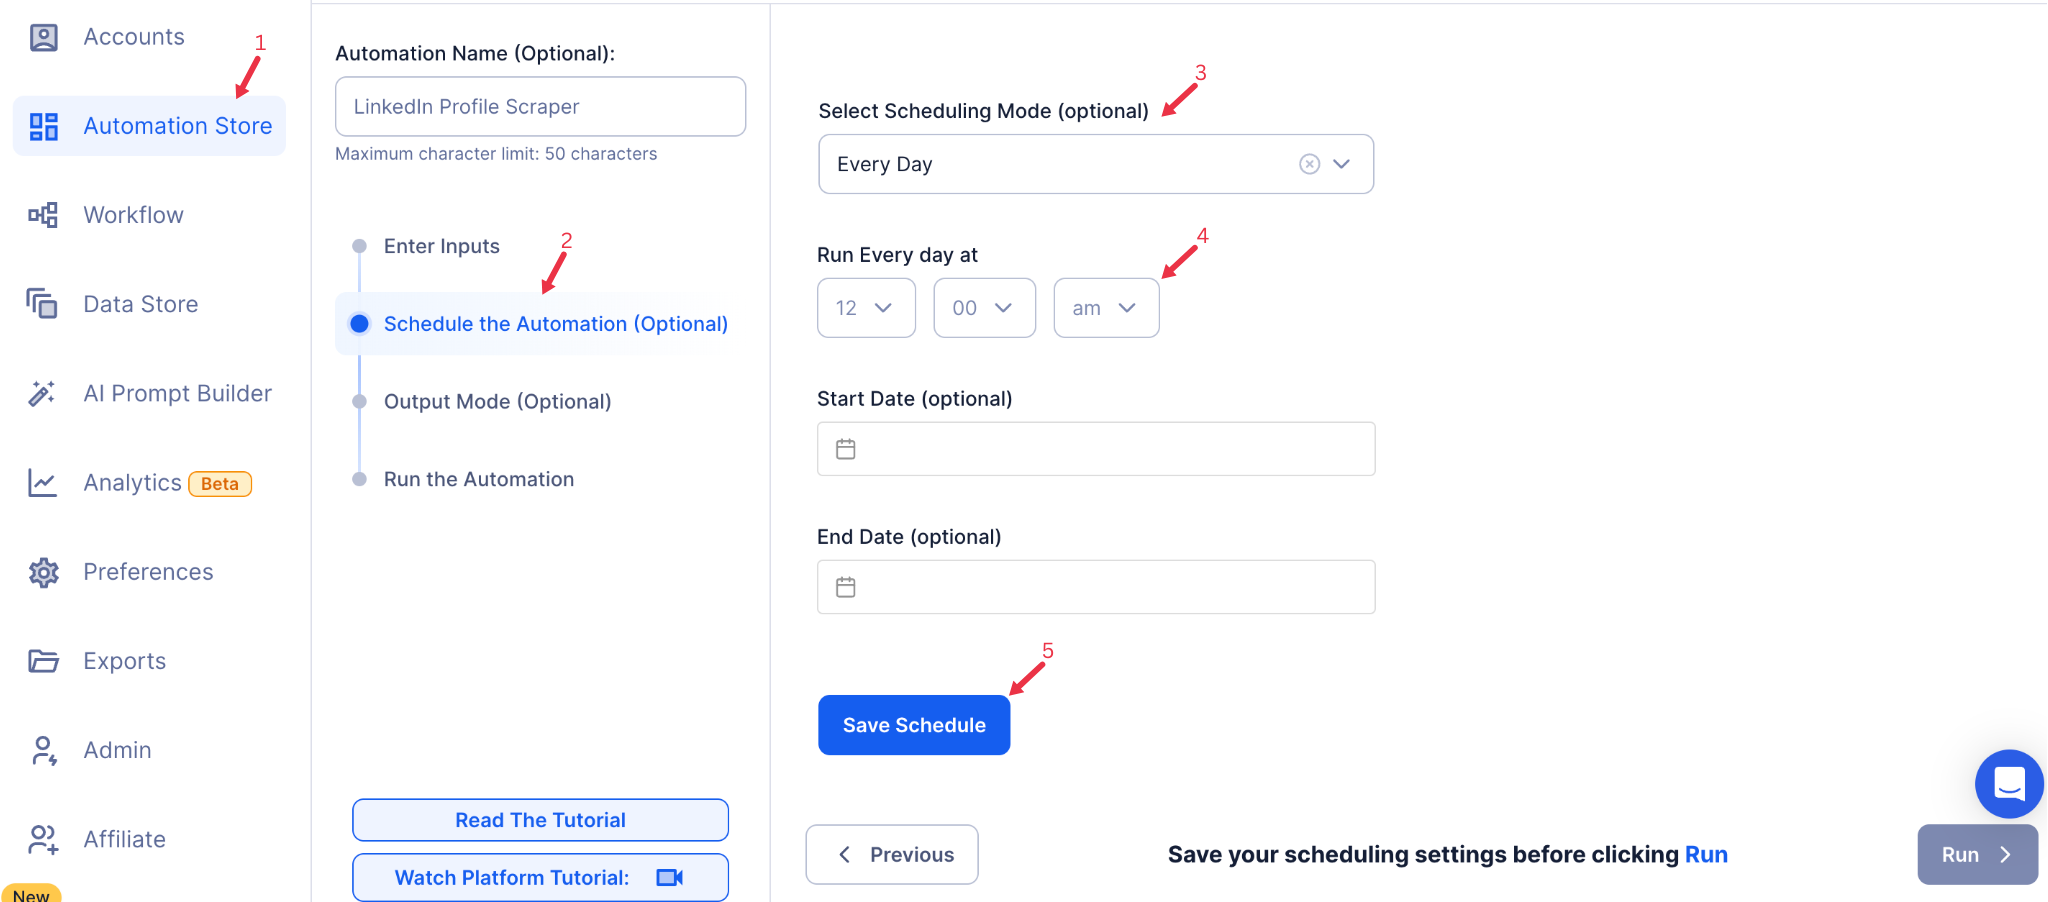
Step 5: Schedule the Automation (Optional)
Set up the schedule for when you want the automation to run. Click Schedule and choose a frequency:
- None
- At Regular Intervals (e.g., every 8 hours or daily)
- Once
- Every Day
- Specific Days of the Week (e.g., every Monday)
- Specific Days of the Month (e.g., 1st and 15th)
- Specific Dates (e.g., December 31)
Tip: Scheduling helps maintain a steady outreach cadence without manual intervention.
{% custom-image src="https://v2-web-assets.s3.us-east-1.amazonaws.com/Common/schedule-the-automation/schedule-the-automation.png" alt="schedule-the-automation" /%}
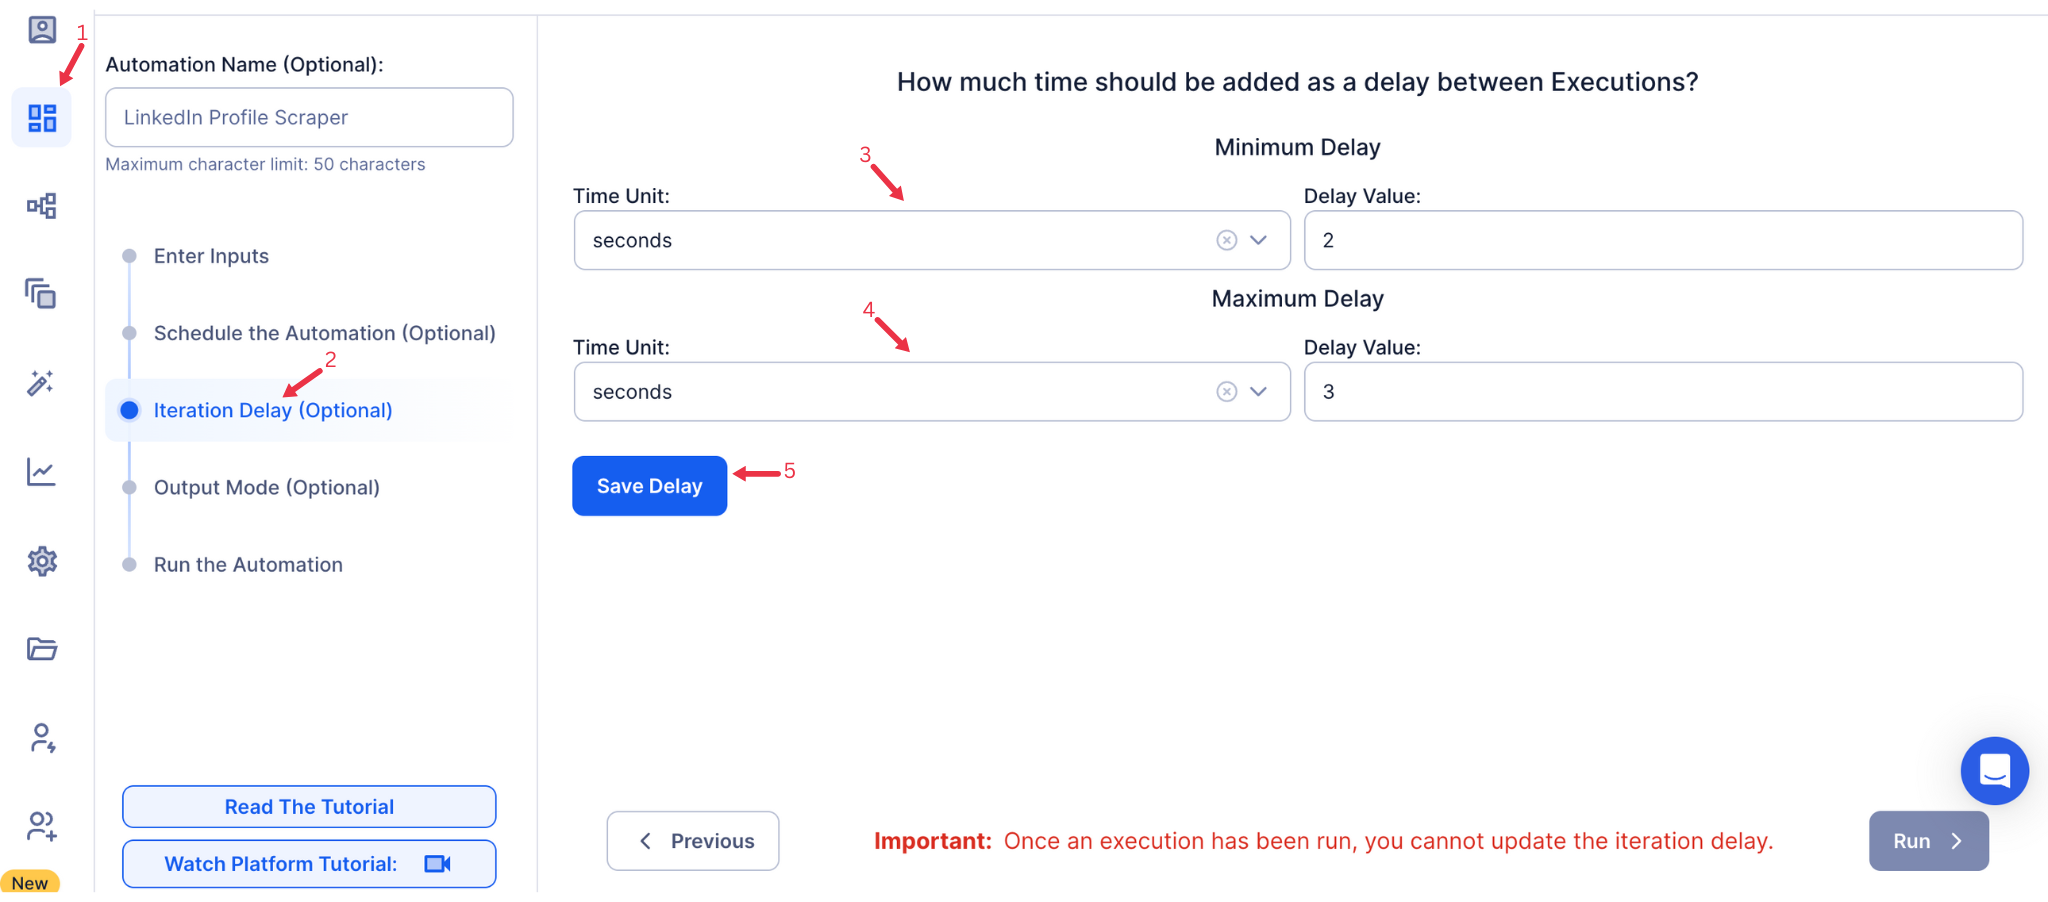
Step 6: Set an Iteration Delay (Optional)
Avoid detection and simulate human-like activity by setting an iteration delay. Choose minimum and maximum time intervals to add randomness between actions. This makes your activity look natural and reduces the chance of being flagged.
- Minimum Delay: Enter the shortest interval (e.g., 10 seconds).
- Maximum Delay: Enter the longest interval (e.g., 20 seconds).
Tip: Random delays keep your automation safe and reliable.
{% custom-image src="https://v2-web-assets.s3.us-east-1.amazonaws.com/Common/iteration-delay/iteration-delay.png" alt="iteration-delay" /%}
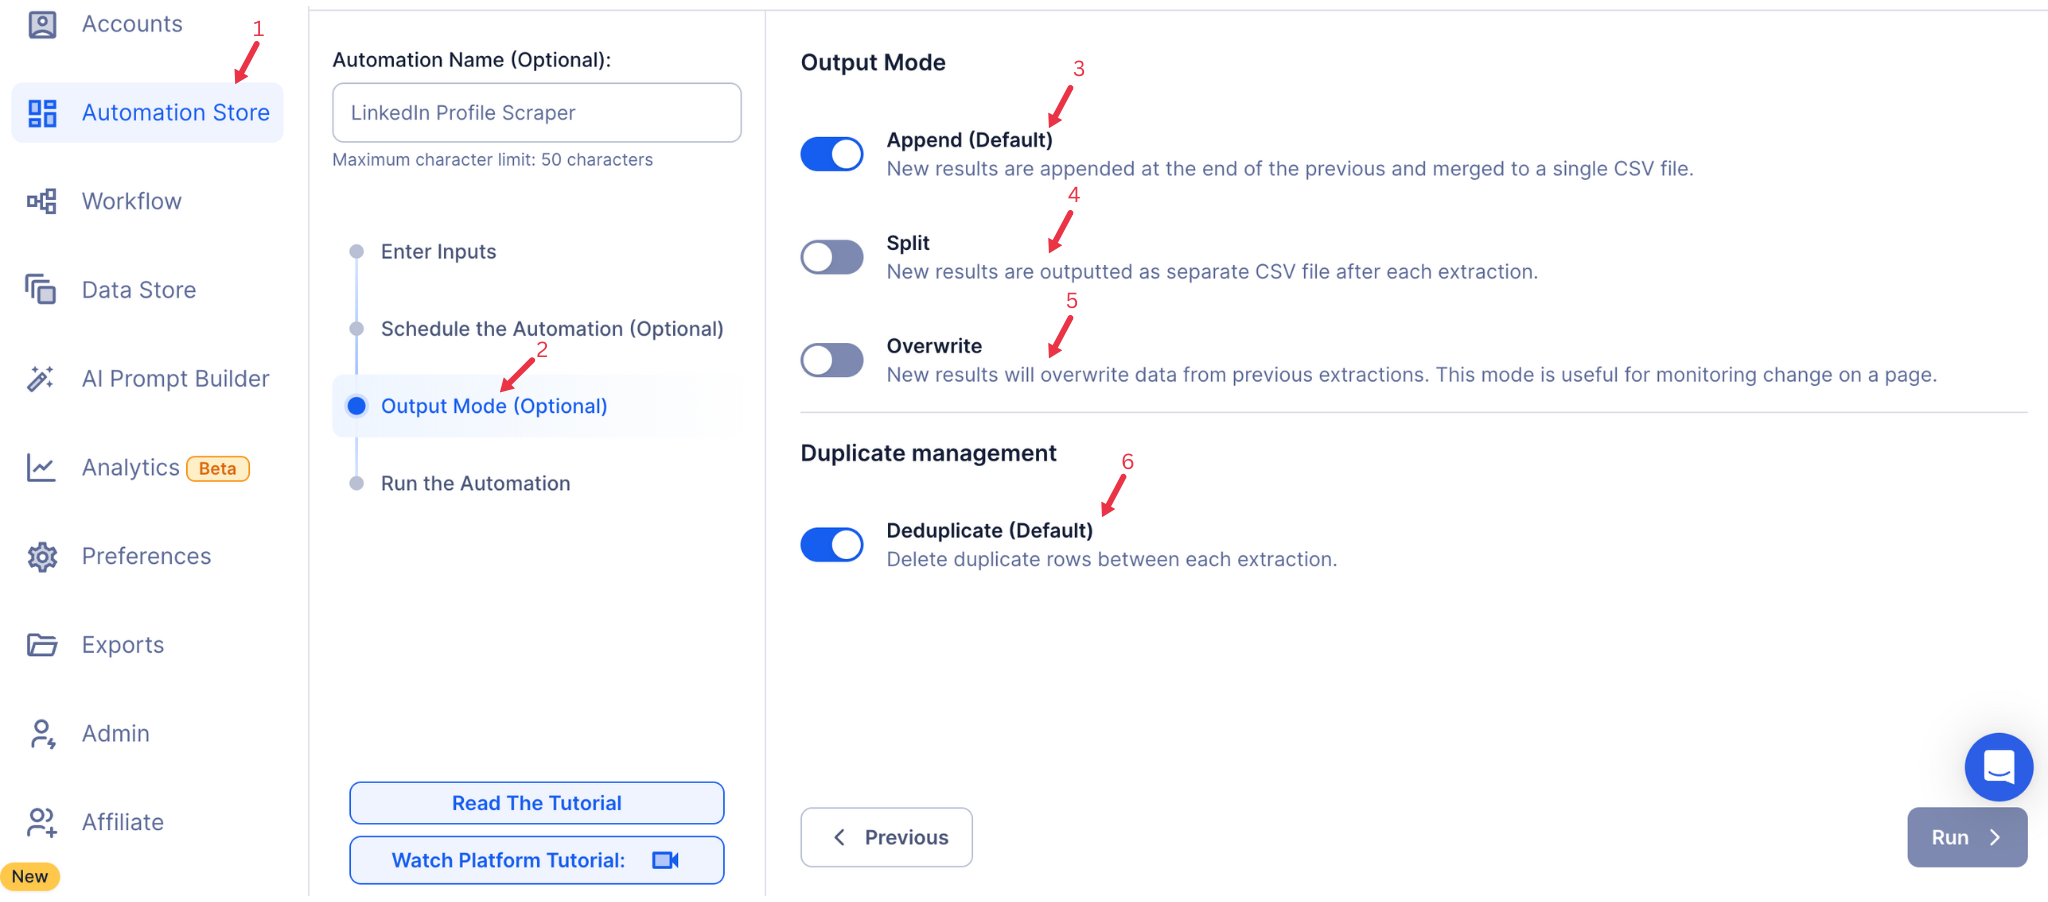
Step 7: Choose Your Output Mode (Optional)
Choose how to save and manage the extracted alumni data. TexAu provides the following options:
- Append (Default): Adds new results to the end of existing data, merging them into a single CSV file.
- Split: Saves new results as separate CSV files for each automation run.
- Overwrite: Replaces previous data with the latest results.
- Duplicate Management: Enable Deduplicate (Default) to remove duplicate rows.
Tip: Google Sheets export makes it easy to collaborate with your team in real time.
{% custom-image src="https://v2-web-assets.s3.us-east-1.amazonaws.com/Common/output-mode/output-mode.png" alt="output-mode" /%}
Step 8: Access the Data from the Data Store
After the automation completes, go to the Data Store in TexAu. Locate the Sales Navigator Auto Connect automation and click See Data to view or download the connection request details.
The Sales Navigator Auto Connect automation helps you scale LinkedIn connections effortlessly. With flexible input options, scheduling, and detailed output management, this tool streamlines your outreach strategy while maintaining professional accuracy.
{% custom-image src="https://v2-web-assets.s3.us-east-1.amazonaws.com/Automations/LinkedIn+Job+Scraper/data-store-see-data.png" alt="step8" /%}
Run this automation on your own server.
TexAu V3 doesn't host social-platform automations anymore — but the runnable code is yours. Tell us your inputs, outputs, and target environment, and we'll ship you a working version you can deploy and operate yourself.