Slack
Slack Auto Message
Send automated messages on Slack with TexAu’s Slack Auto Message tool. Schedule recurring messages, streamline communication, and export logs to Google Sheets or CSV.
Last updated
The **Slack Auto Message** automation allows you to send automated messages to individuals or channels on Slack. This tool is ideal for founders, sales managers, marketers, and growth hackers who want to streamline communication, send updates, or manage outreach campaigns. With TexAu, you can automa
The Slack Auto Message automation allows you to send automated messages to individuals or channels on Slack. This tool is ideal for founders, sales managers, marketers, and growth hackers who want to streamline communication, send updates, or manage outreach campaigns. With TexAu, you can automate the process, integrate data from Google Sheets or CSV, and schedule recurring messages for continuous communication. Follow this step-by-step guide to configure and run the automation.
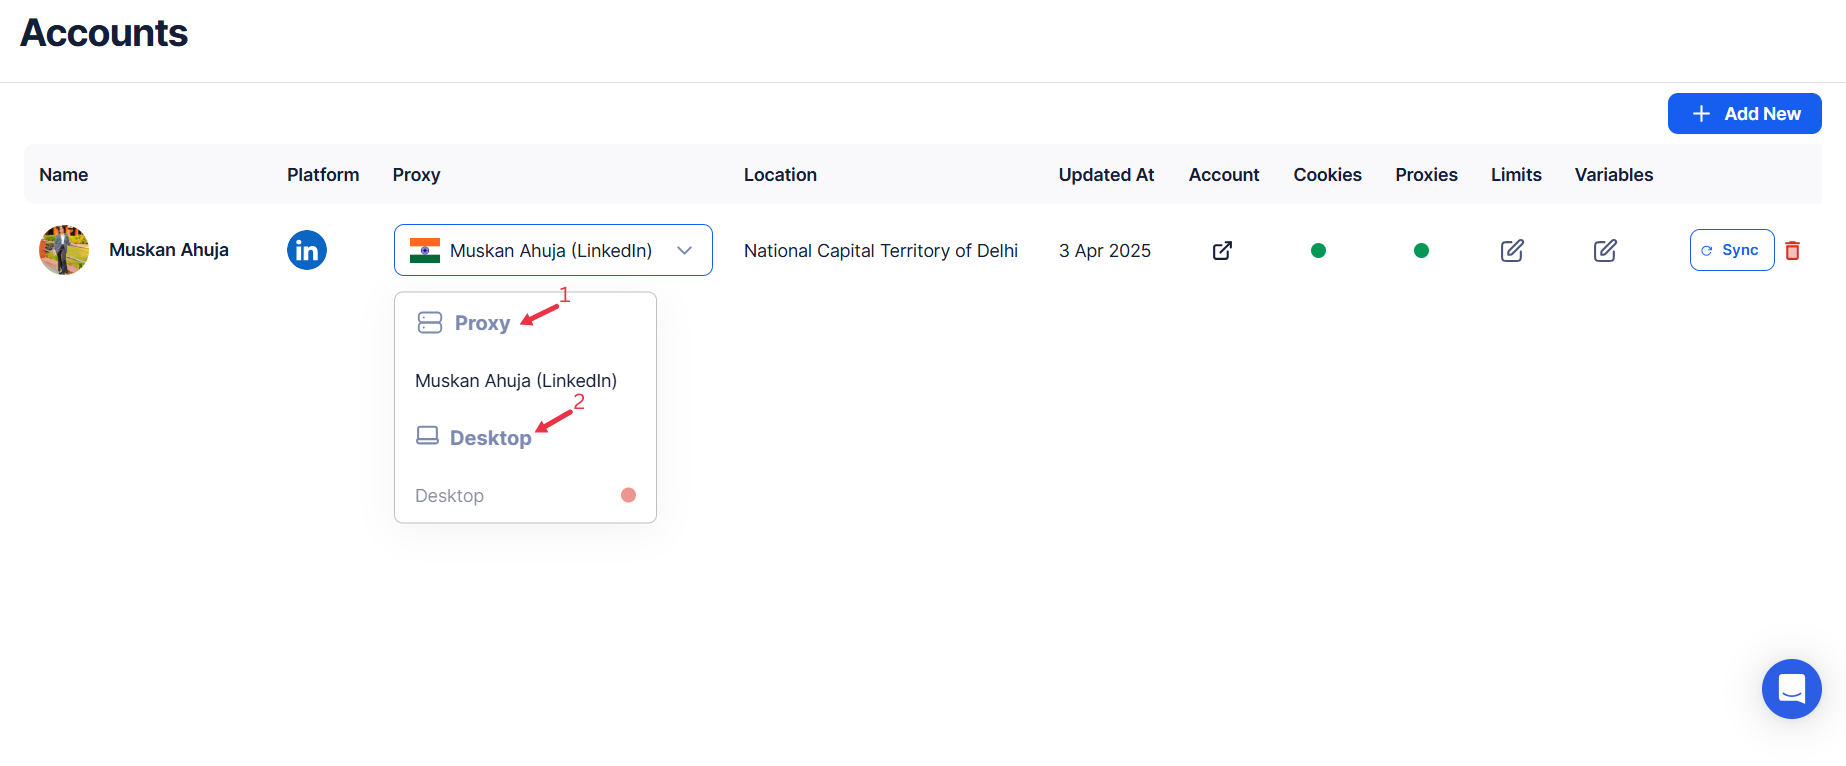
Step 1: Log in to TexAu and Connect Slack Account
Log in to your TexAu account at v2-prod.texau.com.
Go to Accounts and connect your slack account. You can choose one of these methods:
- Share via Magic Link: Share the link, copy it to your browser, and follow the steps to integrate your slack account securely.
- Add Account: Sync cookies and browser data with TexAu for seamless integration.
Tip: Use Magic Link for an easy and secure connection.
{% custom-image src="https://v2-web-assets.s3.us-east-1.amazonaws.com/Automations/LinkedIn+Address+Book+Export/l4.png" alt="l4" /%}
Step 2: Choose Cloud or Desktop Execution
Decide how you want to run the automation:
- Cloud Mode: Automates tasks on TexAu’s servers with built-in proxies. You can add custom proxies via Settings > Preferences > Proxies.
- Desktop Mode: Runs automation on your local device using your IP address.
Tip: Desktop mode saves cloud runtime credits and gives more control over the process.
{% custom-image src="https://v2-web-assets.s3.us-east-1.amazonaws.com/Common/cloud-or-desktop-execution/cloud-or-desktop-execution.png" alt="choose-cloud-or-desktop-execution" /%}
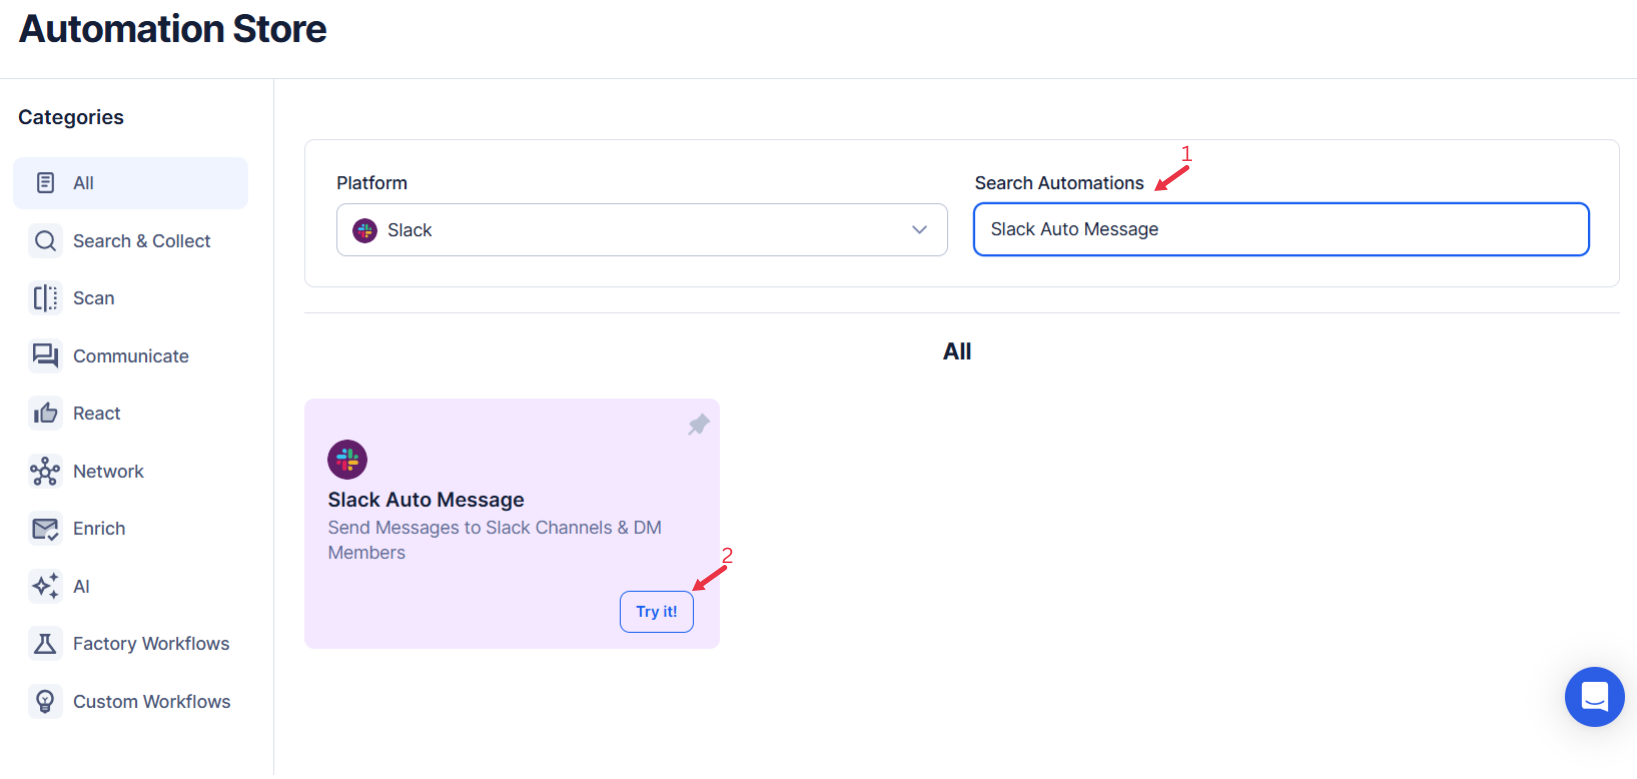
Step 3: Search for the Particular Slack Automation
- Navigate to the Automation Store on TexAu.
- Use the search bar to find Slack Auto Message automation.
{% custom-image src="https://v2-web-assets.s3.us-east-1.amazonaws.com/Automations/slack-auto-message/slack-auto-message.png" alt="search-for-the-particular-slack-automation" /%}
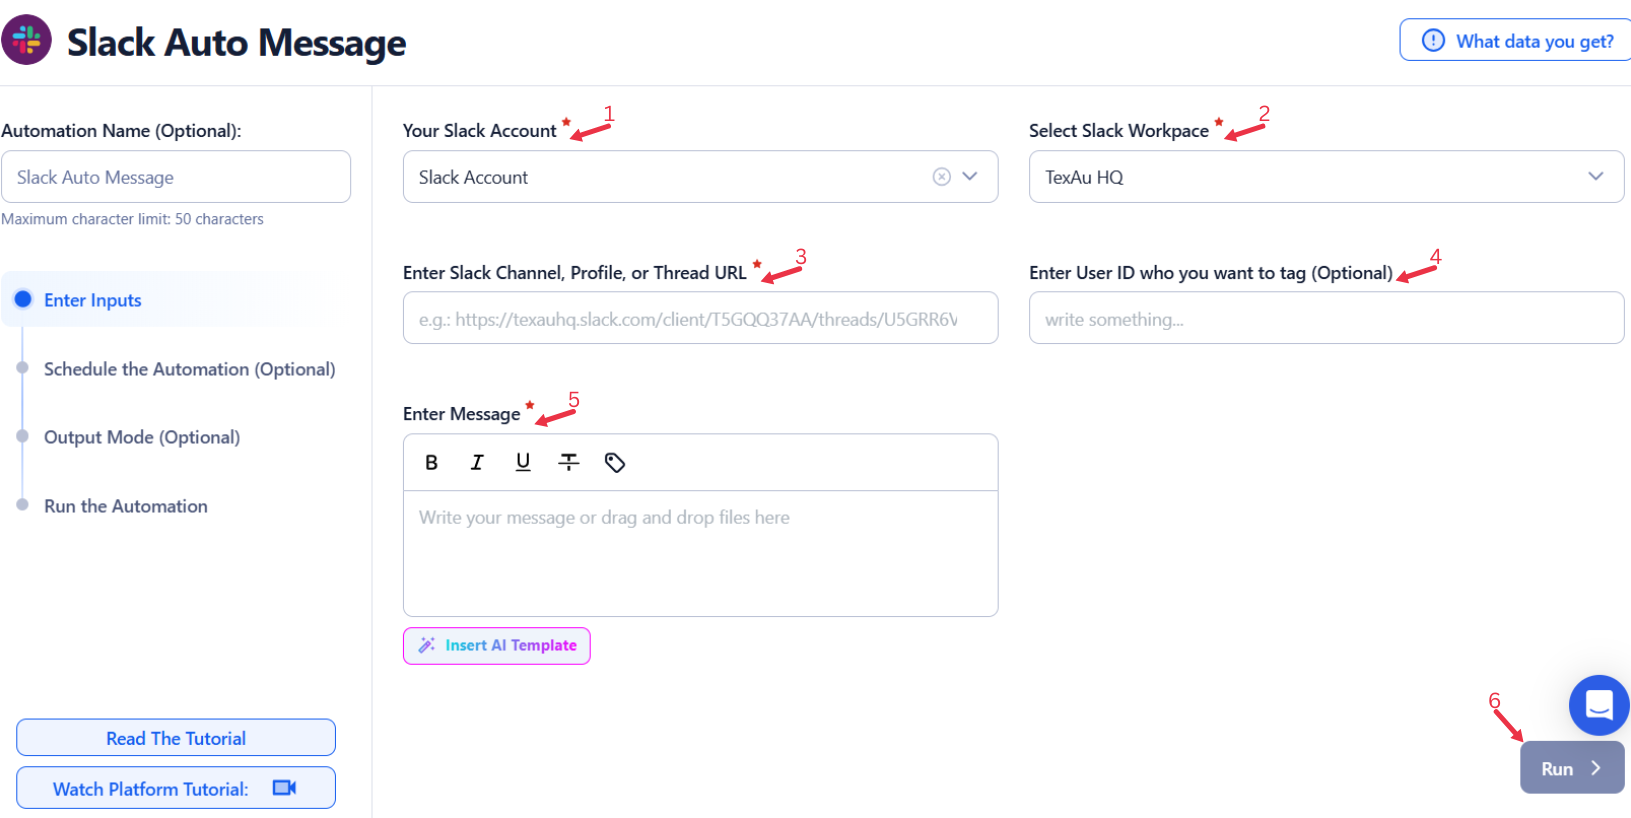
Step 4: Select Your Input Source
Slack Auto Message automation helps you send messages to Slack channels, profiles, or threads directly from TexAu. Whether you're sending one message or bulk messages from Google Sheets or a CSV file, this automation streamlines the process. You can add personalization tags to make your messages more engaging and even use AI templates for quick, professional content creation.
Single Input
This method allows you to send a message to a specific Slack channel, profile, or thread using a single set of inputs.
- Fill Required Inputs:
- Select your Slack account under the Account field.
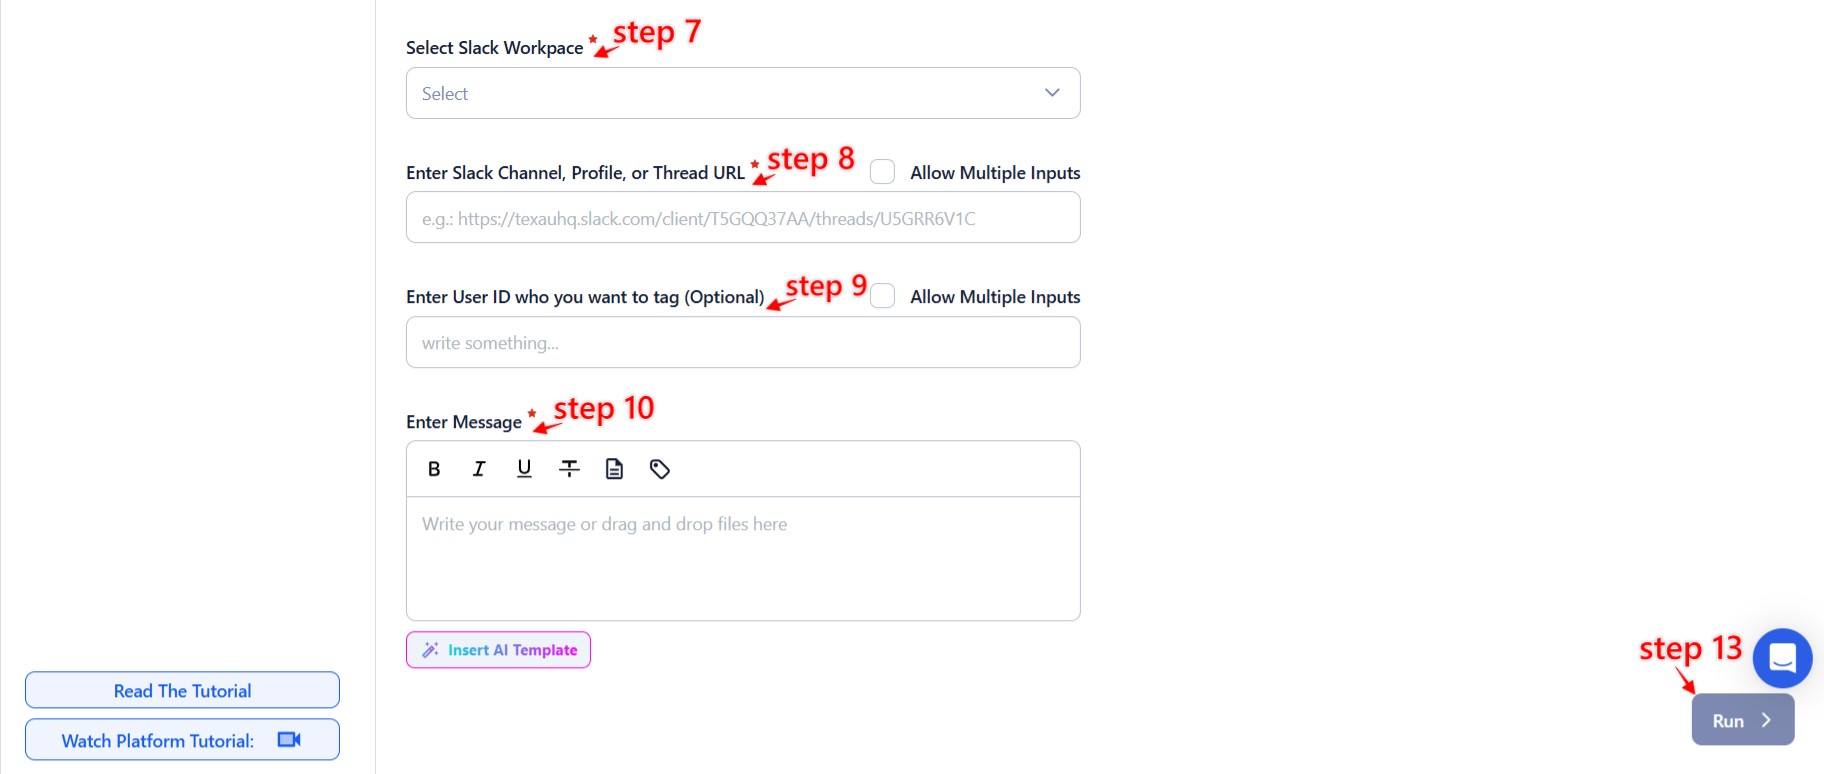
- Choose the Slack Workspace you want to send messages to.
- Enter the Channel or Profile URL in the provided field.
- Optionally, add the Tagged User ID to tag specific users.
- Write your message in the Message field. You can use personalization tags for dynamic content and click on Insert AI Template for pre-generated message templates.
- Schedule the Automation:
- Set the time and frequency for sending messages if required.
- Run the Automation:
- Execute the automation after confirming all inputs.
- Collect the Data:
- Check the results of your automation in the output mode.
{% custom-image src="https://v2-web-assets.s3.us-east-1.amazonaws.com/Automations/slack-auto-message/slack-auto-message-single-inputs.png" alt="enter-a-single-input" /%}
Google Sheets Input
For sending bulk messages, Google Sheets integration allows you to send messages to multiple Slack channels or users.
Enter the Sheet Data:
- Select your Google Sheets account under Google Account.
- Select the specific Spreadsheet and Sheet where your data is stored.
- Specify the number of rows to process and skip if needed.
- Enter Slack-related data, such as the Slack Workspace, Channel or Profile URL, and Message, within your spreadsheet.
Personalized Tags:
- Ensure that the columns in your Google Sheet include dynamic placeholders for personalization, such as (user name) and (message content)
Insert AI Template:
Use the Insert AI Template feature to craft engaging messages.
Loop Mode (Optional)
- Turn on Loop Mode to reprocess the Google Sheet from the start once all rows are completed.
Watch Row (Optional)
Watch Row feature helps automate workflows by detecting new Google Sheet entries and running workflows without manual action.
Define Watch Row settings by selecting an update frequency and an execution timeframe.
Watch Row Schedule
- None
- Scheduling Intervals (e.g., every 15 minutes, every hour)
- One-Time Execution
- Daily Execution
- Weekly Recurrence (e.g., every Tuesday and Thursday)
- Monthly Specific Dates (e.g., 7th and 22nd)
- Custom Fixed Dates (e.g., January 9)
By default, Watch Row scans every 15 minutes and runs for five days unless changed.
With Watch Row, workflows stay dynamic and data-driven.
{% custom-image src="https://v2-web-assets.s3.us-east-1.amazonaws.com/Automations/slack-auto-message/slack-auto-message-1-google-sheet.jpeg" alt="use-google-sheets-for-bulk-input" /%}
{% custom-image src="https://v2-web-assets.s3.us-east-1.amazonaws.com/Automations/slack-auto-message/slack-auto-message-2-google-sheet.jpeg" alt="use-google-sheets-for-bulk-input" /%}
CSV Input
For similar functionality as Google Sheets, you can upload a CSV file:
- Upload the CSV:
- Click on the option to import data via a CSV file.
- Map the CSV fields with the required fields, such as Slack Workspace, Channel or Profile URL, and Message.
- Personalized Tags:
- Ensure that your CSV includes placeholders for personalization, similar to Google Sheets.
{% custom-image src="https://v2-web-assets.s3.us-east-1.amazonaws.com/Common/texau-input-source-options.png" alt="Slack Auto Message" /%}
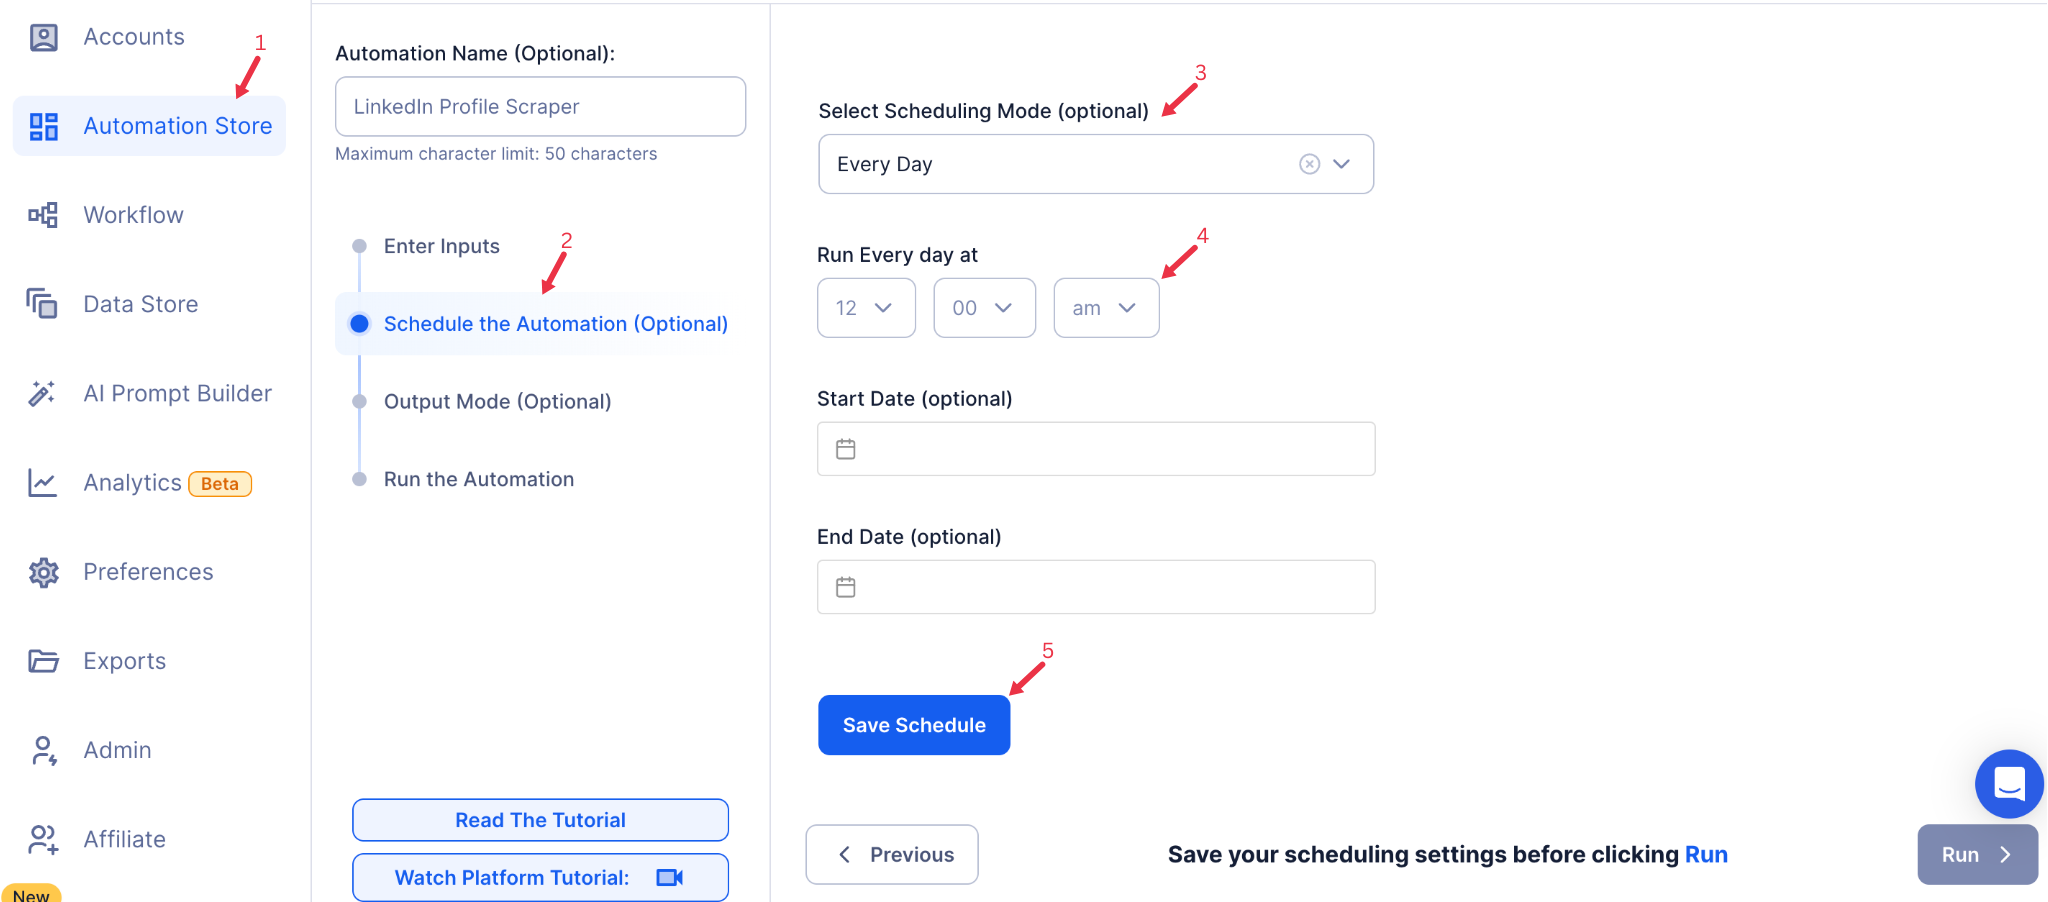
Step 5: Schedule the Automation (Optional)
Set a schedule to run the automation at specific intervals. Click Schedule to configure the start date and time or select a recurrence frequency:
- None
- At Regular Intervals (e.g., every 6 hours)
- Once
- Every Day
- On Specific Days of the Week (e.g., every Monday and Thursday)
- On Specific Days of the Month (e.g., the 5th and 20th)
- On Specific Dates (e.g., March 10)
Tip: Scheduling is ideal for sending reminders, updates, or recurring messages on Slack.
{% custom-image src="https://v2-web-assets.s3.us-east-1.amazonaws.com/Common/schedule-the-automation/schedule-the-automation.png" alt="schedule-the-automation" /%}
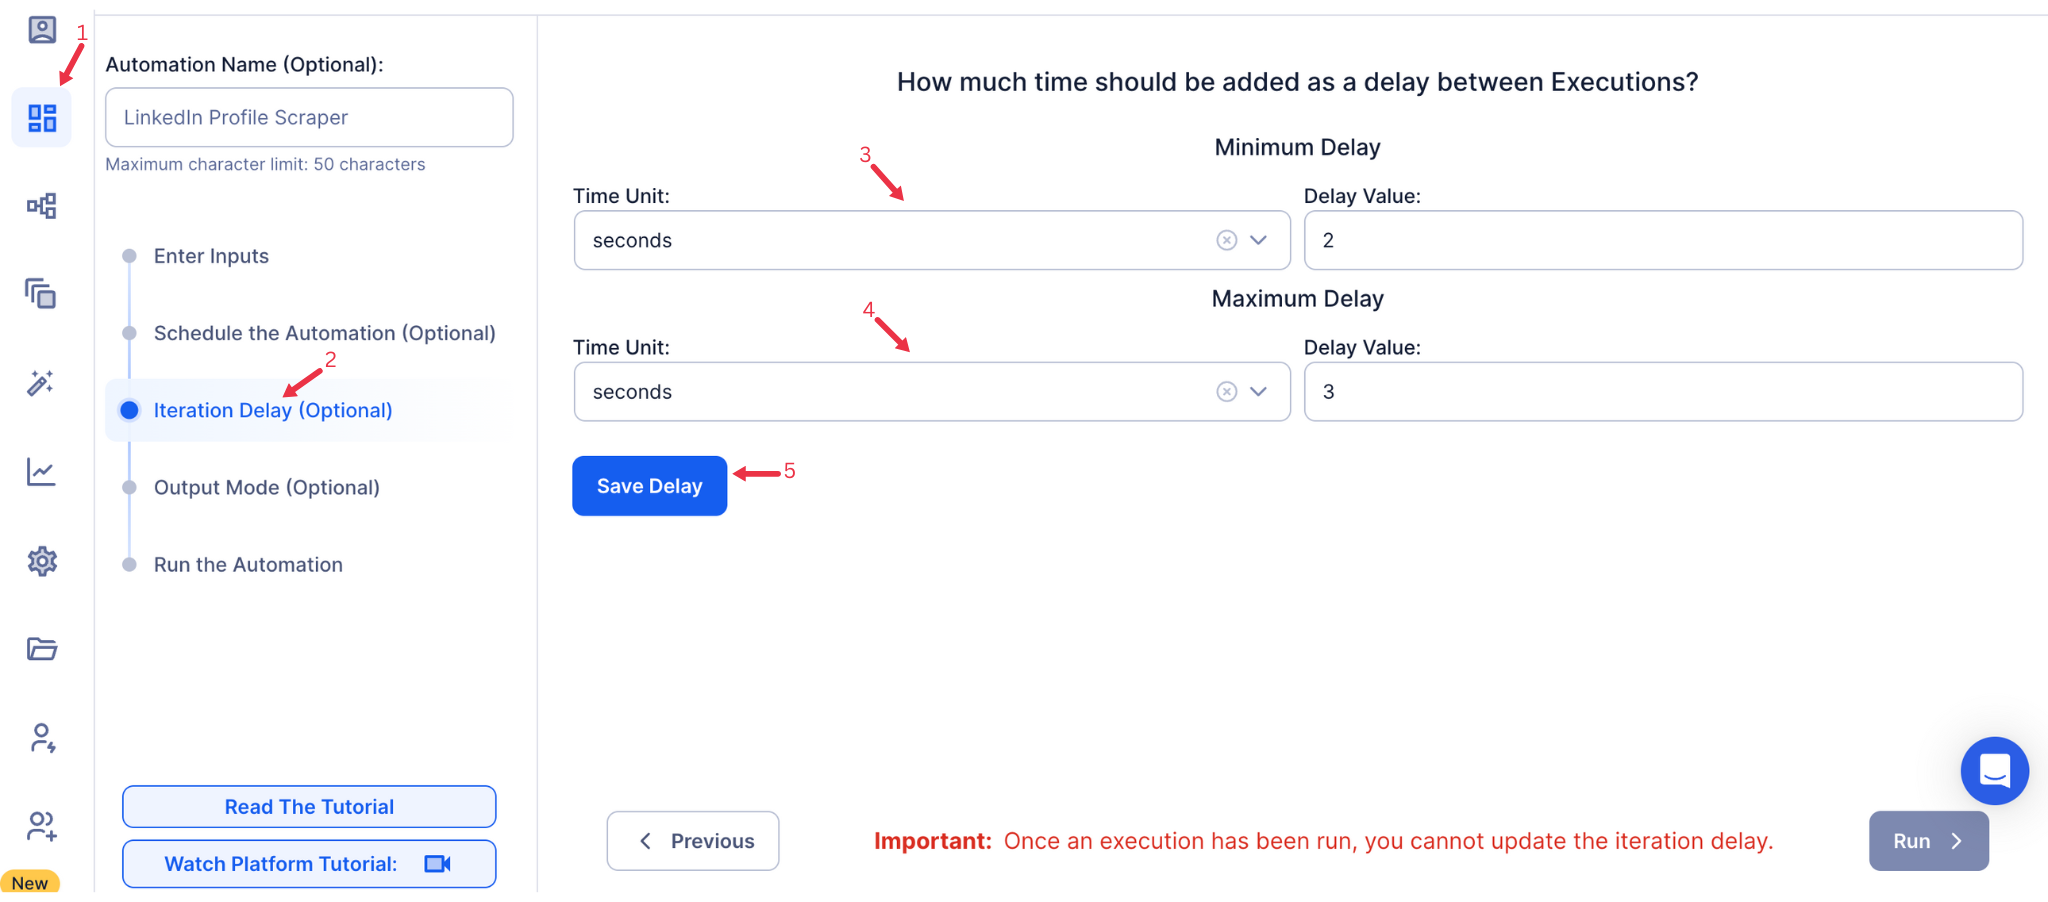
Step 6: Set an Iteration Delay (Optional)
Avoid detection and simulate human-like activity by setting an iteration delay. Choose minimum and maximum time intervals to add randomness between actions. This makes your activity look natural and reduces the chance of being flagged.
- Minimum Delay: Enter the shortest interval (e.g., 10 seconds).
- Maximum Delay: Enter the longest interval (e.g., 20 seconds).
Tip: Random delays keep your automation safe and reliable.
{% custom-image src="https://v2-web-assets.s3.us-east-1.amazonaws.com/Common/iteration-delay/iteration-delay.png" alt="iteration-delay" /%}
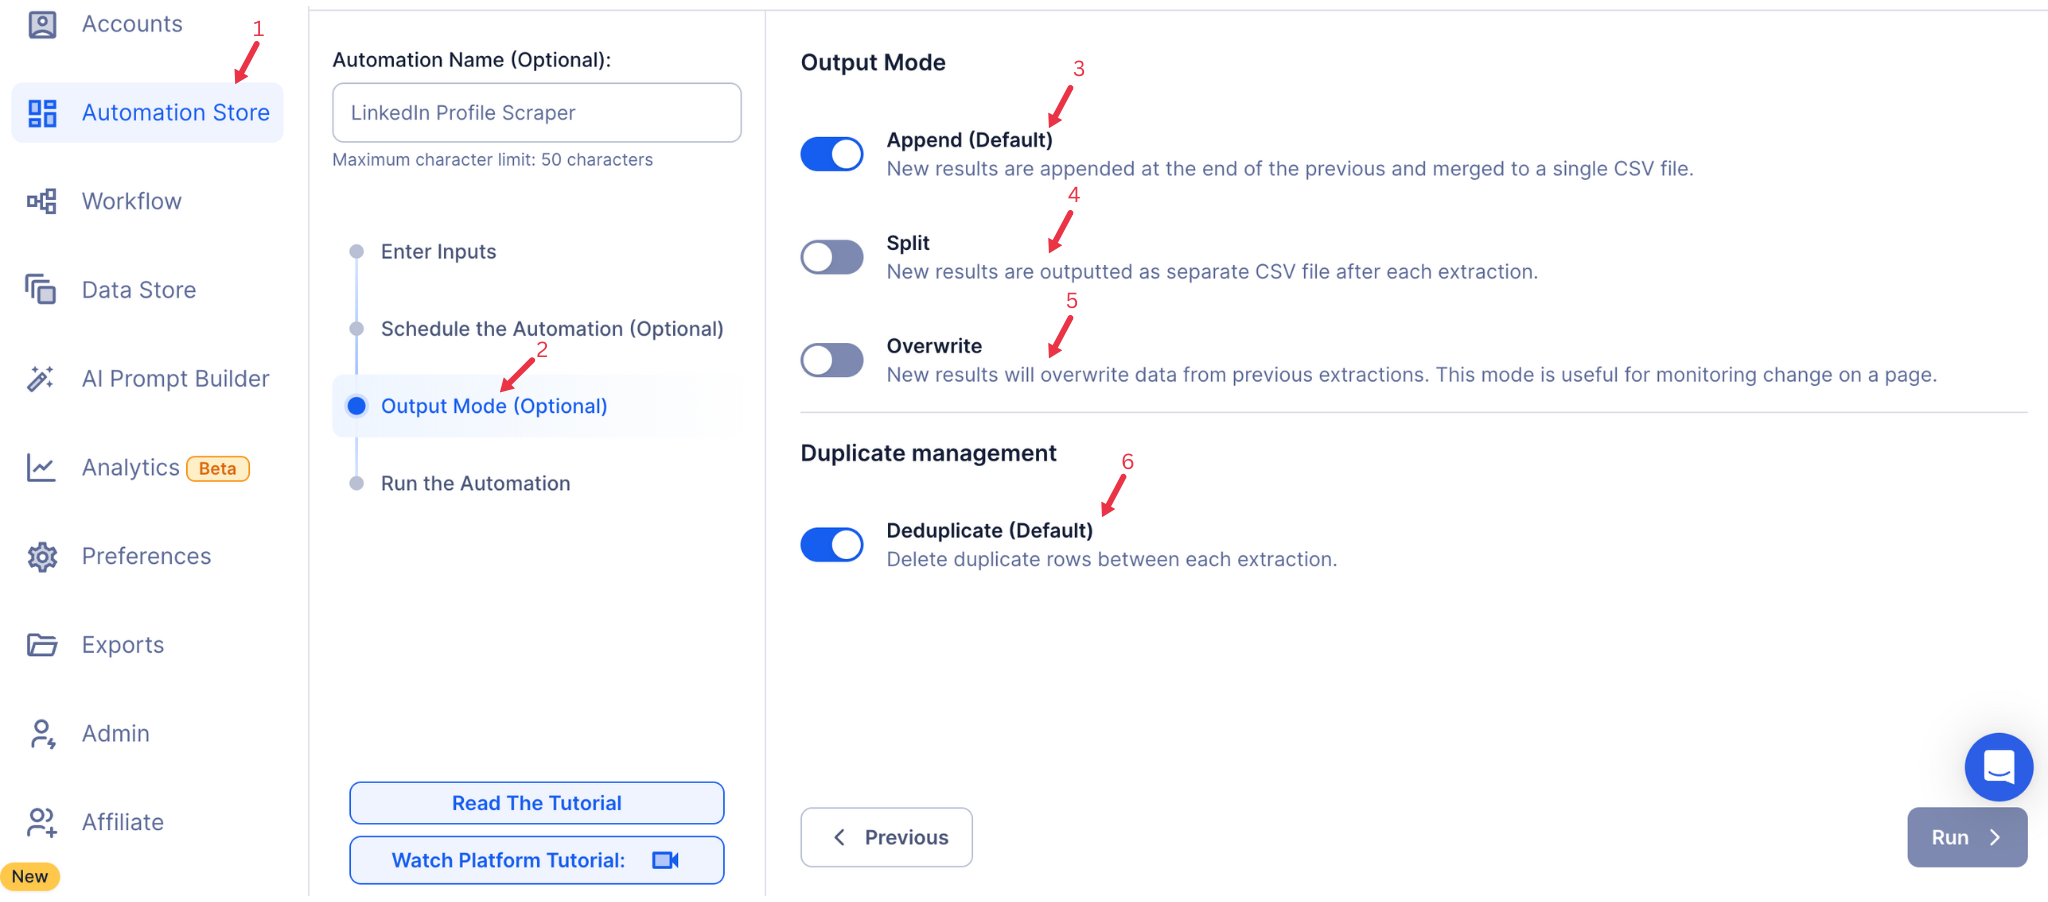
Step 7: Choose Your Output Mode (Optional)
Choose how to save and manage the extracted alumni data. TexAu provides the following options:
- Append (Default): Adds new results to the end of existing data, merging them into a single CSV file.
- Split: Saves new results as separate CSV files for each automation run.
- Overwrite: Replaces previous data with the latest results.
- Duplicate Management: Enable Deduplicate (Default) to remove duplicate rows.
Tip: Google Sheets is ideal for teams working collaboratively and needing real-time data access.
{% custom-image src="https://v2-web-assets.s3.us-east-1.amazonaws.com/Common/output-mode/output-mode.png" alt="output-mode" /%}
Step 8: Access the Data from the Data Store
After the automation completes, go to the Data Store section in TexAu to view the log of sent messages. Locate the Slack Auto Message automation and click See Data to access or download the logs.
{% custom-image src="https://v2-web-assets.s3.us-east-1.amazonaws.com/Automations/LinkedIn+Job+Scraper/data-store-see-data.png" alt="Slack Auto Message" /%}
The Slack Auto Message automation helps streamline communication on Slack, saving time and ensuring consistency in messaging. With flexible input options, scheduling capabilities, and seamless export to Google Sheets or CSV, this tool is a must-have for professionals looking to automate communication tasks efficiently.
Run this automation on your own server.
TexAu V3 doesn't host social-platform automations anymore — but the runnable code is yours. Tell us your inputs, outputs, and target environment, and we'll ship you a working version you can deploy and operate yourself.