LinkedIn Auto Reject Pending Connection
LinkedIn Auto Reject Pending Connection tool helps you automatically decline outdated or irrelevant invites. It saves your time, declutters your network, and keeps your LinkedIn connections relevant. Whether you're streamlining outreach or managing inbound requests, this automation ensures you stay focused on the people who matter without the manual effort of checking invites one by one.
Tutorial
Overview
The LinkedIn Auto Reject Pending Connection automation helps founders, marketers, sales managers, and growth hackers efficiently manage their LinkedIn network by automatically rejecting unwanted pending connection requests. With TexAu’s scheduling, iteration delays, and export options to Google Sheets or CSV, this tool saves time while maintaining a well-organized LinkedIn profile.
Step 1: Log in to TexAu and Connect LinkedIn
Log in to your TexAu account at v2-prod.texau.com.
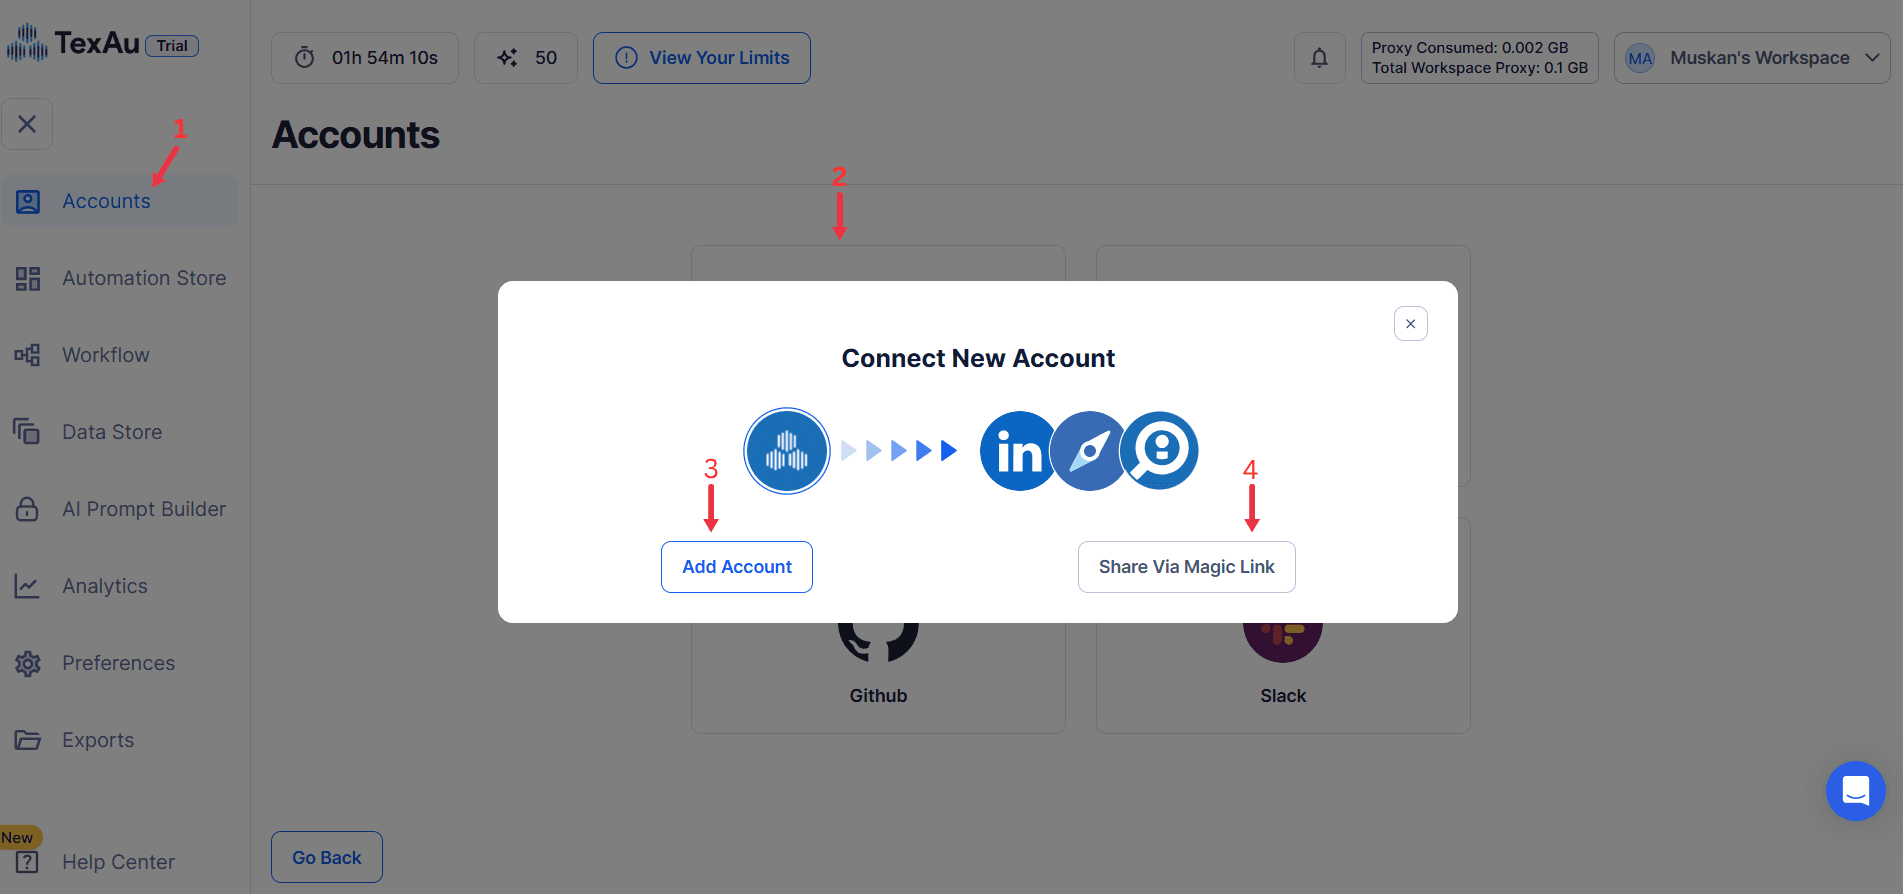
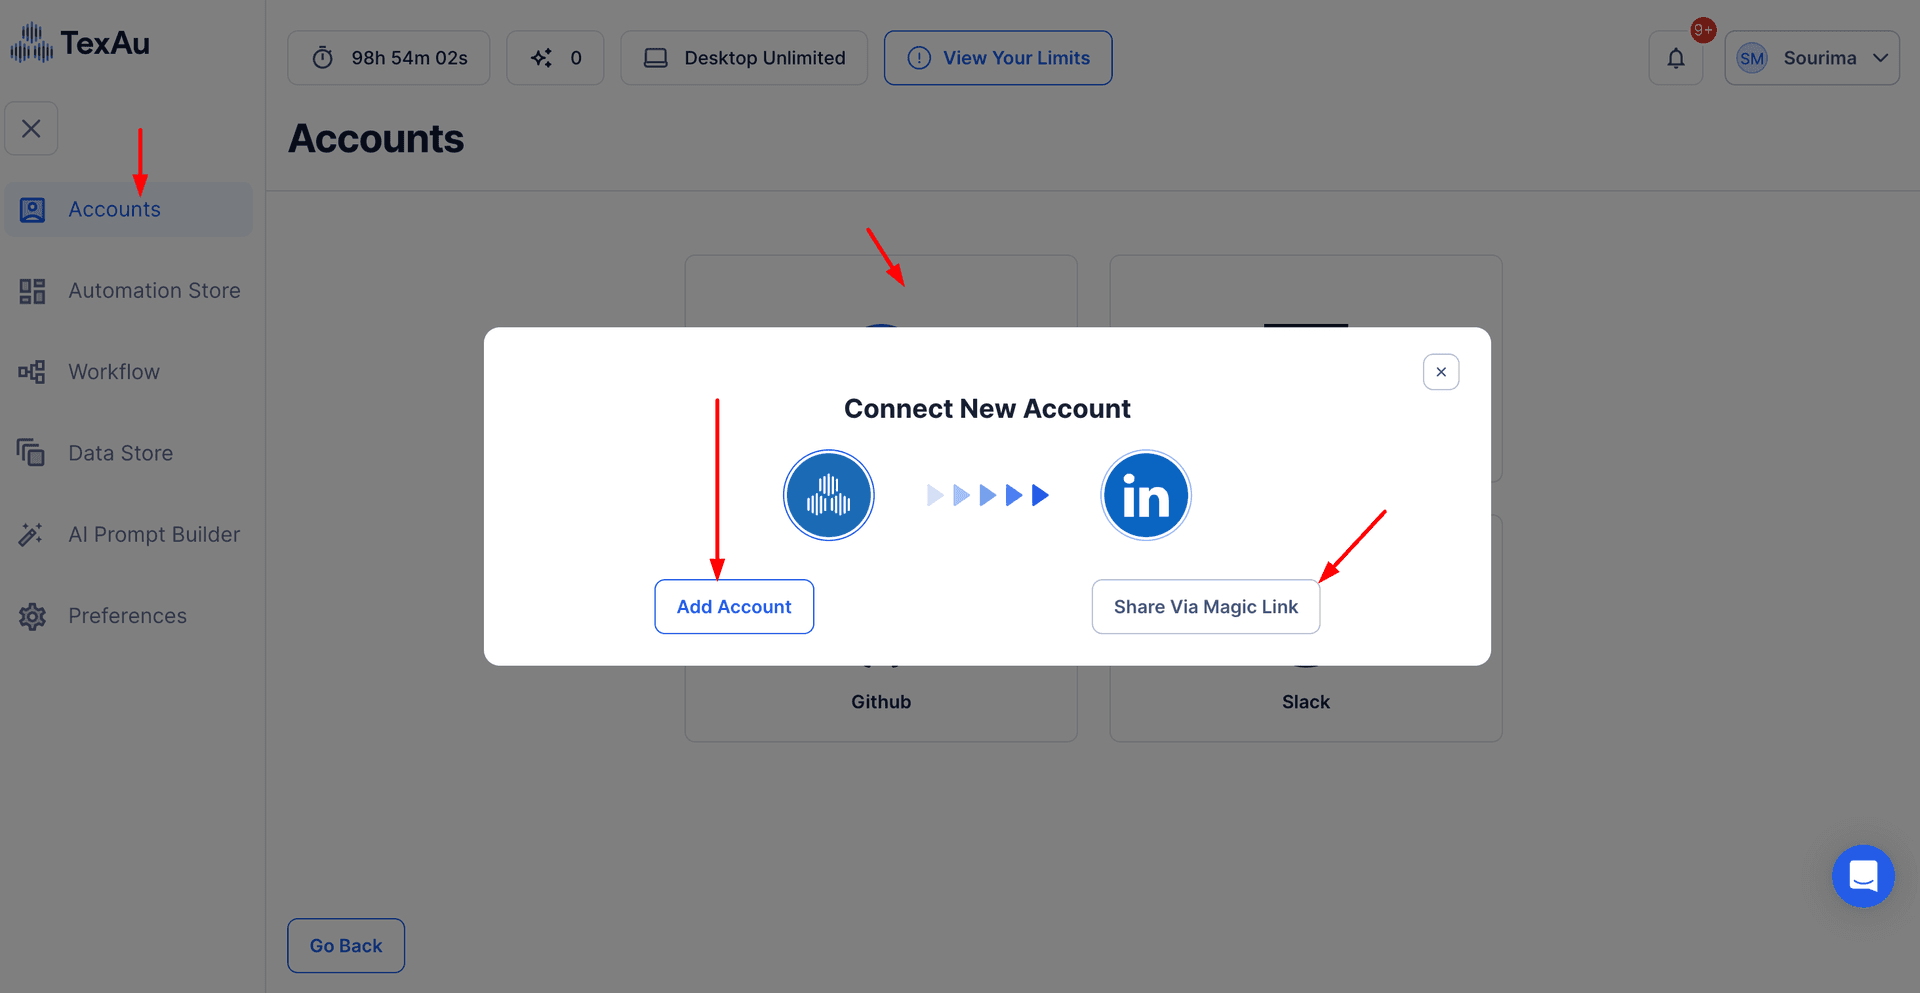
Go to Accounts and connect your LinkedIn account. You can choose one of these methods:
- Share via Magic Link: Share the link, copy it to your browser, and follow the steps to integrate your LinkedIn account securely.
- Add Account: Sync cookies and browser data with TexAu for seamless integration.
Tip: Use Magic Link for an easy and secure connection.
Step 2: Choose Cloud or Desktop Execution
Decide how you want to run the automation:
- Cloud Mode: Automates tasks on TexAu’s servers with built-in proxies. You can add custom proxies via Settings > Preferences > Proxies.
- Desktop Mode: Runs automation on your local device using your IP address.
Tip: Desktop mode saves cloud runtime credits and gives more control over the process.
Step 3: Search for the Particular LinkedIn Automation
- Navigate to the Automation Store on TexAu.
- Use the search bar to find LinkedIn Auto Reject Pending Connection automation.

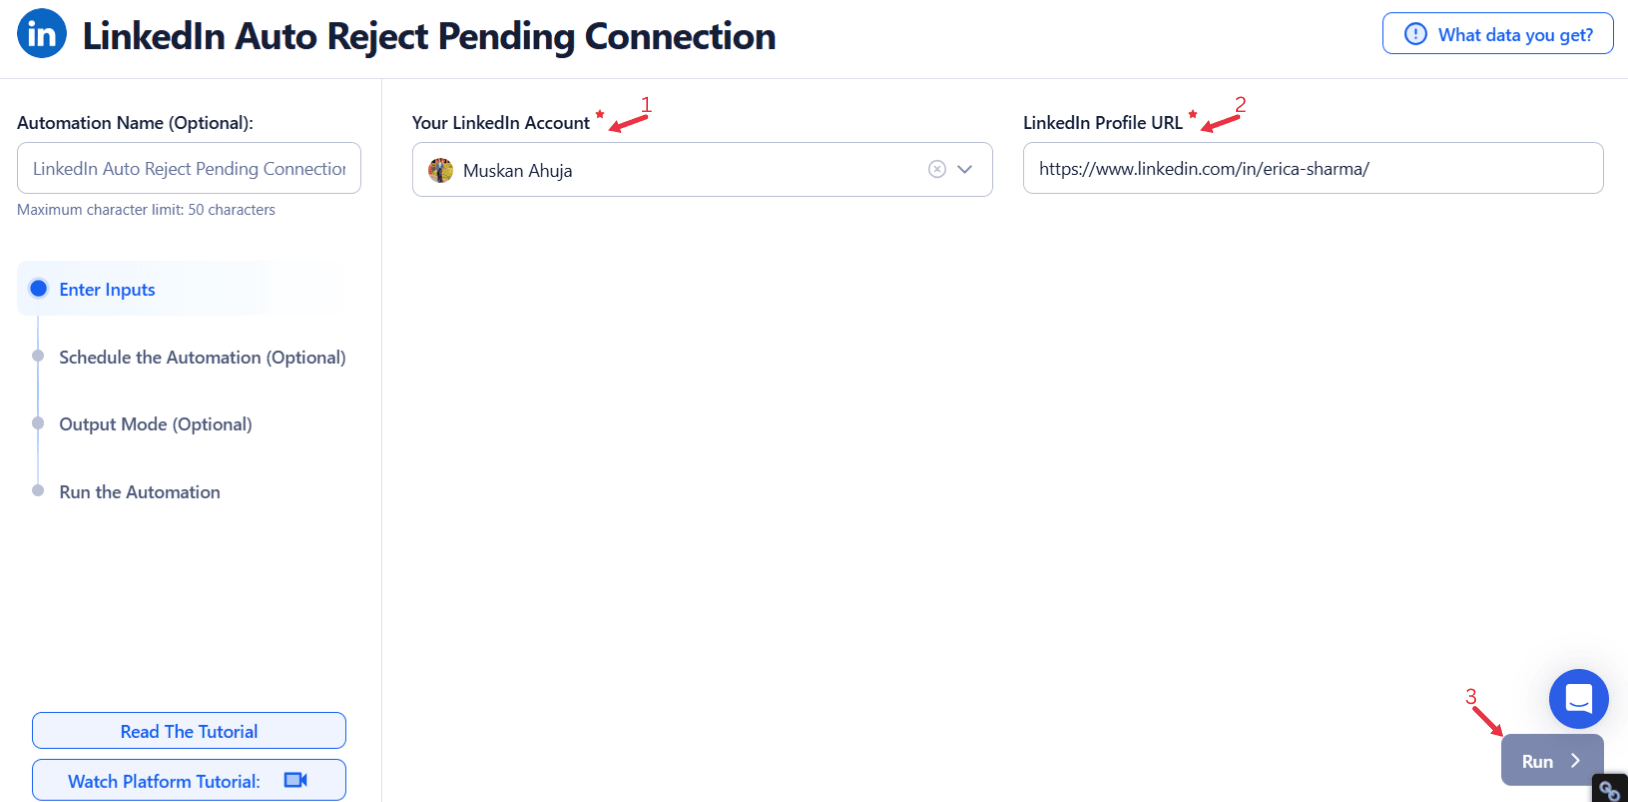
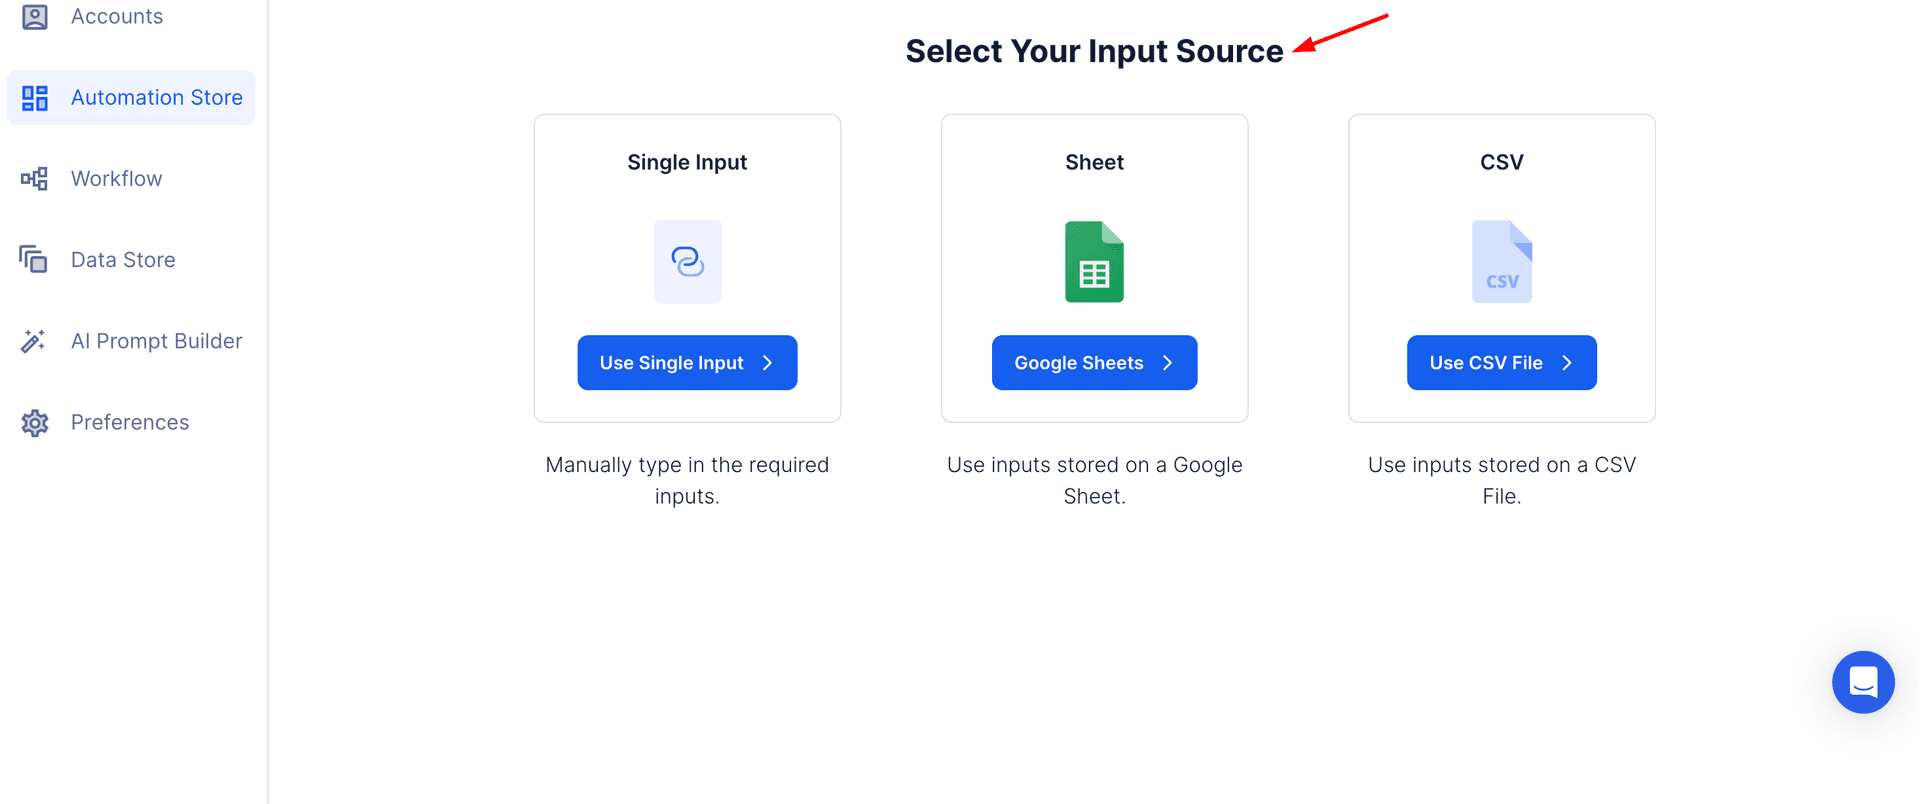
Step 4: Select Your Input Source
Define the input source to specify LinkedIn profile URLs for the LinkedIn Auto Reject Pending Connection automation. Here's how to configure each:
Manually Enter a Single Input
Use this option to reject a pending connection request from a specific LinkedIn profile. Here’s how to use it:
- Profile URL: Enter the LinkedIn profile URL into the input field.
- This method is ideal for targeted actions on a single pending connection.
Use Google Sheets for Bulk Input
This option is ideal for managing multiple pending connection requests efficiently. Follow these steps:
Connect Your Google Account
- Click Select Google Account to choose your Google account or click Add New Google Sheet Account (you can add multiple Google accounts).
Select the Spreadsheet
- Click Open Google Drive to locate the Google Sheet containing LinkedIn profile URLs.
- Select the spreadsheet and the specific sheet (e.g., Sheet5) containing the LinkedIn profile URLs.
Provide Input Details
- LinkedIn Profile URL: Choose the column header containing the LinkedIn profile URLs. This step is mandatory for the automation to function correctly.
Adjust Processing Options
- Number of Rows to Process (Optional): Define the number of rows to process from the sheet. You can input a specific number in the corresponding field.
- Number of Rows to Skip (Optional): Specify rows to skip at the beginning of the sheet to ensure proper data management.
Click Run in the lower-right corner to start the automation if no advanced settings are needed.
Optional Advanced Feature:
- Loop Mode: Enable Loop Mode to re-process the Google Sheet from the beginning once all rows are completed. This is useful for tasks that require recurring updates.
Watch Row (Optional)
Watch Row feature automates data processing by triggering workflows when new data is added to Google Sheets.
Configure Watch Row by selecting an update interval and execution window.
Watch Row Schedule
- None
- Scheduling Intervals (e.g., every 15 minutes, every hour)
- One-Time Execution
- Daily Execution
- Weekly Recurrence (e.g., every Tuesday and Friday)
- Monthly Specific Dates (e.g., 11th and 29th)
- Custom Fixed Dates (e.g., December 6)
By default, Watch Row scans every 15 minutes and executes for five days unless modified.
With Watch Row, workflows operate efficiently in real-time.

Process a CSV File
This option allows you to handle pending connection requests using a static file. Follow these steps:
- Upload the File
- Click Upload CSV File and browse to locate the file containing LinkedIn profile URLs.
- Once uploaded, TexAu will display the file name and preview its content. Verify the data to confirm the correct file is selected.
- Provide Input Details
- LinkedIn Profile URL: Choose the column header containing the LinkedIn profile URLs. This step is mandatory for the automation to function correctly.
- Adjust Processing Options
- Number of Rows to Process (Optional): Specify the number of rows to process from the CSV file.
- Number of Rows to Skip (Optional): Define rows to skip at the beginning of the file.
- Click Run in the lower-right corner to initiate the automation if advanced configurations like scheduling are not required.
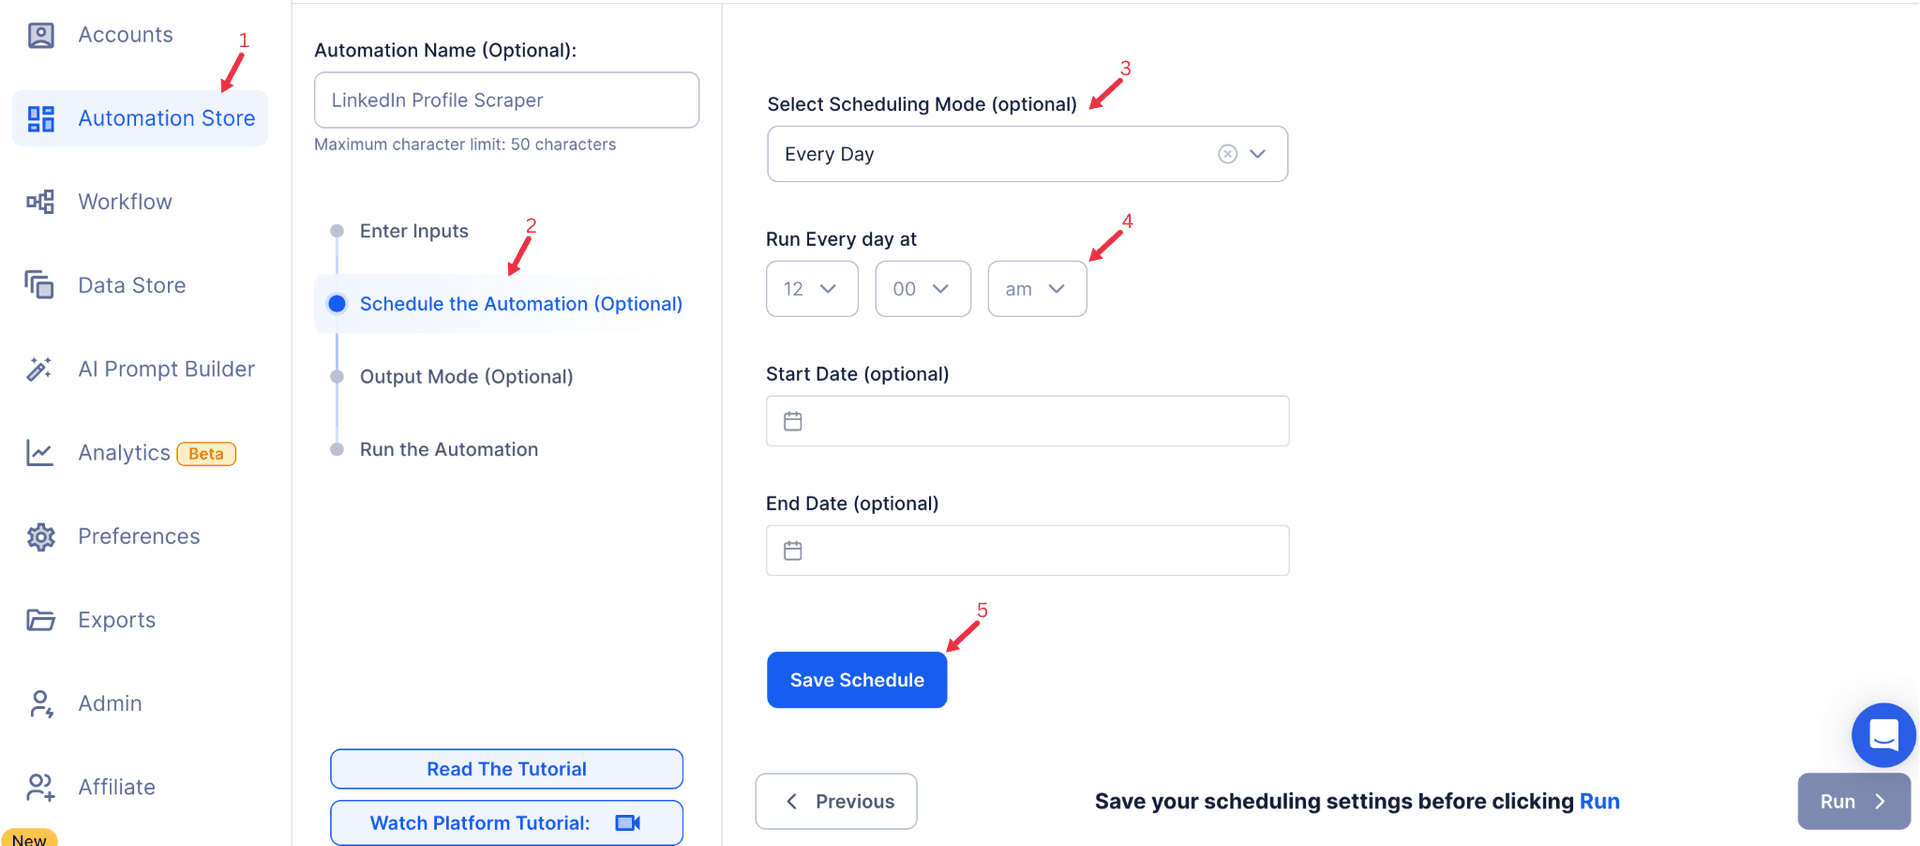
Step 5: Schedule the Automation (Optional)
Use TexAu’s scheduling feature to run the rejection process automatically at chosen times. Click Schedule and set the timing and recurrence frequency:
- None: Run the automation immediately.
- At Regular Intervals (e.g., every 8 hours or daily).
- Once
- Every Day
- On Specific Days of the Week (e.g., every Tuesday and Friday).
- On Specific Days of the Month (e.g., the 1st and 15th).
- On Specific Dates (e.g., January 31).
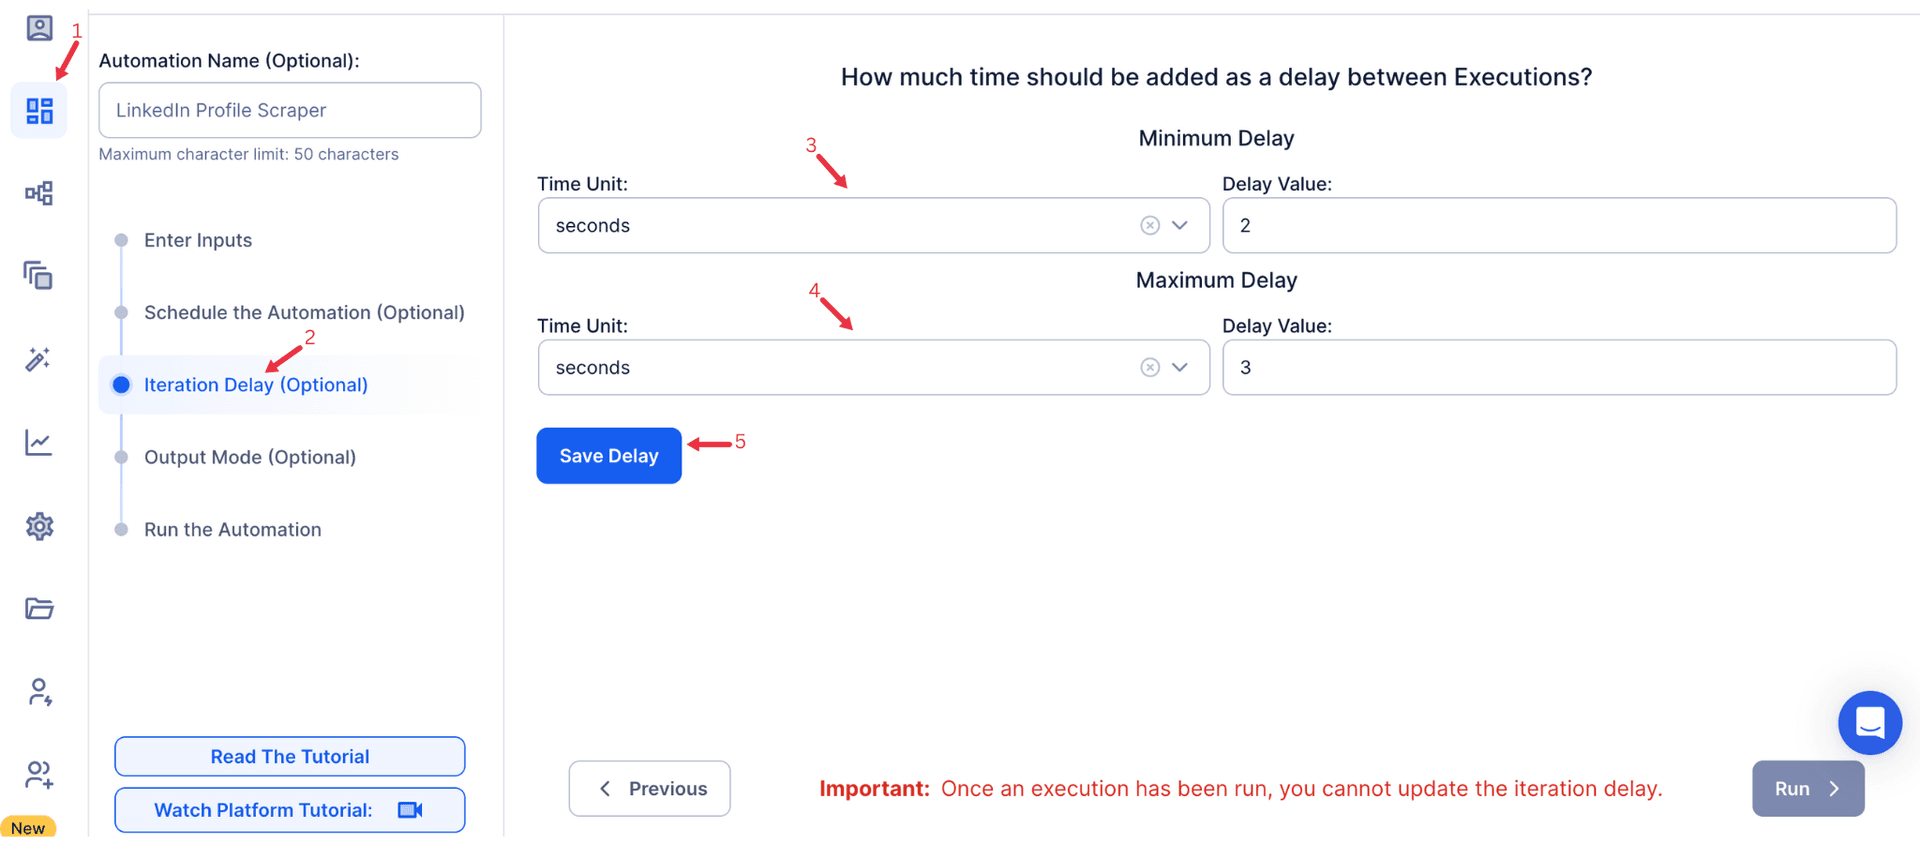
Step 6: Set an Iteration Delay (Optional)
Avoid detection and simulate human-like activity by setting an iteration delay. Choose minimum and maximum time intervals to add randomness between actions. This makes your activity look natural and reduces the chance of being flagged.
- Minimum Delay: Enter the shortest interval (e.g., 10 seconds).
- Maximum Delay: Enter the longest interval (e.g., 20 seconds).
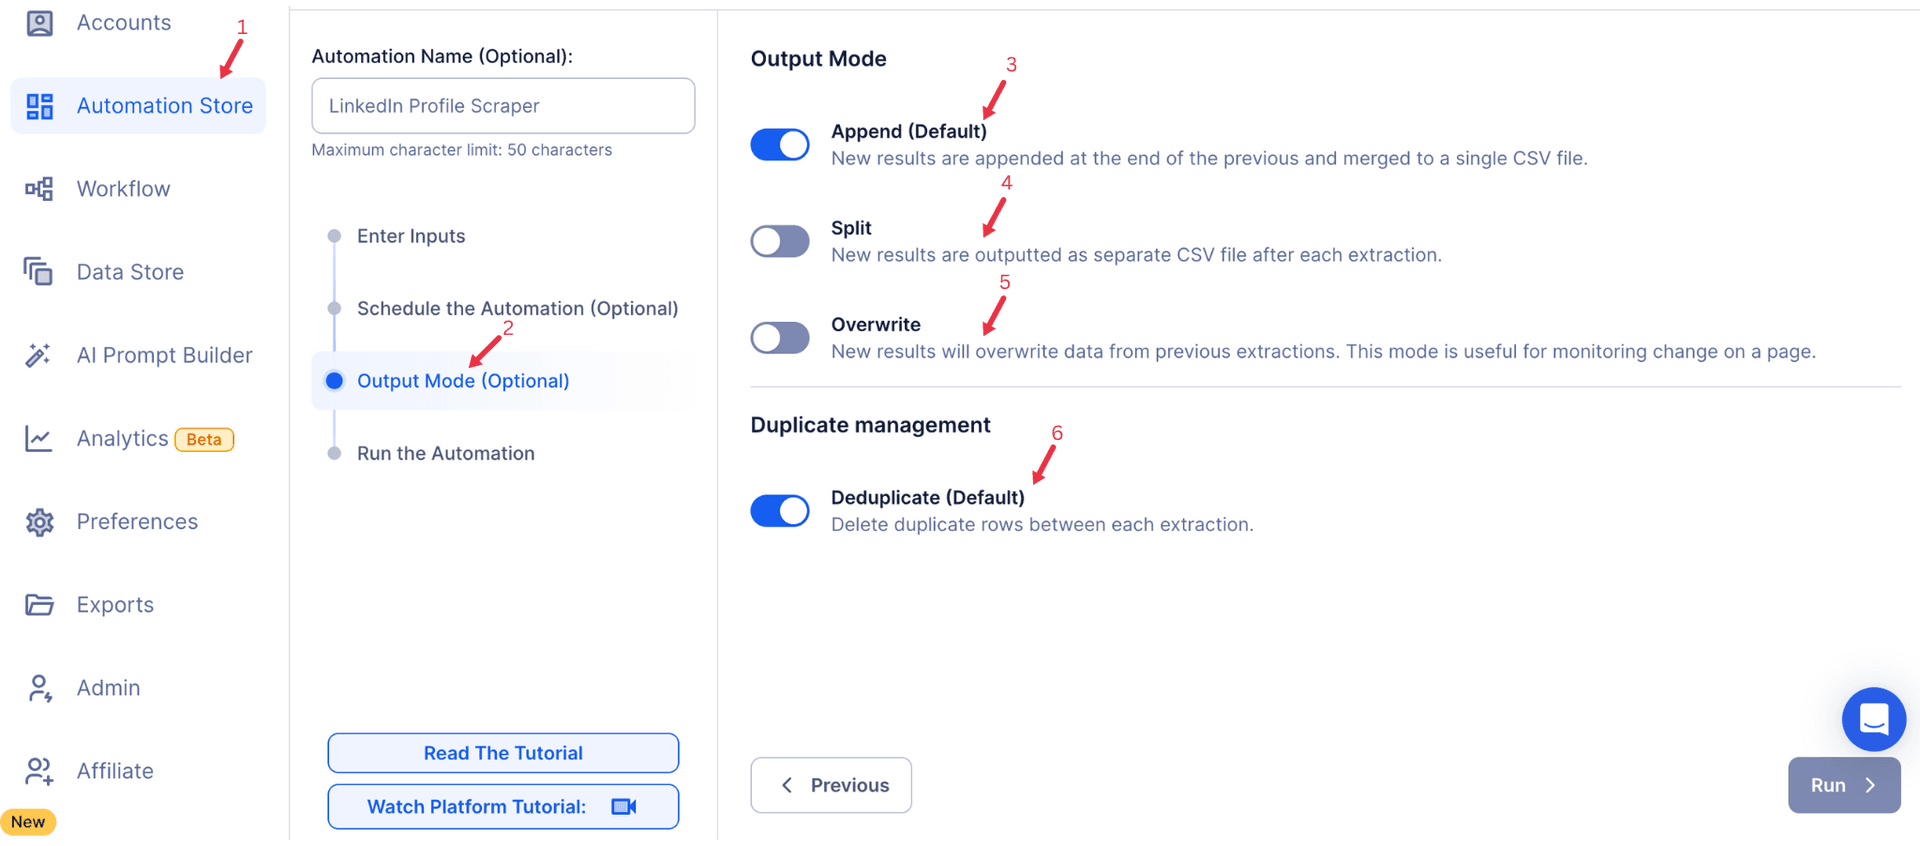
Step 7: Choose Your Output Mode (Optional)
Choose how to save and manage data about rejected connections. TexAu provides the following options:
- Append (Default): Adds new results to the end of existing data, merging them into a single CSV file.
- Split: Saves new results as separate CSV files for each automation run.
- Overwrite: Replaces previous data with the latest results.
- Duplicate Management: Enable Deduplicate (Default) to remove duplicate rows for clean, organized data.
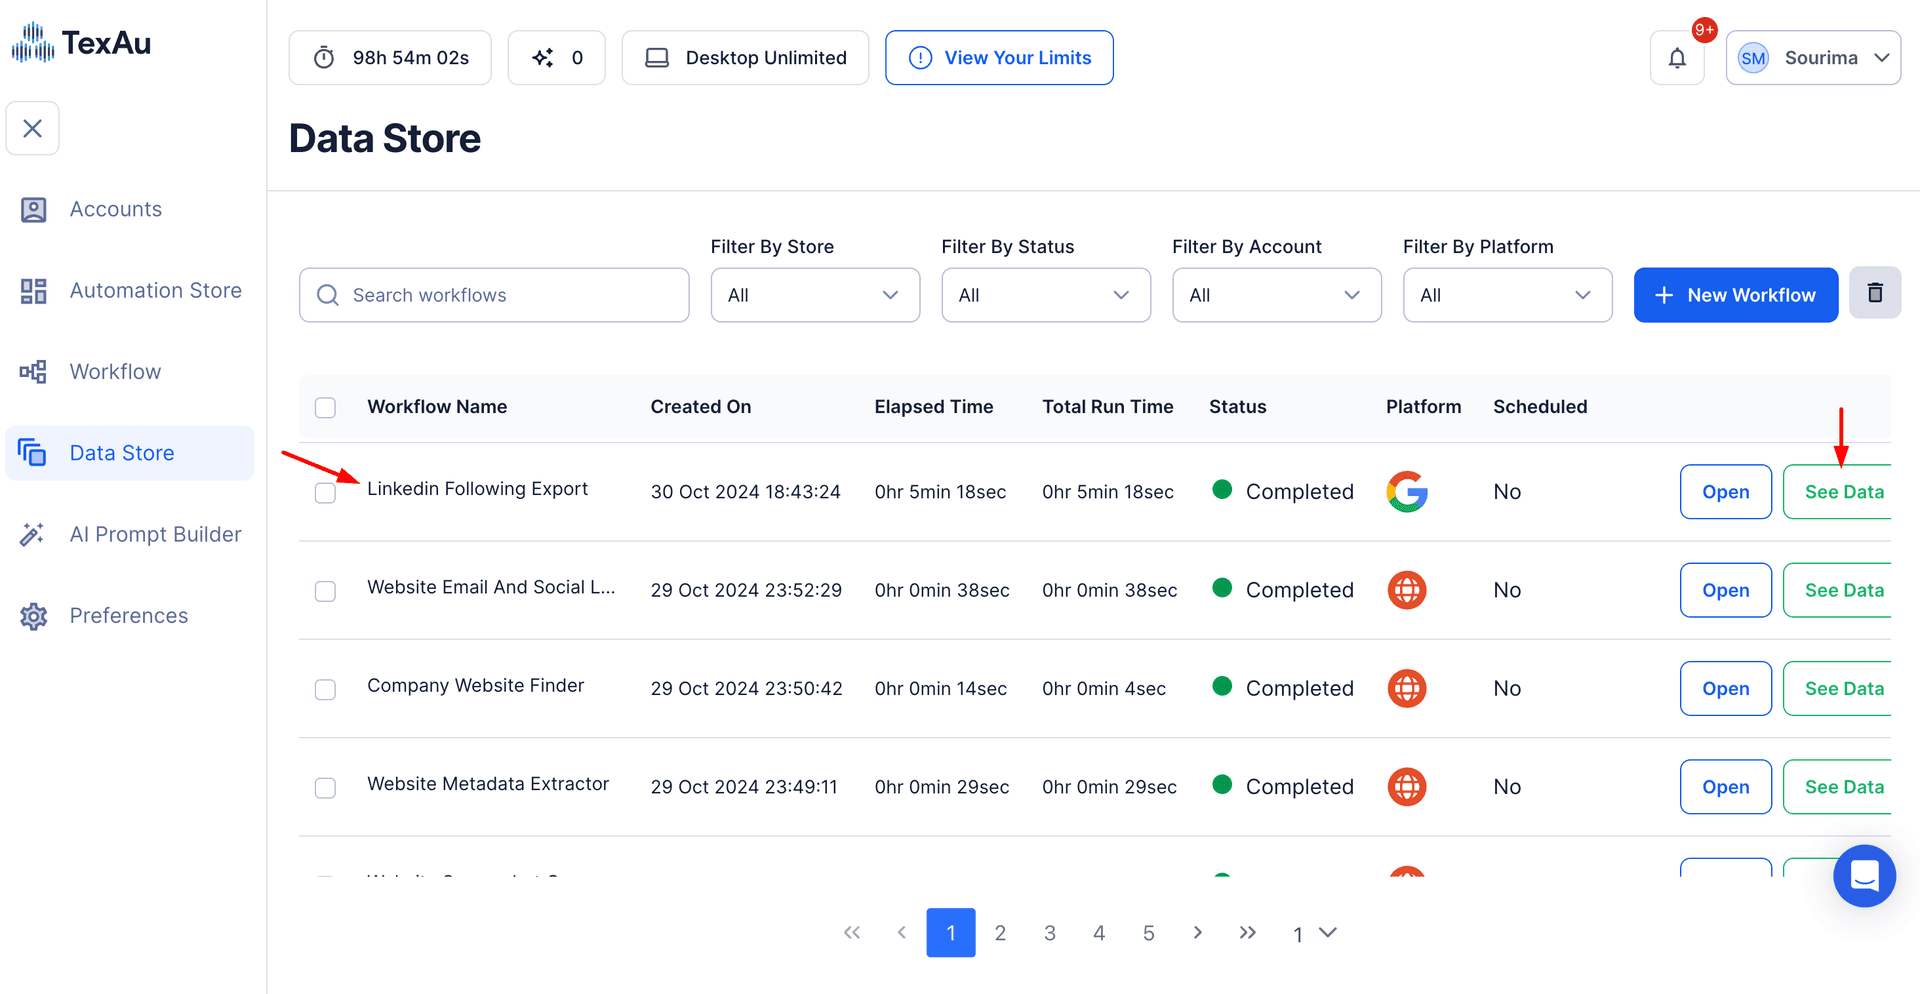
Step 8: Access the Data from the Data Store
After the automation completes, go to the Data Store section in TexAu to access your results. Find the LinkedIn Auto Reject Pending Connection automation or the name you’ve entered, click See Data, then choose either Download CSV to export the data or Open to Google Sheet for quick access.
The LinkedIn Auto Reject Pending Connection automation simplifies managing unwanted LinkedIn requests, ensuring your network remains clean and relevant. With scheduling, iteration delays, and export options, it’s ideal for founders, marketers, and sales managers looking to save time while maintaining a professional LinkedIn profile. Optimize your LinkedIn workflow effortlessly with TexAu.
Recommended Automations
Explore these related automations to enhance your workflow
LinkedIn Received Connection Extractor
Organize and analyze incoming LinkedIn connection requests with the LinkedIn Received Connection Extractor automation. Perfect for sales, recruiters, and network managers, this tool captures data on new invitations, helping you prioritize and respond strategically. Export results to Google Sheets or CSV for streamlined tracking and efficient follow-up management.
LinkedIn Connection Checker
TexAu’s LinkedIn Connection Checker helps you find and remove inactive or unwanted connections fast. Clean your network, improve engagement, and export data easily—all in just a few clicks. Perfect for sales, hiring, or personal branding.
LinkedIn Sent Request Extractor
Easily extract your pending connection requests from LinkedIn and stay updated on your outreach efforts. This tool helps you view, track, and export all sent invites in one place—saving time and making your networking process more organized. Perfect for anyone who wants to keep their LinkedIn activity clean and follow-ups efficient.
Twitter Profile Tweets and Replies Export
Twitter Profile Tweets and Replies Export automation lets you extract tweets and replies from specific profiles with ease. Features like scheduling, iteration delays, and export to Google Sheets or CSV simplify data collection. Use it to analyze trends, track audience engagement, and gather competitive insights. A practical solution for making informed, data-driven decisions and optimizing your Twitter strategy efficiently.
LinkedIn Event Search Export
TexAu helps you export LinkedIn event search results and attendee data effortlessly. No more copy-pasting—just clean lists ready for outreach. Ideal for marketers, recruiters, and sales pros who want smarter prospecting with less hassle.
LinkedIn Sent Request Extractor
Easily extract your pending connection requests from LinkedIn and stay updated on your outreach efforts. This tool helps you view, track, and export all sent invites in one place—saving time and making your networking process more organized. Perfect for anyone who wants to keep their LinkedIn activity clean and follow-ups efficient.
Sales Navigator Account List Creator
The Sales Navigator Account List Creator automation simplifies building and managing account lists from LinkedIn Sales Navigator. Ideal for sales managers, marketers, and founders, this tool allows seamless data export to Google Sheets or CSV. Features include scheduling, iteration delays, and cloud or desktop execution for streamlined lead generation and efficient data management.
Website Schema Extractor
Extract structured data like product info, reviews, and metadata from any website using Website Schema Extractor. Perfect for SEO audits, competitor research, and bulk analysis. Export results to Google Sheets or CSV and automate the process with scheduling and bulk input support.
LinkedIn Received Connection Extractor
Organize and analyze incoming LinkedIn connection requests with the LinkedIn Received Connection Extractor automation. Perfect for sales, recruiters, and network managers, this tool captures data on new invitations, helping you prioritize and respond strategically. Export results to Google Sheets or CSV for streamlined tracking and efficient follow-up management.

Start your 14-day free trial today, no card needed
TexAu updates, tips and blogs delivered straight to your inbox.

