LinkedIn Connection Remover
Remove irrelevant LinkedIn connections quickly and efficiently. Refocus your network on meaningful relationships and maximize your professional impact with TexAu. Start automating now!
Last updated
LinkedIn is the leading platform for professional networking, offering countless opportunities to expand your reach, strengthen your brand, and foster meaningful collaborations. Your LinkedIn **connections list** serves as a dynamic portfolio of professional relationships, offering insights into var
LinkedIn is the leading platform for professional networking, offering countless opportunities to expand your reach, strengthen your brand, and foster meaningful collaborations. Your LinkedIn connections list serves as a dynamic portfolio of professional relationships, offering insights into various industries and opportunities. Your connections are more than digital contacts—they are gateways to industry insights, career advancements, and valuable partnerships that can shape your professional journey.
Building strong professional relationships ensures that your network adds value to your career trajectory and personal branding. Maintaining a strategic and relevant network ensures you engage with professionals who align with your goals, whether you're seeking partnerships, career opportunities, or industry insights. Filtering out unwanted connections can help maintain the relevance and quality of your LinkedIn experience.
For instance, a marketing consultant with a network of connections full of professionals in unrelated fields like manufacturing may find their LinkedIn feed and opportunities less aligned with their expertise. Conversely, a refined network comprising peers, potential clients, and industry leaders can significantly amplify professional visibility and growth. Prioritizing quality connections over quantity ensures your LinkedIn engagements remain meaningful and impactful.
Why Remove Connections
There are various reasons to remove LinkedIn connections, including:
- Inactive Accounts: Connections with outdated profiles or those no longer active on LinkedIn reduce the quality of your network connections. Maintaining a relevant list of connections ensures that your engagement and outreach efforts are directed at active and valuable contacts.
- Irrelevant Connections: As careers evolve, some connections may no longer align with your professional relationships or strategic objectives. Removing unwanted connections from unrelated industries or fields allows you to focus on building a quality connections list.
- Optimizing for Strategic Outreach: A focused network ensures that your outreach, content, and engagement are more impactful, increasing the chances of building meaningful connections and achieving your professional goals.
Example: A recruiter specializing in tech roles may decide to remove irrelevant contacts from unrelated industries like hospitality to keep their network connections relevant and targeted.
Role of TexAu
TexAu’s LinkedIn Connection Remover simplifies and automates the tedious process of managing your LinkedIn connections list. Manually identifying and removing irrelevant contacts can take hours, especially for users with extensive networks. TexAu automates this process, saving valuable time while ensuring precision through customizable filters and analytics integration.
With TexAu, you can:
- Remove multiple network connections in bulk.
- Apply advanced filters to target specific connections for removal, such as by industry, engagement, or activity levels.
- Maintain compliance with LinkedIn’s connection limit and guidelines to ensure your account’s safety.
By leveraging TexAu’s automation, you can streamline your connection management while preserving the quality of your professional relationships on LinkedIn. LinkedIn Connection Remover automates this process, ensuring precision through customizable filters and bulk processing.
Challenges and Solutions
1. Risk of Removing Valuable Connections
One of the primary concerns when managing network connections on LinkedIn is the risk of inadvertently removing valuable contacts. These might include connections who engage with your posts, share opportunities, or provide valuable professional relationships and insights into your industry.
Solution: TexAu’s analytics tools evaluate engagement levels, allowing you to assess the relevance and activity of each connection before removal. By analyzing metrics such as profile activity, mutual connections, and engagement history, TexAu ensures you retain meaningful and high-value connections. LinkedIn Received Connection Extractor evaluates engagement history, profile activity, and mutual connections before removal, ensuring strategic decisions.
Scenario: A sales executive identifies a connection as inactive but notices through TexAu’s engagement tool that this person regularly interacts with their posts. This insight prevents the executive from severing a potentially valuable connection, ensuring their connection list remains impactful.
2. Managing Large Networks
Handling extensive professional networks can be overwhelming, particularly for recruiters, influencers, or executives with thousands of connections. Identifying inactive connections or irrelevant contacts manually is impractical and time-intensive.
Solution: TexAu’s bulk automation tool and advanced filters streamline the process, enabling efficient connection management. You can set specific criteria, such as industry, location, or activity level, to target connections for removal and maintain a refined network.
Scenario: A recruiter with 15,000 connections in various industries uses TexAu’s filter-based automation to identify and remove inactive profiles in the IT sector. This ensures their LinkedIn network remains relevant, manageable, and aligned with their business-oriented platform goals.
Key Features of TexAu LinkedIn Connection Remover
1. Bulk Connection Removal
TexAu revolutionizes connection management on LinkedIn with its ability to remove hundreds or even thousands of connections simultaneously. Manually removing connections can be time-consuming and tedious, particularly for users managing extensive connection lists. With bulk removal, TexAu eliminates this hassle, letting you focus on strategic tasks that drive results.
TexAu provides an intuitive interface that allows you to:
- Select multiple connections at once.
- Specify removal criteria, such as inactivity, irrelevant industries, or geographical locations.
- Execute the removal process quickly and seamlessly.
Example: A sales manager targeting C-suite executives in the healthcare sector realizes their network is cluttered with irrelevant contacts from unrelated industries, which dilutes their outreach impact. Using TexAu’s bulk removal tool, they eliminate 500 unrelated connections in one session. This refines their network connections, enabling professional relationships that align with their objectives.
2. Customizable Filters
TexAu’s customizable filters empower you to create a tailored strategy for removing LinkedIn connections based on your specific goals. These filters ensure you retain valuable contacts while efficiently removing those who no longer align with your professional objectives.
Key Filtering Options:
- Industry: Remove connections outside your area of expertise or business focus.
- Location: Filter out profiles in regions irrelevant to your business-oriented platform objectives.
- Activity Level: Identify and remove inactive profiles with outdated details.
Scenario: A digital marketer focused on European startups finds their network connections cluttered with inactive profiles and connections from other continents. Using TexAu’s filtering options, they remove non-European and inactive contacts, enhancing the relevance of their network. This targeted approach leads to more productive engagement and effective outreach.
3. Safe Automation
TexAu ensures compliance with LinkedIn’s strict rules against excessive or unnatural activity through its automation-safe features. Violating these guidelines risks account suspension, but TexAu mitigates this with:
- Rate limits to control the frequency of connection removals.
- Random delays between actions, mimicking human behavior.
- Gradual processing to maintain safe automation.
Example: A tech influencer with over 20,000 network connections relies on TexAu’s safe automation tools to remove 100 unwanted connections daily. This automation process is gradual and secure, preserving the account’s integrity while refining their network for better professional relationships.
4. Real-Time Sync
TexAu includes real-time synchronization, automatically updating your connections list after every removal action. This ensures your LinkedIn network remains accurate and up-to-date without manual effort.
Benefit: Real-time sync minimizes errors, such as accidentally reconnecting with previously removed contacts, and guarantees a smooth connection management process.
5. Analytics Integration
TexAu provides analytics tools to help you evaluate the impact of your connection removals on key performance metrics. With actionable insights, you can refine your LinkedIn strategy and track improvements in:
- Engagement rates: Measure how refined connections improve interactions on your posts.
- Profile views: Monitor increases in visibility post-removal.
- Connection quality: Assess the relevance of your network for better direct messages and outreach.
Example: A SaaS founder removes 800 inactive contacts using TexAu. Through the analytics dashboard, they observe a 20% increase in engagement rates and a more engaged audience. This confirms that removing irrelevant connections enhances both network quality and content visibility.
Benefits
1. Streamlined Network Management
Managing a LinkedIn network manually can be overwhelming, especially for professionals with thousands of connections. TexAu simplifies this task by automating the removal of irrelevant profiles and unwanted connections. Its intuitive features allow users to focus on cultivating quality connections rather than spending countless hours manually organizing their list of connections.
2. Improved Engagement Rates
A well-maintained LinkedIn network improves the quality of professional relationships by ensuring your content reaches an engaged audience. By removing inactive accounts or irrelevant contacts, TexAu helps boost engagement rates for posts and messages.
Example: An HR consultant regularly shares industry insights but notices low engagement on their posts. Using TexAu to remove inactive connections, they see a surge in comments and shares from their current connections, highlighting the power of a refined professional network.
3. Enhanced Profile Visibility
LinkedIn’s algorithm favors content for a relevant audience. A cluttered network dilutes your profile’s impact, while a refined network improves profile visibility and increases the likelihood of appearing in search results or feeds.
Scenario: A recruiter specializing in tech talent removes 1,000 inactive profiles and irrelevant connections from their network. This action results in a 30% increase in profile views, as LinkedIn promotes their profile to a more active and focused audience.
4. Time-Saving Automation
TexAu’s bulk processing feature removes the hassle of manual connection removals, saving valuable time. Instead of spending hours managing your connections list, TexAu allows you to achieve the same results in minutes, giving you more time to focus on outreach messages and content creation.
Use Cases
1. For Recruiters
Recruiters often manage large networks cluttered with outdated connections lists, making it difficult to identify active talent pools. TexAu helps recruiters optimize their network connections by removing inactive accounts or irrelevant contacts, ensuring their efforts focus on quality connections and professional relationships.
Example: A recruiter specializing in engineering roles removes connections from unrelated fields like finance and marketing. This refinement enhances their ability to connect with current connections who are active and relevant, streamlining their recruitment process.
2. For Sales Teams
Sales professionals depend on a targeted network to maximize their outreach messages and improve conversion rates. TexAu empowers sales teams to remove unresponsive leads and irrelevant contacts, ensuring their efforts focus on potential leads who are more likely to engage.
Scenario: A sales representative for a B2B SaaS company uses TexAu to clean their network by removing 1st-degree connections outside their target industries. This optimization results in higher response rates for their direct messages and posts, boosting their overall sales process.
3. For Professionals
Professionals aiming to align their network with their current career goals can benefit from TexAu’s automation tools. Whether transitioning industries, focusing on specific regions, or building business-oriented platforms, TexAu simplifies maintaining a relevant and dynamic network.
Example: A marketing consultant transitioning into tech startups removes unwanted connections unrelated to this niche. This curated network enables them to connect with potential clients and collaborators, driving growth in their new focus area.
Why Choose TexAu?
TexAu’s LinkedIn Connection Remover is a powerful automation tool for managing your network connections. Its features, including customizable filters, bulk connection removal, and analytics integration, enable users to:
- Streamline their connections list with precision.
- Enhance engagement rates by focusing on quality connections.
- Save valuable time while maintaining compliance with LinkedIn’s guidelines.
Take the First Step: Refine your LinkedIn network and achieve your professional goals effortlessly with TexAu! Whether you’re a recruiter, sales professional, or an expert aiming to grow your business contacts, TexAu empowers you to maintain a dynamic and impactful LinkedIn presence.
Best Practices
Effectively managing your LinkedIn network requires a clear strategy to maximize professional relationships and enhance engagement. TexAu’s automation tool simplifies the connection removal process, but following these best practices ensures that you optimize your connections list with purpose and precision.
1. Define Objectives
Before removing connections, establish clear goals to ensure your actions align with your broader professional relationships and business-oriented platform strategy.
- Relevance: Assess whether connections align with your current business goals or professional focus.Example: A recruiter in the tech industry removes irrelevant contacts from unrelated fields like hospitality to focus on 1st-degree connections in IT talent acquisition.
- Engagement: Removing inactive accounts or unresponsive profiles helps boost direct messages visibility and ensures your content strategy reaches a genuinely interested audience.Example: A consultant focusing on content creation for large corporations removes connections with professionals in unrelated industries, ensuring their LinkedIn posts resonate with the right audience.
- Network Focus: Tailor your list of connections to meet your career or business objectives. For instance, a startup founder refines their contact list to focus on investors and decision-makers in their niche.
2. Use Filters Wisely
TexAu’s customizable templates and filters ensure you target unwanted connections effectively while retaining quality connections that support your goals.
-
Industry: Use filters to remove profiles from industries that no longer align with your current connections or career path.
-
Scenario: An HR consultant uses LinkedIn Received Connection Extractor to filter out inactive accounts, ensuring an active and engaged network.
-
Location: Apply location filters to streamline network connections to specific regions.Example: A sales executive targeting Europe removes connections outside the region, focusing on prospects within their market.
-
Activity Level: Remove inactive leads and profiles that haven’t engaged with your content or LinkedIn activity in a while.
Scenario: An HR consultant uses TexAu’s filters to remove basic profiles that haven’t posted or interacted in over a year, ensuring an active and engaged network.
3. Schedule Removals
Regular connection limit reviews prevent your network from becoming cluttered and ensure strategic outreach remains effective. TexAu allows you to schedule recurring network cleanups to maintain a focused and relevant connections list.
- Monthly or Quarterly Reviews: Plan regular reviews to assess and optimize your network connections.Example: A SaaS marketing manager schedules quarterly cleanups to remove irrelevant contacts, focusing on leads generated during campaigns.
- Post-Campaign Cleanups: After completing major outreach campaigns, remove unresponsive leads to improve the efficiency of your future efforts.
- Scenario: A B2B contact manager removes unwanted connections from non-responsive clients, ensuring their outreach efforts remain targeted and impactful.
Why It Matters
By applying these best practices, you can:
- Streamline your professional relationships for more effective outbound marketing efforts.
- Improve content engagement by focusing on active and relevant 1st-degree connections.
- Save valuable time with TexAu’s automation tool while maintaining an aligned and dynamic network.
Refine your LinkedIn network today with TexAu’s LinkedIn Connection Remover, and ensure your professional presence remains focused and impactful.
Advanced Features
TexAu provides several advanced features that further enhance the efficiency and customization of your connection removal process. These features allow for a more targeted, organized, and strategic approach to managing your LinkedIn network.
1. Connection Categorization
Before removing connections, it’s useful to categorize your connections based on their value or relevance to your professional goals. TexAu allows you to categorize connections into groups (e.g., leads, partners, colleagues, etc.) to help you prioritize which ones to remove.
- Prioritization: Categorizing your connections ensures you don’t mistakenly remove high-value profiles. It’s easy to accidentally remove a decision-maker or key partner, but by categorizing your connections, you can ensure that only irrelevant or inactive profiles are removed.
- Streamlined Removal: When it’s time to clean your network, categorization helps you quickly identify which groups of connections need to be pruned. This allows for a more organized and thoughtful approach to network management.
Example: A business development manager categorizes their connections into “potential clients,” “industry peers,” and “inactive leads.” When cleaning up their network, they focus on removing only the inactive leads, ensuring their relevant connections remain intact.
2. Export Connection Data
TexAu’s export feature allows you to save connection data before removal. This ensures that you have a record of your network and can re-add connections if necessary. Exporting connection details also helps in maintaining a database of contacts that may be useful for future outreach or professional purposes.
- CSV or Excel Exports: Download your connection data in CSV or Excel formats for record-keeping. This is especially helpful if you want to track the profiles you have removed and later analyze whether you need to re-engage with any of them.
- Data Insights: Exported data can be analyzed to uncover patterns, such as the types of connections that tend to become inactive or unresponsive over time. This insight can guide future connection-building strategies.
Example: A tech recruiter exports the contact details of 500 connections before performing a cleanup. Later, they can refer to this data to see which candidates might need to be re-engaged or approached again for new job opportunities.
3. Integration with Other TexAu Features
TexAu’s LinkedIn Profile Scraper can be combined with the Connection Remover tool to perform a more in-depth analysis of your network before removing connections. The Profile Scraper allows you to gather additional data about each profile, such as their job title, company, and activity level.
- In-Depth Analysis: Before removing connections, use the LinkedIn Profile Scraper to gather detailed insights into each profile’s relevance. You can filter profiles based on specific criteria, ensuring you only remove those that no longer align with your goals.
- Data-Driven Decisions: By analyzing profiles before removal, you can make more informed decisions about which connections are valuable and which should be removed.
Example: A sales manager uses the LinkedIn Profile Scraper to analyze the job titles, company sizes, and activity levels of their connections. Based on this data, they decide to remove profiles that no longer fit the ideal customer profile for their outreach.
4. Scalability for Large Networks
TexAu is designed to handle large LinkedIn networks, ensuring that even professionals with thousands of connections can manage their network efficiently. Its robust processing capabilities allow users to handle extensive networks without feeling overwhelmed.
- Bulk Processing: For users with large networks, TexAu can process removals in bulk, ensuring that all irrelevant or inactive profiles are removed efficiently and safely.
- Scalable Automation: TexAu’s automation-safe features (rate limits, random delays, etc.) ensure that the network management process remains compliant with LinkedIn’s terms, regardless of the size of your network.
Example: A senior executive with over 10,000 LinkedIn connections uses TexAu to remove 500 irrelevant profiles at once. TexAu’s scalability ensures that the process is efficient and done without the risk of LinkedIn flagging the activity.
Conclusion
Maintaining a relevant and engaged LinkedIn network is critical to your professional success. Whether you are a recruiter, salesperson, or industry leader, TexAu’s LinkedIn Connection Remover provides a powerful tool for cleaning up your network, improving engagement, and aligning your connections with your current career or business goals.
By following best practices such as defining objectives, using filters wisely, and scheduling regular cleanups, you can ensure that your network remains focused and valuable. Additionally, TexAu’s advanced features, such as connection categorization, data export, and integration with other TexAu tools, offer deeper customization and enhanced decision-making.
Take control of your LinkedIn network today with TexAu and make every connection count!
The LinkedIn Connection Remover automation enables you to efficiently clean your LinkedIn network by removing unnecessary or irrelevant connections in bulk. This tool is perfect for founders, marketers, sales professionals, and growth hackers aiming to streamline their LinkedIn network and focus on meaningful connections. Follow these steps to configure and execute the automation, with options for Google Sheets or CSV export and seamless desktop or cloud operation.
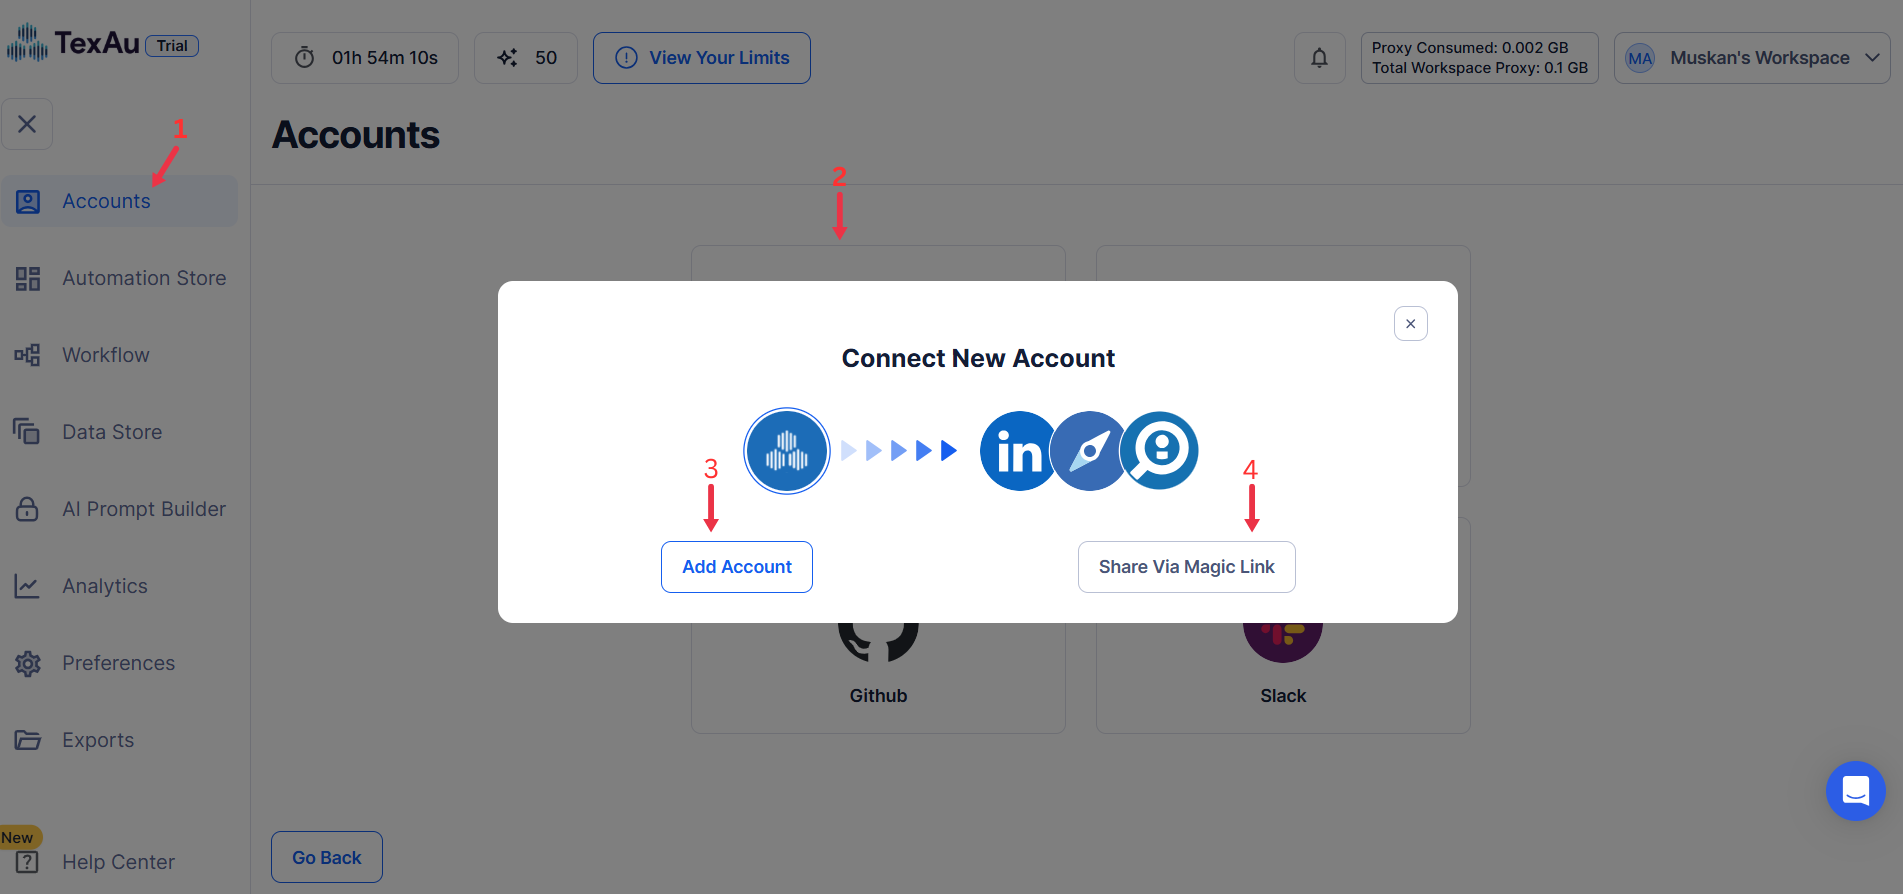
Step 1: Log in to TexAu and Connect LinkedIn
- Log in to your TexAu account at v2-prod.texau.com.
- Go to Accounts and connect your LinkedIn account. You can choose one of these methods:
- Share via Magic Link: Share the link, copy it to your browser, and follow the steps to integrate your LinkedIn account securely.
- Add Account: Sync cookies and browser data with TexAu for seamless integration.
Tip: Use Magic Link for an easy and secure connection.
{% custom-image src="https://v2-web-assets.s3.us-east-1.amazonaws.com/Common/log-in-to-texau-and-connect-linkedin/connect-linkedin.png" alt="connect-linkedin" /%}
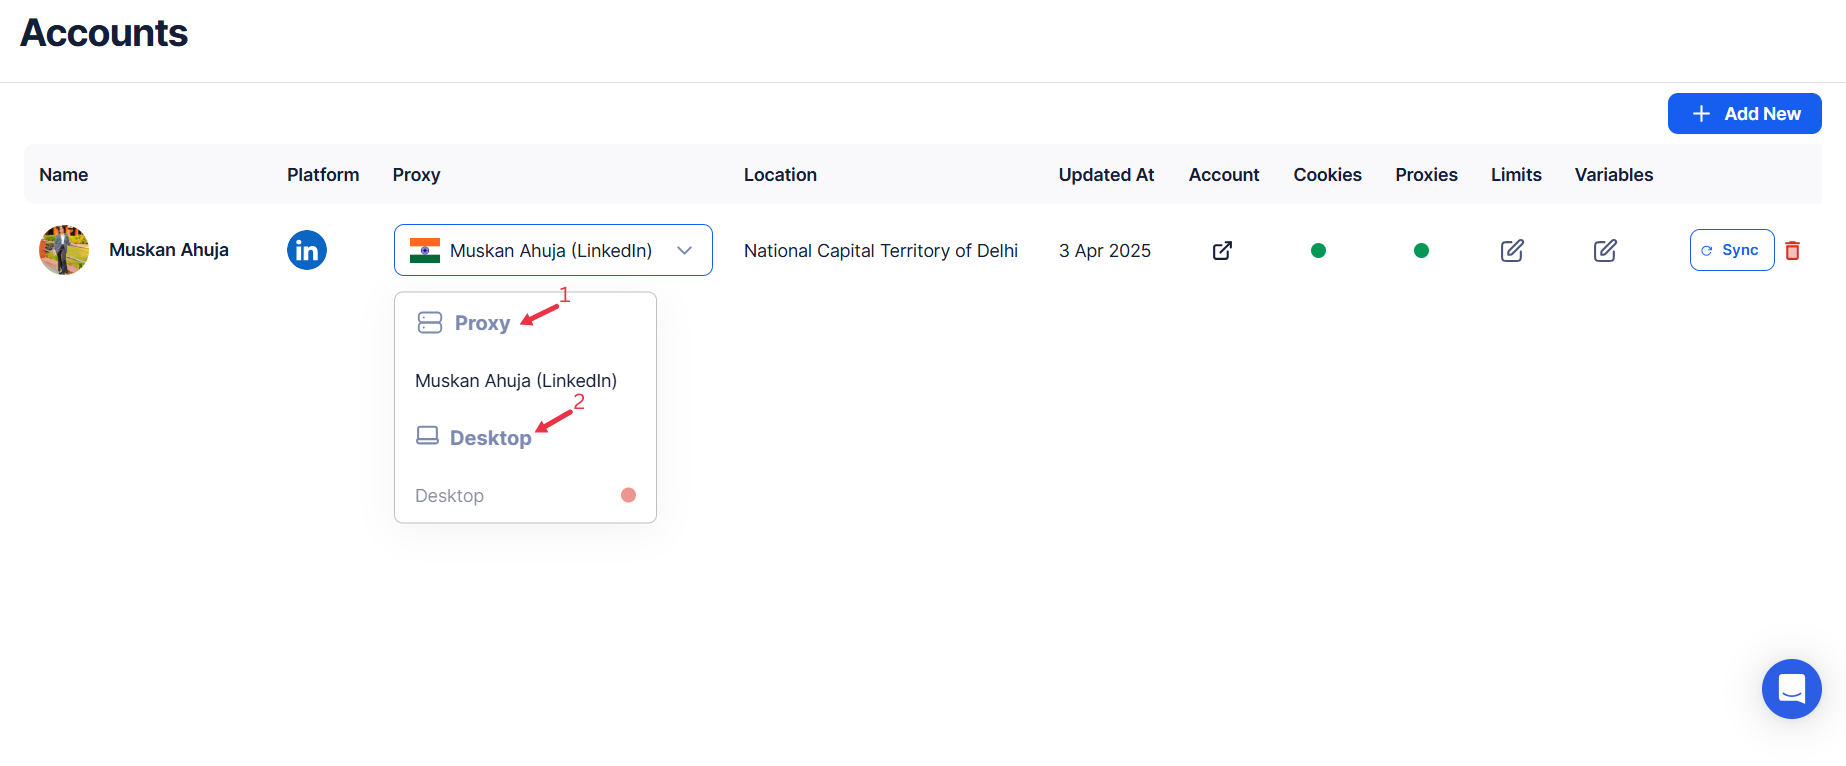
Step 2: Choose Cloud or Desktop Execution
Decide how you want to run the automation:
- Cloud Mode: Automates tasks on TexAu’s servers with built-in proxies. You can add custom proxies via Settings > Preferences > Proxies.
- Desktop Mode: Runs automation on your local device using your IP address.
Tip: Desktop mode saves cloud runtime credits and gives more control over the process.
{% custom-image src="https://v2-web-assets.s3.us-east-1.amazonaws.com/Common/cloud-or-desktop-execution/cloud-or-desktop-execution.png" alt="choose-cloud-or-desktop-execution" /%}
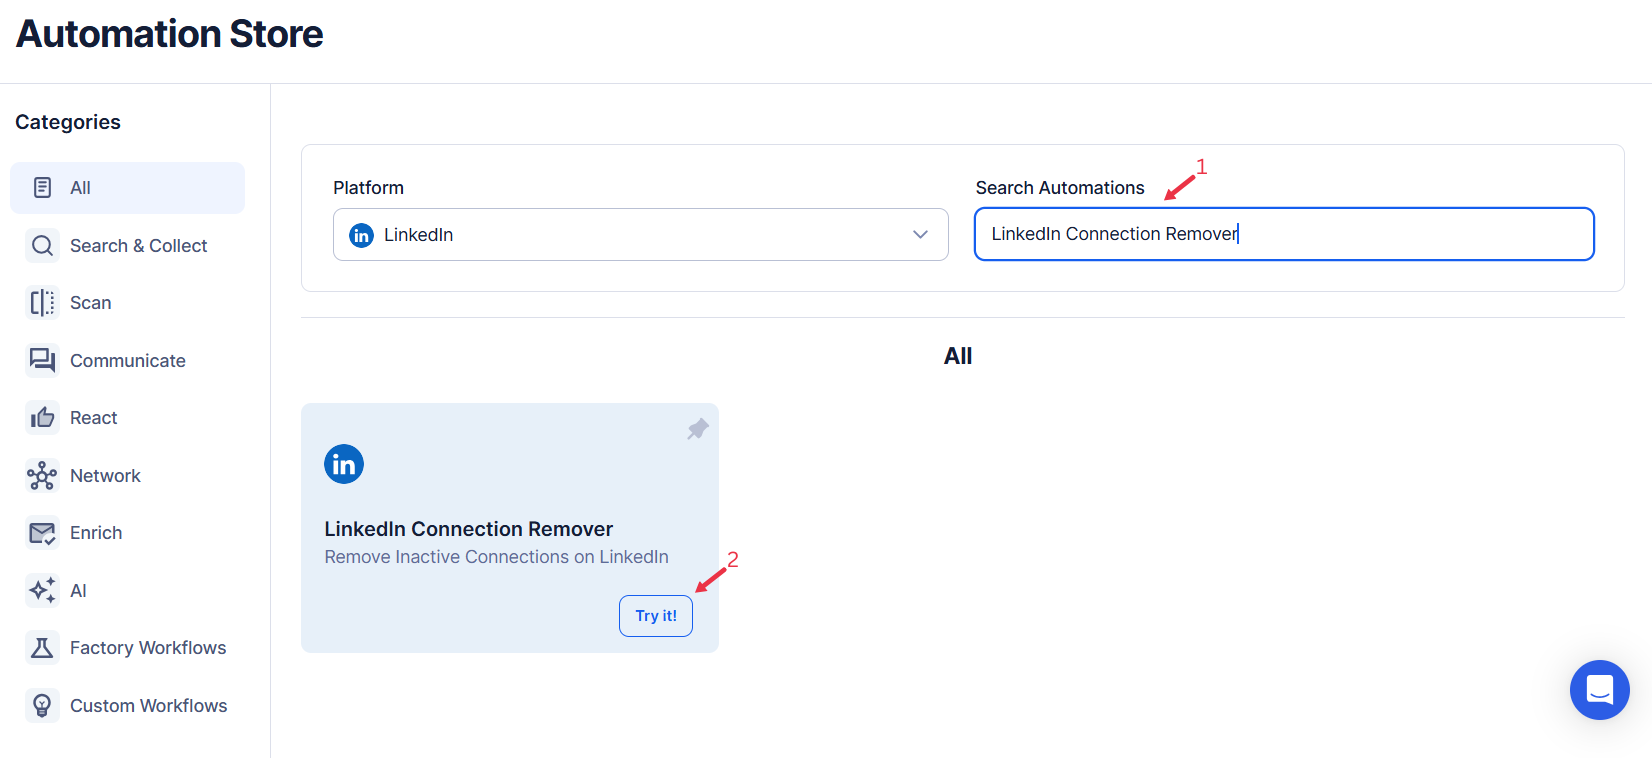
Step 3: Search for the Particular LinkedIn Automation
- Navigate to the Automation Store on TexAu.
- Use the search bar to find LinkedIn Connection Remover automation.
{% custom-image src="https://v2-web-assets.s3.us-east-1.amazonaws.com/Automations/linkedin-connection-remover/linkedin-connection-remover.png" alt="search-for-the-particular-LinkedIn-automation" /%}
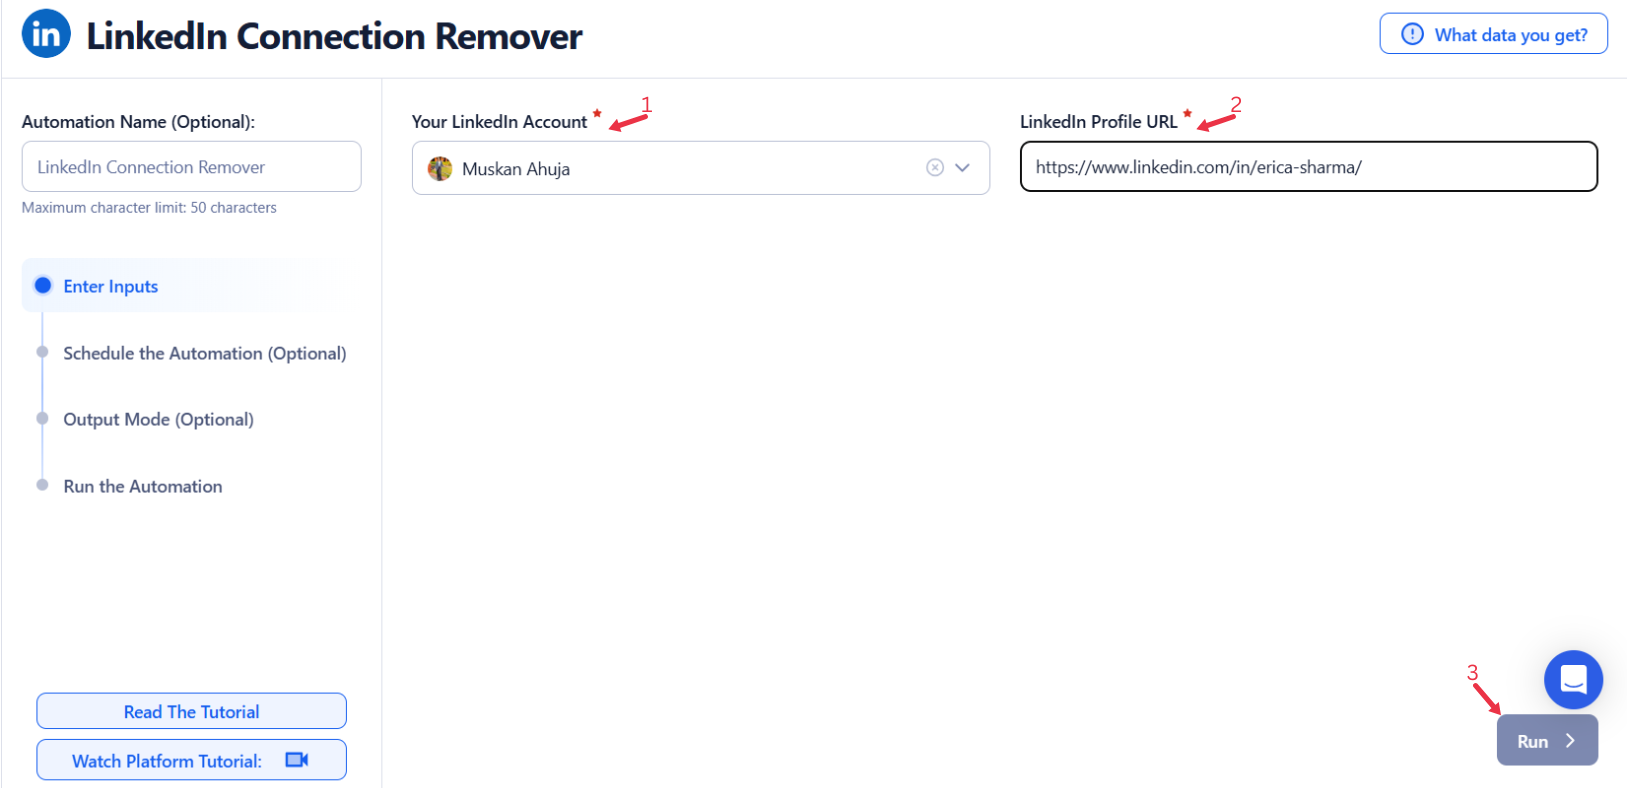
Step 4: Select Your Input Source
Define the input source to specify LinkedIn profile URLs for the LinkedIn Connection Remover automation. Here's how to configure each:
{% cta buttonText="Start free trial" title="Remove LinkedIn Connections at Scale" description="Streamline your LinkedIn network by removing unwanted connections in bulk. Easy to use, secure export options, and works on both cloud and desktop." /%}
Manually Enter a Single Input
This option allows you to remove a specific LinkedIn connection. Follow these steps:
- LinkedIn Profile URL: Enter the LinkedIn profile URL of the connection you want to remove.
- This is ideal for targeted removal of a single connection.
- Click run in the lower-right corner to initiate the automation.
{% custom-image src="https://v2-web-assets.s3.us-east-1.amazonaws.com/Automations/linkedin-connection-remover/linkedin-connection-remover-single-inputs.png" alt="enter-a-single-input" /%}
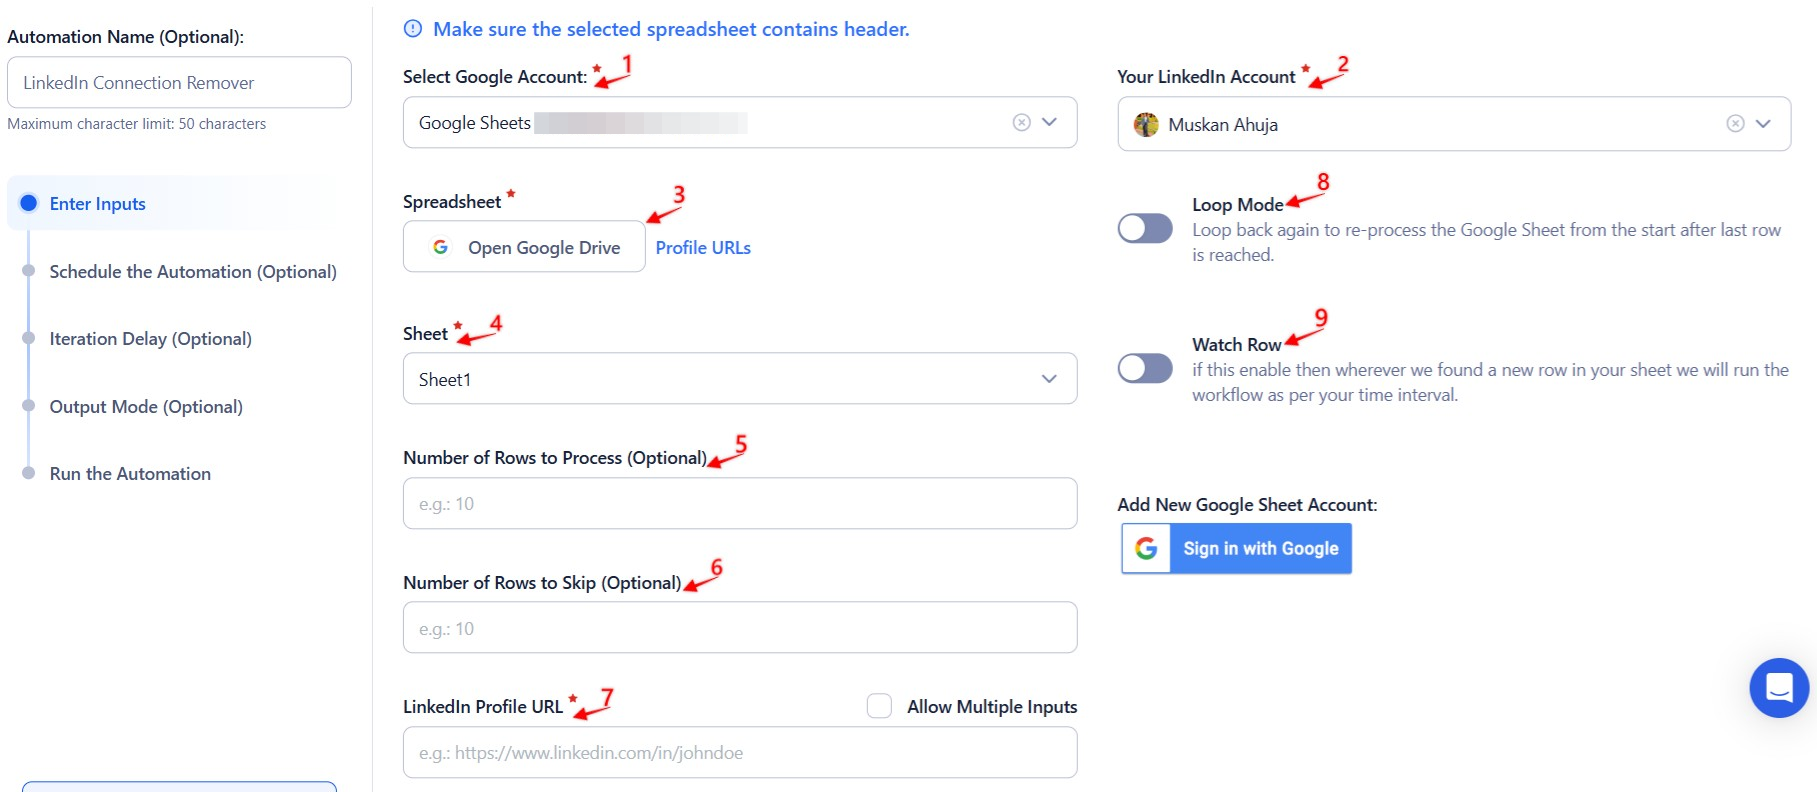
Use Google Sheets for Bulk Input
This option is perfect for removing multiple LinkedIn connections efficiently. Follow these steps:
- Click select Google account to choose your Google account or click add new Google Sheet account (you can add multiple Google accounts).
- Click accounts to select LinkedIn as the platform.
- Click open Google Drive to locate the Google Sheet containing LinkedIn profile URLs.
- Select the spreadsheet and the specific sheet (e.g., "Sheet1") containing the LinkedIn profile URLs.
- LinkedIn Profile URL: Choose the column header containing the LinkedIn profile URLs. This step is mandatory for the automation to function correctly.
- Configure additional options:
- Number of Rows to Process (Optional): Define the number of rows to process from the sheet.
- Number of Rows to Skip (Optional): Specify rows to skip at the beginning of the sheet to ensure proper data management.
- Click run in the lower-right corner to start the automation if no advanced settings are needed.
Optional Advanced Feature:
- Loop Mode: Enable Loop Mode to re-process the Google Sheet from the beginning once all rows are completed. This is useful for tasks that require recurring updates.
-
Watch Row (Optional)
Watch Row feature enables workflow automation by detecting new Google Sheet entries and executing linked processes immediately.
Configure Watch Row by choosing an execution frequency and setting a monitoring time frame.
Watch Row Schedule
- None
- Scheduling Intervals (e.g., every 15 minutes, every hour)
- One-Time Execution
- Daily Execution
- Weekly Recurrence (e.g., every Thursday and Sunday)
- Monthly Specific Dates (e.g., 9th and 28th)
- Custom Fixed Dates (e.g., August 19)
By default, Watch Row scans every 15 minutes and continues for five days unless adjusted.
With Watch Row, TexAu ensures automated task execution without manual input.
{% custom-image src="https://v2-web-assets.s3.us-east-1.amazonaws.com/Automations/linkedin-connection-remover/linkedin-connection-remover-google-sheetss.jpeg" alt="use-google-sheets-for-bulk-input" /%}
Process a CSV File
This option allows you to remove multiple LinkedIn connections using a static file. Follow these steps:
- Click upload CSV file and browse to locate the file containing LinkedIn profile URLs.
- Once uploaded, TexAu will display the file name and preview its content. Verify the data to confirm the correct file is selected.
- LinkedIn Profile URL: Choose the column header containing the LinkedIn profile URLs.
- Configure additional options:
- Number of Rows to Process (Optional): Specify the number of rows to process from the CSV file.
- Number of Rows to Skip (Optional): Define rows to skip at the beginning of the file.
- Click run in the lower-right corner to initiate the automation if advanced configurations like scheduling are not required.
{% custom-image src="https://v2-web-assets.s3.us-east-1.amazonaws.com/Common/texau-input-source-options.png" alt="step3" /%}
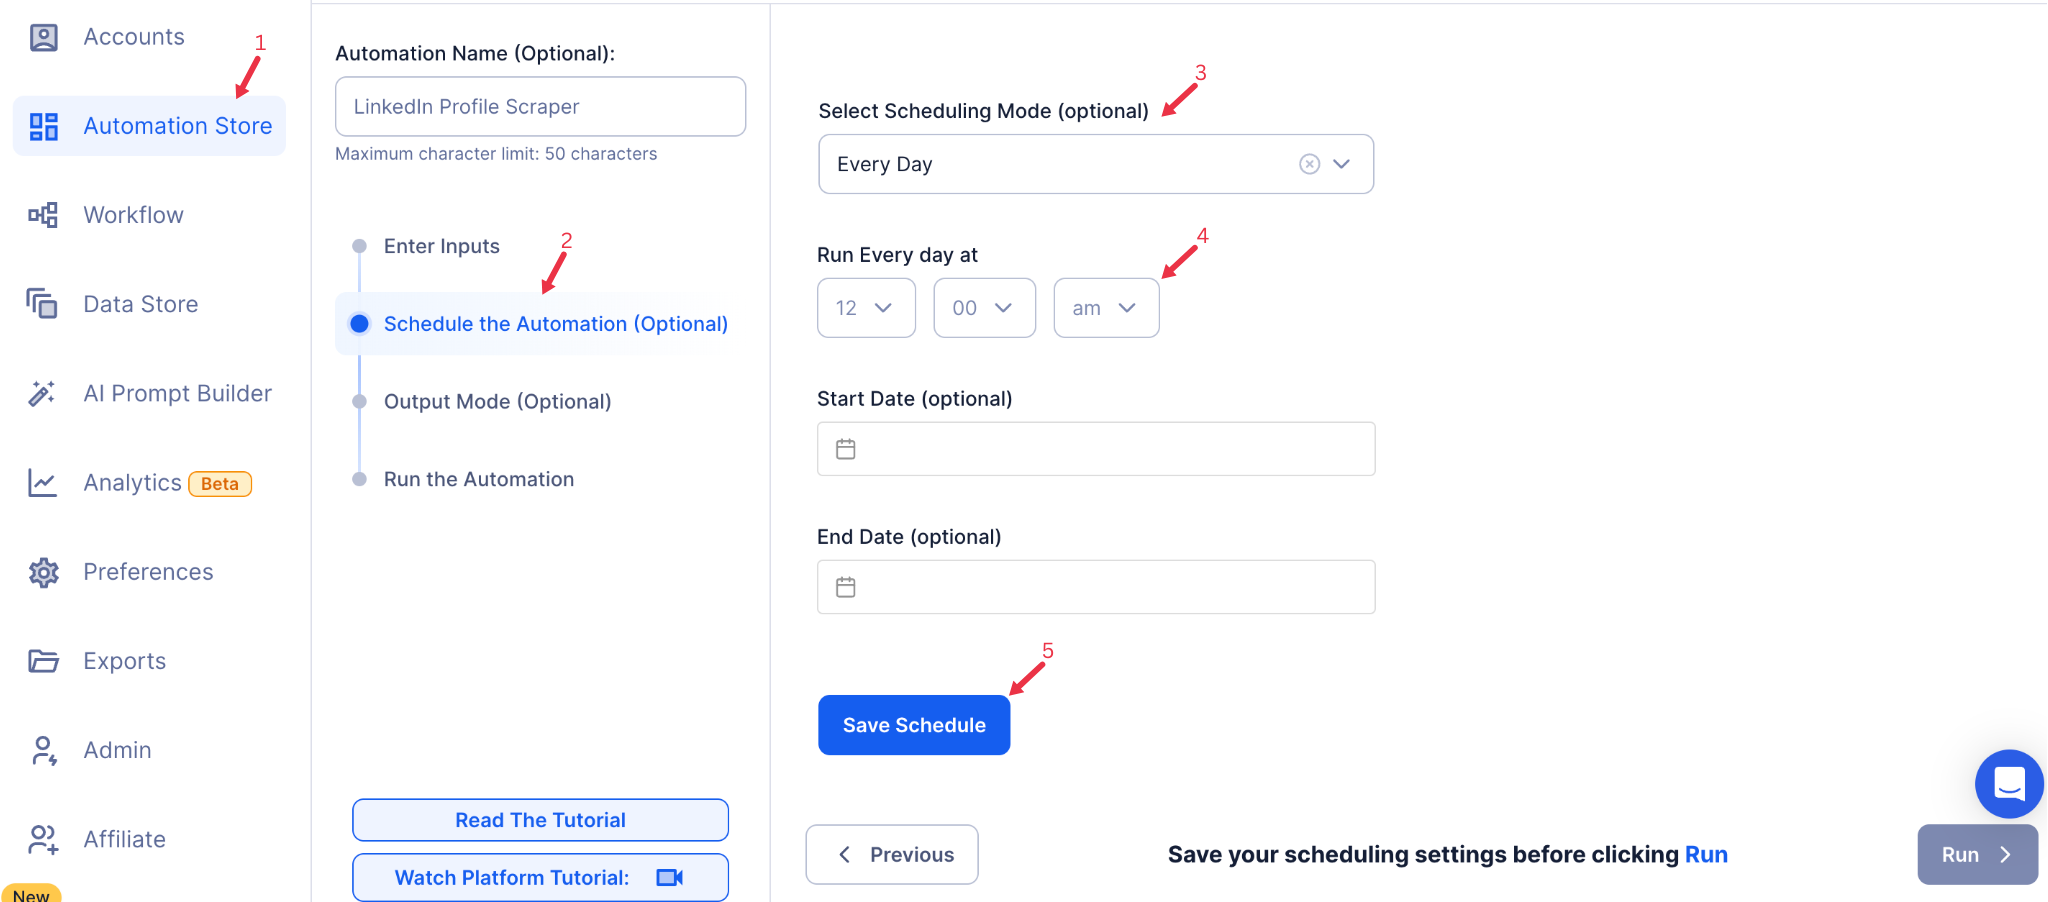
Step 5: Schedule the Automation (Optional)
If you want to run the automation at specific times, use the Schedule feature. Set the date and time for execution or choose a recurring schedule:
- None
- At Regular Intervals (e.g., every 8 hours or daily)
- Once
- Every Day
- On Specific Days of the Week (e.g., every Monday)
- On Specific Days of the Month (e.g., the 1st and 15th)
- On Specific Dates (e.g., January 10)
Tip: Scheduling is useful for regular network cleanups.
{% custom-image src="https://v2-web-assets.s3.us-east-1.amazonaws.com/Common/schedule-the-automation/schedule-the-automation.png" alt="schedule-the-automation" /%}
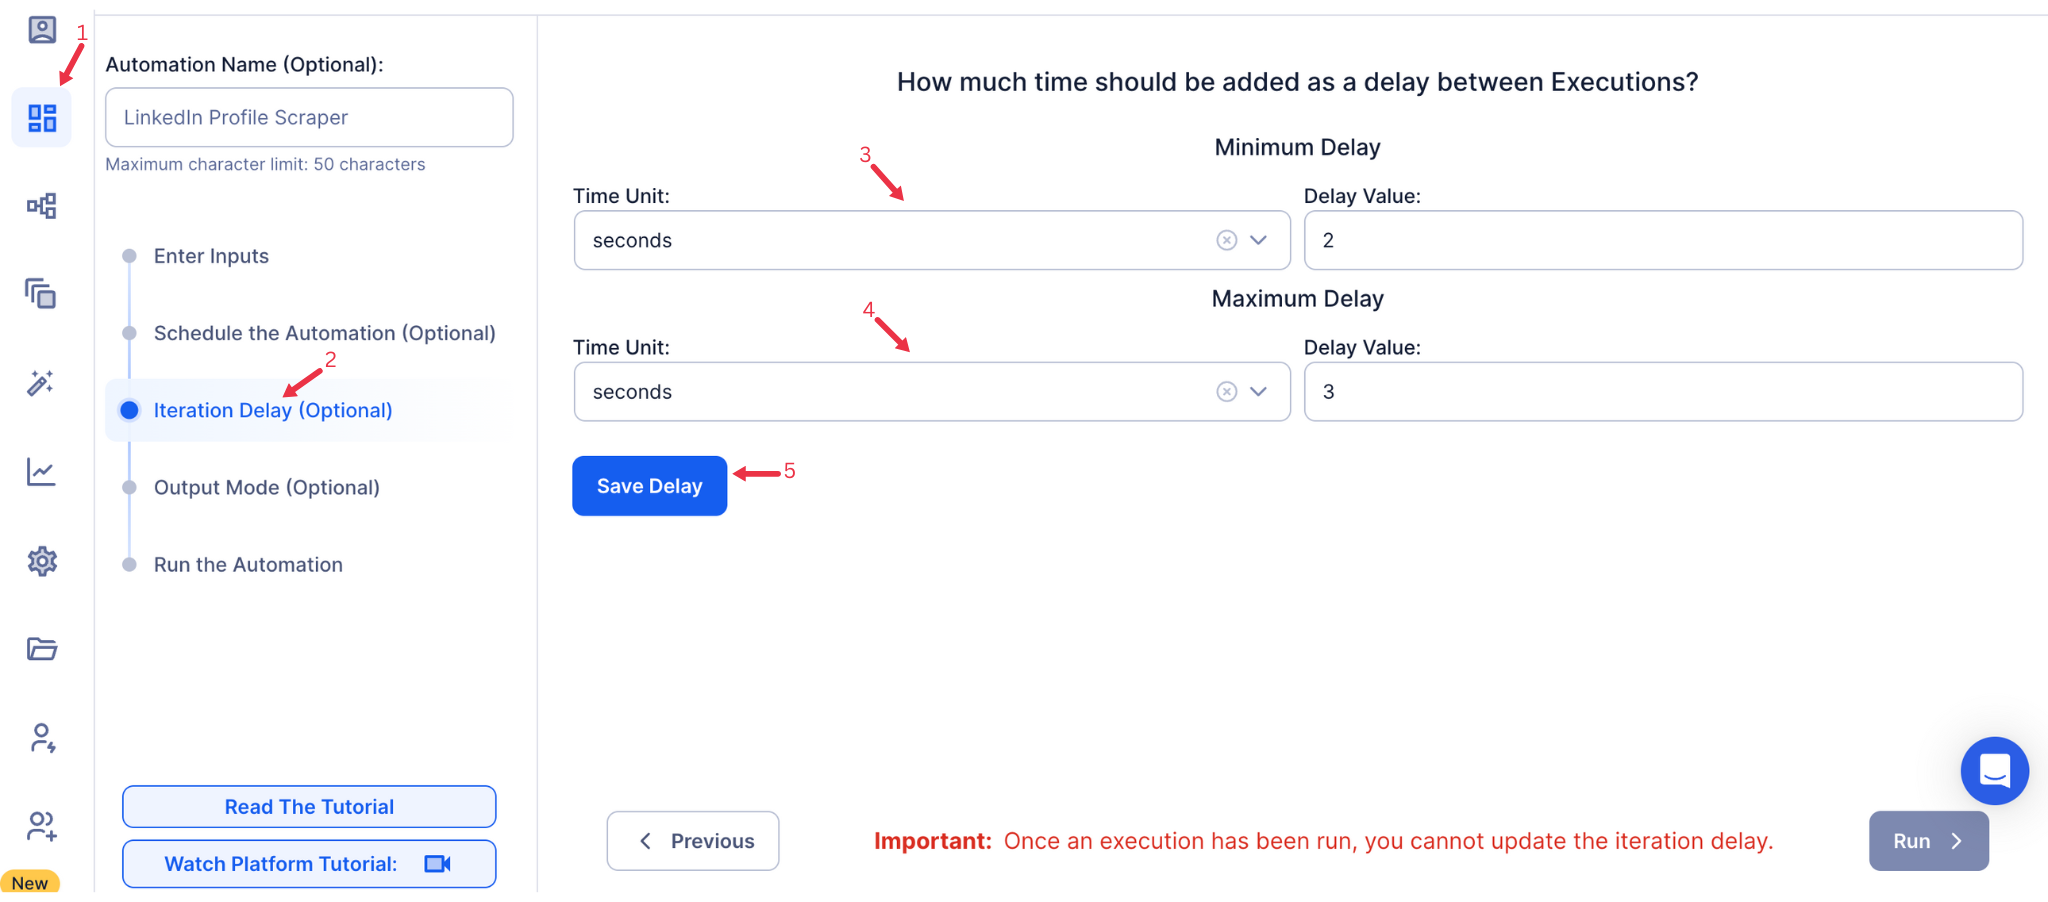
Step 6: Set an Iteration Delay (Optional)
Avoid detection and simulate human-like activity by setting an iteration delay. Choose minimum and maximum time intervals to add randomness between actions. This makes your activity look natural and reduces the chance of being flagged.
- Minimum Delay: Enter the shortest interval (e.g., 10 seconds).
- Maximum Delay: Enter the longest interval (e.g., 20 seconds).
Tip: Random delays keep your automation safe and reliable.
{% custom-image src="https://v2-web-assets.s3.us-east-1.amazonaws.com/Common/iteration-delay/iteration-delay.png" alt="iteration-delay" /%}
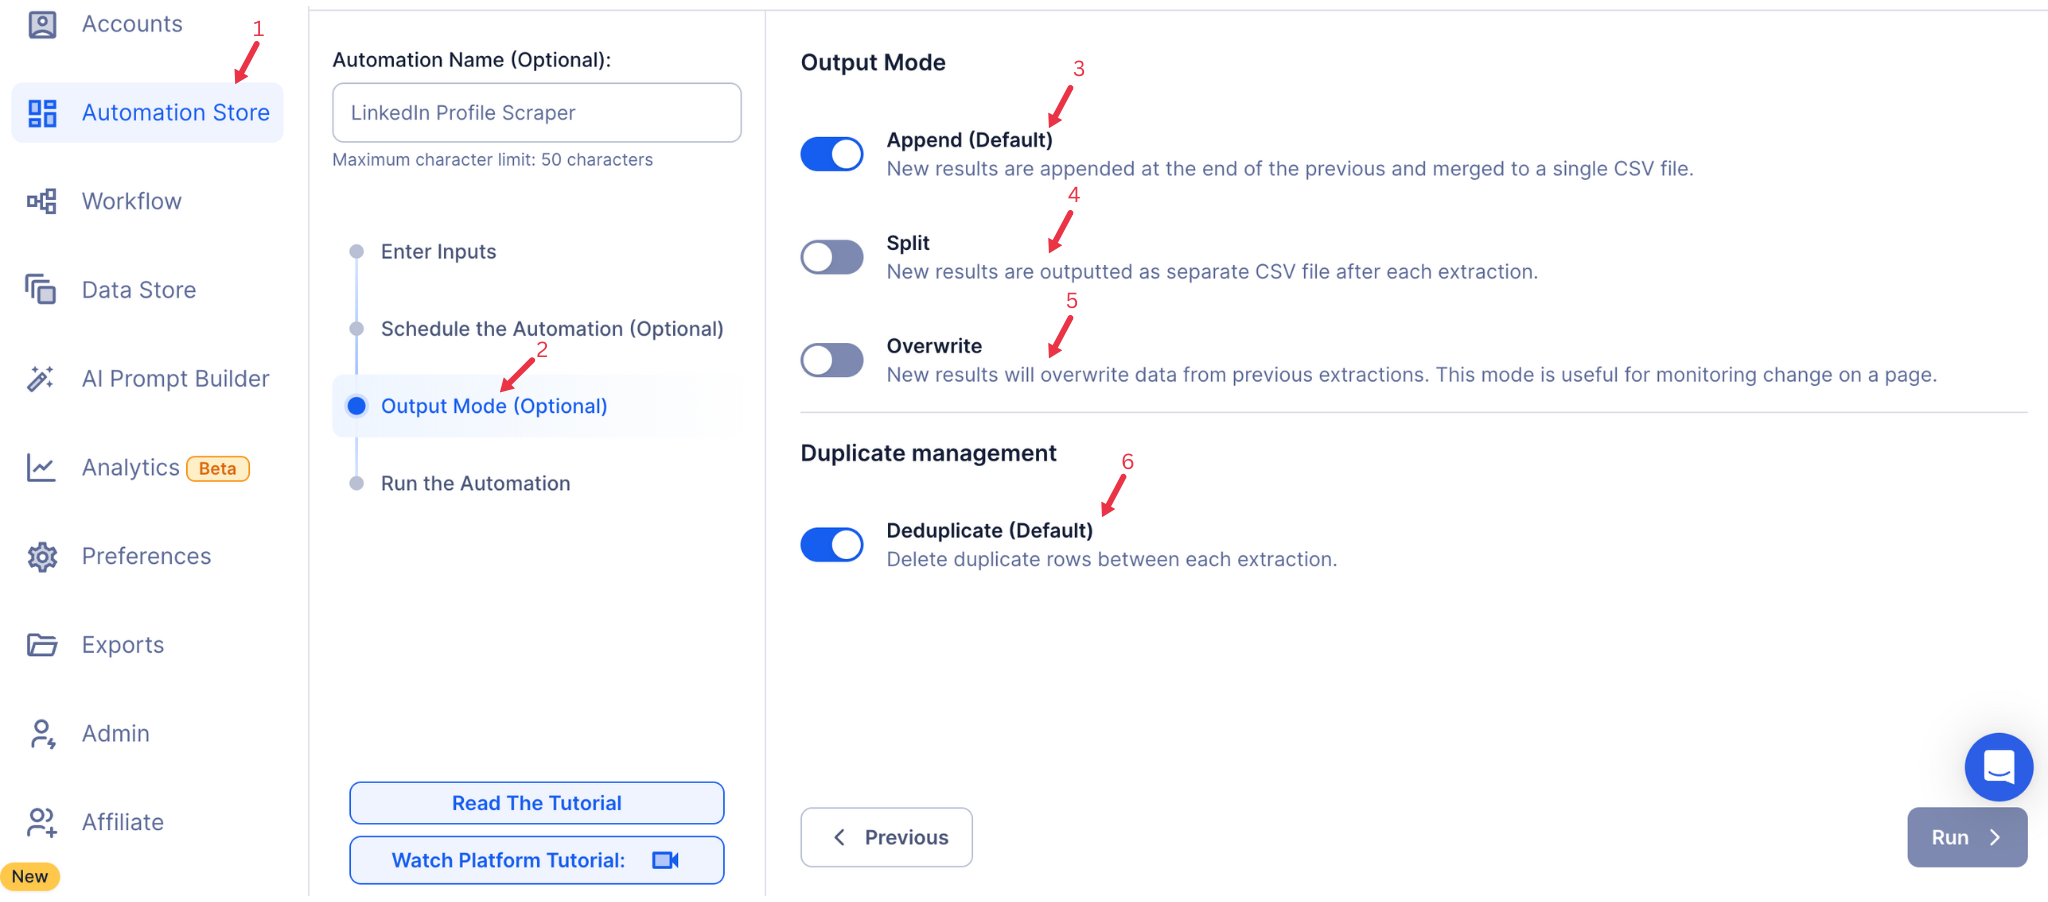
Step 7: Choose Your Output Mode (Optional)
In Output Mode, decide how to save and manage the automation’s results.
- Export Options: Select Google Sheets or CSV file as your output format. If using Google Sheets, link your Google account for direct export.
- Output Management:
- Append: Add data to the end of the existing file.
- Split: Create a new file for each automation run.
- Overwrite: Replace the previous file with the latest results.
- Duplicate Management: Enable Deduplicate to remove duplicate entries automatically.
Tip: Exporting to Google Sheets allows for easy collaboration and real-time updates.
{% custom-image src="https://v2-web-assets.s3.us-east-1.amazonaws.com/Common/output-mode/output-mode.png" alt="output-mode " /%}
Step 8: Access the Data from the Data Store
Once the automation is complete, access the results from the Data Store in your TexAu account.
- Locate the "LinkedIn Connection Remover" automation and click See Data to view or download the processed connection removal records.
{% custom-image src="https://v2-web-assets.s3.us-east-1.amazonaws.com/Automations/LinkedIn+Job+Scraper/data-store-see-data.png" alt="step8" /%}
Conclusion
The LinkedIn Connection Remover automation simplifies your network cleanup process by removing unnecessary connections in bulk. With advanced scheduling, flexible input options, and seamless data export to Google Sheets or CSV, this tool is essential for professionals aiming to optimize their LinkedIn network. Run the automation on cloud or desktop for tailored control.
Run this automation on your own server.
TexAu V3 doesn't host social-platform automations anymore — but the runnable code is yours. Tell us your inputs, outputs, and target environment, and we'll ship you a working version you can deploy and operate yourself.