Open Ai
AI Sentiment Analysis
Analyze tone, emotion, and intent in any text using AI-powered sentiment analysis. Instantly detect if content is positive, negative, or neutral.
Last updated
The **AI Sentiment Analysis** automation helps founders, sales managers, marketers, and growth hackers analyze customer sentiments in textual data. This tool is invaluable for understanding customer feedback, monitoring social media, or analyzing reviews to make data-driven decisions. TexAu provides
The AI Sentiment Analysis automation helps founders, sales managers, marketers, and growth hackers analyze customer sentiments in textual data. This tool is invaluable for understanding customer feedback, monitoring social media, or analyzing reviews to make data-driven decisions. TexAu provides options to run this automation on the cloud or desktop, with seamless Google Sheets and CSV exports for easy data organization. Follow this guide to set up and run the AI Sentiment Analysis automation.
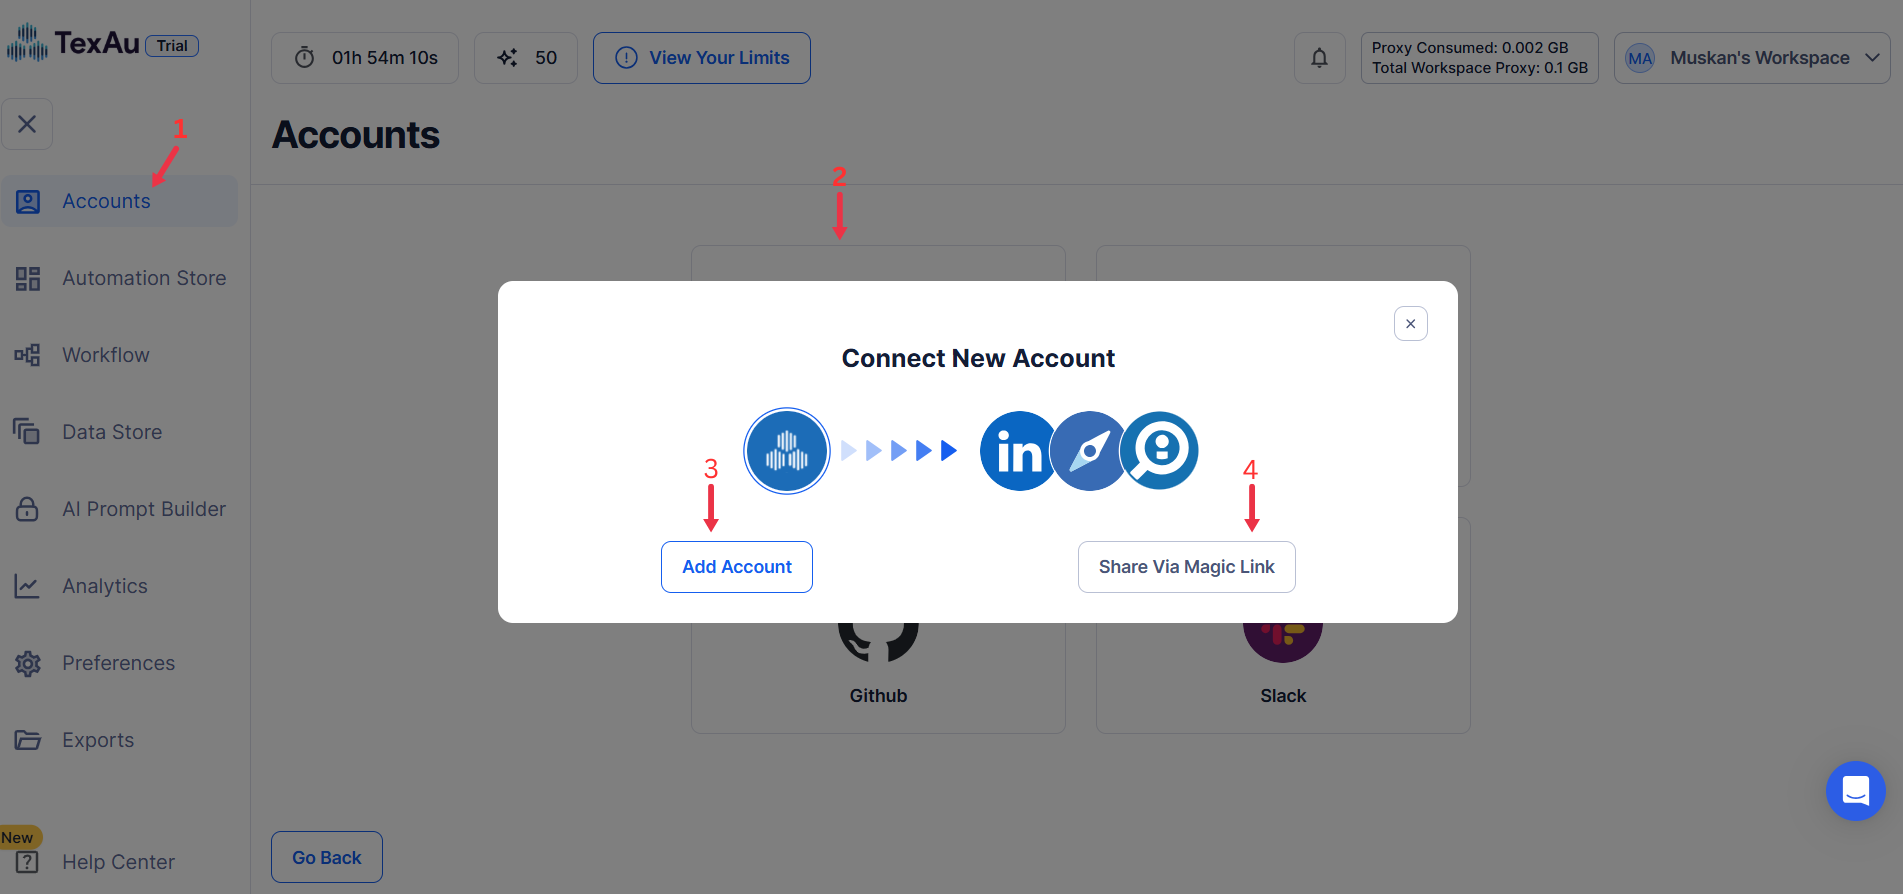
Step 1: Log in to the TexAu and Connect Linkedin.
Log in to your account at v2-prod.texau.com.
{% custom-image src="https://v2-web-assets.s3.us-east-1.amazonaws.com/Common/log-in-to-texau-and-connect-linkedin/connect-linkedin.png" alt="connect-linkedin" /%}
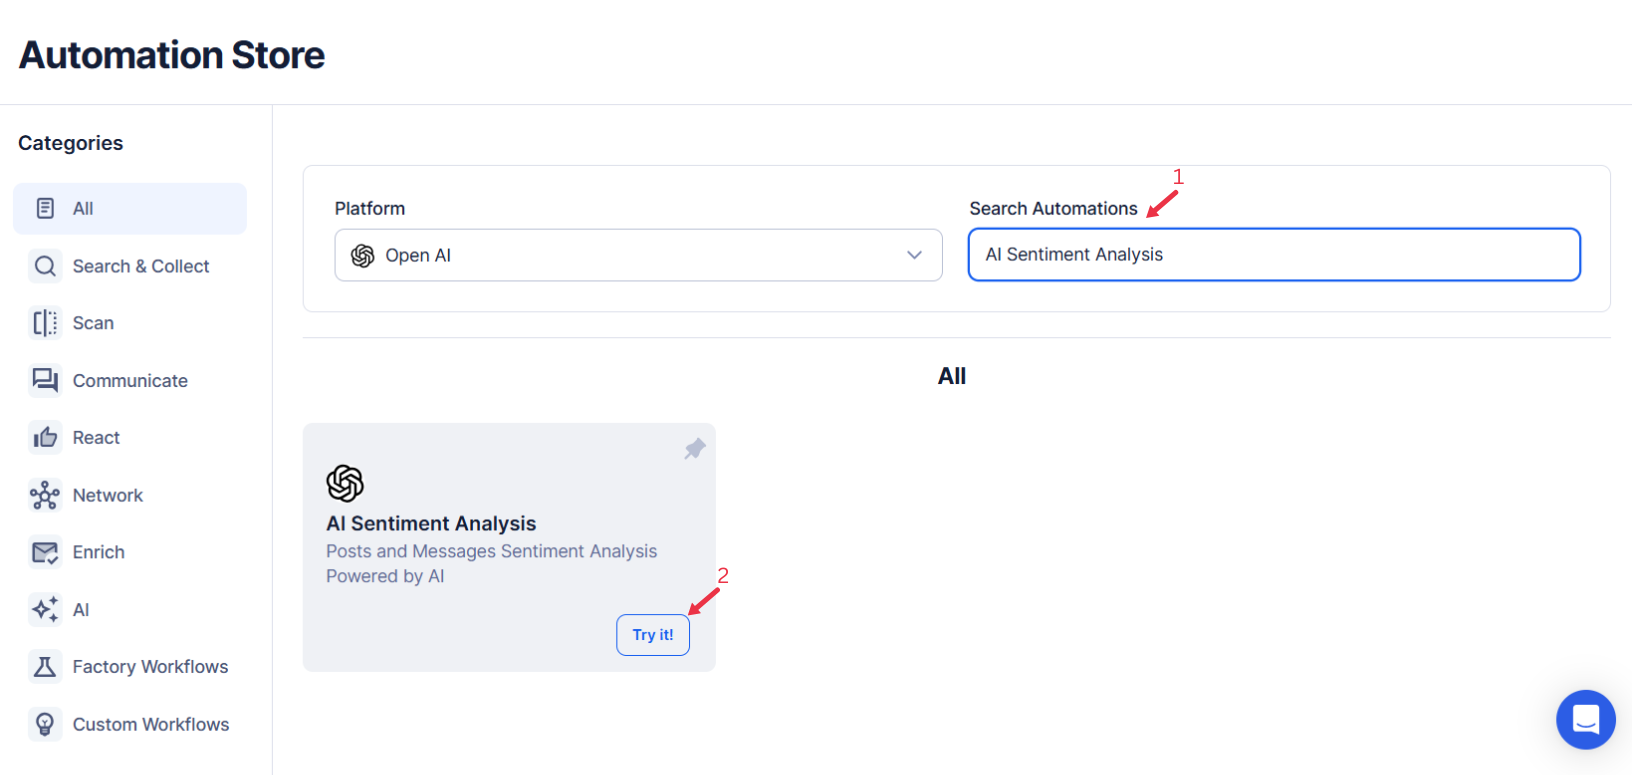
Step 2: Search for the Particular Automation
Log in to your TexAu account at v2-prod.texau.com. In the Automation Store, search for AI Sentiment Analysis and select it to open the configuration page.
{% custom-image src="https://v2-web-assets.s3.us-east-1.amazonaws.com/Automations/ai-sentiment-analysis/ai-sentiment-analysis.png" alt="search-for-the-particular-OpenAI-automation" /%}
Step 3: Select Your Input Source
AI Summarizer efficiently condenses lengthy text into key highlights, making it easier to grasp essential information quickly. It enhances productivity by automatically extracting the most relevant insights from any given content.
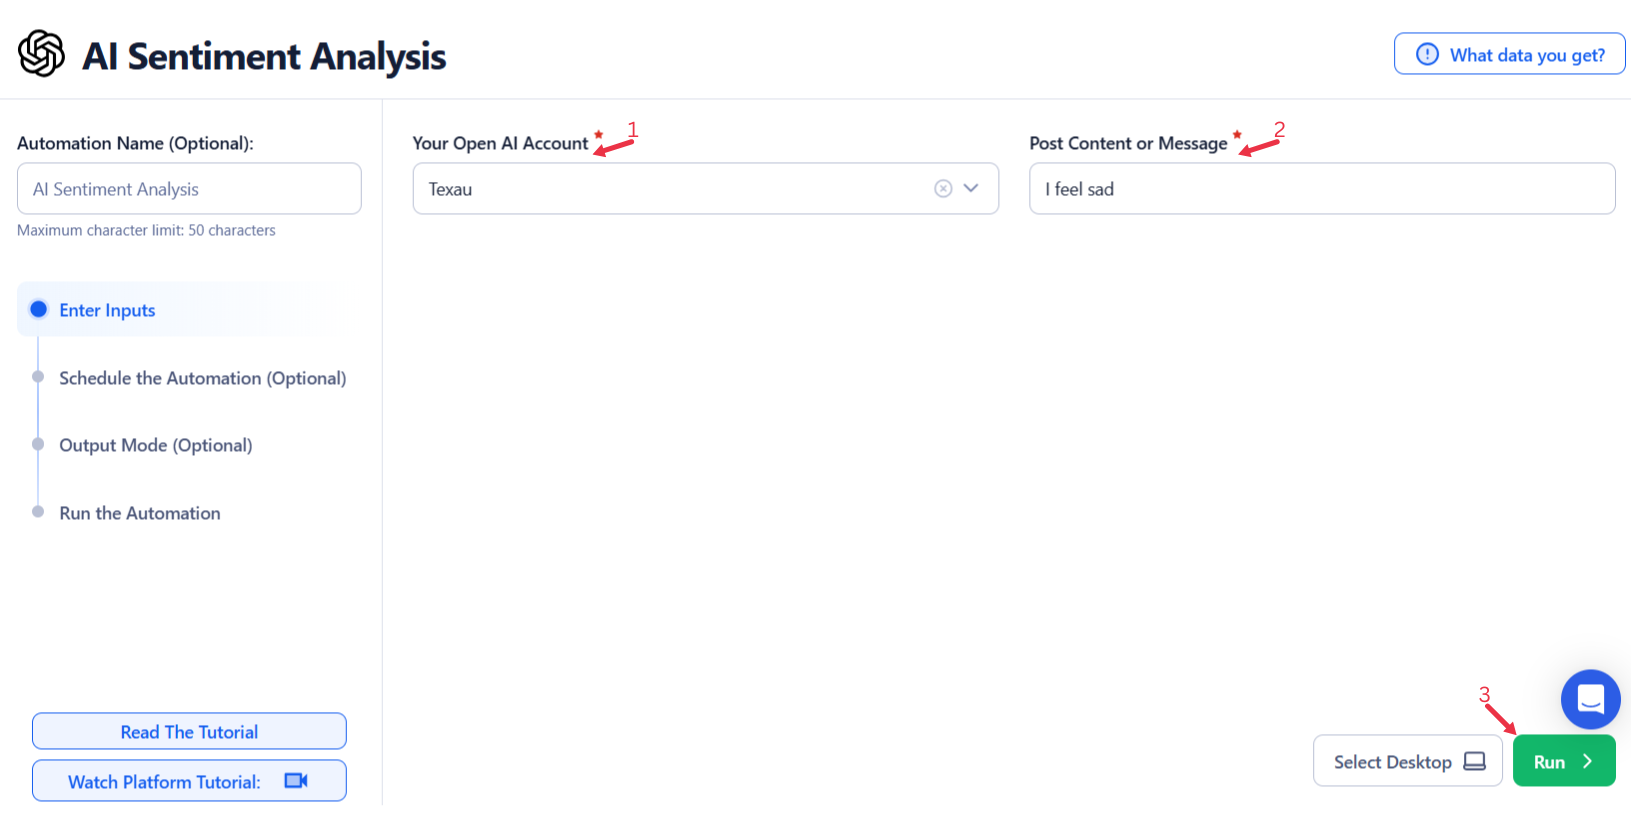
Single Input
This option allows you to summarize a single text input using AI within a specified OpenAI account.
Account: Select the OpenAI account that will be used for summarization.
Post Content: Enter the text content or message that needs to be summarized.
{% custom-image src="https://v2-web-assets.s3.us-east-1.amazonaws.com/Automations/ai-sentiment-analysis/ai-sentiment-analysis-single-inputs.png" alt="enter-a-single-input" /%}
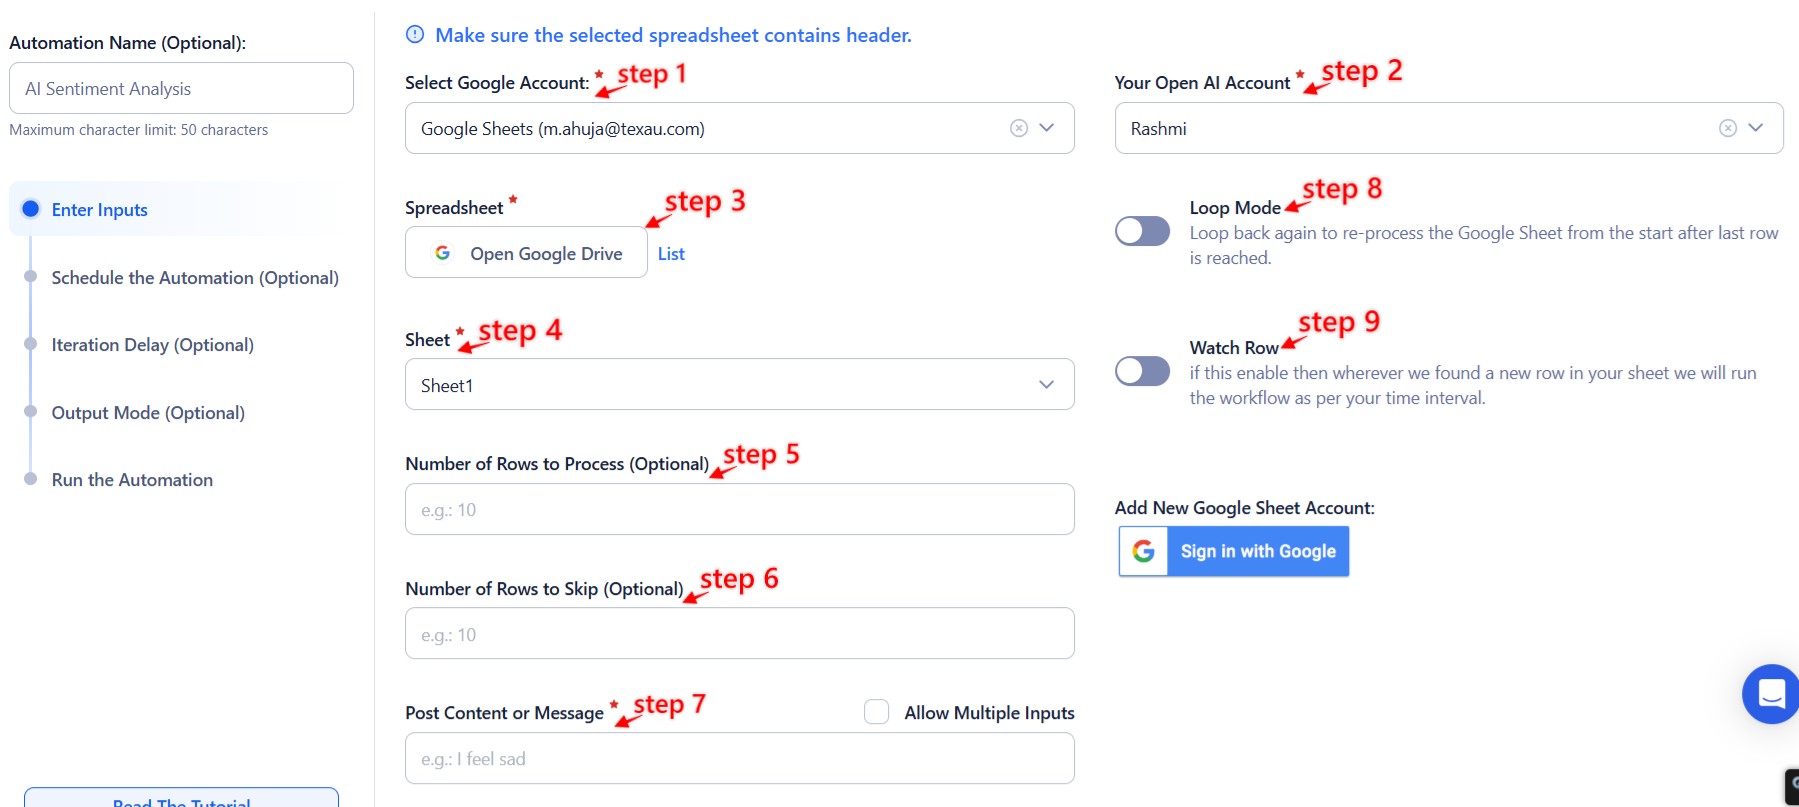
Google Sheets
Use this option to process multiple text inputs listed in a Google Sheet.
Select Google Account: Link your Google account or select an existing one. Add a new Google account if needed.
Select Your Spreadsheet: Click "Open Google Drive" to locate the Google Sheet. Choose the spreadsheet and sheet where text data is stored.
Processing Options:
-
Number of Rows to Process (Optional): Specify how many rows to process from the sheet.
-
Number of Rows to Skip (Optional): Define how many rows to skip before starting the process.
-
Post Content: Allow multiple inputs for processing multiple text entries.
Loop Mode (Optional)
- Turn on Loop Mode to reprocess the Google Sheet from the start once all rows are completed.
Watch Row (Optional)
Watch Row feature helps automate workflows by detecting new Google Sheet entries and running workflows without manual action.
Define Watch Row settings by selecting an update frequency and an execution timeframe.
Watch Row Schedule
- None
- Scheduling Intervals (e.g., every 15 minutes, every hour)
- One-Time Execution
- Daily Execution
- Weekly Recurrence (e.g., every Tuesday and Thursday)
- Monthly Specific Dates (e.g., 7th and 22nd)
- Custom Fixed Dates (e.g., January 9)
By default, Watch Row scans every 15 minutes and runs for five days unless changed.
With Watch Row, workflows stay dynamic and data-driven.
{% custom-image src="https://v2-web-assets.s3.us-east-1.amazonaws.com/Automations/ai-sentiment-analysis/AI-sentiment-analysis-google-sheet.jpeg" alt="use-google-sheets-for-bulk-input" /%}
Process a CSV File
For static lists of text content stored in a CSV file.
Upload the File: Click "Upload CSV File" and select the CSV containing the text data. Ensure the file includes all the required fields.
Adjust Processing Settings:
- Number of Rows to Process (Optional): Specify how many rows to process.
- Number of Rows to Skip (Optional): Define how many rows to skip before starting the process.
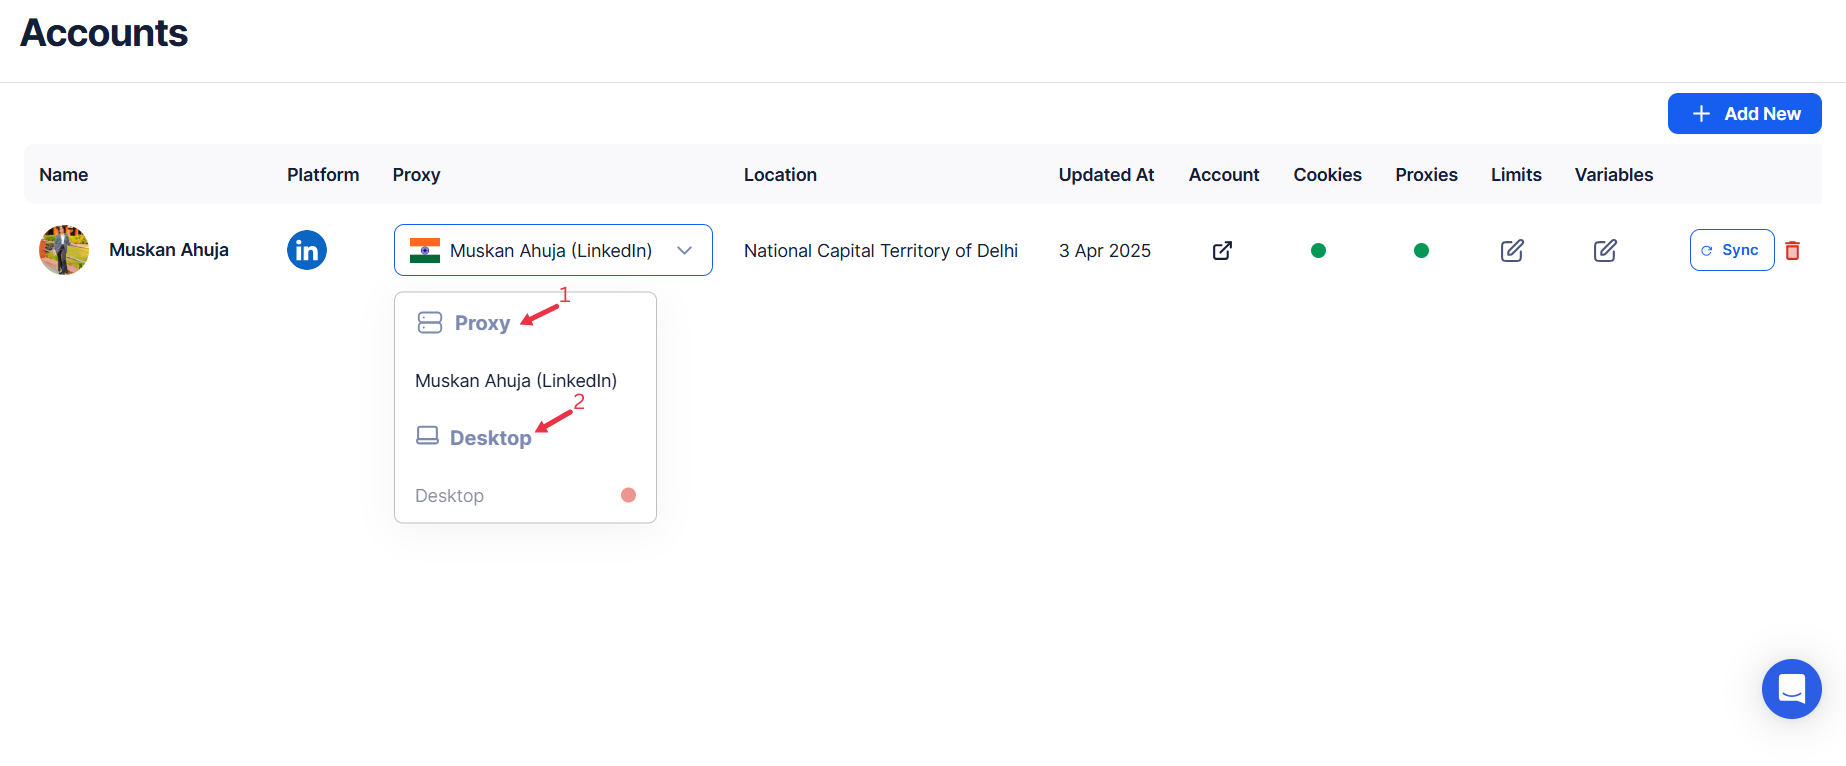
Step 4: Choose Cloud or Desktop Execution
- Decide how you want to run the automation:
- Cloud Mode: Automates tasks on TexAu’s servers with built-in proxies. You can add custom proxies via Settings > Preferences > Proxies.
- Desktop Mode: Runs automation on your local device using your IP address.
Tip: Desktop mode saves cloud runtime credits and gives more control over the process.
{% custom-image src="https://v2-web-assets.s3.us-east-1.amazonaws.com/Common/cloud-or-desktop-execution/cloud-or-desktop-execution.png" alt="Choose-Cloud-or-Desktop-Execution" /%}
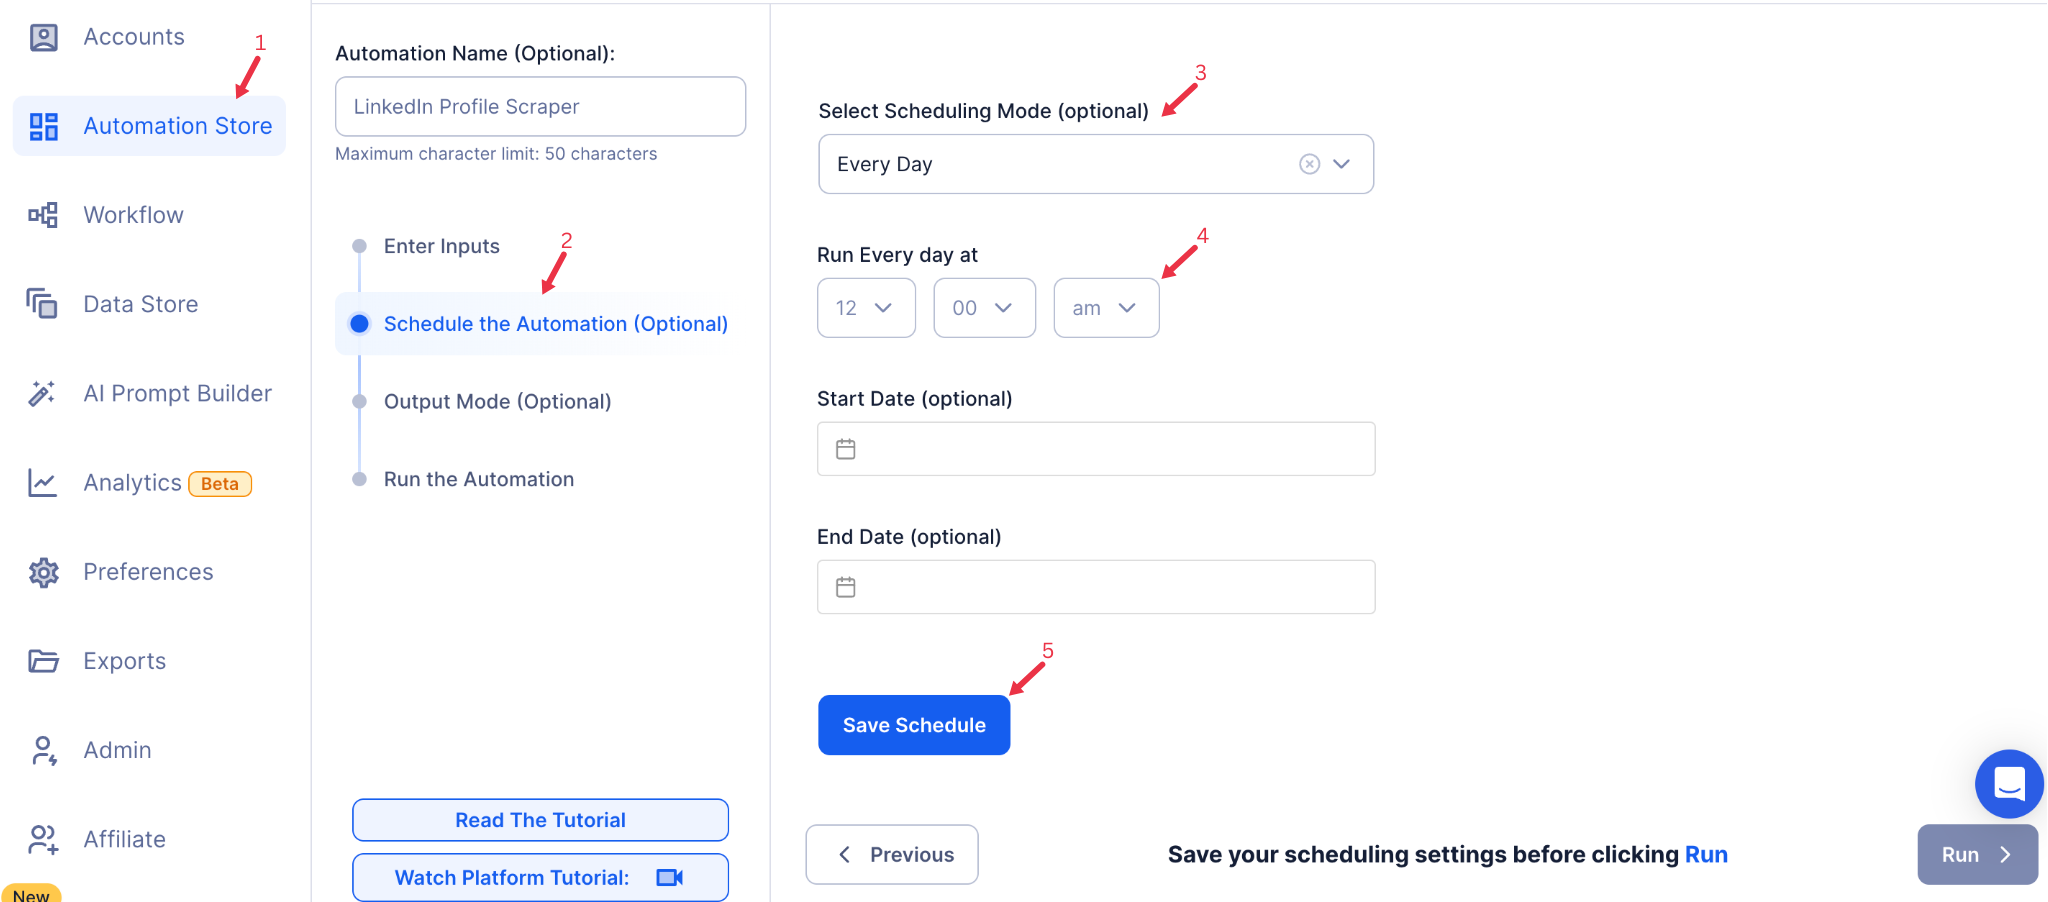
Step 5: Schedule the Automation (Optional)
Configure a schedule to run the summarization task at your preferred time or frequency. Click Schedule and choose one of the following options:
- None
- At Regular Intervals (e.g., every 12 hours)
- Once
- Every Day
- On Specific Days of the Week (e.g., Monday, Wednesday)
- On Specific Days of the Month (e.g., the 5th and 25th)
- On Specific Dates (e.g., January 15)
Tip: Use the scheduling feature for recurring tasks like summarizing weekly reports or monitoring updates on web pages.
{% custom-image src="https://v2-web-assets.s3.us-east-1.amazonaws.com/Common/schedule-the-automation/schedule-the-automation.png" alt="schedule-the-automation" /%}
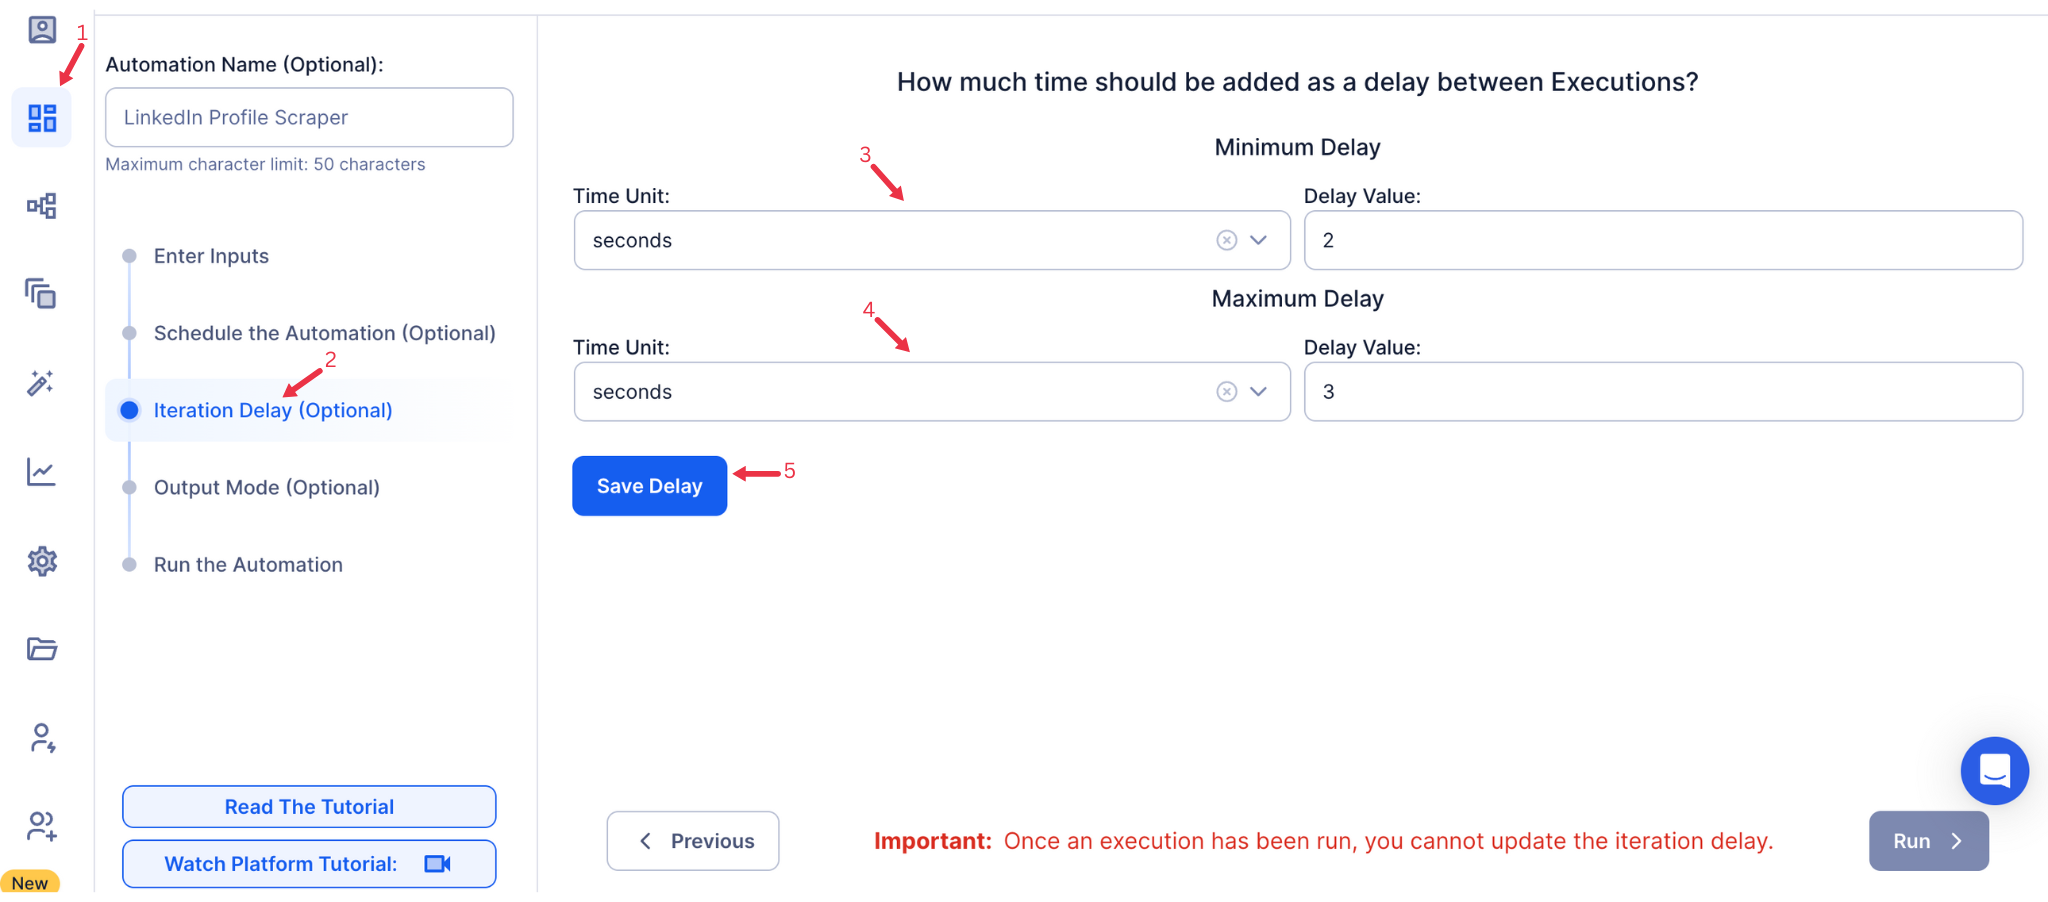
Step 6: Set an Iteration Delay (Optional)
To simulate a natural pace and prevent API throttling, configure an Iteration Delay. Set Minimum Delay and Maximum Delay values to vary the time interval between each summarization task. You can choose seconds, minutes, or hours as the delay units.
{% custom-image src="https://v2-web-assets.s3.us-east-1.amazonaws.com/Common/iteration-delay/iteration-delay.png" alt="iteration-delay" /%}
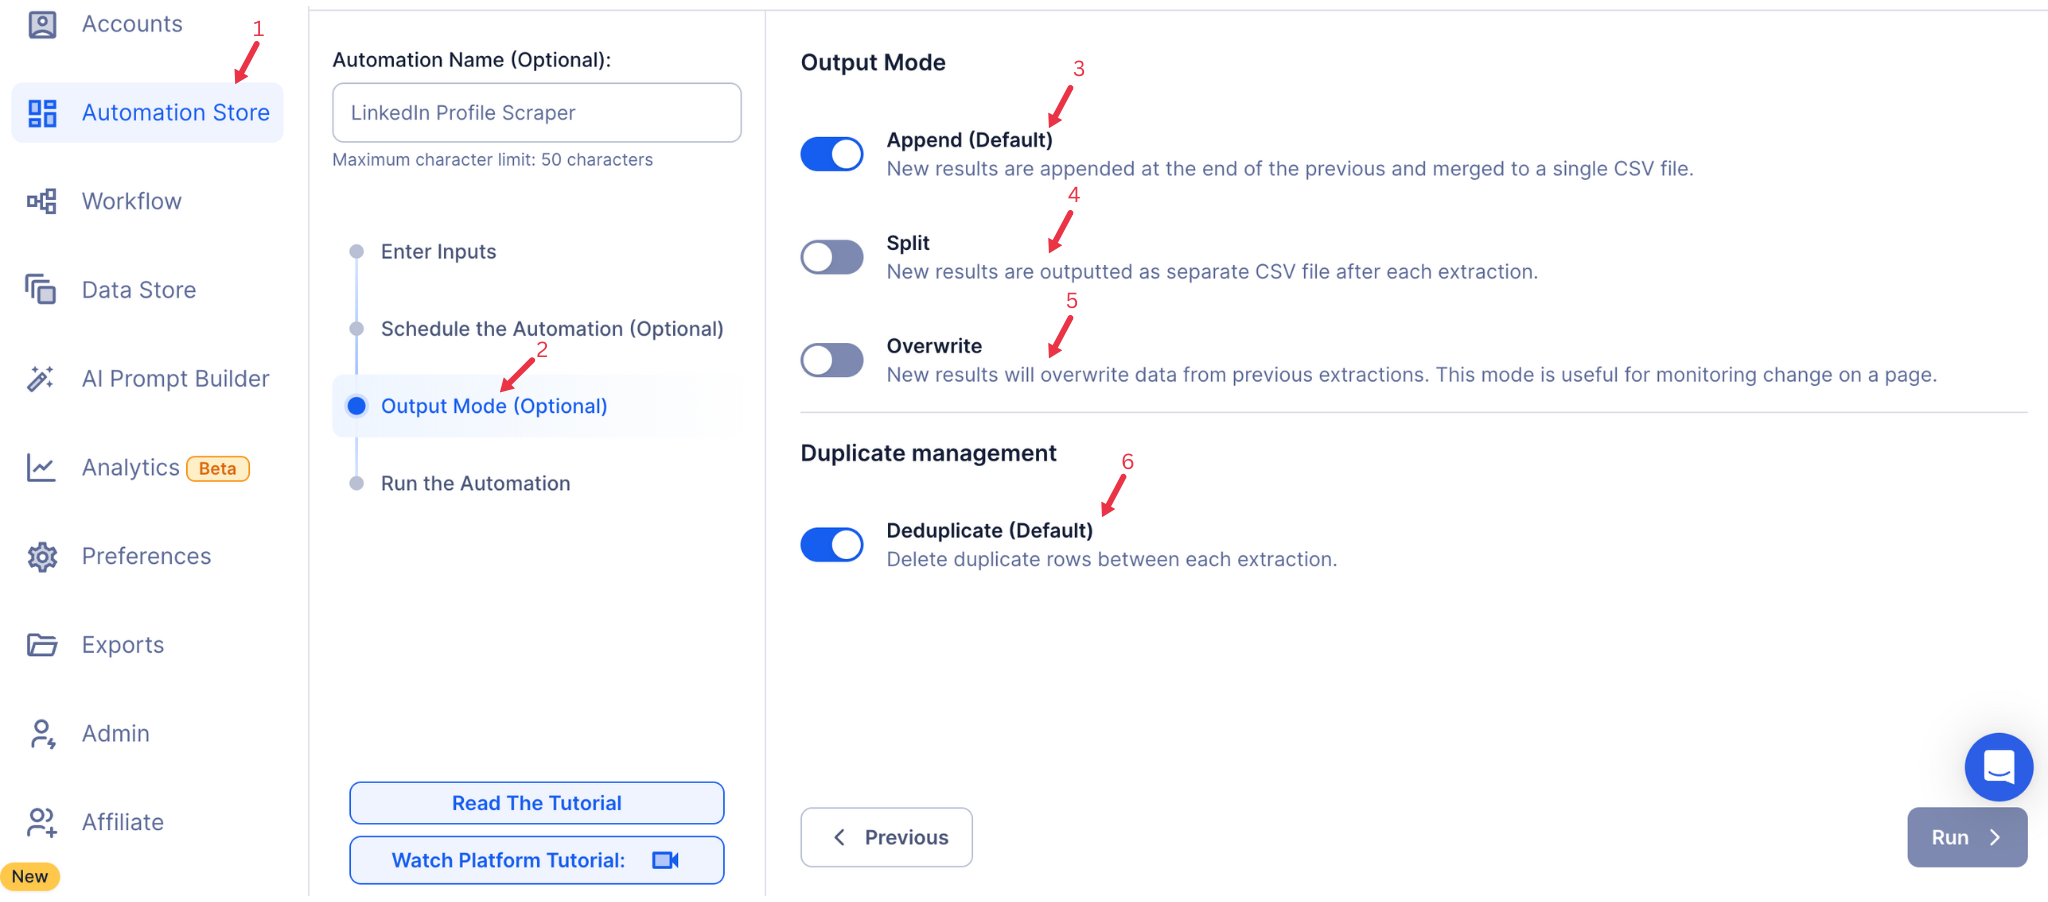
Step 7: Choose Your Output Mode (Optional)
Decide how you want to manage and export the summarized data:
- Export Options: Choose to export data directly to Google Sheets or a CSV file for convenient storage and analysis.
- Output Management:
- Append (Default): Add new summaries to the existing file.
- Split: Create a new file for each automation run.
- Overwrite: Replace previous summaries with the latest results.
- Duplicate Management: Enable Deduplicate to avoid processing duplicate entries from your input.
Tip: Exporting to Google Sheets ensures collaborative tracking and easy sharing of summarized content.
{% custom-image src="https://v2-web-assets.s3.us-east-1.amazonaws.com/Common/output-mode/output-mode.png" alt="output-mode" /%}
Step 8: Access the Data from the Data Store
Once the automation is complete, navigate to the Data Store section in TexAu. Locate the AI Sentiment Analysis automation and click See Data to view or download the summarized results.
Screenshot Suggestion: Show the Data Store screen with the "See Data" button highlighted.
The AI Sentiment Analysis automation is a powerful tool for uncovering emotional insights in textual data. Whether you’re monitoring customer reviews, social media sentiment, or feedback forms, this automation provides actionable insights to refine strategies and make informed decisions. With customizable scheduling, input options, and output modes, TexAu makes sentiment analysis efficient and scalable for businesses.
Run this automation on your own server.
TexAu V3 doesn't host social-platform automations anymore — but the runnable code is yours. Tell us your inputs, outputs, and target environment, and we'll ship you a working version you can deploy and operate yourself.