Find An Email Address
Find email addresses easily with TexAu’s verified email lookup tool. Supports bulk search, CRM export, and seamless automation for outreach.
Last updated
In today’s digital-first sales and marketing environment, having access to accurate and verified email addresses is crucial for lead generation, sales prospecting, and business outreach. However, manually searching for and verifying emails can be an incredibly time-consuming task, often resulting in
In today’s digital-first sales and marketing environment, having access to accurate and verified email addresses is crucial for lead generation, sales prospecting, and business outreach. However, manually searching for and verifying emails can be an incredibly time-consuming task, often resulting in outdated or incorrect data.
TexAu’s Find an Email Address automation is designed to solve this challenge by automating the discovery of professional email addresses using various data points such as names, company domains, and LinkedIn profiles. This tool simplifies email lookup, enhances lead data accuracy, and integrates seamlessly with CRMs and outreach platforms, allowing businesses to scale their email prospecting efforts efficiently.
This guide explores how TexAu’s Find an Email Address tool works, its key features, challenges it addresses, and the benefits it provides to sales, marketing, and recruitment teams. Additionally, we will cover best practices, metrics to track, and tips for maximizing results.
Key Features of TexAu’s Find an Email Address Tool
1. Email Discovery Using Multiple Data Points
TexAu’s automation tool is built to locate emails using different search inputs, ensuring high accuracy and a greater success rate. The following data points can be used to find an email address:
- Full Name & Company Domain – Enter a prospect’s name and company domain to identify their corporate email address.
- LinkedIn Profile URL – Extract email addresses directly from LinkedIn profiles.
- Company Website – Find potential email addresses from company domains and employee directories.
**Example Use Case:**A sales team at a B2B SaaS company wants to reach out to CFOs of Fortune 500 companies. Instead of manually searching for email addresses, they input CFO names and company domains into TexAu, retrieving verified corporate email addresses within minutes.
2. Bulk Email Lookup for Large-Scale Prospecting
Instead of looking up one email at a time, TexAu allows users to search for hundreds or thousands of email addresses simultaneously.
**Example Use Case:**A marketing agency planning an ABM (Account-Based Marketing) campaign needs to contact 500+ marketing directors from mid-sized SaaS companies. Using TexAu’s bulk lookup, they retrieve verified emails from LinkedIn profiles in one session, saving days of manual work.
3. Automated Email Pattern Matching & Validation
TexAu analyzes common corporate email patterns (e.g., [email protected]) and uses domain-based validation to identify valid email structures.
- Identifies industry-standard email formats.
- Verifies email deliverability in real-time.
- Detects catch-all and role-based emails (e.g., info@, support@).
**Example Use Case:**A recruiter looking to hire senior engineers at Google inputs LinkedIn profiles into TexAu, which detects and validates the engineers' emails based on company patterns.
4. Seamless Data Export & CRM Integration
Once email addresses are discovered and verified, they can be exported to CSV, Google Sheets, or directly integrated into CRM tools like HubSpot, Salesforce, and Pipedrive.
**Example Use Case:**A sales team uses TexAu to find 1,000+ verified emails of potential customers and directly syncs them into Salesforce, assigning leads to sales reps for outreach.
5. Scheduling & Automation for Recurring Searches
TexAu allows users to automate email lookups on a scheduled basis, ensuring their contact lists are always fresh and accurate.
**Example Use Case:**A startup founder wants to identify and reach out to potential investors every month. They set up an automated email lookup workflow that refreshes investor email lists weekly, keeping their outreach efforts efficient.
6. Real-Time Email Validation for Accuracy
TexAu’s email validation ensures that found email addresses are:
- Deliverable & Active – Can receive emails without bouncing.
- Catch-All or Risky – Identifies domains that accept all emails but may not be legitimate.
- Temporary or Disposable – Detects fake emails often used for spam.
**Example Use Case:**A cold email campaign manager verifies that 95% of found emails are deliverable before launching a campaign, improving open rates and reducing bounces.
Challenges Addressed by TexAu’s Find an Email Address Tool
1. Finding Decision-Makers’ Emails Manually is Time-Consuming
One of the biggest challenges faced by sales teams, marketers, and recruiters is finding the correct email addresses of key decision-makers. Traditionally, professionals spend hours scouring LinkedIn profiles, company websites, and email databases in an attempt to find the right contact information. Even after gathering email addresses, there's still a high chance that some may be outdated, incorrect, or belong to the wrong person.
TexAu eliminates this manual effort by automating email discovery, allowing users to find professional email addresses in just a few clicks. Instead of spending hours on research, users can input key details—such as a person’s name, LinkedIn profile, or company domain—and TexAu will generate accurate email addresses within minutes.
Example Use Case
A business development executive at a SaaS company is tasked with reaching out to potential partners in the healthcare industry. Manually searching for the email addresses of decision-makers at 200 different hospitals would take several days. By using TexAu’s Find an Email Address automation, they retrieve all emails within minutes, allowing them to focus on personalized outreach instead of tedious research.
2. High Bounce Rates Due to Invalid Emails
Sending emails to invalid or non-existent addresses can significantly harm email deliverability, reduce engagement rates, and negatively impact sender reputation. If too many emails bounce, email service providers (ESPs) may flag your domain as spam, making it even harder for future emails to reach inboxes.
TexAu addresses this issue with built-in email validation, ensuring that only real, verified email addresses are used. It checks email addresses for validity, existence, and potential spam traps before adding them to a mailing list. This reduces bounce rates and enhances the chances of emails landing in recipients’ inboxes.
Example Use Case
A startup launching a new SaaS product prepares an email campaign targeting 5,000 potential leads. If 20% of these emails are invalid, the campaign would suffer a high bounce rate, damaging their sender reputation. By running the list through TexAu’s email verification, they remove all invalid contacts, ensuring only verified, deliverable emails are used. As a result, their email open rate improves by 30%, and the campaign performs significantly better.
3. Scattered & Incomplete Lead Data
Many businesses struggle with inconsistent, fragmented lead data spread across multiple sources like spreadsheets, CRM systems, LinkedIn connections, and email databases. This makes it difficult to keep track of updated contacts, leading to inefficiencies and wasted outreach efforts.
TexAu helps solve this problem by consolidating email contacts into a structured, easy-to-manage format. Users can export found email addresses into Google Sheets, CSV files, or directly integrate with CRM platforms like HubSpot, Salesforce, and Pipedrive. This ensures that teams always work with clean, organized, and up-to-date contact lists.
Example Use Case
A recruitment agency maintains candidate contact information in multiple spreadsheets and CRM platforms. Many of these emails are outdated, and some are missing entirely. Using TexAu’s Find an Email Address automation, they retrieve accurate, verified emails for 1,000+ candidates and seamlessly update their CRM. This results in faster, more efficient hiring processes and improved communication with job seekers.
Benefits of Using TexAu’s Find an Email Address Automation
1. Faster Lead Generation & Sales Prospecting
For sales professionals, speed is everything. The ability to quickly find and verify email addresses can be the difference between closing a deal and losing a prospect. TexAu’s automation speeds up the process, allowing sales teams to find decision-makers’ emails instantly, rather than spending days manually searching.
Example Use Case
A cybersecurity sales team wants to reach out to CISOs (Chief Information Security Officers) at Fortune 1000 companies. Instead of searching manually, they use TexAu to input company domains and names, retrieving verified email addresses for hundreds of CISOs within minutes. As a result, the team saves 50% of their time on prospecting, allowing them to focus on engaging leads and closing deals.
2. Improved Email Deliverability & Reduced Bounce Rates
Having a list of email addresses is not enough—ensuring those emails are valid and deliverable is crucial for effective outreach. TexAu not only finds email addresses but also verifies their validity in real-time. This ensures that users are not sending emails to dead or non-existent addresses, which can harm sender reputation and reduce engagement rates.
Example Use Case
A tech startup launching a new product plans to send an email campaign to 10,000 potential customers. However, a previous campaign had a high bounce rate of 15%, affecting their email deliverability. Before launching the new campaign, they use TexAu to validate every email address. After removing invalid contacts, their bounce rate drops to below 2%, leading to a 30% increase in email open rates.
3. Enhanced CRM Enrichment & Lead Data Accuracy
CRMs are only as effective as the data they contain. Outdated, incorrect, or incomplete contact information can result in ineffective sales efforts and wasted time. TexAu ensures that businesses maintain clean, updated lead data by continuously discovering and verifying email addresses.
Example Use Case
A recruitment agency specializing in executive hires realizes that many of the email addresses in their CRM are no longer in use. They use TexAu to find and update verified contact information for over 500 executives, improving communication efficiency and candidate engagement.
4. Time-Saving Automation for Large-Scale Outreach
For businesses conducting large-scale email outreach, manually searching and verifying thousands of emails is impractical. TexAu automates this process, allowing users to extract and validate thousands of emails in minutes, freeing up valuable time for more strategic tasks.
Example Use Case
A growth hacking agency that specializes in cold outreach needs to contact 1,000+ potential clients per week. Instead of manually researching emails, they use TexAu’s bulk email lookup feature to extract verified email addresses from LinkedIn profiles and company domains. This allows them to scale their outreach efforts without spending hours on research.
5. More Targeted & Personalized Outreach
When businesses reach out to the wrong contacts or use outdated information, engagement rates suffer. TexAu ensures that only accurate, relevant emails are used, allowing sales and marketing teams to personalize their outreach based on verified contacts.
Example Use Case
A fintech startup wants to connect with potential investors. Instead of sending generic mass emails, they use TexAu to find accurate email addresses of VCs and angel investors. With personalized messaging and verified contact data, they achieve a 30% increase in response rates, leading to more investor meetings and funding opportunities.
TexAu’s Find an Email Address automation tool is a must-have for sales, marketing, and recruitment teams looking to scale their outreach efforts efficiently. By automating email discovery, verifying accuracy, and integrating with CRM tools, TexAu helps businesses:
- Save time by automating email research and validation.
- Improve email deliverability by reducing bounce rates.
- Enrich CRM databases with up-to-date contact information.
- Scale outreach efforts for sales, marketing, and hiring.
- Boost engagement rates through accurate and targeted messaging.
For organizations looking to enhance lead generation, sales prospecting, and business outreach, TexAu provides a powerful, scalable, and reliable solution to find and verify email addresses with ease.
Use Cases for TexAu’s Find an Email Address Tool
1. Sales Teams & SDRs – Boost Cold Outreach with Verified Decision-Maker Emails
Sales Development Representatives (SDRs) and sales teams heavily depend on email outreach to connect with potential clients and close deals. However, the biggest challenge is finding the right contacts at target companies—especially decision-makers like CEOs, VPs, and Directors.
How TexAu Helps Sales Teams
- Automates the process of finding decision-makers' email addresses.
- Ensures email accuracy to avoid bounces and spam traps.
- Integrates with CRMs like HubSpot and Salesforce for seamless lead management.
Example Use Case
A SaaS sales team wants to pitch their new B2B platform to VPs of IT at enterprise software firms. Instead of spending hours searching LinkedIn for contact details, they use TexAu’s Find an Email Address tool to quickly locate and verify email addresses. This allows them to launch their cold outreach campaign faster, resulting in higher response rates and more booked sales meetings.
Key Benefit
Sales reps save 50% of their time on lead research, allowing them to focus on closing deals instead of hunting for emails.
2. Marketing Teams – Enrich CRM & Run Highly Targeted Email Campaigns
Marketing teams rely on email outreach to connect with potential customers, influencers, and partners. However, email marketing campaigns are only as effective as the quality of the email list. Many businesses struggle with outdated, incorrect, or missing contacts, leading to low open rates and poor engagement.
How TexAu Helps Marketing Teams
- Enriches CRM databases with verified and up-to-date email addresses.
- Helps build high-quality email lists for lead nurturing and promotional campaigns.
- Increases email open and response rates by targeting the right audience.
Example Use Case
A fintech marketing team wants to partner with influencers to promote a new product. They use TexAu’s Find an Email Address automation to quickly discover and verify fintech bloggers’ and YouTube influencers’ emails. With a validated contact list, they run a successful partnership email blast, securing collaborations with top influencers in their niche.
Key Benefit
100% deliverability for email launch campaigns, resulting in higher engagement and conversion rates.
3. Recruiters & HR Professionals – Find Candidate Emails for Hiring Outreach
Recruiters and HR professionals need accurate candidate contact information to efficiently source and connect with top talent. However, many professionals do not list their emails publicly, making outreach challenging and time-consuming.
How TexAu Helps Recruiters
- Finds corporate email addresses of potential candidates for direct outreach.
- Verifies email addresses to ensure recruiters reach active inboxes.
- Reduces time spent manually searching LinkedIn and other job platforms.
Example Use Case
A tech recruiter is hiring for a leading AI startup and wants to reach out to top software engineers. Many candidates only list LinkedIn profiles with no visible email addresses. Using TexAu, the recruiter finds and verifies their corporate emails, allowing them to contact top candidates directly and speed up the hiring process.
Key Benefit
Recruiters increase response rates and reduce hiring time by reaching the right candidates faster.
4. Growth Hackers & Business Owners – Automate Email Discovery for Business Development
Startups, business owners, and growth hackers need effective outreach strategies for fundraising, partnerships, and customer acquisition. Finding the right investors, partners, and clients can be time-consuming without the right tools.
How TexAu Helps Growth Hackers & Business Owners
- Automates the process of finding potential partners’ and investors’ emails.
- Helps startups connect with venture capitalists (VCs) and angel investors.
- Finds and validates customer emails for targeted growth campaigns.
Example Use Case
A startup founder is raising Series A funding and needs to connect with potential investors. Instead of manually searching for contact details, they use TexAu to locate and verify investor emails from VC firms. With this verified email list, they send personalized funding outreach emails, increasing their chances of securing investor meetings.
Key Benefit
Automates investor outreach, helping startups raise funds more efficiently.
Best Practices for Maximizing TexAu’s Email Lookup Tool
To get the most out of TexAu’s Find an Email Address automation, follow these best practices:
-
Use Multiple Data Points –
Combine name, company domain, and LinkedIn profile to improve email accuracy.
-
Verify Before Sending Emails –
Always run emails through TexAu’s email verification to reduce bounce rates.
-
Export & Integrate with CRM –
Keep email databases updated by automatically syncing verified emails into CRM tools like HubSpot, Salesforce, and Pipedrive.
Metrics & Tracking for Email Lookup Success
To measure the effectiveness of your email discovery and outreach, track these key metrics:
Email Discovery Success Rate –
Measures how many found emails are valid and deliverable.
Deliverability Improvements –
Tracks how verified emails improve inbox placement and reduce bounce rates.
Lead Conversion Rate –
Measures how accurate email discovery improves sales performance and customer acquisition.
Example Tracking Scenario
A B2B sales team runs an email lookup campaign targeting 500 leads. Initially, their bounce rate was 12%. After validating emails with TexAu, the bounce rate drops to below 2%, and their response rate increases by 20%.
Tips for Maximizing Results with TexAu’s Email Lookup
Combine Multiple Search Inputs –
- Use LinkedIn profiles, domains, and names for higher accuracy.
Run Regular Lookups –
- Email databases degrade over time; re-verify contacts monthly.
Export Verified Emails to CRM & Outreach Tools –
- Automate email list updates for seamless lead nurturing.
TexAu’s Find an Email Address automation is an indispensable tool for sales teams, marketers, recruiters, and business owners. By automating email discovery and verification, TexAu helps professionals:
- Save hours of manual research and focus on high-value tasks.
- Reduce bounce rates and improve email deliverability with verified contacts.
- Scale outreach efforts efficiently for sales, marketing, and hiring.
- Enhance lead quality and CRM data accuracy for long-term business growth.
Conclusion: Why TexAu’s Email Lookup Tool is Essential for Growth
TexAu’s Find an Email Address automation is a game-changer for sales, marketing, and recruitment teams looking to scale their outreach efforts efficiently. By automating email discovery, ensuring accuracy, and integrating with CRMs, TexAu enables businesses to enhance lead generation, improve email deliverability, and drive higher conversions.
For teams looking to streamline their prospecting efforts, TexAu provides an essential competitive advantage in today’s fast-paced digital landscape
The Find an Email Address automation allows you to find email addresses associated with individuals or companies using their names, domains, or LinkedIn profiles. This tool is ideal for sales managers, marketers, recruiters, and growth hackers looking to streamline outreach, build lead lists, or enhance CRM data. TexAu supports bulk input options, scheduling, and seamless data export to Google Sheets or CSV, with execution available on cloud or desktop.
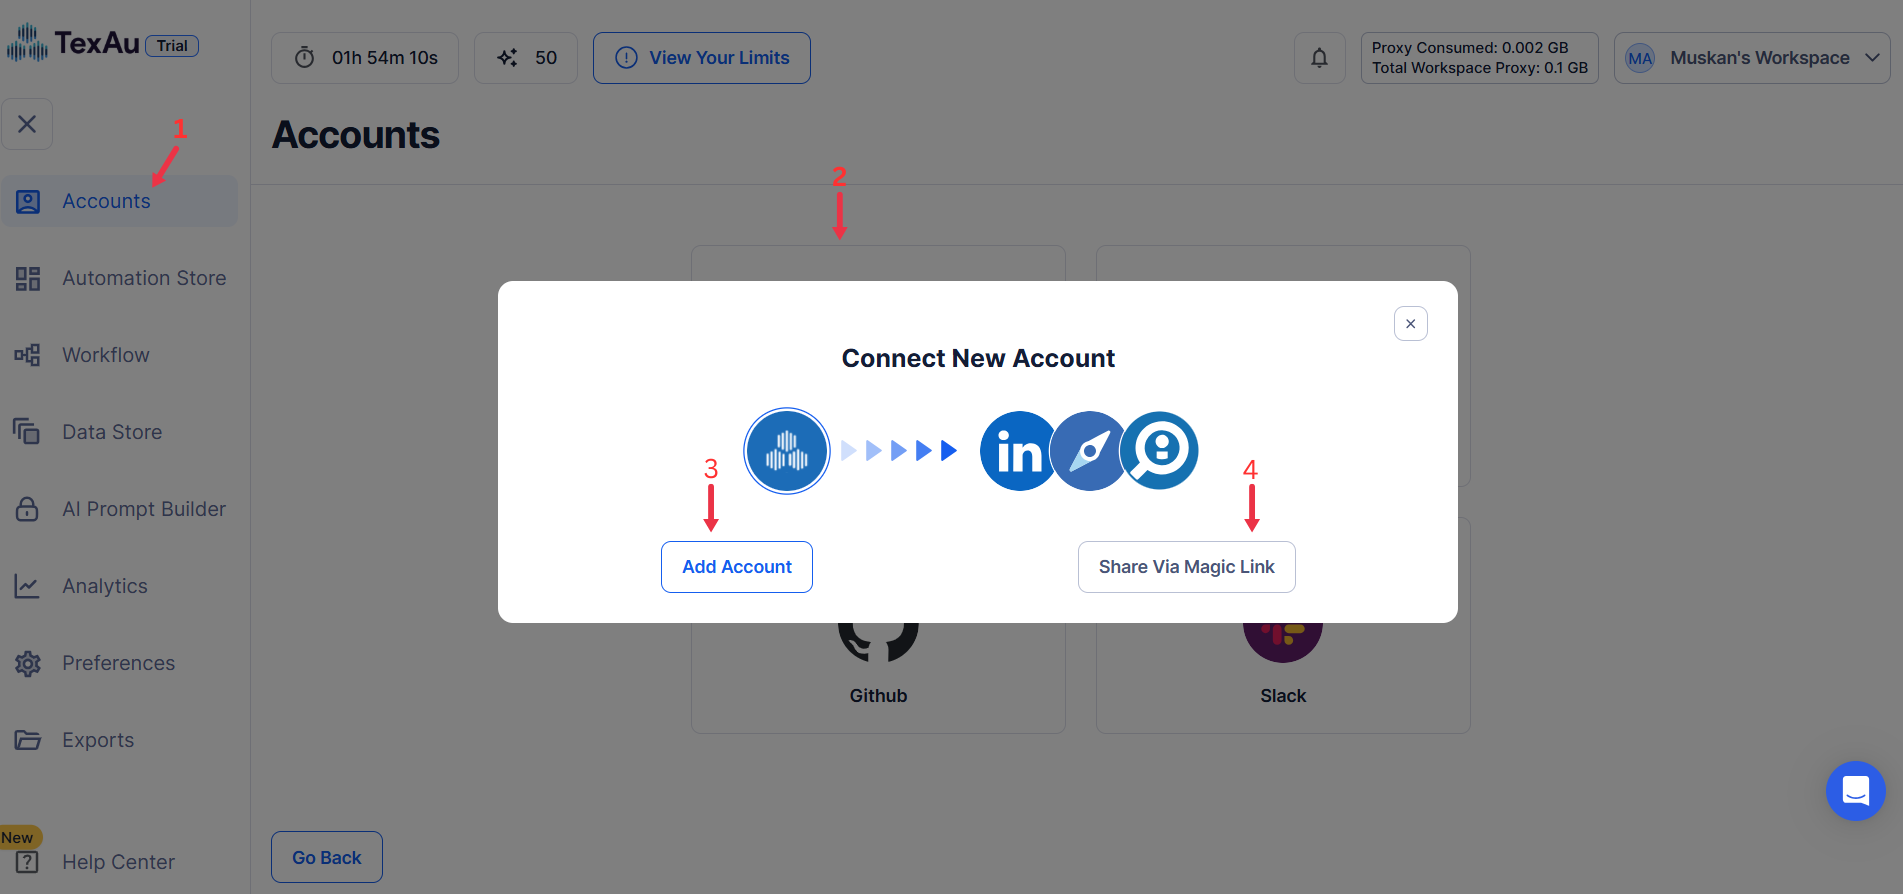
Step 1: Log in to the TexAu App and Connect LinkedIn
Connect your LinkedIn account to ensure TexAu can access relevant information. Click Add Account and select LinkedIn. TexAu offers two secure connection methods:
- Magic Link: Sends a secure login link to your email, providing quick access without managing cookies.
- Add Account Using Browser Extension: Log in through TexAu’s browser extension for seamless integration and direct access.
Tip: Use Magic Link for a fast and straightforward connection without additional steps.
{% custom-image src="https://v2-web-assets.s3.us-east-1.amazonaws.com/Automations/find-email-address/find-email-address.png" alt="search-for-the-particular-email-automation" /%}
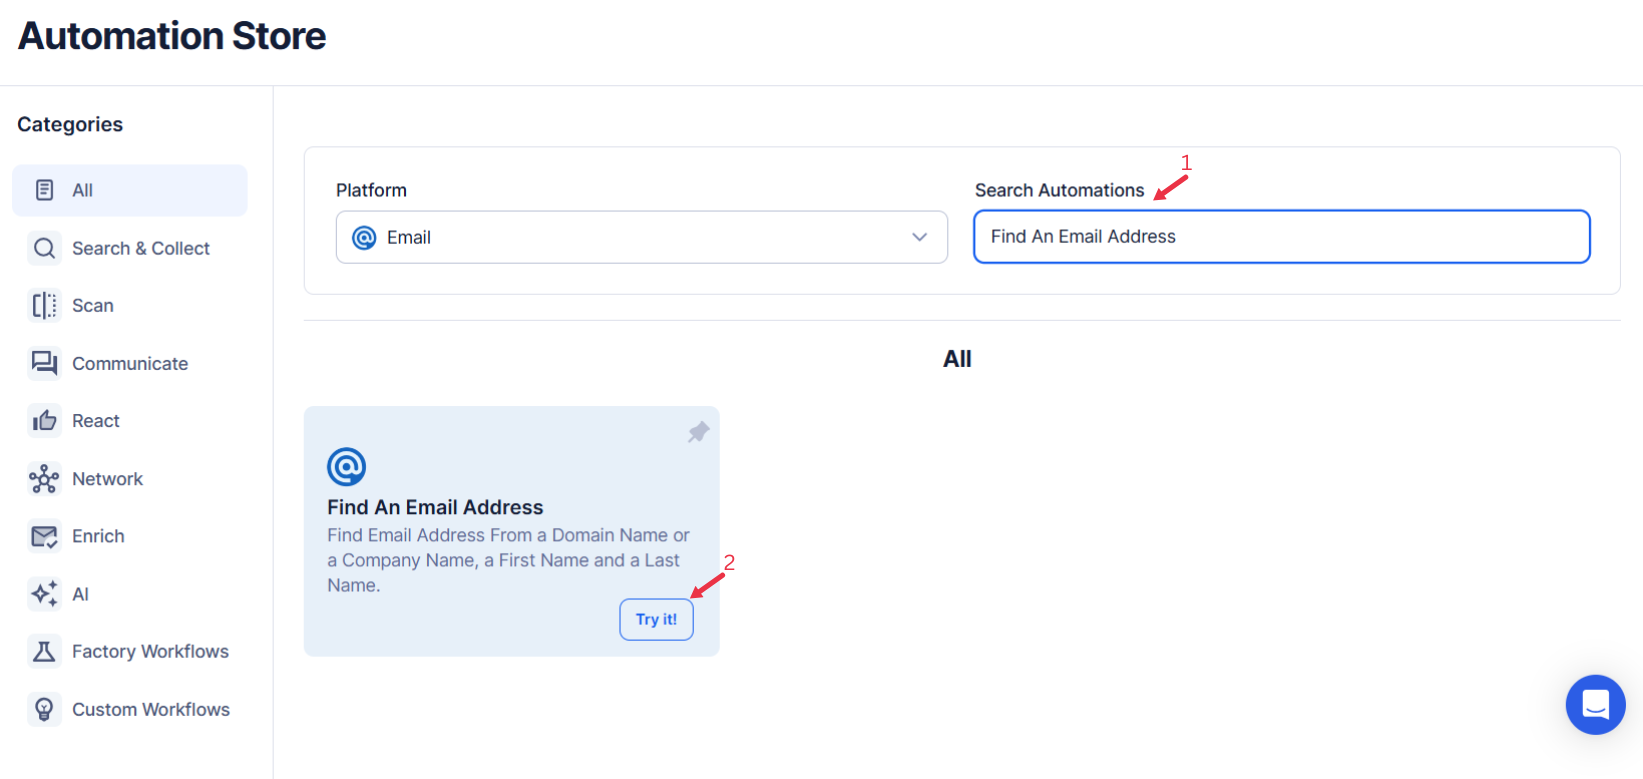
Step 2: Locate the Automation
Log in to your TexAu account at v2-prod.texau.com. Navigate to the Automation Store and enter "find-email-address" in the search bar to locate this tool, which helps you discover websites for a list of companies.
{% custom-image src="https://v2-web-assets.s3.us-east-1.amazonaws.com/Common/log-in-to-texau-and-connect-linkedin/connect-linkedin.png" alt="connect-linkedin" /%}
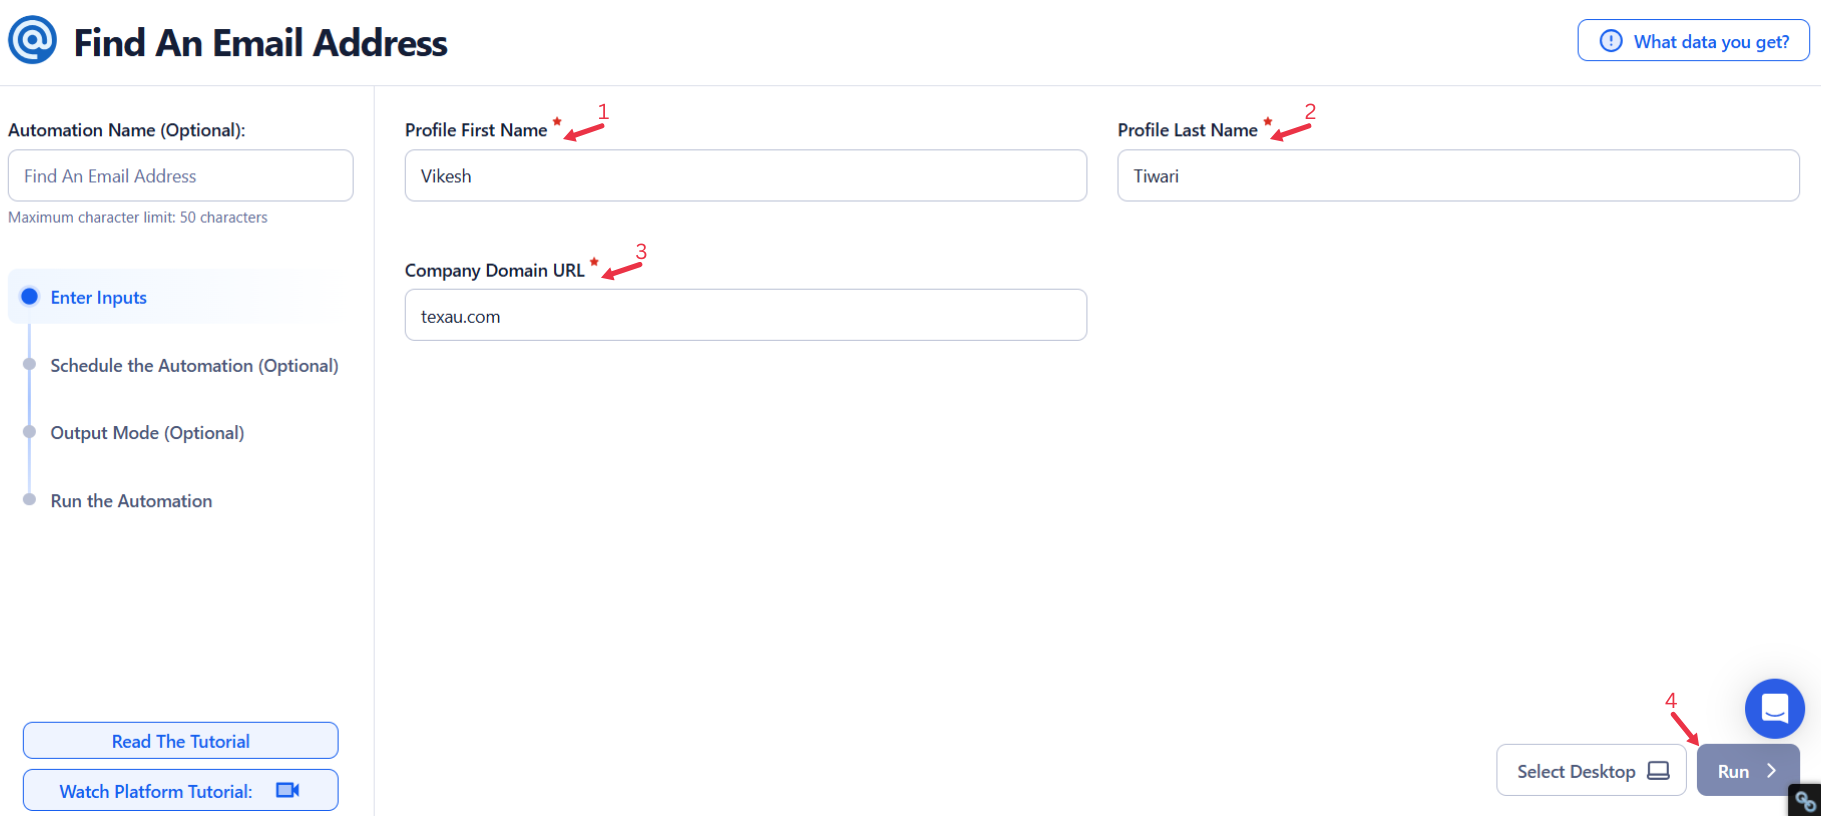
Step 3: Select Your Input Source
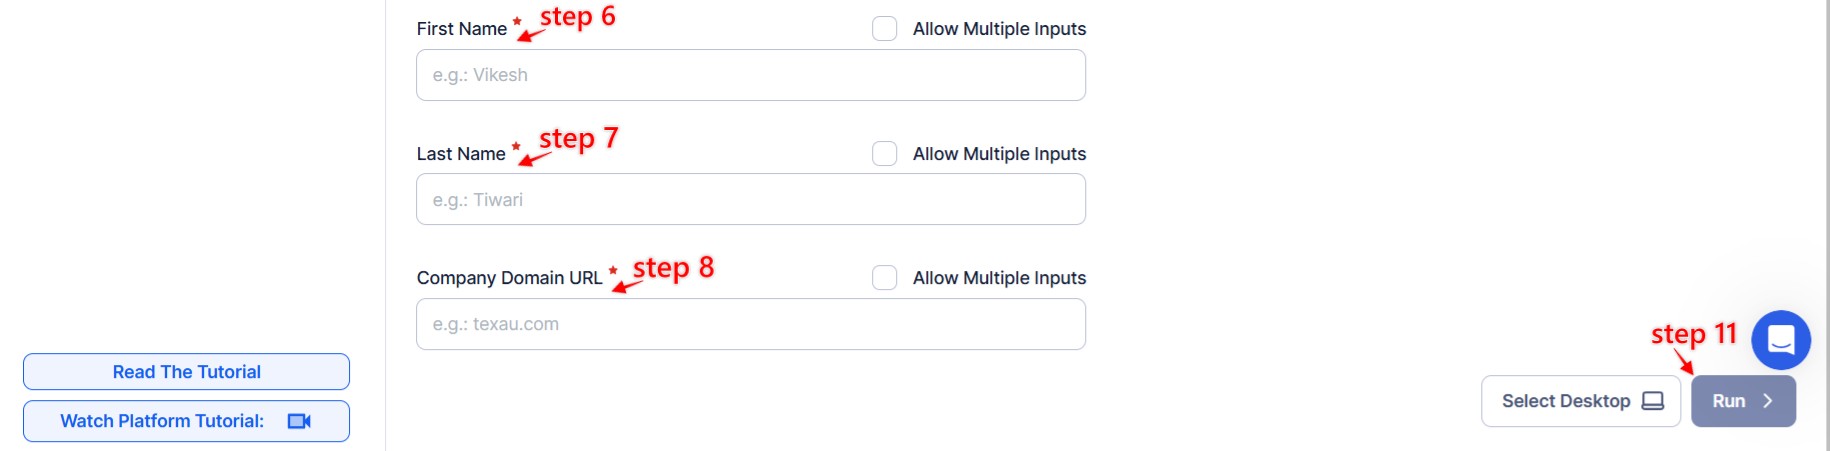
TexAu simplifies the process of finding email addresses by extracting them based on profile details and domain. This tool can be used to locate specific email addresses efficiently.
Single Input
Use this option to find an email address for a single profile.
- First Name: Enter the first name of the person.
- Last Name: Enter the last name of the person.
- Domain/Website URL: Enter the company domain or website URL to search within.
{% custom-image src="https://v2-web-assets.s3.us-east-1.amazonaws.com/Automations/find-email-address/find-email-address-single-inputs.png" alt="enter-a-single-input" /%}
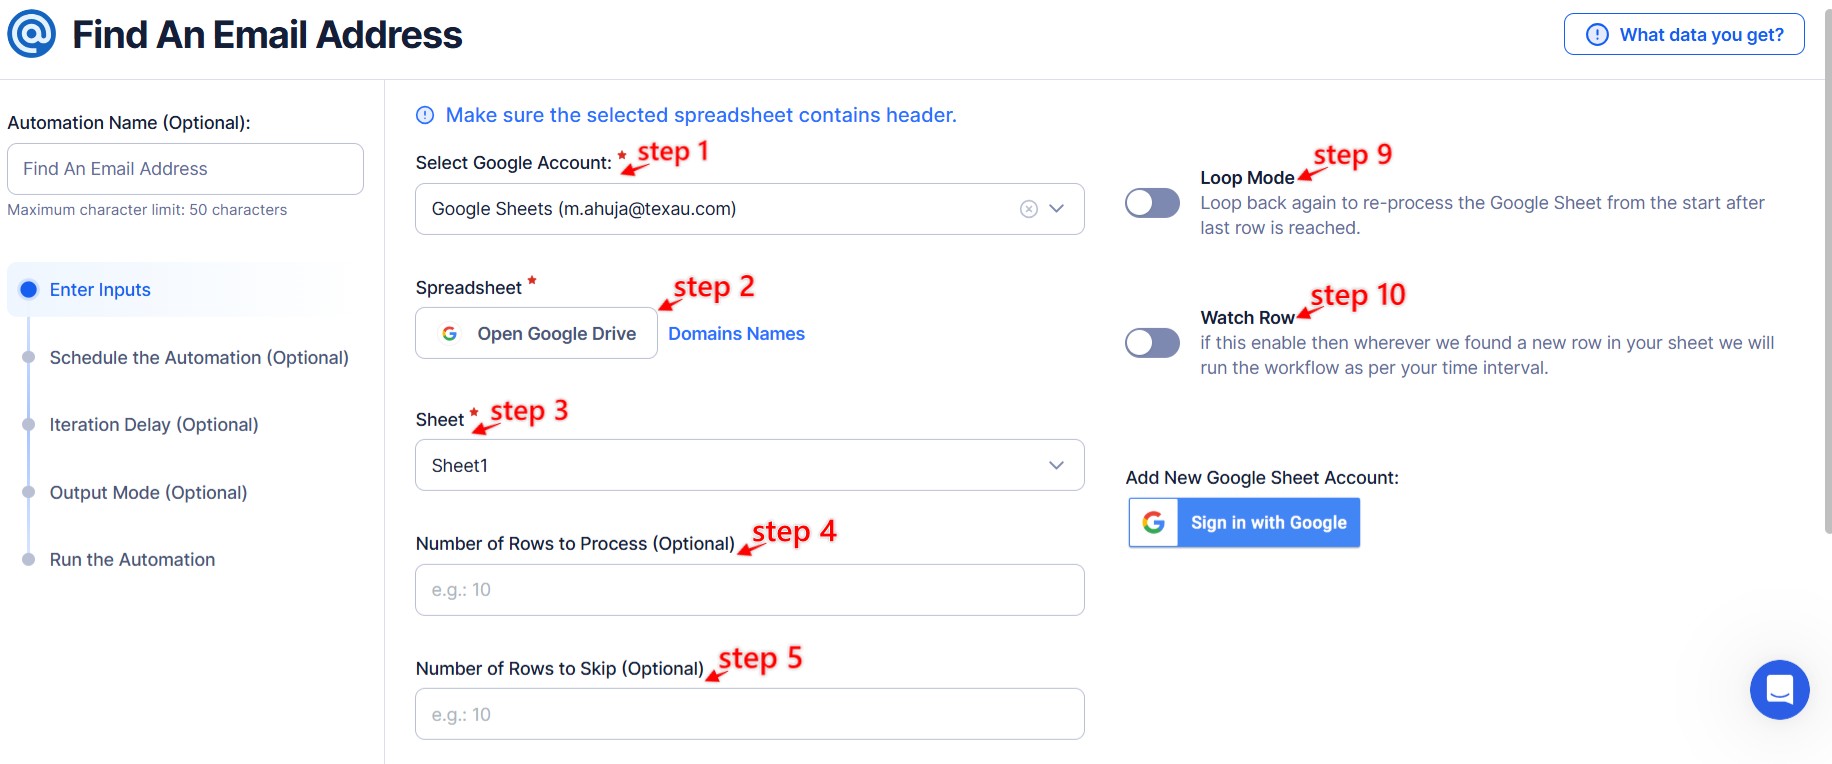
Google Sheets
This option is ideal for processing multiple profiles stored in a Google Sheet.
Connect your Google Account
- Click Select Google Account to choose your connected account or add a new one using Add New Google Sheet Account.
Select Your Spreadsheet
- Click Open Google Drive to locate the Google Sheet containing profile details.
- Choose the spreadsheet and the specific sheet where your data is stored.
Adjust Processing Options
- Number of Rows to Process (Optional): Define the number of rows of data to process.
- Number of Rows to Skip (Optional): Specify rows to skip if necessary.
Provide Input Details
- Ensure the columns contain valid first names, last names, and domains.
Watch Row (Optional)
With Watch Row, automation ensures data is always processed in real-time by scanning Google Sheets at regular intervals. When a row is added, the automation runs without delay.
To configure, choose a scan frequency and set the start and end dates.
Watch Row Schedule:
- None
- At Regular Intervals (e.g., every 15 minutes or every hour)
- Once
- Every Day
- On Specific Days of the Week (e.g., every Tuesday and Friday)
- On Specific Days of the Month (e.g., the 3rd and 18th)
- On Specific Dates (e.g., October 25)
The system detects updates every 15 minutes and stops checking after five days, unless modified.
{% custom-image src="https://v2-web-assets.s3.us-east-1.amazonaws.com/Automations/find-email-address/find-an-email-address-1-google-sheet.jpeg" alt="use-google-sheets-for-bulk-input" /%}
{% custom-image src="https://v2-web-assets.s3.us-east-1.amazonaws.com/Automations/find-email-address/find-an-email-address-2-google-sheet.jpeg" alt="use-google-sheets-for-bulk-input" /%}
CSV File
Use this option to process a static list of profiles stored in a CSV file.
- Upload the File
- Click Upload CSV File and select the file containing profile details.
- TexAu will preview the content for verification.
- Adjust Processing Settings
- Number of Rows to Process (Optional): Define the number of rows to process.
- Number of Rows to Skip (Optional): Specify rows to skip if necessary.
- Provide Input Details
- Ensure the correct columns contain valid first names, last names, and domains.
Tip: Use Google Sheets for dynamic or frequently updated lists and CSV files for static data.
{% custom-image src="https://v2-web-assets.s3.us-east-1.amazonaws.com/Common/texau-input-source-options.png" alt="Find An Email Address" /%}
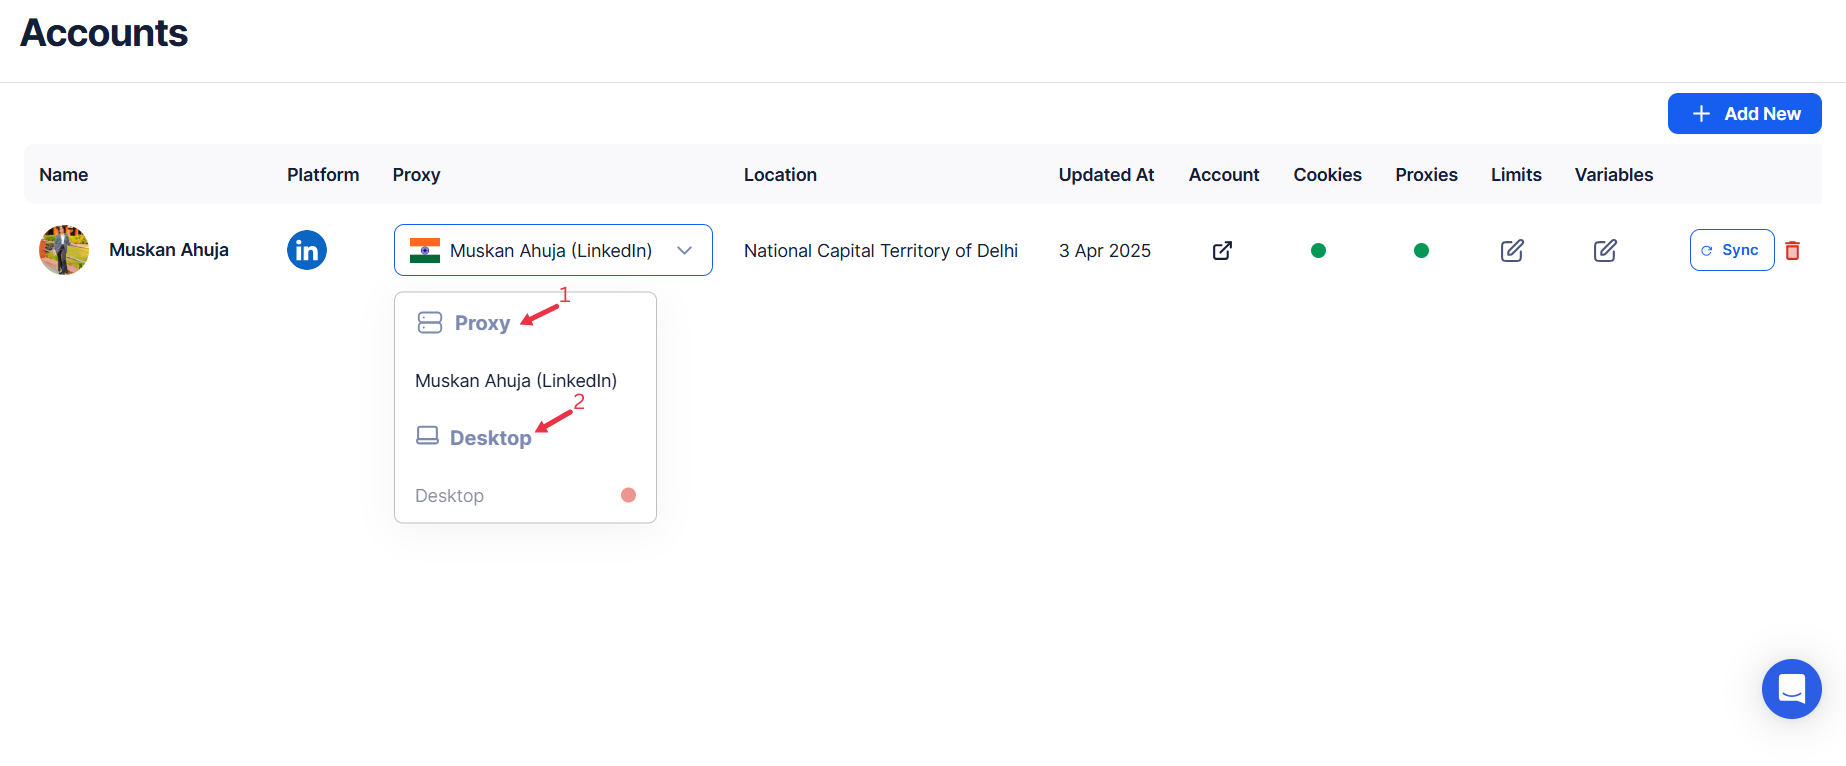
Step 3: Execute Automations on TexAu Desktop or Cloud
- Open the automation setup and select Desktop Mode.
- Click Choose a Desktop to Run this Automation.
- From the platform, select your connected desktop (status will show as "Connected") or choose a different desktop mode or account.
- Click “Use This” after selecting the desktop to run the automation on your local system.
- Alternatively, if you wish to run the automation on the cloud, click Run directly without selecting a desktop.
{% custom-image src="https://v2-web-assets.s3.us-east-1.amazonaws.com/Common/cloud-or-desktop-execution/cloud-or-desktop-execution.png" alt="choose-cloud-or-desktop-execution" /%}
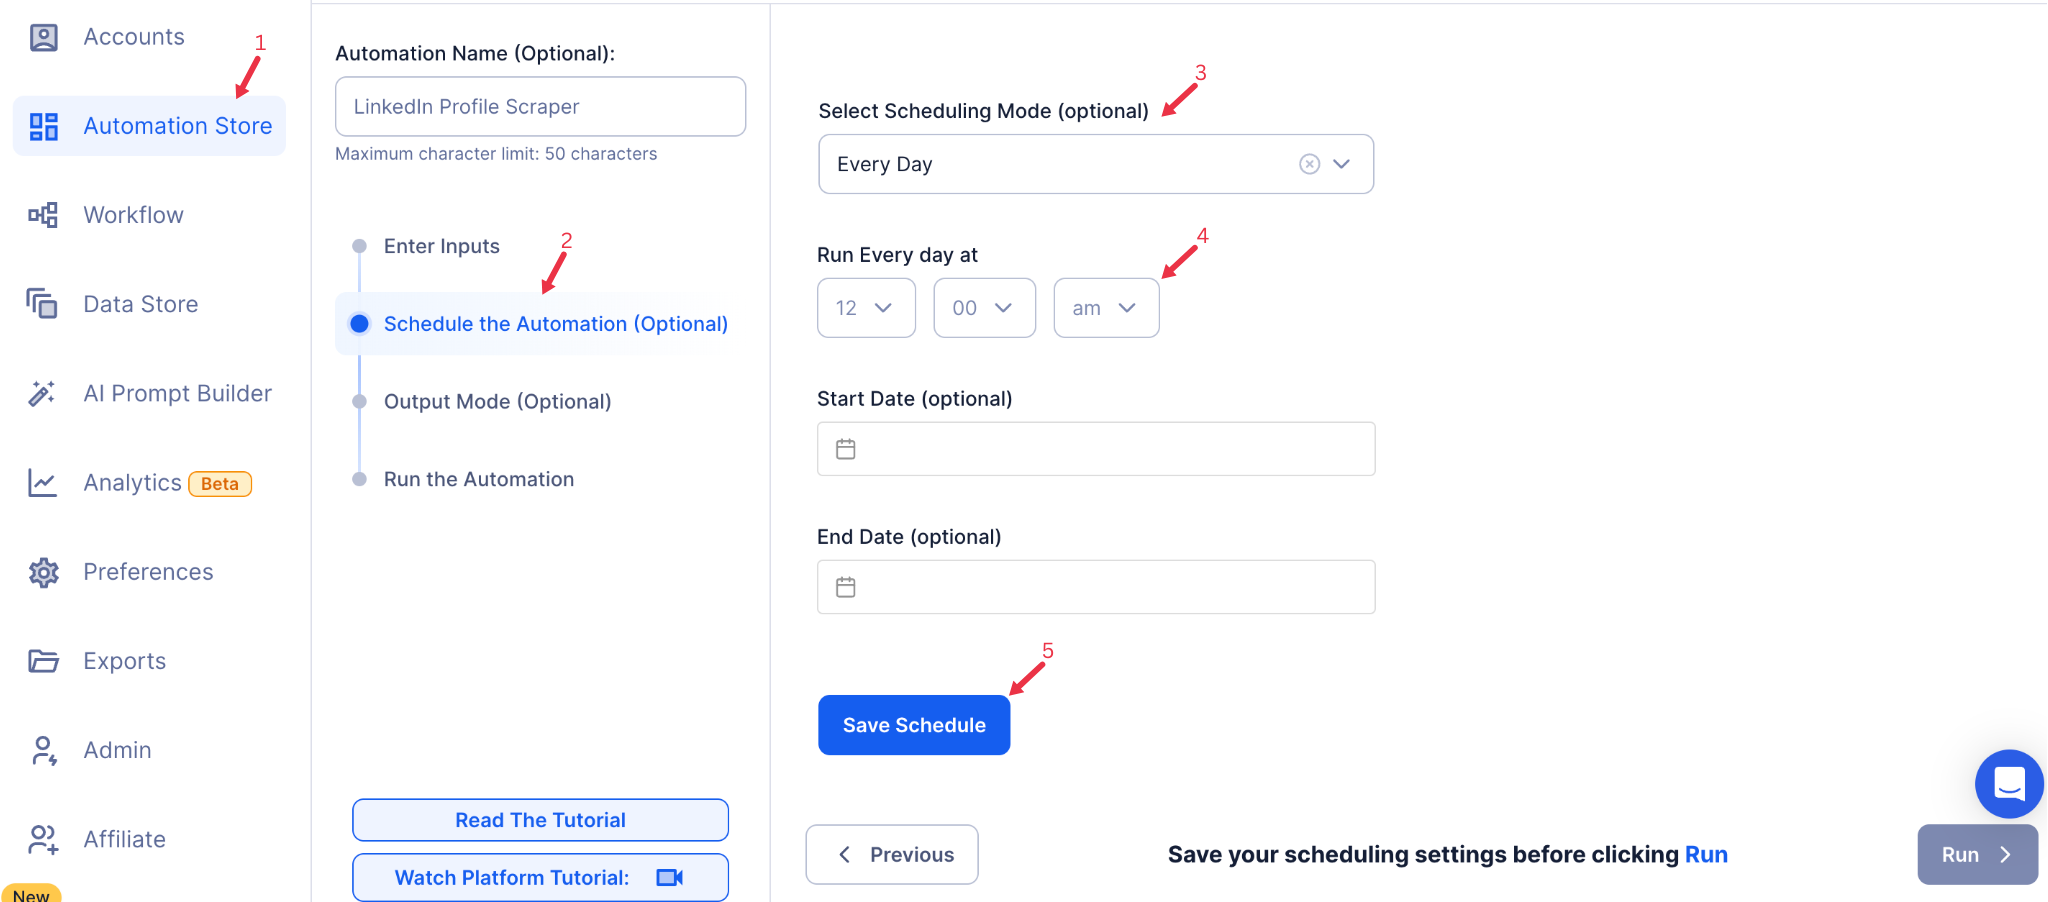
Step 4: Schedule the Automation (Optional)
Schedule the automation to run at specific times or intervals for ongoing email discovery. Click Schedule to configure the timing and recurrence options:
- None
- At Regular Intervals (e.g., every 6 hours)
- Once
- Every Day
- On Specific Days of the Week (e.g., Mondays and Fridays)
- On Specific Days of the Month (e.g., the 1st and 15th)
- On Specific Dates (e.g., March 20)
Tip: Scheduling helps you keep your email lists updated regularly without manual effort.
{% custom-image src="https://v2-web-assets.s3.us-east-1.amazonaws.com/Common/schedule-the-automation/schedule-the-automation.png" alt="schedule-the-automation" /%}
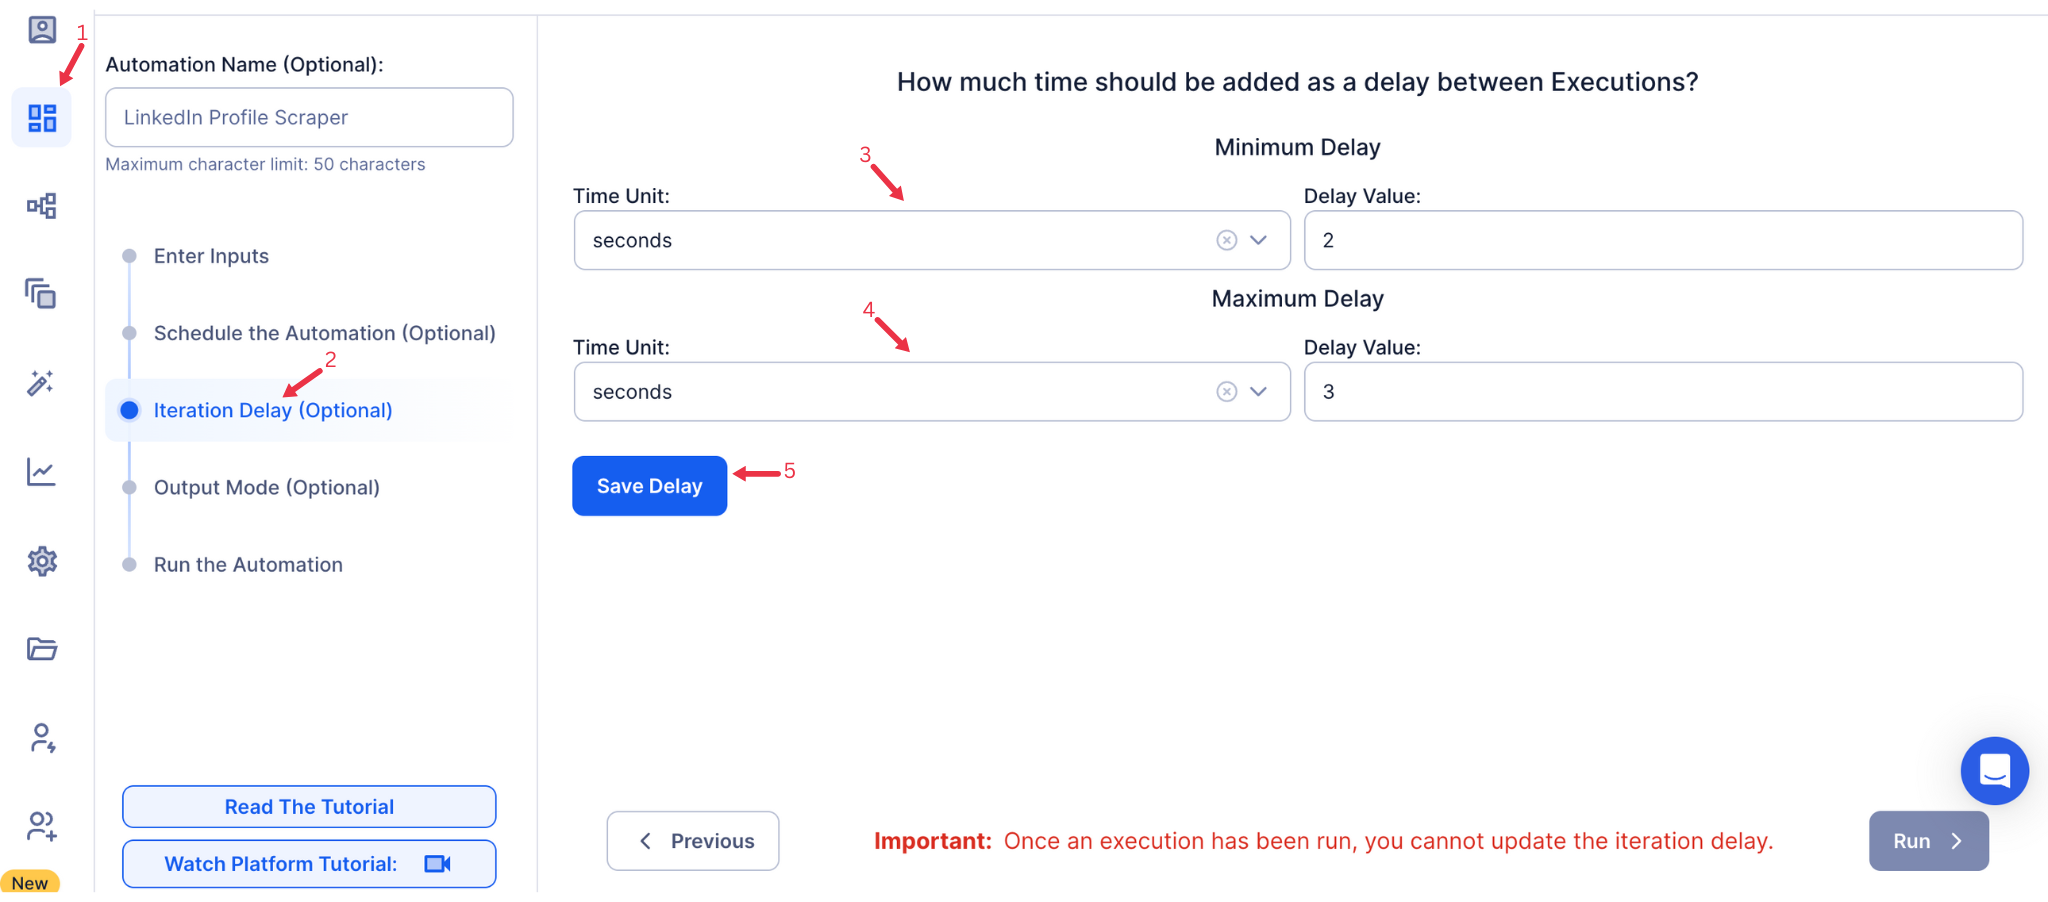
Step 5: Set an Iteration Delay (Optional)
Avoid detection and simulate human-like activity by setting an iteration delay. Choose minimum and maximum time intervals to add randomness between actions. This makes your activity look natural and reduces the chance of being flagged.
- Minimum Delay: Enter the shortest interval (e.g., 10 seconds).
- Maximum Delay: Enter the longest interval (e.g., 20 seconds).
Tip: Random delays keep your automation safe and reliable.
{% custom-image src="https://v2-web-assets.s3.us-east-1.amazonaws.com/Common/iteration-delay/iteration-delay.png" alt="iteration-delay" /%}
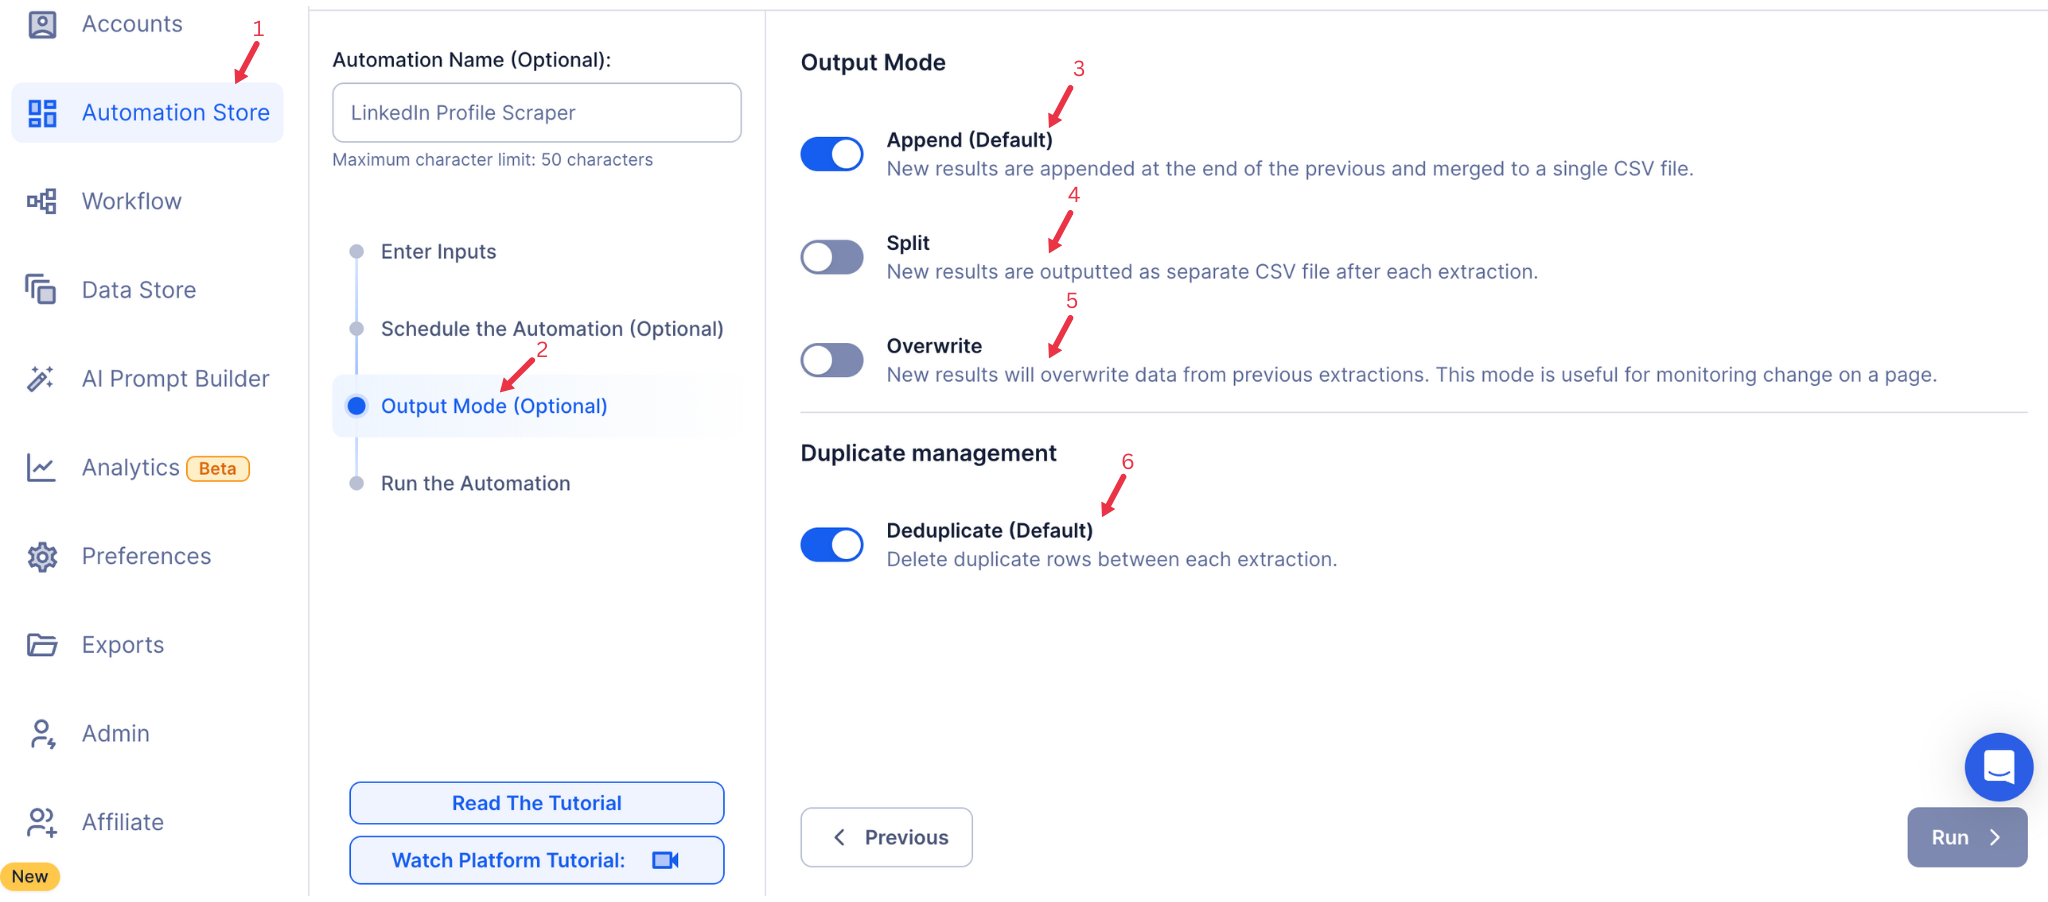
Step 6: Choose Your Output Mode (Optional)
Choose how to save and manage the extracted alumni data. TexAu provides the following options:
- Append (Default): Adds new results to the end of existing data, merging them into a single CSV file.
- Split: Saves new results as separate CSV files for each automation run.
- Overwrite: Replaces previous data with the latest results.
- Duplicate Management: Enable Deduplicate (Default) to remove duplicate rows.
Tip: Google Sheets export makes it easy to collaborate with your team in real time
{% custom-image src="https://v2-web-assets.s3.us-east-1.amazonaws.com/Common/output-mode/output-mode.png" alt="output-mode" /%}
Step 7: Access the Data from the Data Store
Once the automation completes, navigate to the Data Store section in TexAu to view the extracted email data. Locate the "Find an Email Address" automation and click See Data to review or download the results.
{% custom-image src="https://v2-web-assets.s3.us-east-1.amazonaws.com/Automations/LinkedIn+Job+Scraper/data-store-see-data.png" alt="Find An Email Address" /%}
The Find an Email Address automation simplifies the process of discovering contact emails, making it an essential tool for building outreach lists, enriching CRM data, and optimizing lead generation. With TexAu's flexible input options, scheduling capabilities, and seamless Google Sheets or CSV exports, you can efficiently scale your email discovery workflows and focus on achieving your business goals.
Run this automation on your own server.
TexAu V3 doesn't host social-platform automations anymore — but the runnable code is yours. Tell us your inputs, outputs, and target environment, and we'll ship you a working version you can deploy and operate yourself.