LinkedIn Auto Accept Pending Connection
Automate LinkedIn networking with TexAu's Auto Accept Pending Connection tool. Instantly approve all pending connection requests to grow your network.
Last updated
LinkedIn has established itself as the epicenter of professional networking. It’s not just a platform for professionals to showcase their expertise; it’s a dynamic space where businesses, entrepreneurs, and thought leaders exchange ideas, explore opportunities, and foster collaboration. Despite its
LinkedIn has established itself as the epicenter of professional networking. It’s not just a platform for professionals to showcase their expertise; it’s a dynamic space where businesses, entrepreneurs, and thought leaders exchange ideas, explore opportunities, and foster collaboration. Despite its immense potential, managing and expanding your LinkedIn network can often feel overwhelming. From handling connection requests to nurturing relationships, the process demands both time and effort. This is where automation and streamlined tools become indispensable, ensuring you maximize LinkedIn’s potential without compromising efficiency.
Accepting pending connection requests is a crucial aspect of LinkedIn networking. Every request is a potential opportunity—whether it’s a prospective client, a hiring manager, or an industry peer. By expanding your network, you not only increase your visibility but also unlock more engagement opportunities, such as endorsements, collaborations, and knowledge sharing.
Manually sifting through pending requests, however, can be tedious and time-intensive. Enter TexAu’s LinkedIn Auto Accept Pending Connection—a powerful solution that automates this process, saving time while ensuring your LinkedIn presence remains professional and impactful. By leveraging this tool, you can focus on cultivating relationships rather than administrative tasks, making it easier to scale your network effortlessly.
Key Features of LinkedIn Auto Accept Pending Connection
1. Automated Connection Acceptance
TexAu’s tool automates the process of accepting pending LinkedIn connection requests. Instead of manually approving each request, you can accept them in bulk with just a single action. This feature is ideal for professionals managing large volumes of requests.
Example: Imagine a recruiter who receives hundreds of requests weekly from job seekers and industry professionals. Using TexAu’s automation, they can process all requests in one go, ensuring no potential candidate is overlooked. To maintain a clean and relevant network, recruiters can further utilize LinkedIn Connection Remover to periodically remove inactive or irrelevant connections.
2. Customizable Filters
One of the standout features of TexAu’s tool is its ability to filter requests based on criteria like job title, location, or industry. This ensures you’re accepting connections that align with your professional goals, saving you from adding irrelevant contacts.
Example: A tech startup founder can use filters to accept connection requests only from individuals in the IT sector or those with "CTO" or "Product Manager" in their titles, creating a network tailored to their business objectives.
3. Bulk Request Processing
Handling hundreds—or even thousands—of pending connection requests is no longer an arduous task. TexAu’s bulk processing capability lets you accept multiple requests simultaneously, reducing time spent on administrative tasks.
Example: A marketer launching a campaign might receive over 500 requests from potential collaborators. With bulk processing, they can quickly grow their audience and focus on engaging with new connections instead of approving requests manually. To further optimize their outreach, they can track sent requests using LinkedIn Sent Request Extractor, ensuring efficient follow-ups with pending connections.
4. Integration with Messaging
TexAu goes beyond accepting requests by enabling you to send a personalized welcome message to each new connection. This feature helps initiate meaningful engagement right from the start.
Example: When a sales professional accepts a connection request, the tool can automatically send a message like:"Hi [Name], thank you for connecting! I’m excited to learn more about your work in [Industry]. Let me know if there’s anything I can assist you with!"
This proactive approach helps create rapport and sets the tone for future interactions.
Challenges Addressed by LinkedIn Auto Accept Pending Connection
1. Manual Connection Approval
Manually reviewing and accepting connection requests can be a time-consuming and tedious process, particularly for professionals with high-profile LinkedIn accounts. Each request requires careful consideration, which can take hours, especially when hundreds of requests are pending. This manual approach often leads to missed opportunities, as it's difficult to review every profile promptly.
TexAu’s automation eliminates this hassle by streamlining the entire process. It ensures that all relevant connection requests are promptly approved without requiring manual intervention.
Scenario: A LinkedIn influencer with over 10,000 followers receives hundreds of connection requests daily. These requests range from fans of their content to industry peers and potential collaborators. Without automation, reviewing each profile to determine its relevance is overwhelming, and some valuable requests may even be overlooked due to the volume. TexAu automates the approval process, allowing the influencer to grow their network while ensuring that high-quality connections are included. This saves significant time and allows the influencer to focus on creating content and engaging with their audience.
2. Overwhelming Requests
Large volumes of pending connection requests can easily overwhelm LinkedIn users, particularly after events like webinars, conferences, or the launch of a new campaign. Manually approving these requests often leads to delays, missed opportunities, and an inefficient use of time.
TexAu provides a solution by handling these requests in bulk, ensuring that no valuable connection slips through the cracks.
Example: A keynote speaker at a global marketing conference attracts hundreds of attendees who send connection requests after the event. Sorting through these requests manually could take days, causing a loss of momentum and delaying follow-ups. By using TexAu, the speaker can instantly approve all relevant requests, keeping their network engaged and making the most of their increased visibility. This not only saves time but also strengthens their relationships with attendees and industry professionals. To ensure quality control, the speaker can track their newly accepted connections using LinkedIn Received Connection Extractor.
3. Missed Opportunities
Delaying the approval of connection requests can lead to missed opportunities, whether it’s a potential collaboration, an endorsement, or a job offer. In the fast-paced professional world, timeliness is critical, and failing to act quickly can cost you valuable connections.
TexAu ensures that all requests are approved promptly, allowing you to seize opportunities as they arise.
Scenario: A freelancer specializing in graphic design receives a connection request from a potential client. Due to their busy schedule, they delay reviewing the request, only to find out later that the client has already hired someone else. With TexAu, the freelancer could have approved the request instantly, initiated a conversation and secured the project. Automating approvals ensures that such opportunities are never missed, helping professionals stay ahead in their careers.
Benefits of Automating Connection Approvals
1. Streamlined Network Growth
TexAu simplifies the process of expanding your LinkedIn network by automating connection approvals. Instead of manually managing requests, you can accept them in bulk, allowing your network to grow exponentially with minimal effort. A larger network not only increases your reach but also enhances your chances of discovering new opportunities.
Example: A business owner running an e-commerce brand automates their connection approvals and experiences a 30% increase in their network size within a month. This expanded network includes potential clients, industry experts, and collaborators, giving the business owner access to a wealth of opportunities and insights.
By removing the bottleneck of manual approvals, TexAu enables professionals to focus on engaging with their growing network rather than managing administrative tasks.
2. Targeted Networking
One of the key advantages of TexAu’s automation is its customizable filters. These filters allow you to focus your networking efforts on individuals who align with your professional goals. You can set criteria such as job titles, industries, or geographic locations to ensure that your network grows with relevant and valuable connections.
Example: A SaaS founder aims to connect with product managers, investors, and tech industry leaders to accelerate their startup’s growth. By using TexAu’s filters, they can automatically approve requests from individuals with titles like "Product Manager," "Investor," or "CTO," ensuring their network is tailored to their goals. This targeted approach helps them build meaningful relationships that directly contribute to their startup’s success.
3. Enhanced Engagement
The moment a connection request is approved, the opportunity for engagement begins. TexAu allows you to automate welcome messages to new connections, fostering immediate and meaningful interactions. These messages can introduce you, highlight your expertise, or provide a resource, setting the stage for a productive relationship.
Example: A recruiter automates the acceptance of connection requests from candidates and sends a personalized message to each one:"Hi [Name], thank you for connecting! I noticed your experience in [Field/Skill], and I’d love to discuss potential opportunities at [Company Name]. Feel free to reach out if you’re interested!"
This proactive engagement encourages candidates to respond promptly, streamlining the recruitment process and building stronger relationships.
4. Improved Visibility
An active and growing network boosts your visibility on LinkedIn. When you accept more connection requests, your profile becomes more prominent in LinkedIn searches, increasing the likelihood of collaboration, job offers, or client inquiries. Consistent growth and engagement signal to LinkedIn’s algorithm that your profile is active and valuable, further enhancing your reach.
Example: A digital marketer automates connection approvals and sees a 40% increase in profile views within two months. This visibility leads to more inquiries about their services, collaborations with other marketers, and invitations to industry events. The improved visibility not only strengthens their brand but also opens doors to new opportunities.
By automating connection approvals with TexAu, professionals can address challenges like manual approval delays, overwhelming requests, and missed opportunities while reaping the benefits of streamlined growth, targeted networking, enhanced engagement, and improved visibility. These features make TexAu an essential tool for anyone looking to maximize their LinkedIn potential.
Use Cases: Who Benefits from TexAu’s Auto Accept Feature?
1. Marketers: Expanding Your Audience
For marketers, building a broad and relevant audience is essential for promoting products, services, and campaigns effectively. TexAu’s Auto Accept Pending Connection feature allows marketers to effortlessly grow their LinkedIn network by automatically approving connection requests from professionals within their target industries or areas of interest. This ensures they are engaging with the right audience, boosting the impact of their campaigns.
Scenario: A content marketer specializing in SEO and content strategy receives numerous connection requests from professionals interested in learning about these topics. By using TexAu’s automation and setting filters to prioritize requests from individuals with titles such as "SEO Specialist" or "Content Strategist," the marketer expands their network with highly relevant professionals. The larger and more targeted network increases engagement on their posts, helping them establish authority in their field and drive traffic to their services or resources.
2. Recruiters: Building a Larger Talent Pool
Recruiters often face the challenge of identifying and connecting with the right candidates quickly. By automating the acceptance of LinkedIn connection requests, recruiters can grow their network of potential hires without the manual effort of reviewing each request individually. This allows them to focus on other aspects of the hiring process, such as conducting interviews or engaging with shortlisted candidates.
Scenario: A recruiter looking to hire software engineers uses TexAu to approve pending requests from professionals with skills in Python, JavaScript, or cloud computing. This automation helps the recruiter expand their talent pool and quickly identify candidates for open roles. Instead of wasting time sifting through requests, the recruiter can immediately start engaging with potential hires, reducing the time to hire for critical positions.
3. Sales Teams: Growing a Network of Potential Leads
For sales teams, LinkedIn is a goldmine for generating leads and building relationships with potential clients. The Auto Accept Pending Connection feature allows sales professionals to automate the acceptance of requests from prospects, ensuring they don’t miss out on valuable opportunities to grow their sales pipeline.
Scenario: A sales executive targets decision-makers at Fortune 500 companies to pitch their SaaS product. Using TexAu, the executive sets filters to accept connection requests from individuals with titles like "CEO," "CIO," or "VP of Technology." This ensures their network includes key stakeholders, making it easier to engage in targeted outreach and close deals more efficiently.
4. Business Owners: Expanding Reach and Building Collaborations
For business owners, expanding their network can open doors to partnerships, collaborations, and growth opportunities. TexAu’s automation ensures that they don’t miss connection requests from potential collaborators or industry leaders, enabling them to build a strong network that supports their business goals.
Scenario: An entrepreneur running a sustainable fashion brand receives numerous connection requests after speaking at a webinar. By automating the acceptance process, they can quickly connect with other industry leaders, investors, and collaborators who are interested in their mission. This expanded network provides insights, partnerships, and exposure, accelerating the growth of the brand.
Best Practices for Maximizing TexAu’s Auto Accept Feature
1. Set Filters Wisely
Filters are a powerful way to ensure you’re building a high-quality network that aligns with your professional goals. By defining acceptance criteria based on job titles, industries, or locations, you can focus on connecting with individuals who are relevant to your career or business.
Example: A freelance graphic designer might set filters to prioritize connection requests from marketing managers, creative directors, and business owners. This ensures that their network includes potential clients who are likely to need their design services.
Pro Tip: Regularly update your filters to reflect changes in your professional focus or goals.
2. Engage Promptly
Building a meaningful relationship begins the moment you accept a connection request. Sending a personalized message to new connections demonstrates professionalism and encourages immediate engagement.
Example: After accepting a connection request, a career coach sends the following message:"Hi [Name], thank you for connecting! I noticed your expertise in [field/role], and I’d love to hear more about your work. Please feel free to reach out if there’s any way I can support you."
This prompt engagement sets the tone for a productive relationship and increases the likelihood of future collaboration.
3. Monitor Connection Quality
While automation is excellent for saving time, it’s important to periodically review your network to ensure it remains valuable. Remove inactive or irrelevant connections to maintain a high-quality and engaged audience.
Example: A LinkedIn influencer might review their network quarterly to identify and remove inactive accounts or connections that no longer align with their professional goals. This helps maintain a focused and meaningful LinkedIn presence. A B2B consultant uses LinkedIn AI Connector to analyze engagement patterns and predict which connections are most likely to convert into leads.
Metrics and Tracking: Measuring the Impact of Automation
1. Acceptance Rate Trends
Tracking how many requests are approved over time provides valuable insights into your network growth. By analyzing monthly or quarterly acceptance rates, you can identify patterns and adjust your strategy accordingly.
Example: A consultant notices a 20% increase in accepted requests after implementing TexAu’s Auto Accept feature. This growth allows them to reach a wider audience, leading to more inquiries about their services.
2. Engagement Rates
Measuring how new connections interact with your posts, messages, or shared content helps you understand the effectiveness of your engagement strategy. Focus on the most responsive segments of your network to optimize your efforts.
Example: A content creator tracks which industries or job titles engage most with their posts. They discover that marketing professionals are particularly responsive, prompting them to tailor their content to this audience for maximum impact.
3. Lead Conversion Rates
Evaluating how new connections translate into leads, collaborations, or sales is crucial for measuring the ROI of automation. By tracking conversion rates, you can refine your approach to maximize results.
Example: A sales manager uses TexAu to automate connection approvals and tracks how many of these new connections become paying clients. They discover a 15% conversion rate, validating the effectiveness of the tool for their outreach efforts.
Tips for Maximizing Results
1. Pair with Messaging Automation
Follow-up messages are key to nurturing new connections. Combine TexAu’s Auto Accept feature with messaging automation to send personalized introductions or offers, ensuring immediate engagement.
Example: A digital marketing agency accepts connection requests and automatically sends a message offering a free consultation. This proactive approach leads to a higher rate of responses and conversions.
2. Clean Your Network Regularly
Removing inactive or irrelevant connections ensures your network remains valuable and engaged. A smaller but more targeted network often yields better results than a large but disengaged one.
Example: An HR professional removes outdated connections from previous roles to focus on building a network aligned with their current industry.
3. Share Relevant Content
Keep your new connections engaged by consistently sharing valuable content, such as articles, insights, or updates about your work. This not only strengthens relationships but also positions you as a thought leader in your field.
Example: A leadership coach regularly shares articles on team management and career growth, sparking discussions with new connections and increasing their visibility on LinkedIn.
By combining these strategies with TexAu’s Auto Accept Pending Connection feature, you can effectively grow and maintain a high-quality LinkedIn network that drives meaningful engagement and results.
Conclusion
TexAu’s LinkedIn Auto Accept Pending Connection is a game-changer for professionals looking to grow their networks efficiently. By automating approvals, you save time, enhance engagement, and unlock growth opportunities. Whether you’re a marketer, recruiter, or business owner, this tool empowers you to focus on building meaningful connections while TexAu handles the repetitive tasks.
Ready to simplify your LinkedIn networking? Try TexAu’s Auto Accept Pending Connection feature today and take your professional growth to the next level.
The LinkedIn Auto Accept Pending Connection automation helps founders, sales managers, marketers, and growth hackers streamline their LinkedIn connections by automatically accepting pending requests. With customizable scheduling, input options, and export formats, this tool ensures seamless connection management to build your professional network efficiently. Follow this step-by-step guide to configure and execute the automation.
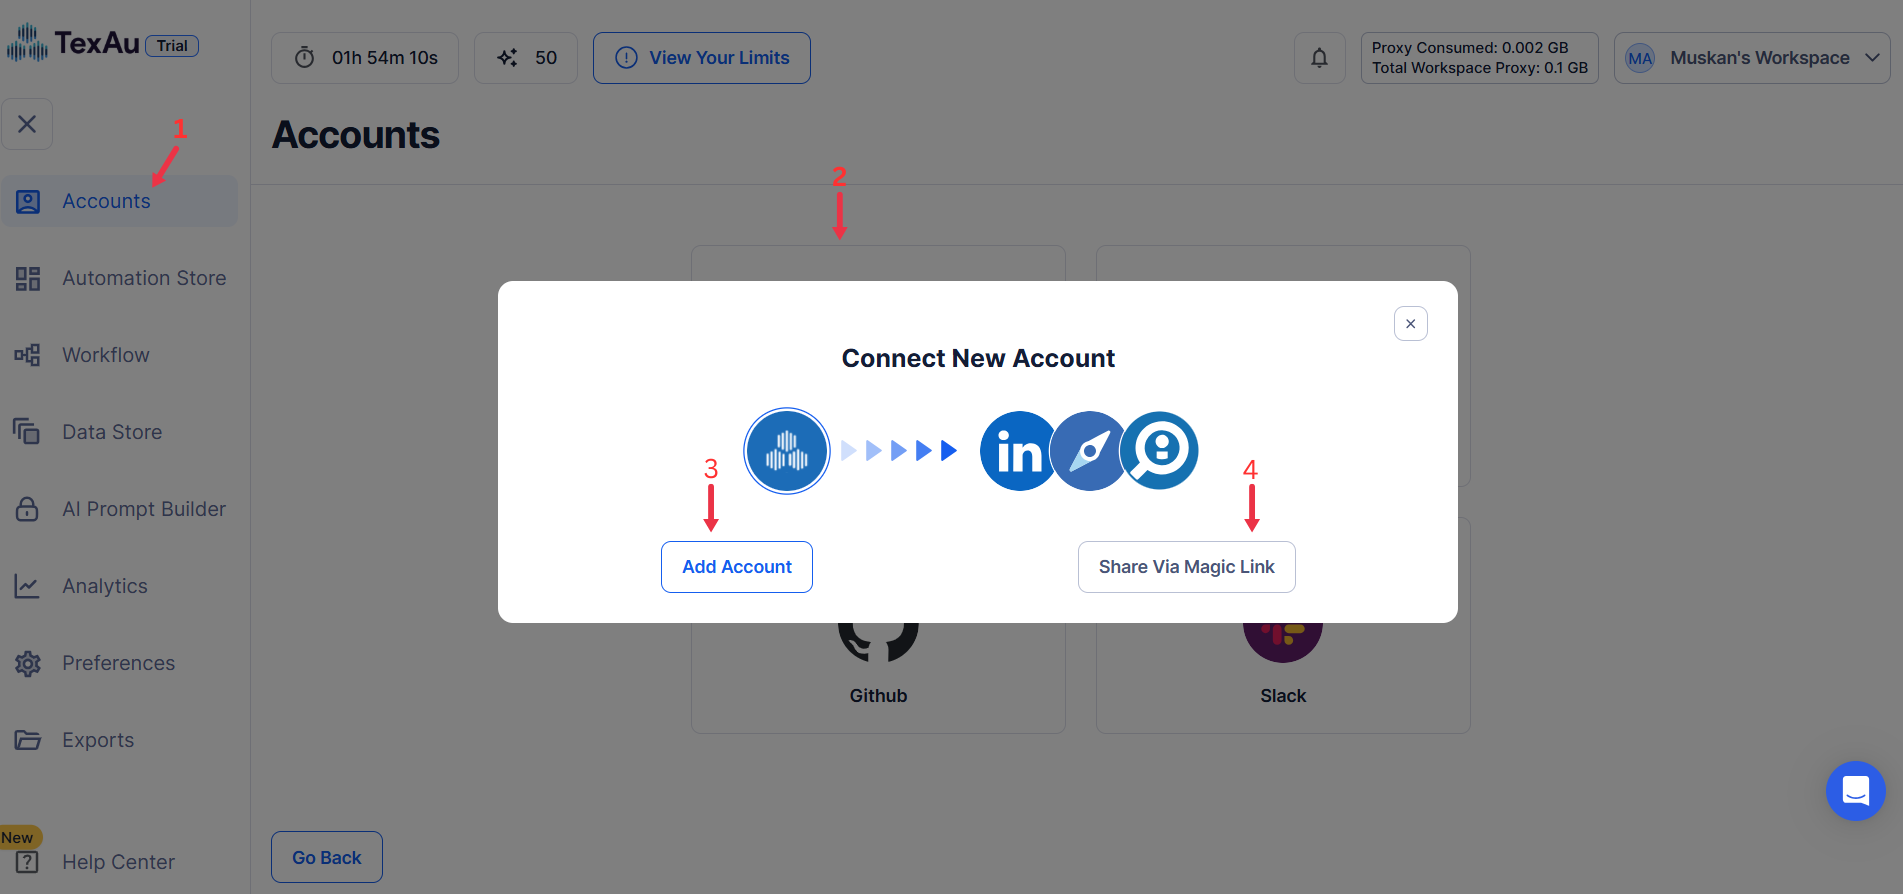
Step 1: Log in to TexAu and Connect LinkedIn
Log in to your TexAu account at v2-prod.texau.com.
Go to Accounts and connect your LinkedIn account. You can choose one of these methods:
- Share via Magic Link: Share the link, copy it to your browser, and follow the steps to integrate your LinkedIn account securely.
- Add Account: Sync cookies and browser data with TexAu for seamless integration.
Tip: Use Magic Link for an easy and secure connection.
{% custom-image src="https://v2-web-assets.s3.us-east-1.amazonaws.com/Common/log-in-to-texau-and-connect-linkedin/connect-linkedin.png" alt=" connect-linkedin" /%}
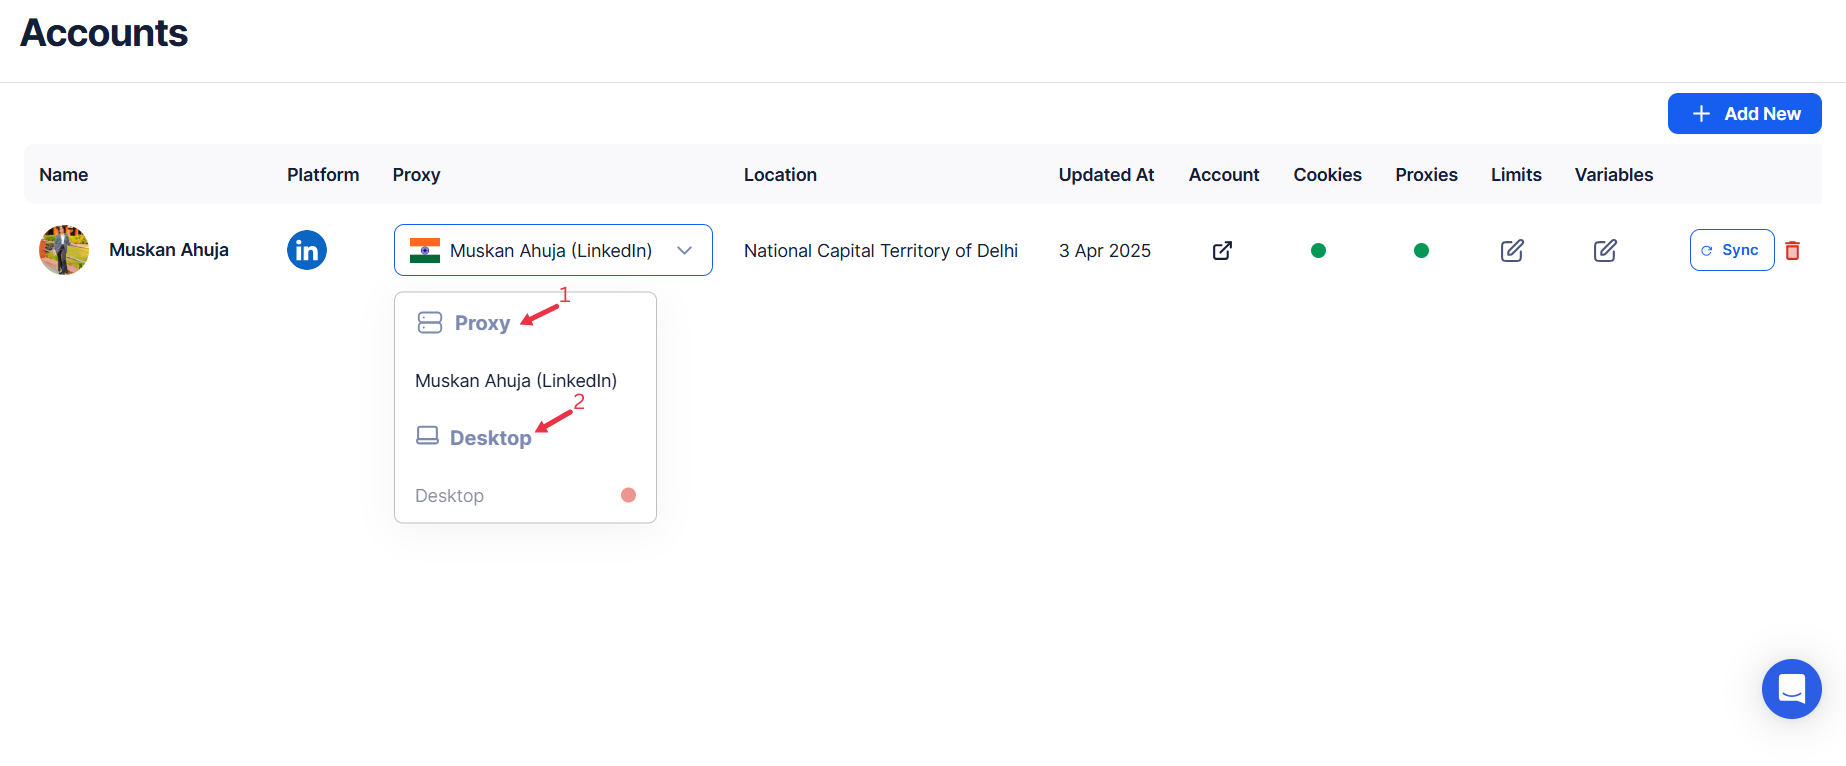
Step 2: Choose Cloud or Desktop Execution
Decide how you want to run the automation:
- Cloud Mode: Automates tasks on TexAu’s servers with built-in proxies. You can add custom proxies via Settings > Preferences > Proxies.
- Desktop Mode: Runs automation on your local device using your IP address.
Tip: Desktop mode saves cloud runtime credits and gives more control over the process.
{% custom-image src="https://v2-web-assets.s3.us-east-1.amazonaws.com/Common/cloud-or-desktop-execution/cloud-or-desktop-execution.png" alt="cloud-or-desktop-execution" /%}
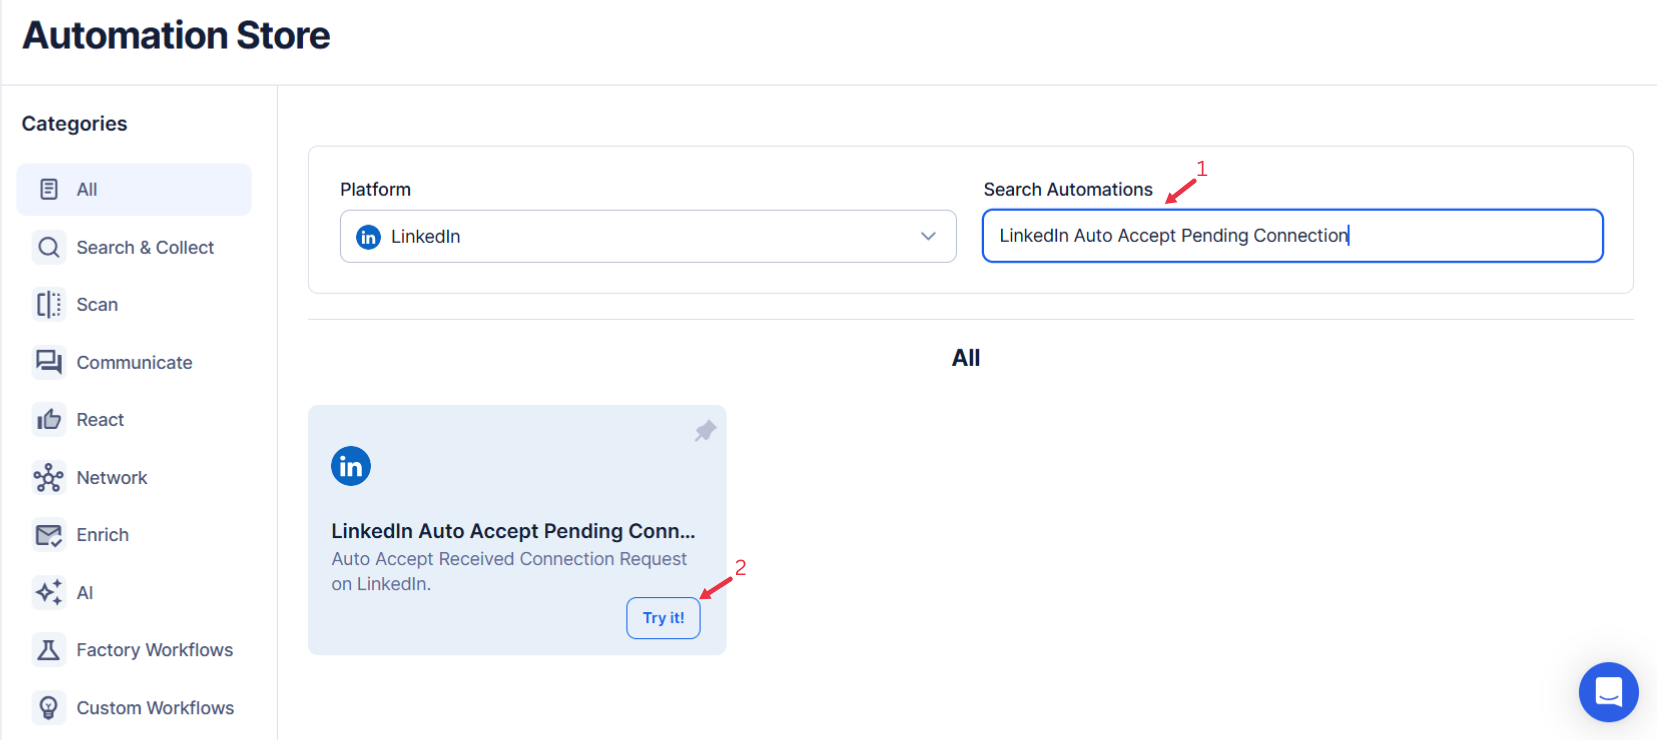
Step 3: Search for the Particular LinkedIn Automation
- Navigate to the Automation Store on TexAu.
- Use the search bar to find LinkedIn Auto Accept Pending Connection automation.
{% custom-image src="https://v2-web-assets.s3.us-east-1.amazonaws.com/Automations/linkedin-auto-accept-pending-connection/linkedin-auto-accept-pending-connection.png" alt="search-for-the-particular-LinkedIn-automation" /%}
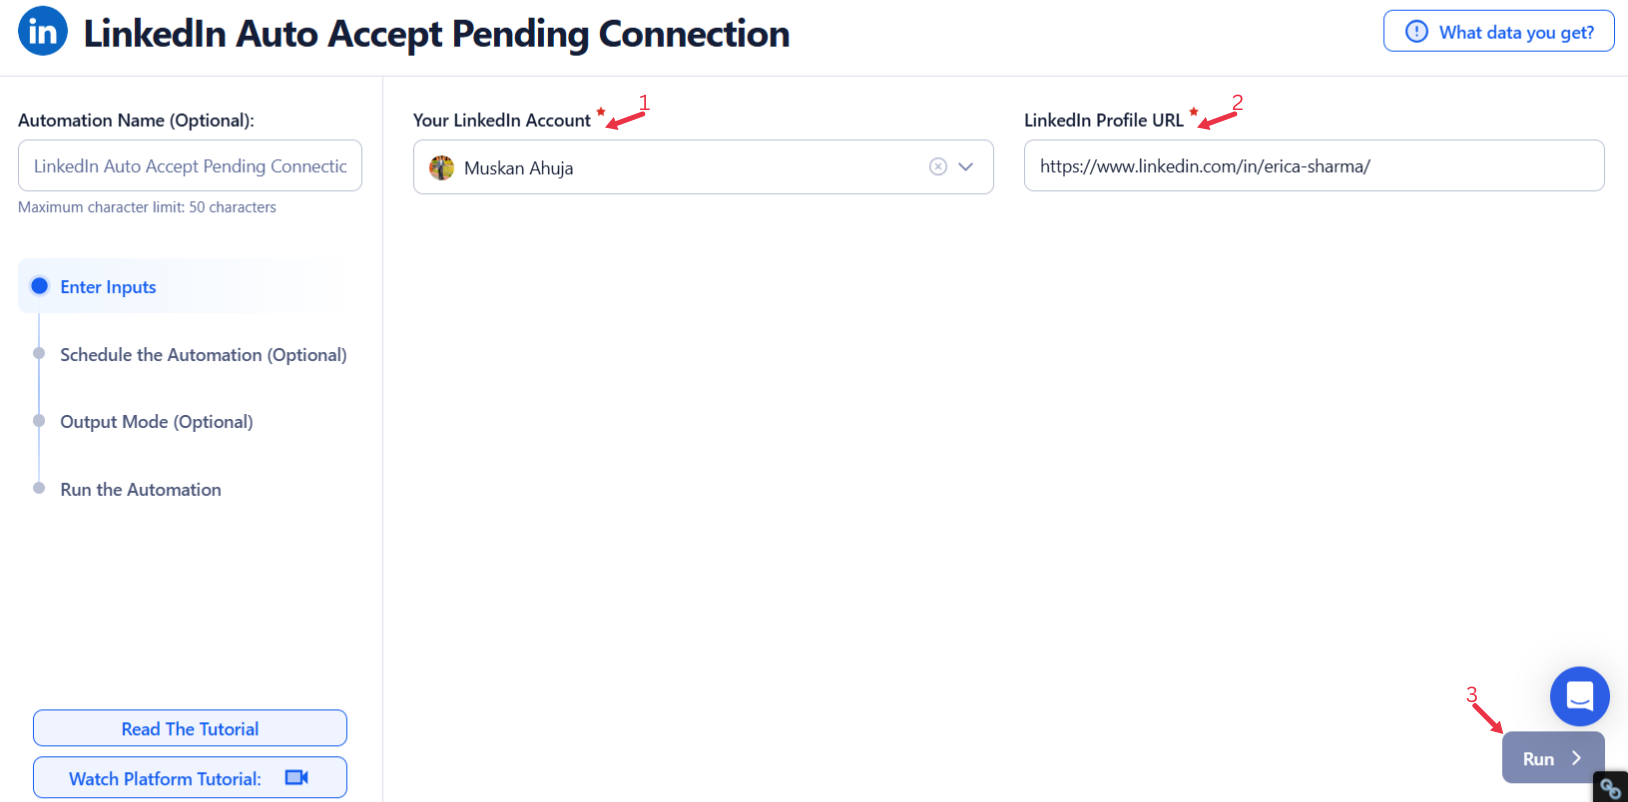
Step 4: Select Your Input Source
Manually Enter a Single Input
This option allows you to auto-accept pending connections for a specific LinkedIn profile. Follow these steps:
- Profile URL: Enter the LinkedIn profile URL directly into the input field (e.g., https://www.linkedin.com/in/johndoe).
- Click Run in the lower-right corner to initiate the automation.
{% custom-image src="https://v2-web-assets.s3.us-east-1.amazonaws.com/Automations/linkedin-auto-accept-pending-connection/linkedin-auto-accept-pending-connection-single-inputs.png" alt="enter-a-single-input" /%}
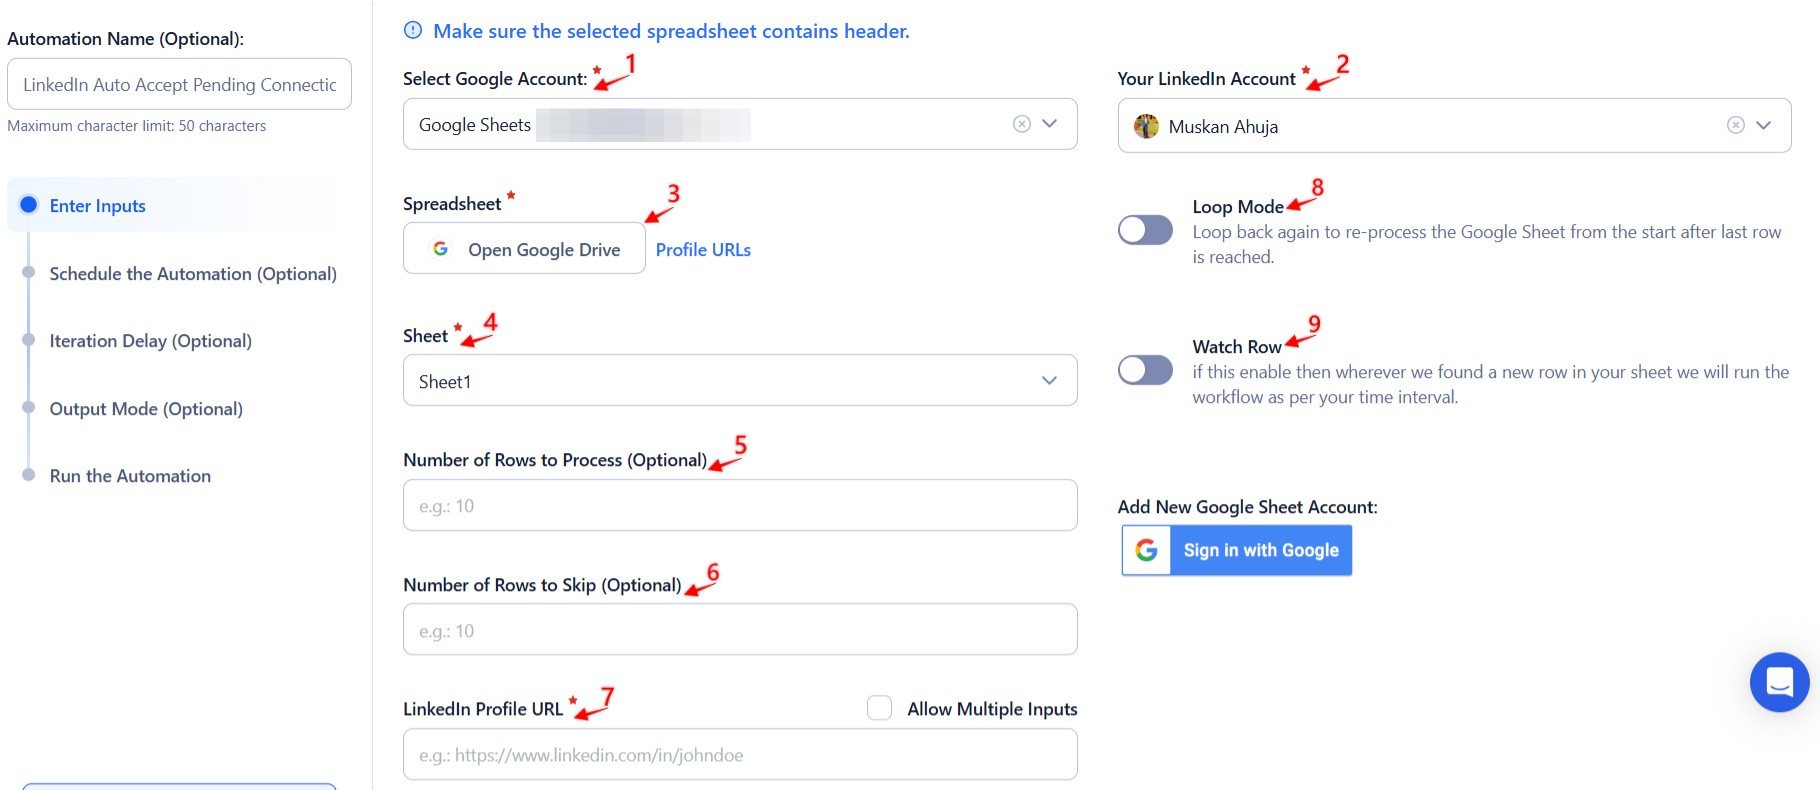
Use Google Sheets for Bulk Input
This option is ideal for processing multiple LinkedIn profiles efficiently. Follow these steps:
- Click Select Google Account to choose your Google account or click on Add New Google Sheet Account to link additional accounts.
- Click Accounts to select LinkedIn as the platform.
- Click Open Google Drive to locate the Google Sheet containing LinkedIn profile URLs.
- Select the spreadsheet and the specific sheet containing LinkedIn profile URLs.
- Profile URL: Provide the column containing LinkedIn profile URLs.
- Configure additional options:
- Number of Rows to Process (Optional): Define the number of rows to process from the Google Sheet.
- Number of Rows to Skip (Optional): Specify rows to skip at the beginning of the sheet.
- Click Run in the lower-right corner to start the automation.
Optional Advanced Feature:
- Loop Mode: Enable Loop Mode to re-process the Google Sheet from the beginning once all rows are completed. This is useful for tasks that require recurring updates.
Watch Row (Optional)
Watch Row feature enables automated workflow execution whenever new data is added to a Google Sheet. It continuously scans for updates and executes linked workflows.
Configure Watch Row by selecting a frequency and setting an execution period.
Watch Row Schedule
- None
- Scheduling Intervals (e.g., every 15 minutes, every hour)
- One-Time Execution
- Daily Execution
- Weekly Recurrence (e.g., every Thursday and Sunday)
- Monthly Specific Dates (e.g., 5th and 19th)
- Custom Fixed Dates (e.g., July 21)
By default, TexAu checks for new rows every 15 minutes and runs for five days unless changed.
With Watch Row, workflows operate based on real-time data updates.
{% custom-image src="https://v2-web-assets.s3.us-east-1.amazonaws.com/Automations/linkedin-auto-accept-pending-connection/linkedin-auto-accept-pending-connection-google-sheetss.jpeg" alt="use-google-sheets-for-bulk-input" /%}
Process a CSV File
This option allows you to process LinkedIn profiles from a static file. Follow these steps:
- Click Upload CSV File and browse to locate the file containing LinkedIn profile URLs.
- Once uploaded, TexAu will display the file name and preview its content. Verify the data to ensure accuracy.
- Profile URL: Provide the column containing LinkedIn profile URLs.
- Configure additional options:
- Number of Rows to Process (Optional): Define the number of rows to process from the CSV file.
- Number of Rows to Skip (Optional): Specify rows to skip at the beginning of the file.
- Click Run in the lower-right corner to initiate the automation.
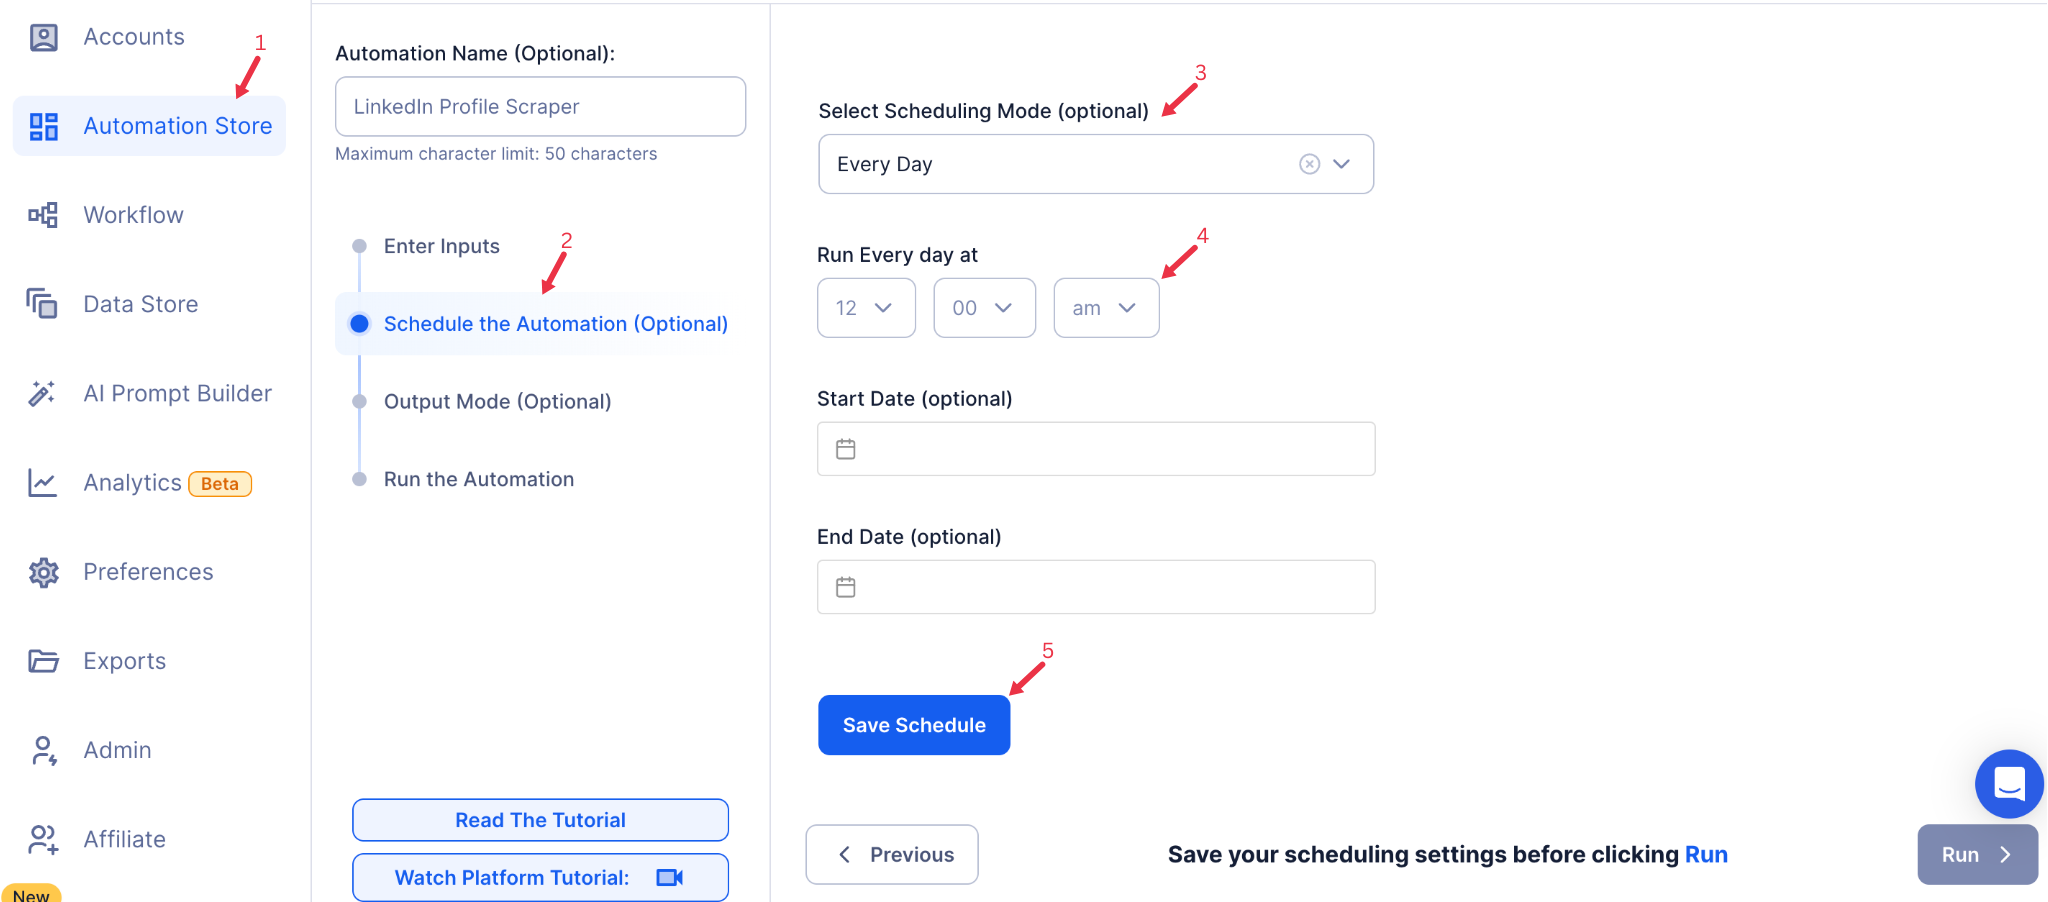
Step 5: Schedule the Automation (Optional)
Schedule the automation to run at specific times to regularly accept pending connection requests. Select one of the following options:
- None
- At Regular Intervals (e.g., every 12 hours or daily)
- Once
- Every Day
- On Specific Days of the Week (e.g., every Monday)
- On Specific Days of the Month (e.g., the 5th and 20th)
- On Specific Dates (e.g., January 10)
{% custom-image src="https://v2-web-assets.s3.us-east-1.amazonaws.com/Common/schedule-the-automation/schedule-the-automation.png" alt="schedule-the-automation" /%}
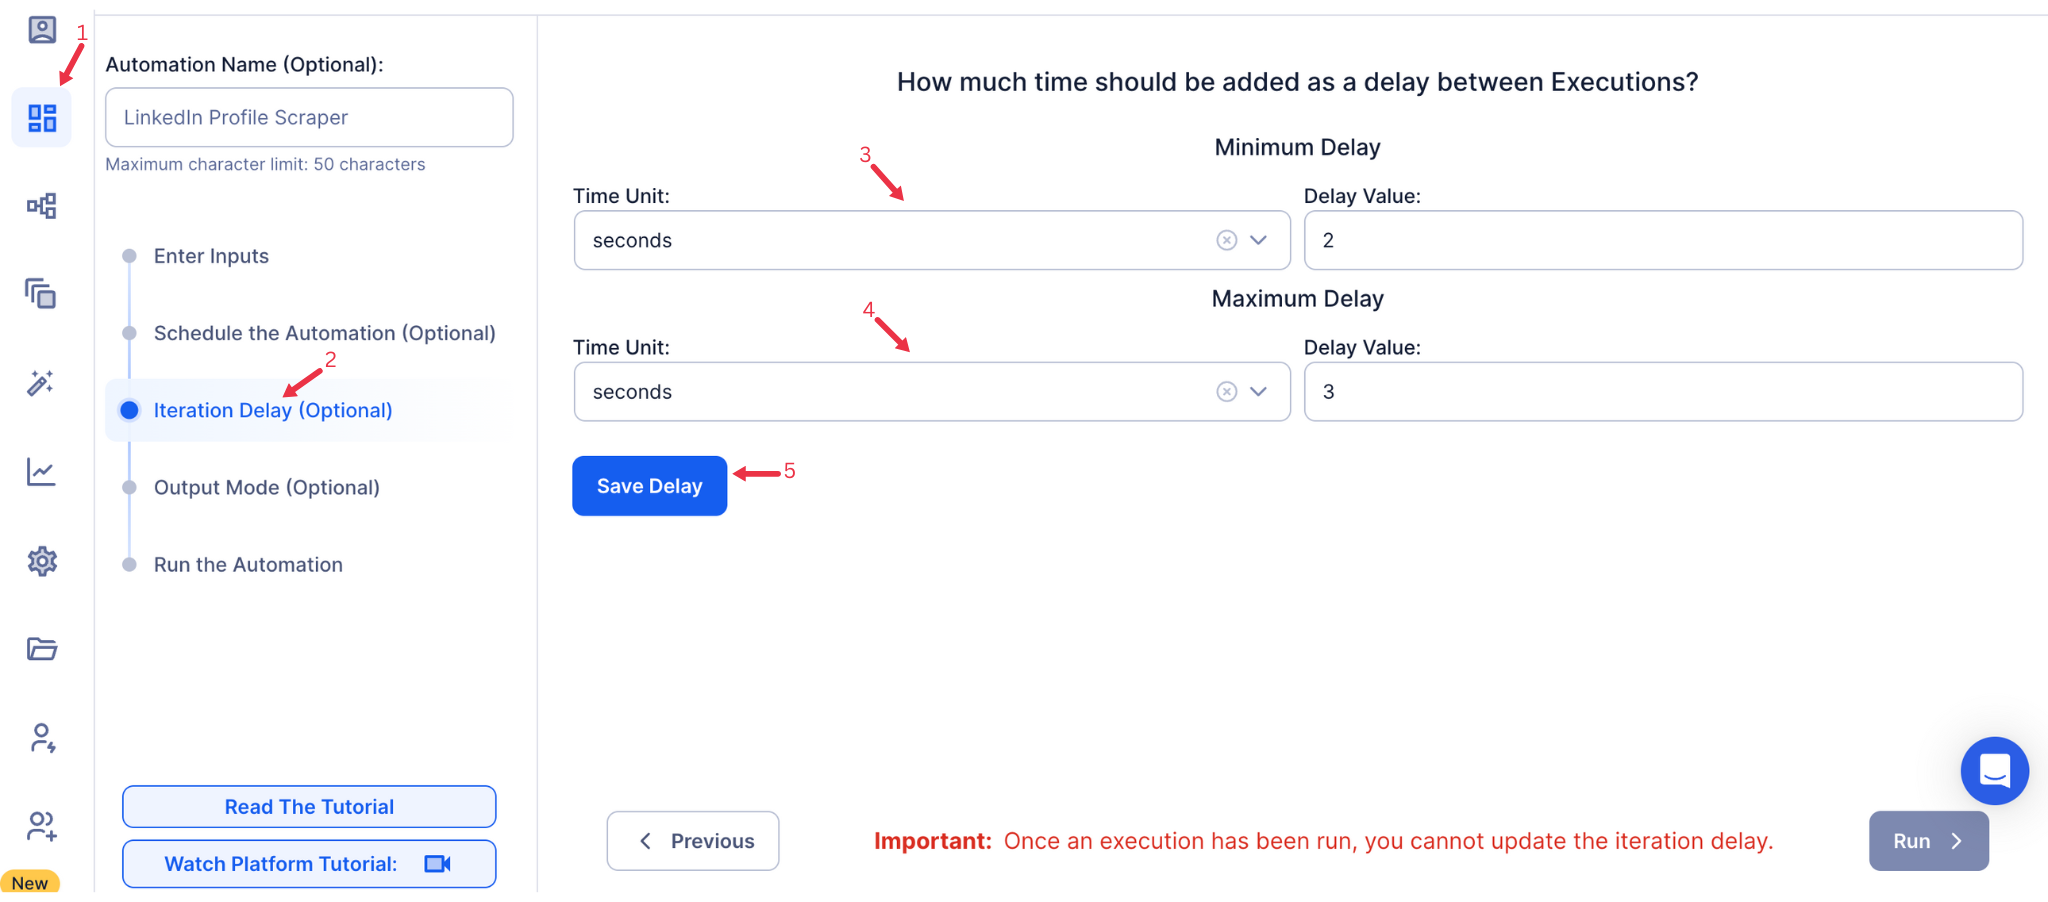
Step 6: Set an Iteration Delay (Optional)
Avoid detection and simulate human-like activity by setting an iteration delay. Choose minimum and maximum time intervals to add randomness between actions. This makes your activity look natural and reduces the chance of being flagged.
- Minimum Delay: Enter the shortest interval (e.g., 10 seconds).
- Maximum Delay: Enter the longest interval (e.g., 20 seconds).
Tip: Random delays keep your automation safe and reliable.
{% custom-image src="https://v2-web-assets.s3.us-east-1.amazonaws.com/Common/iteration-delay/iteration-delay.png" alt="iteration-delay" /%}
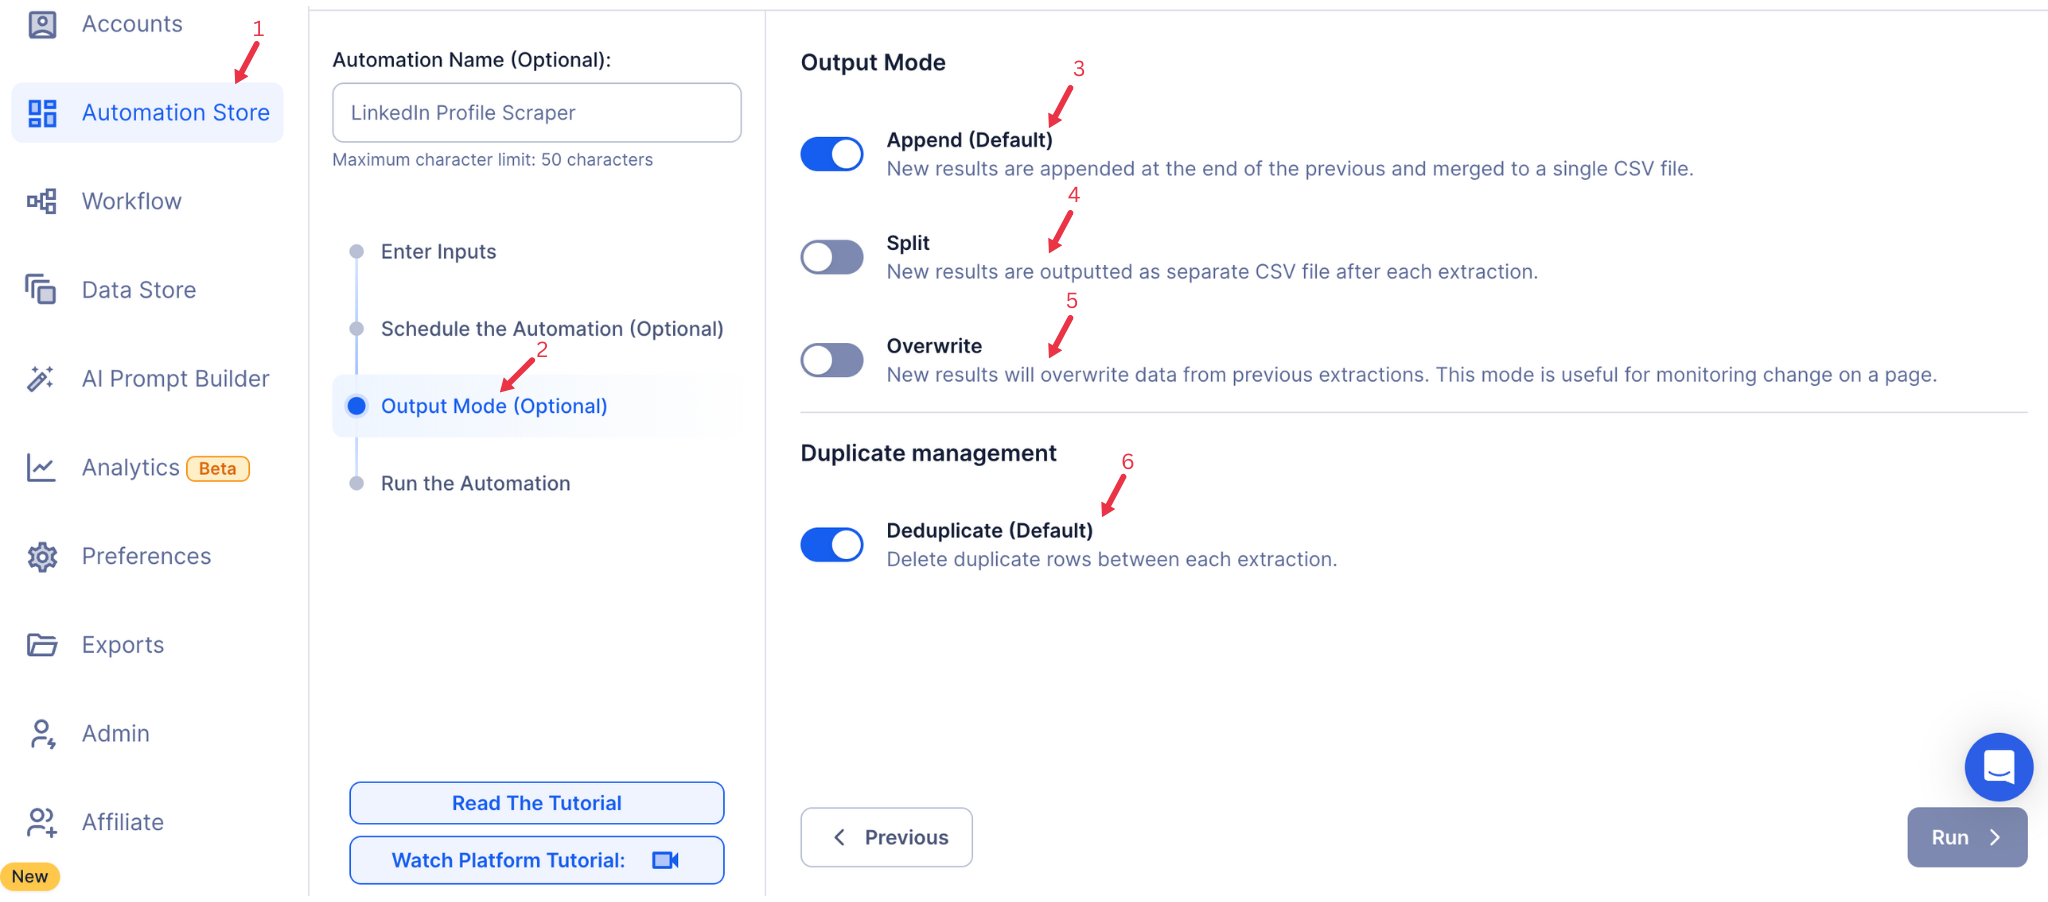
Step 7: Choose Your Output Mode (Optional)
Choose how to save and manage data about the accepted connections. TexAu provides the following options:
- Append (Default): Adds new results to the end of existing data, merging them into a single CSV file.
- Split: Saves new results as separate CSV files for each automation run.
- Overwrite: Replaces previous data with the latest results.
- Duplicate Management: Enable Deduplicate (Default) to remove duplicate rows for clean, organized data.
{% custom-image src="https://v2-web-assets.s3.us-east-1.amazonaws.com/Common/output-mode/output-mode.png" alt="output-mode " /%}
Step 8: Access the Data from the Data Store
After the automation completes, go to the Data Store section in TexAu to access your results. Find the LinkedIn Auto Accept Pending Connection automation or the name you’ve entered, click See Data, then choose either Download CSV to export the data or Open to Google Sheet for quick access.
{% custom-image src="https://v2-web-assets.s3.us-east-1.amazonaws.com/Automations/LinkedIn+Job+Scraper/data-store-see-data.png" alt="step8" /%}
The LinkedIn Auto Accept Pending Connection automation simplifies managing your LinkedIn network by automatically approving connection requests. With scheduling, iteration delays, and export options, it’s ideal for founders, marketers, and growth hackers to efficiently expand their professional network. Save time and maintain a well-managed LinkedIn profile with TexAu.
Run this automation on your own server.
TexAu V3 doesn't host social-platform automations anymore — but the runnable code is yours. Tell us your inputs, outputs, and target environment, and we'll ship you a working version you can deploy and operate yourself.