LinkedIn Auto Post
Automate and schedule LinkedIn posts with TexAu. Plan once and publish consistently without logging in every time.
Last updated
LinkedIn is a versatile platform that empowers professionals to connect, showcase expertise, and cultivate meaningful business relationships. It provides a space for individuals and companies to share insights, industry trends, and accomplishments. As a key tool for enhancing brand visibility, estab
LinkedIn is a versatile platform that empowers professionals to connect, showcase expertise, and cultivate meaningful business relationships. It provides a space for individuals and companies to share insights, industry trends, and accomplishments. As a key tool for enhancing brand visibility, establishing thought leadership, and fostering engagement, LinkedIn plays a pivotal role in building a strong professional presence and driving impactful interactions.
One of the most important factors in maintaining an active and influential LinkedIn presence is consistency. Regular posting helps keep your audience engaged, allowing you to stay top-of-mind, share valuable content, and establish your brand as a thought leader. However, manual posting can be cumbersome, particularly when trying to maintain a consistent posting schedule across multiple accounts or campaigns. Additionally, timing is crucial—posting at the right time can significantly increase your content’s visibility and engagement.
This is where TexAu’s LinkedIn Auto Post feature comes into play. By automating the scheduling and posting process, TexAu allows you to maintain a steady flow of content without the need for constant manual effort. Whether you’re a marketer promoting a new product, a content creator sharing thought leadership insights, or a business owner celebrating milestones, TexAu’s automated posting tools save time and ensure your content strategy remains impactful and consistent.
Key Features of LinkedIn Auto Post
1. Automated Post Scheduling
TexAu’s automated post scheduling feature allows you to plan and schedule LinkedIn posts to go live at the most optimal times. By strategically timing your posts, you can ensure maximum visibility and engagement. This eliminates the guesswork and the need to post manually at peak hours, allowing you to focus on more strategic activities. For businesses looking to optimize LinkedIn content strategies, LinkedIn Product Search Export helps identify trending products and discussions within LinkedIn, allowing for more targeted and relevant post content.
Example: A digital marketing agency is preparing for the launch of a new product and wants to share regular updates leading up to the launch. Using TexAu, they schedule a series of posts about the product’s features, benefits, and pre-launch offers to go live at optimal times during the week, ensuring that the posts reach their target audience at the most impactful moments.
2. Customizable Post Content
TexAu’s flexibility allows users to customize the content of their posts, including text, images, videos, and links. This means you can craft compelling posts that align with your brand voice and the message you want to convey, without the limitations of a one-size-fits-all approach.
Example: A content creator shares a weekly blog post about the latest trends in artificial intelligence. Using TexAu, they automatically schedule the post with a custom caption, a relevant image from their blog, and a link to the article. The customized content ensures that each post is tailored to their audience’s interests and resonates with the message they wish to communicate. For users managing large LinkedIn networks, LinkedIn Connections Export enables professionals to track, analyze, and manage LinkedIn connections efficiently.
3. Bulk Post Upload
TexAu simplifies content management by allowing users to upload and schedule multiple posts at once. This bulk upload feature streamlines the posting process, especially for users who need to plan out an entire content calendar at once. For recruiters and marketers, LinkedIn Company Followers Export helps track and analyze LinkedIn followers, providing valuable insights into audience engagement and reach.
Example: A social media manager overseeing a large corporate LinkedIn page needs to schedule multiple posts for the upcoming month. Instead of manually scheduling each post one by one, they upload the posts in bulk to TexAu, scheduling a mix of company news, industry insights, and promotional content for the entire month, saving time and ensuring a steady flow of content.
4. Targeted Audience Selection
TexAu allows users to select specific target audiences for their posts, ensuring that content reaches the right people. Posts can be tailored to specific industries, job titles, locations, or even professional connections, allowing for hyper-targeted content distribution.
Example:
A recruiter posting a job opening for a software developer can use TexAu to target professionals in the tech industry, particularly those with software engineering backgrounds and located in a specific geographic region. This targeted approach increases the likelihood of reaching qualified candidates and attracting high-quality applicants.
5. Real-Time Post Tracking
Once your posts are live, TexAu provides real-time tracking and analytics so you can monitor the performance of each post. This allows you to measure engagement, such as likes, comments, and shares, and adjust your content strategy accordingly.
Example: A business owner promotes a special offer for their service on LinkedIn. Using TexAu’s real-time post tracking, they monitor how many people are interacting with the post, what type of comments are being made, and whether there are spikes in engagement during specific times. This data helps the owner refine their future posts to drive even higher levels of engagement. Users looking to improve LinkedIn engagement tracking can leverage LinkedIn Connection Checker to analyze and manage their professional network more effectively.
Challenges Addressed by LinkedIn Auto Post
1. Manual Posting
Manual posting requires constant attention and can become a repetitive and time-consuming task, especially when managing multiple accounts or campaigns. It’s easy to lose track of timing, miss optimal posting windows, or forget to post altogether. TexAu automates this process, ensuring that posts are made at the right time, without requiring constant manual intervention.
Example: A content creator working on a series of thought leadership posts for the next few weeks needs to publish content regularly but has limited time to log into LinkedIn multiple times per day. With TexAu, they can schedule all their posts in advance, freeing up time for other important tasks, while maintaining a steady presence on the platform. If you have excessive pending connection requests, LinkedIn Automatic Invitation Withdrawal helps efficiently manage and optimize LinkedIn requests.
2. Inconsistent Posting
Inconsistent posting can lead to a drop in audience engagement, as followers may forget about your content or brand. A lack of regular posts may also reduce your visibility in the LinkedIn algorithm, limiting the reach of your content. TexAu ensures that content is posted consistently, helping to maintain audience engagement and visibility.
Example: A marketer trying to maintain visibility for their brand may struggle to keep up with the frequency of posts required to stay relevant. With TexAu’s scheduling tool, they can plan content for an entire week or month in advance, ensuring that their audience receives regular updates and that the brand stays fresh in their minds.
3. Missed Opportunities
Without a solid content strategy, you may miss out on opportunities to engage your audience during peak times, such as during a live event, product launch, or industry-related news cycle. TexAu’s automation ensures that posts go live at the right times to capitalize on these opportunities, increasing engagement and visibility.
Example: A startup founder has an upcoming product launch event and wants to ensure their posts go live at the optimal times leading up to the event. By scheduling posts through TexAu, they ensure that their promotional content reaches their target audience during the best possible times to create anticipation and excitement.
Benefits of Automating LinkedIn Posting with TexAu
1. Time Efficiency
Automating the posting process saves significant time, as you no longer need to manually post updates or worry about missing an optimal posting window. With TexAu, you can schedule posts in bulk, plan your content calendar, and free up time to focus on other strategic activities, such as building relationships with clients, prospects, or partners.
Example: A business owner spends time engaging with potential clients and building their network instead of manually posting content every day. They use TexAu to schedule their posts for the week ahead, allowing them to focus on high-priority tasks while maintaining a consistent LinkedIn presence.
2. Consistent Engagement
By scheduling posts regularly, you ensure that your content reaches your audience consistently, which in turn helps maintain engagement. Regular posts help to establish familiarity and trust with your network, making it more likely that your audience will engage with your content, share it, or take the desired action.
Example: A content creator shares weekly insights on industry trends. By automating these posts, they maintain a consistent presence on LinkedIn, building trust and engagement with their audience over time. This consistency helps foster loyalty and increases the likelihood that followers will return to engage with future posts. For those looking to automate LinkedIn interactions, LinkedIn Auto Comment allows professionals to engage with relevant posts by liking and commenting automatically, ensuring consistent visibility.
3. Increased Reach
Posting at optimal times can significantly boost the reach of your content. TexAu helps you automate this process, ensuring your posts are published during peak hours when your audience is most active. This increases the likelihood that your content will be seen, liked, shared, and commented on.
Example: A SaaS company shares a product update on LinkedIn. By automating the post to go live during peak activity hours (e.g., mid-morning or early afternoon), the post reaches a larger audience and generates more engagement than it would if posted randomly. This increases the likelihood of the post being shared, commented on, and noticed by potential customers.
4. Enhanced Content Strategy
With TexAu, you can plan and execute a cohesive content calendar that aligns with your business objectives, product launches, industry events, or seasonal campaigns. Scheduling posts in advance allows you to execute your content strategy with precision, ensuring your messaging is consistent and aligned with your overall goals.
Example: A company preparing for a product launch schedules a series of posts leading up to the launch date. TexAu ensures that each post is published at the right time, building momentum and excitement as the launch day approaches. By automating this process, the company maintains control over its content calendar while ensuring it aligns with key milestones and goals.
Use Cases for LinkedIn Auto Post
Marketers
Marketers can utilize TexAu to automate the posting of promotional content and updates for campaigns, ensuring consistent visibility across LinkedIn. This automation helps maintain a robust online presence while freeing up time for strategic planning.
Example: A digital marketing agency preparing for an upcoming product launch schedules posts to announce key features, teaser videos, and webinar invitations. With TexAu automating these posts, the team can focus on refining other campaign elements, such as email outreach and performance analysis, while maintaining an active LinkedIn presence.
Content Creators
Content creators often rely on consistent posting to engage and grow their audience. Automating the sharing of blog posts, insights, and thought leadership pieces allows them to concentrate on producing high-quality content.
Example: A blogger schedules a weekly series of posts summarizing their recent articles, each tailored to address a specific topic or trend. By automating this process, they ensure their followers stay engaged and look forward to consistent updates without diverting time from creating new content.
Recruiters
Recruiters can automate the process of sharing job postings, company updates, and industry insights, ensuring a steady stream of content that attracts top talent. Automation reduces manual posting efforts and ensures a professional and consistent online presence.
Example: A recruiter creates a schedule for posts announcing open roles, sharing employee testimonials, and showcasing the company culture. Over time, this strategy not only attracts qualified applicants but also builds the employer brand on LinkedIn.
Business Owners
Business owners can enhance client and partner relationships by automating posts that highlight their achievements, celebrate milestones, or share relevant updates. This automation ensures consistent communication with their network.
Example: A small business owner schedules posts to announce a partnership with a well-known brand and celebrate their business’s 10th anniversary. By automating these updates, they maintain engagement while managing other responsibilities.
Best Practices for LinkedIn Auto Post
1. Create a Content Calendar
A content calendar is an essential tool for planning and organizing your LinkedIn posts. It ensures that your content aligns with your business objectives, campaigns, and events while maintaining a consistent posting schedule.
- How to Create a Content Calendar: Identify key dates such as product launches, webinars, or industry events. Assign specific topics or themes to each date, ensuring your content supports broader marketing goals.
- Pro Tip: Mix your content types—including promotional posts, educational insights, and engagement-driven updates like polls or questions to keep your content fresh and varied.
2. Optimize Timing
The timing of your posts can significantly impact how your audience engages with your content. Posting at the right time ensures higher visibility and interaction.
- Finding Optimal Posting Times: Use LinkedIn Analytics or TexAu's insights to identify when your audience is most active. This could vary based on factors like time zones, industries, and demographics.
- Scheduling for Maximum Impact: Once you know your audience’s peak activity hours, schedule your posts accordingly. For instance, B2B audiences often engage more during weekdays, especially mid-morning or early afternoon.
- Pro Tip: Experiment with different posting times to refine your schedule. Regularly review engagement metrics to adapt and optimize your strategy.
3. Engage with Comments
Automation handles the posting process, but personal engagement is key to building relationships and fostering trust.
- Why Engagement Matters: Responding to comments, answering questions, and acknowledging feedback shows your audience that you value their input. This not only boosts your credibility but also encourages more interactions.
- Best Practices for Engagement:
-
- Set aside time each day to check for comments on your posts.
- Respond promptly and thoughtfully to questions or feedback.
- Use responses to spark deeper conversations, encouraging followers to stay engaged.
- Pro Tip: Use automated alerts or tools to track comments and mentions, ensuring no interaction goes unnoticed.
Real-Life Applications of LinkedIn Auto Post
Case Study 1: Marketing Campaigns
A marketing team planning a new product launch used TexAu to automate their LinkedIn strategy.
- What They Did: Scheduled teaser posts leading up to the launch, feature highlights on launch day, and follow-up content such as customer testimonials and case studies.
- Results: This approach led to a 40% increase in engagement, as the consistent updates kept their audience informed and excited throughout the campaign.
Case Study 2: Recruitment Drive
A recruitment agency aimed to attract top talent by maintaining a steady presence on LinkedIn.
- What They Did: Automated weekly job postings, shared company culture updates, and posted industry news to appeal to potential candidates.
- Results: Over three months, the agency saw a 30% rise in job applications. Automation allowed them to focus on interviews and candidate evaluation while ensuring consistent visibility.
Case Study 3: Thought Leadership
A business consultant wanted to establish themselves as a thought leader in their field.
- What They Did: Scheduled a series of posts sharing insights on industry trends, actionable advice, and personal experiences.
- Results: This strategy resulted in a significant boost in profile views and connection requests, as their consistent and valuable content attracted a wider audience.
Metrics and Tracking
1. Engagement Rates
Engagement metrics like likes, shares, and comments indicate how well your content resonates with your audience. For enhanced automation, LinkedIn AI Message helps craft personalized LinkedIn messages at scale to increase response rates and engagement.
- How to Track Engagement: Use LinkedIn Analytics or TexAu's reporting features to measure post interactions. Compare engagement rates across different types of content (e.g., videos vs. text posts) to identify what works best.
- Pro Tip: Look for patterns in audience preferences. If posts with visuals perform better, incorporate more images or videos into your strategy.
2. Reach and Impressions
Reach measures how many unique users see your post, while impressions track the total number of times your post is displayed. To improve LinkedIn outreach effectiveness, LinkedIn Connections Export provides insights into the growth and quality of your LinkedIn network.
- Why These Metrics Matter: They help you gauge the visibility of your content and identify factors like the effectiveness of hashtags or posting times.
- How to Track Reach and Impressions: Use LinkedIn's analytics dashboard to monitor these metrics. Test different strategies, such as incorporating trending hashtags or adjusting post timing, to improve your visibility.
3. Conversion Metrics
Conversion metrics track actions taken as a result of your posts, such as clicks to your website, webinar sign-ups, or form submissions.
- Why They’re Important: These metrics directly reflect how well your content drives business goals, making them critical for measuring ROI.
- How to Track Conversions:
-
- Use UTM parameters in your LinkedIn links to track clicks and conversions.
- Analyze LinkedIn Analytics to identify which posts generate the most traffic or leads.
- Monitor website analytics for spikes in traffic after posting specific content.
- Pro Tip: Tie conversion metrics back to specific campaigns or content themes to understand what drives the best results.
Conclusion: Streamlining LinkedIn Content Management with TexAu
TexAu’s LinkedIn Auto Post feature is a powerful tool that helps professionals and businesses automate the posting process, ensuring consistent engagement and efficient content management. By leveraging TexAu’s scheduling, targeting, and tracking capabilities, users can enhance their content strategy, save time, and boost their LinkedIn visibility. Start using TexAu today to simplify your LinkedIn content management and maximize the impact of your posts!
The LinkedIn Auto Post automation allows founders, companies, marketers, and sales managers to schedule and post content automatically to their LinkedIn feed or groups. With TexAu’s scheduling, iteration delays, and export features, this automation helps you save time and maintain a consistent LinkedIn presence to engage your audience effectively.
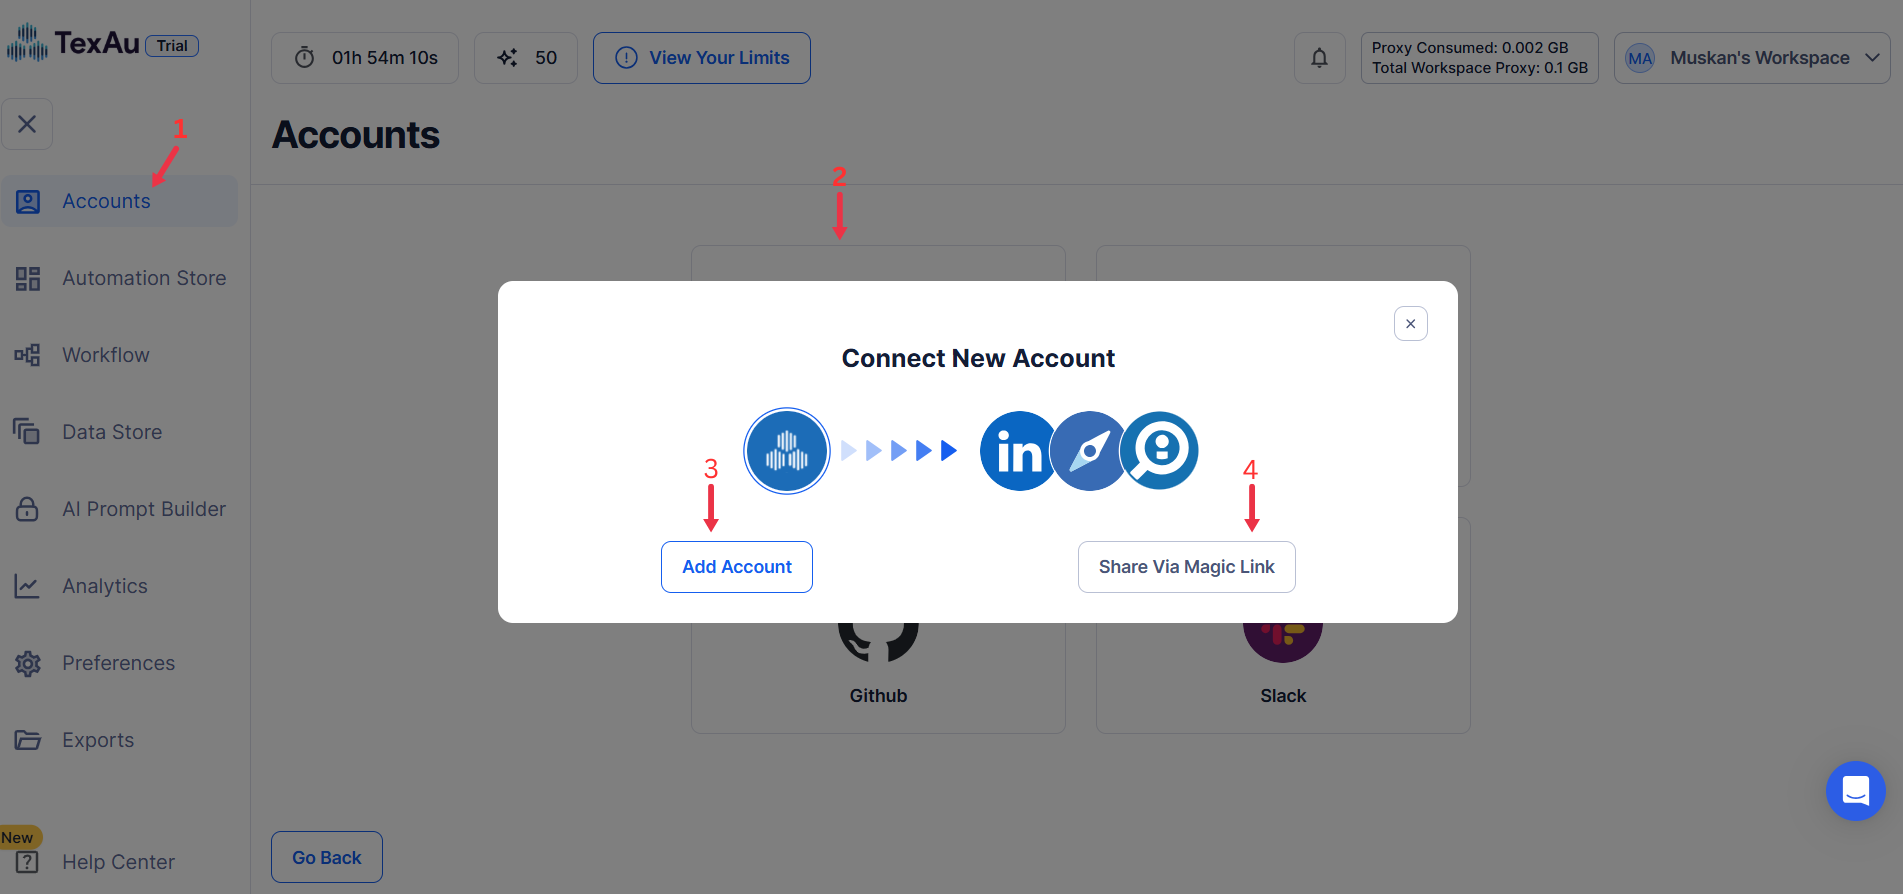
Step 1: Log in to TexAu and Connect LinkedIn
Log in to your TexAu account at v2-prod.texau.com.
Go to Accounts and connect your LinkedIn account. You can choose one of these methods:
- Share via Magic Link: Share the link, copy it to your browser, and follow the steps to integrate your LinkedIn account securely.
- Add Account: Sync cookies and browser data with TexAu for seamless integration.
Tip: Use Magic Link for an easy and secure connection.
{% custom-image src="https://v2-web-assets.s3.us-east-1.amazonaws.com/Common/log-in-to-texau-and-connect-linkedin/connect-linkedin.png" alt="connect-linkedin" /%}
Step 2: Choose Cloud or Desktop Execution
Decide how you want to run the automation:
- Cloud Mode: Automates tasks on TexAu’s servers with built-in proxies. You can add custom proxies via Settings > Preferences > Proxies.
- Desktop Mode: Runs automation on your local device using your IP address.
Tip: Desktop mode saves cloud runtime credits and gives more control over the process.
{% custom-image src="https://v2-web-assets.s3.us-east-1.amazonaws.com/Common/add-account.png" alt="step2" /%}
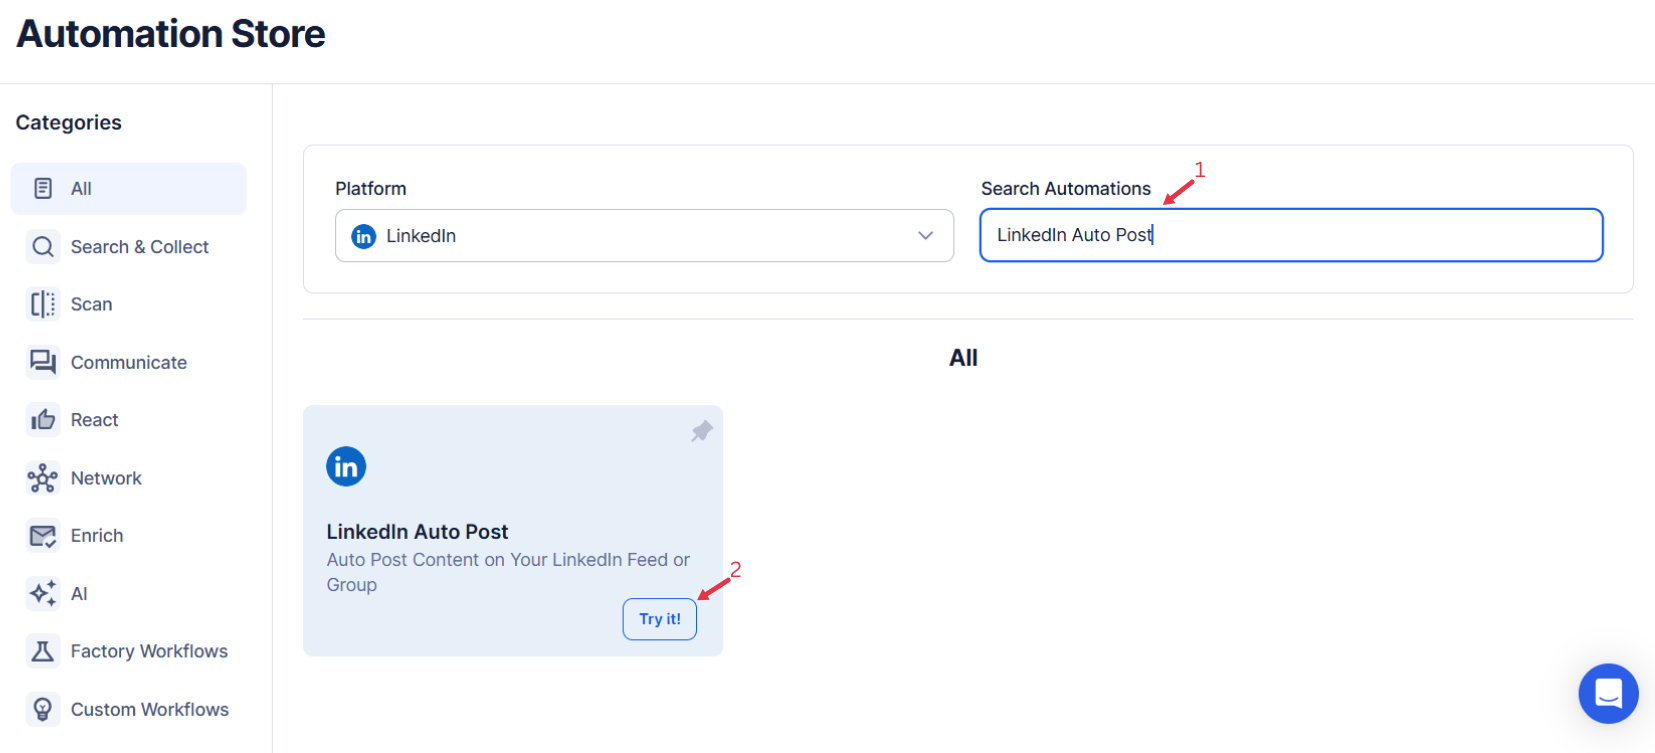
Step 3: Search for the Particular LinkedIn Automation
- Navigate to the Automation Store on TexAu.
- Use the search bar to find LinkedIn Auto Post automation.
{% custom-image src="https://v2-web-assets.s3.us-east-1.amazonaws.com/Automations/linkedin-auto-post/linkedin-auto-post.png" alt="b5search-for-the-particular-LinkedIn-automation" /%}
Step 4: Select Your Input Source
Define the input source to specify LinkedIn post content and details for the LinkedIn Auto Post automation. TexAu offers flexible options to streamline your posting process and enhance your LinkedIn presence. Here's how to configure each:
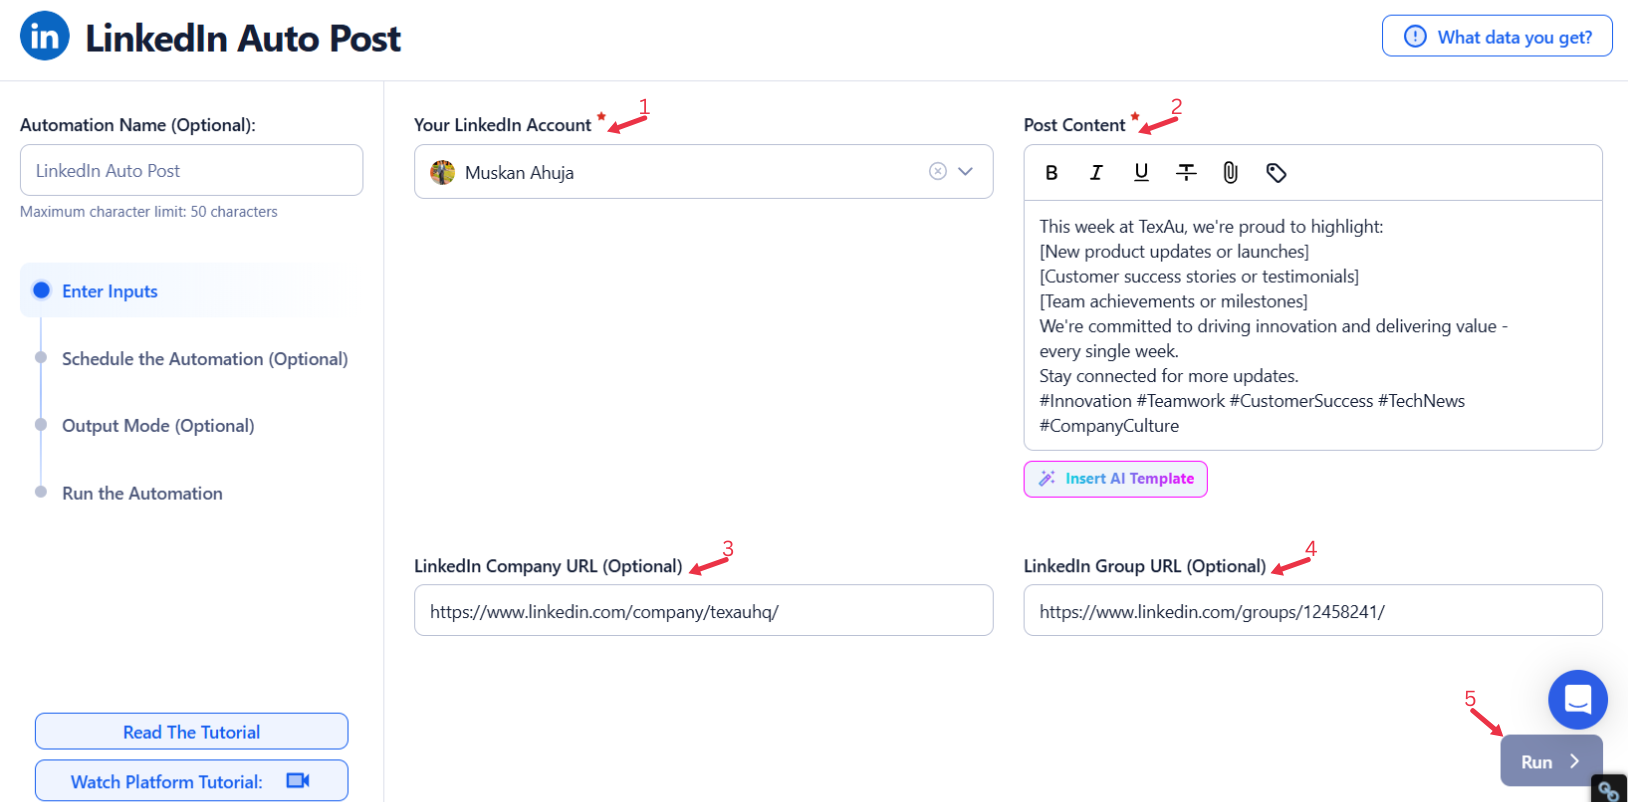
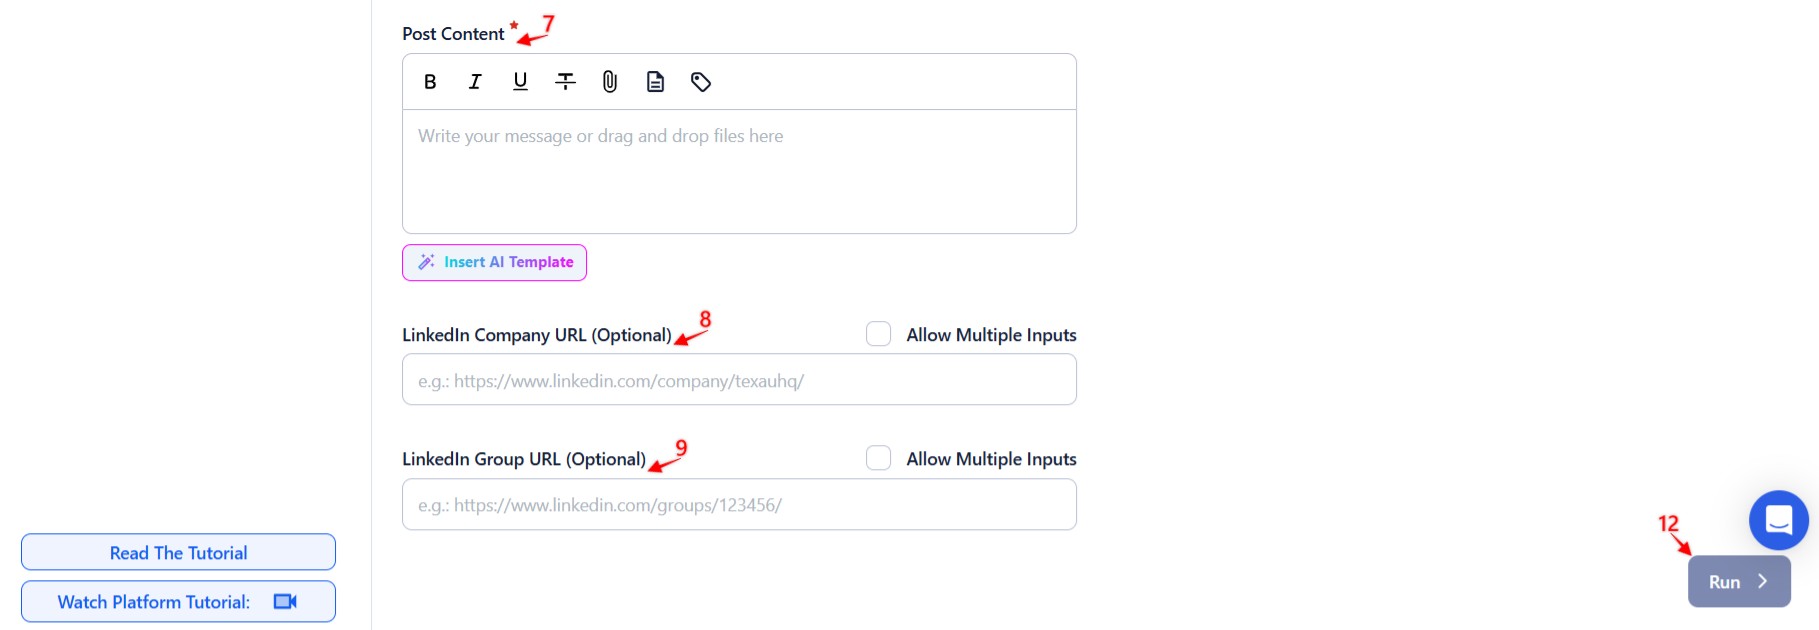
Manually Enter a Single Input
Use this option to create and post content on one specific LinkedIn profile, company page, or group. Here’s how to use it:
- LinkedIn URL: Enter the required LinkedIn URL (e.g., a company or group URL).
- Post Content: Provide the post content in the corresponding fields.
- Use the rich text editor to format the post content, attach files, or include emojis.
- This option is ideal for targeted or high-priority posts.
{% custom-image src="https://v2-web-assets.s3.us-east-1.amazonaws.com/Automations/linkedin-auto-post/linkedin-auto-post-single-inputs.png" alt="enter-a-single-input" /%}
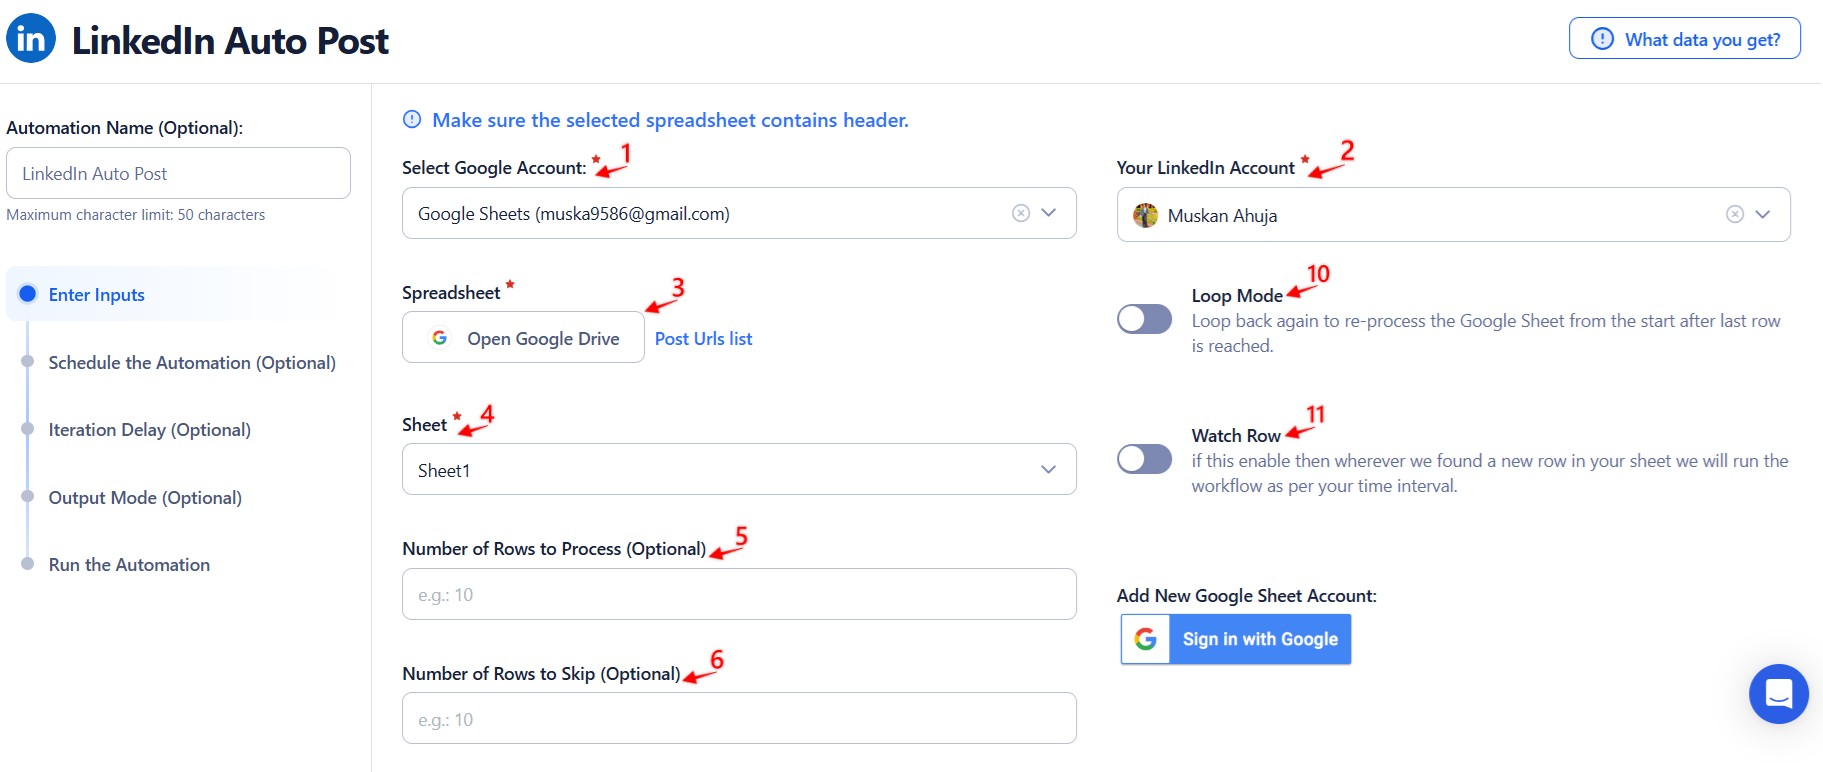
Use Google Sheets for Bulk Input
This option is perfect for scheduling and managing multiple LinkedIn posts efficiently. Follow these steps:
- Connect Your Google Account
- Click Select Google Account to choose your Google account or click Add New Google Sheet Account (you can add multiple Google accounts).
- Select the Spreadsheet
- Click Open Google Drive to locate the Google Sheet containing LinkedIn post content, company URLs, or group URLs.
- Select the spreadsheet and the specific sheet (e.g., Sheet1) containing the post content and associated LinkedIn URLs.
- Provide Input Details
- Post Content: Choose the column header containing the post content you want to publish. The post content can include text, emojis, and attachments.
- LinkedIn Company URL or Group URL (Optional): Choose the column headers containing the URLs for the LinkedIn company pages or groups where the posts should be published.
- Select Allow Multiple Inputs if you need to publish the same content across multiple URLs.
- LinkedIn Company URL or Group URL (Optional): Choose the column headers containing the URLs for the LinkedIn company pages or groups where the posts should be published.
- Adjust Processing Options
- Number of Rows to Process (Optional): Define the number of rows to process from the sheet. You can input a specific number in the corresponding field.
- Number of Rows to Skip (Optional): Specify rows to skip at the beginning of the sheet to ensure proper data management.
- Click Run in the lower-right corner to start the automation if no advanced settings are needed.
Optional Advanced Feature:
- Loop Mode: Enable Loop Mode to re-process the Google Sheet from the beginning once all rows are completed. This is useful for tasks that require recurring updates.
Watch Row (Optional)
Watch Row feature provides seamless workflow automation by detecting new rows in Google Sheets and executing the assigned tasks immediately.
Set Watch Row settings by selecting an execution frequency and defining a monitoring period.
Watch Row Schedule
- None
- Scheduling Intervals (e.g., every 15 minutes, every hour)
- One-Time Execution
- Daily Execution
- Weekly Recurrence (e.g., every Monday and Saturday)
- Monthly Specific Dates (e.g., 10th and 28th)
- Custom Fixed Dates (e.g., November 12)
By default, Watch Row checks every 15 minutes and continues for five days unless modified.
With Watch Row, workflows stay updated automatically.
{% custom-image src="https://v2-web-assets.s3.us-east-1.amazonaws.com/Automations/linkedin-auto-post/linkedin-auto-post-1-google-sheet.jpeg" alt="use-google-sheets-for-bulk-input" /%}
{% custom-image src="https://v2-web-assets.s3.us-east-1.amazonaws.com/Automations/linkedin-auto-post/linkedin-auto-post-2-google-sheet.jpeg" alt="use-google-sheets-for-bulk-input" /%}
Process a CSV File
This option allows you to manage LinkedIn posts using a static file. Follow these steps:
- Upload the File
- Click Upload CSV File and browse to locate the file containing LinkedIn post content, company URLs, or group URLs.
- Once uploaded, TexAu will display the file name and preview its content. Verify the data to confirm the correct file is selected.
- Provide Input Details
- Post Content: Choose the column header containing the post content you want to publish. The post content can include text, emojis, and attachments.
- LinkedIn Company URL or Group URL (Optional): Choose the column headers containing the URLs for the LinkedIn company pages or groups where the posts should be published.
- Select Allow Multiple Inputs if you need to publish the same content across multiple URLs.
- Adjust Processing Options
- Number of Rows to Process (Optional): Specify the number of rows to process from the CSV file.
- Number of Rows to Skip (Optional): Define rows to skip at the beginning of the file.
- Click Run in the lower-right corner to initiate the automation if advanced configurations like scheduling are not required.
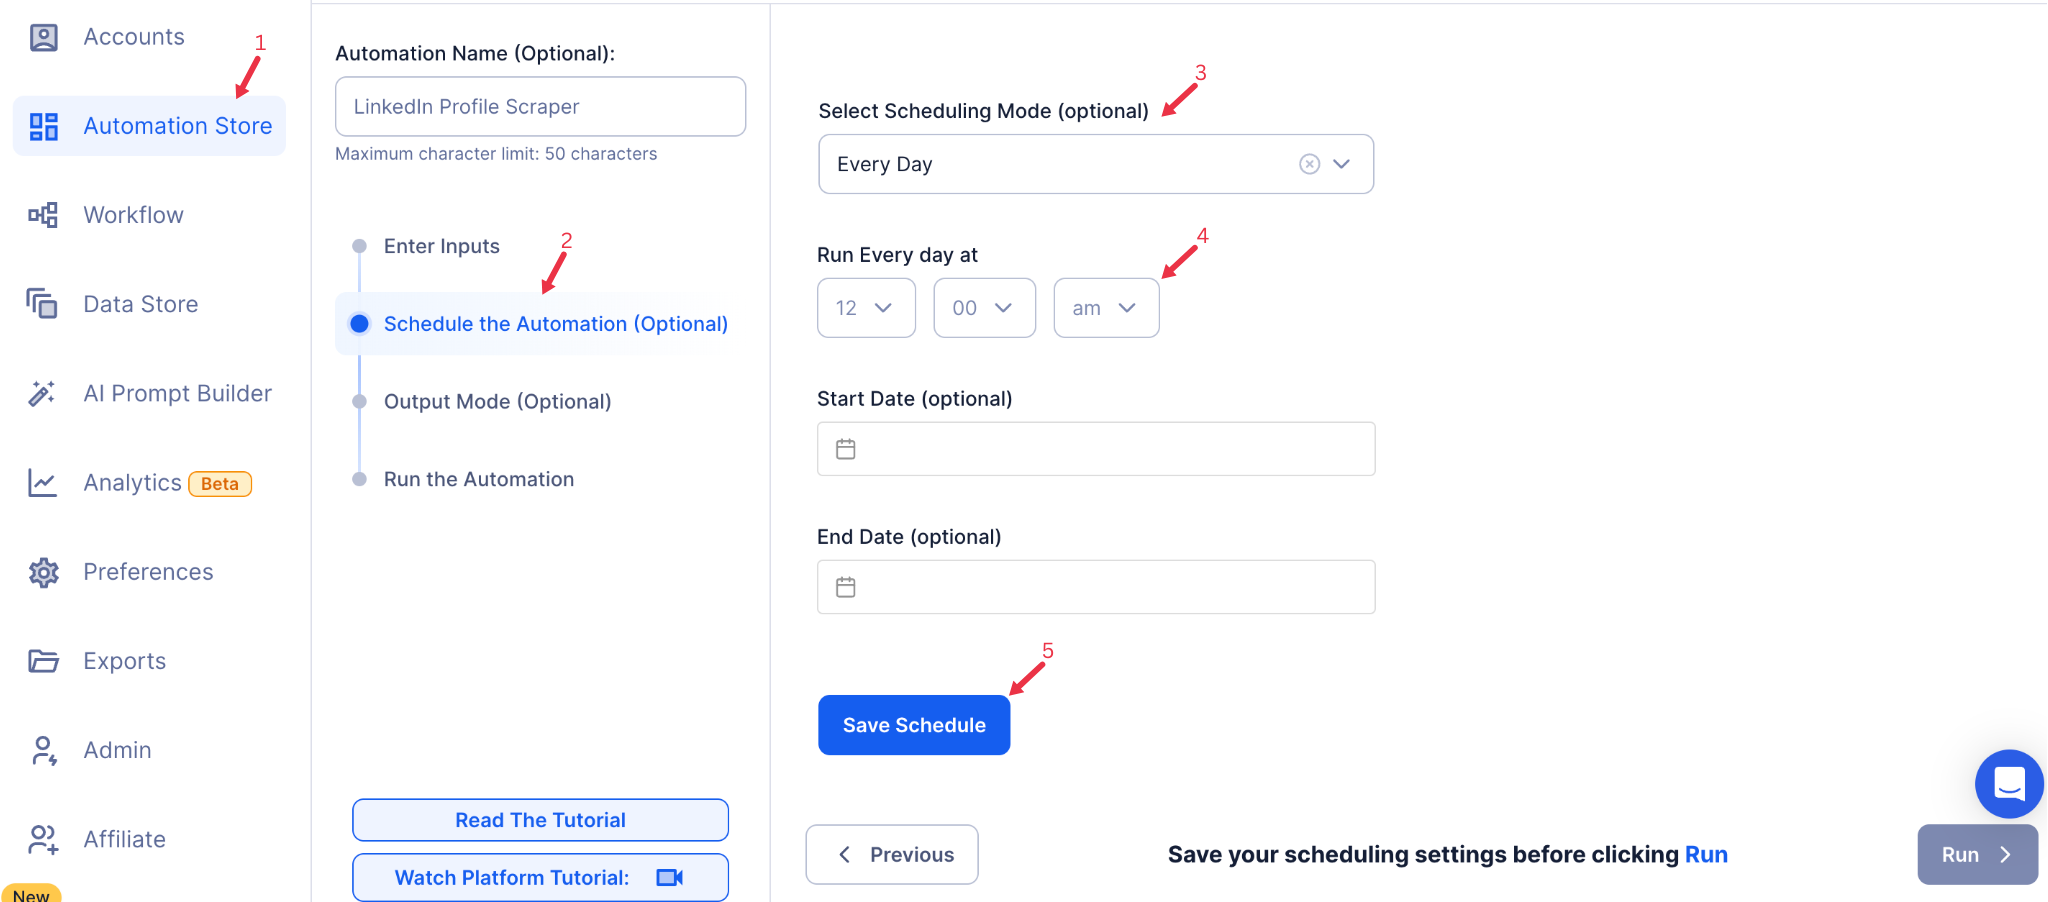
Step 5: Schedule the Automation (Optional)
Schedule the automation to run at specific times and intervals to maintain consistent posting. Select one of the following options:
- None
- At Regular Intervals (e.g., every 12 hours or daily)
- Once
- Every Day
- On Specific Days of the Week (e.g., every Monday)
- On Specific Days of the Month (e.g., the 5th and 20th)
- On Specific Dates (e.g., January 10)
{% custom-image src="https://v2-web-assets.s3.us-east-1.amazonaws.com/Common/schedule-the-automation/schedule-the-automation.png" alt="schedule-the-automation" /%}
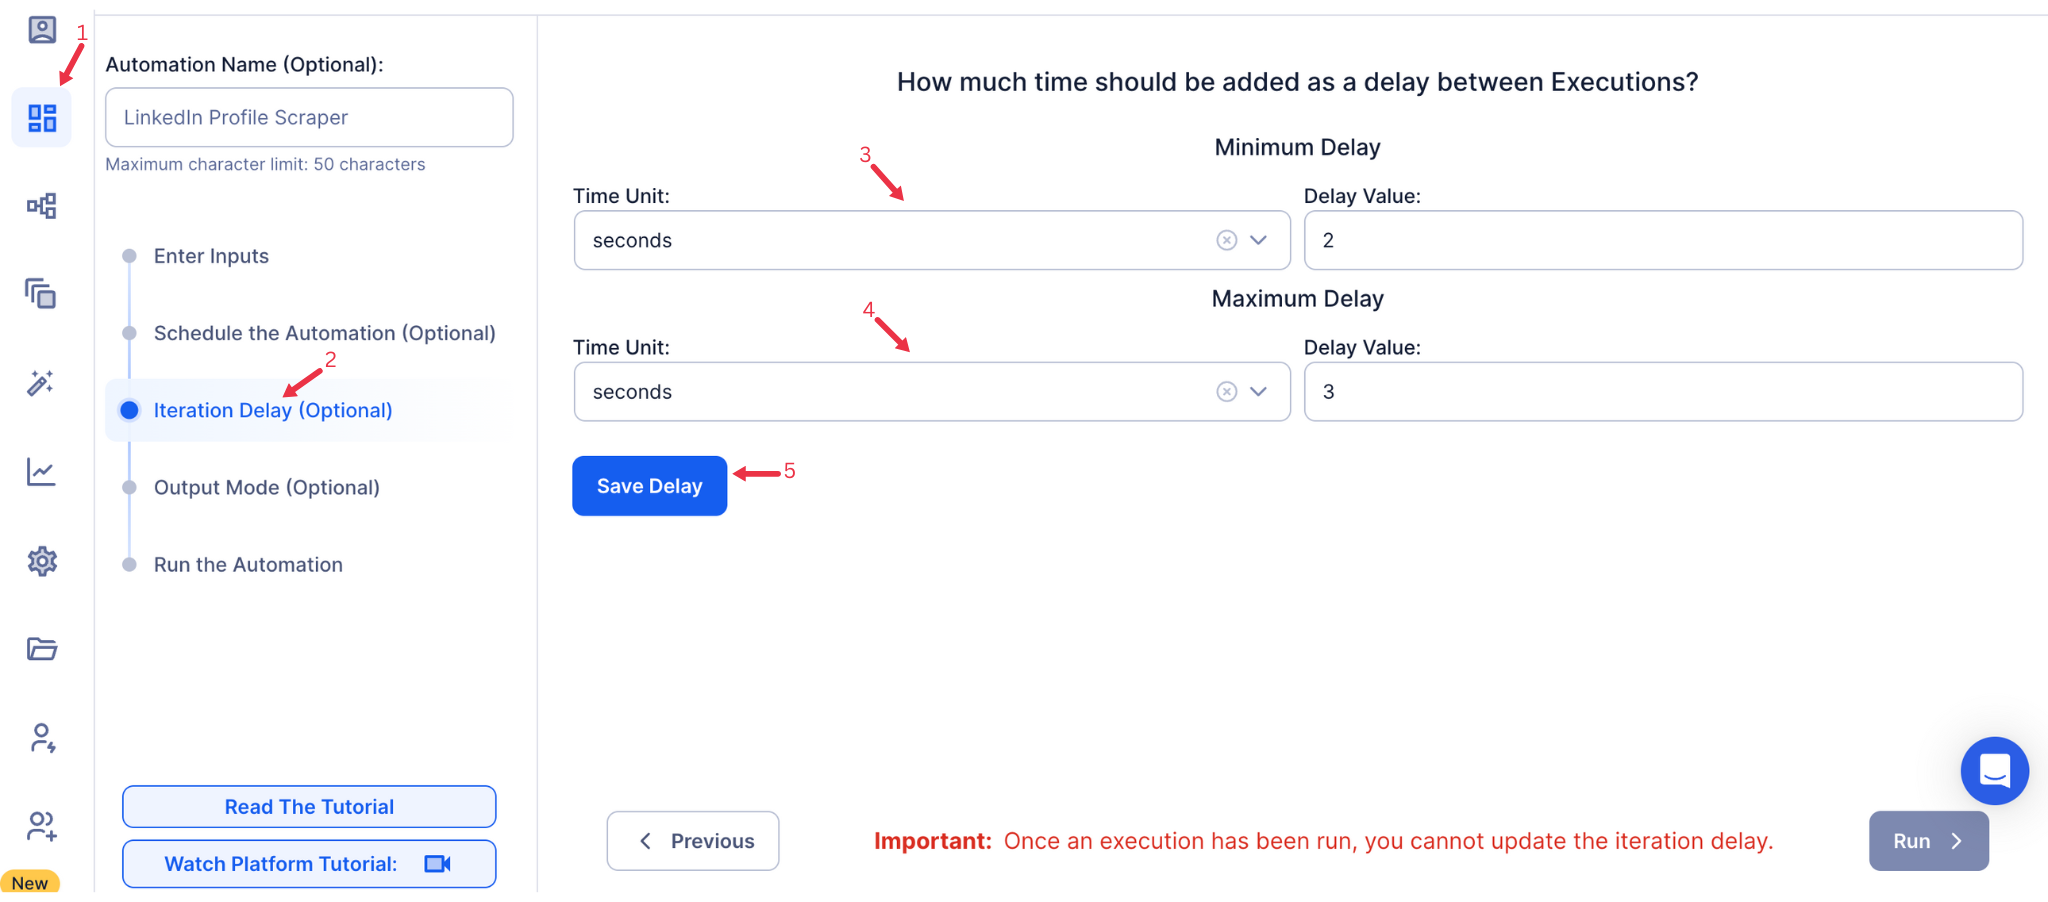
Step 6: Set an Iteration Delay (Optional)
Avoid detection and simulate human-like activity by setting an iteration delay. Choose minimum and maximum time intervals to add randomness between actions. This makes your activity look natural and reduces the chance of being flagged.
- Minimum Delay: Enter the shortest interval (e.g., 10 seconds).
- Maximum Delay: Enter the longest interval (e.g., 20 seconds).
Tip: Random delays keep your automation safe and reliable.
{% custom-image src="https://v2-web-assets.s3.us-east-1.amazonaws.com/Common/iteration-delay/iteration-delay.png" alt="iteration-delay" /%}
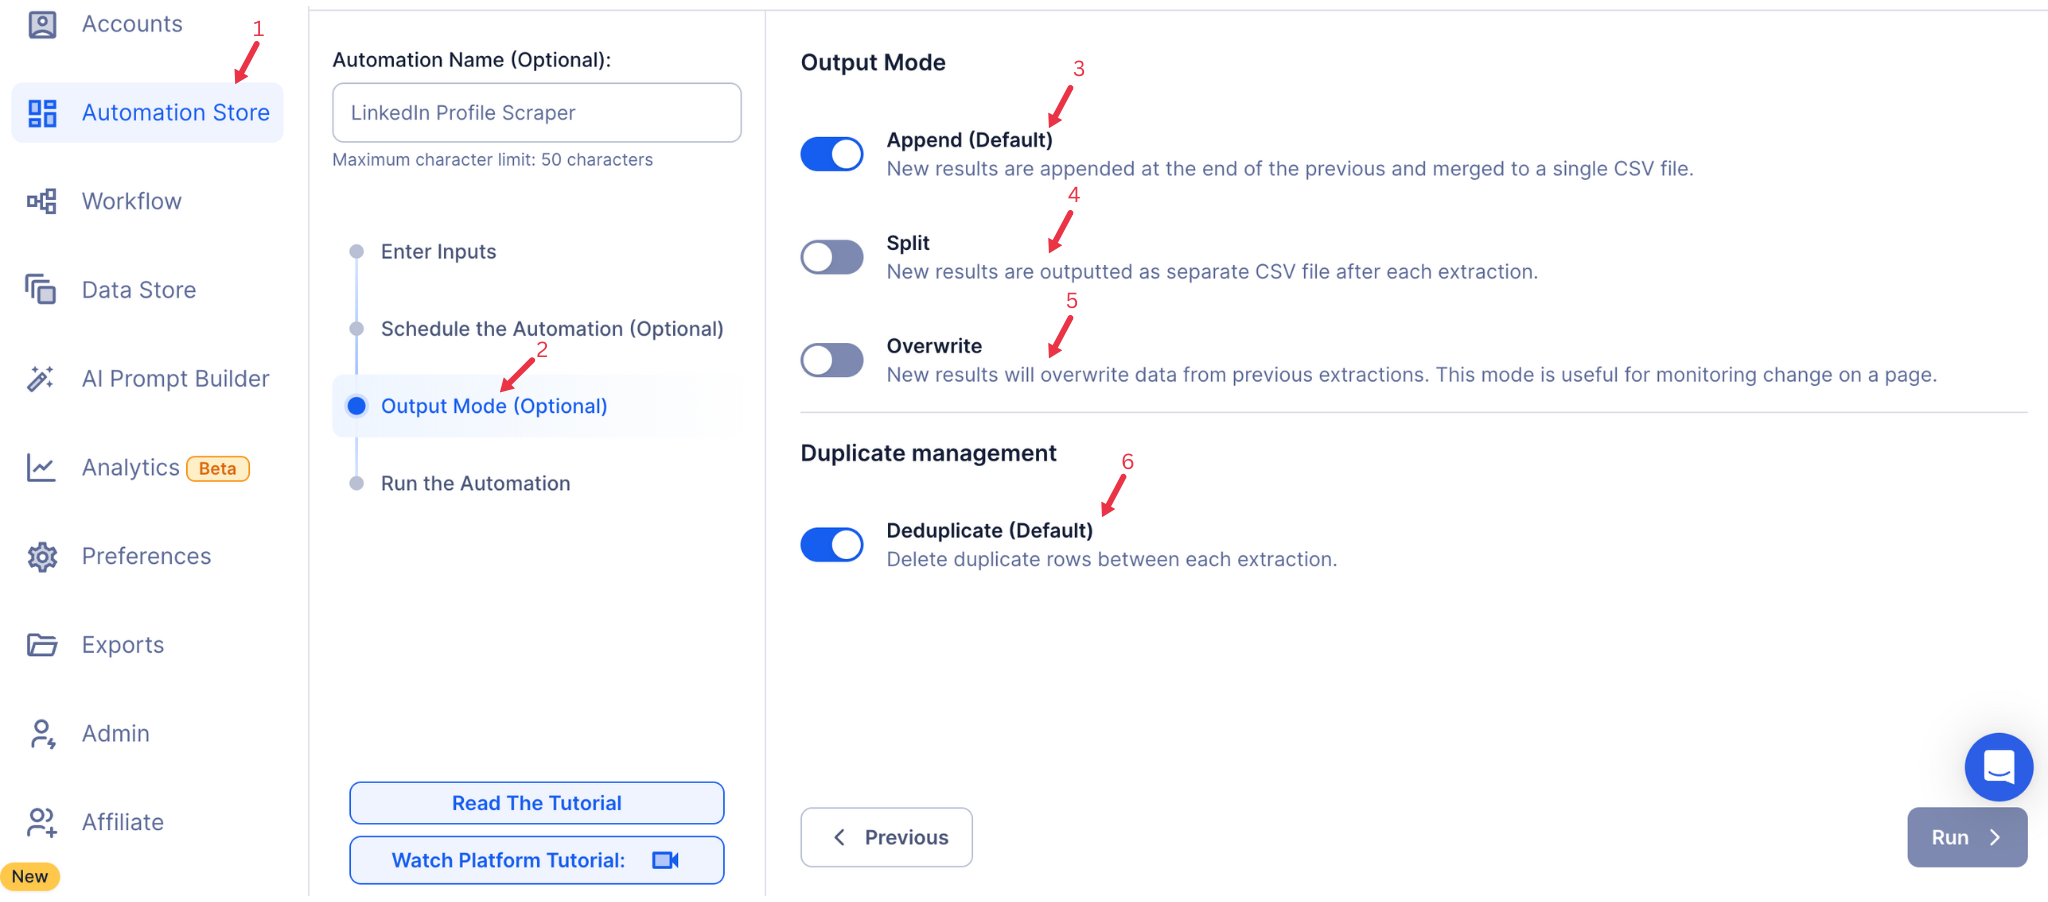
Step 7: Choose Your Output Mode (Optional)
Choose how to save and manage data about the posted content. TexAu provides the following options:
- Append (Default): Adds new results to the end of existing data, merging them into a single CSV file.
- Split: Saves new results as separate CSV files for each automation run.
- Overwrite: Replaces previous data with the latest results.
- Duplicate Management: Enable Deduplicate (Default) to remove duplicate rows for clean, organized data.
{% custom-image src="https://v2-web-assets.s3.us-east-1.amazonaws.com/Common/output-mode/output-mode.png" alt="output-mode " /%}
Step 8: Access the Data from the Data Store
After the automation completes, go to the Data Store section in TexAu to access your results. Find the LinkedIn Auto Post automation or the name you’ve entered, click See Data, then choose either Download CSV to export the data or Open to Google Sheet for quick access.
{% custom-image src="https://v2-web-assets.s3.us-east-1.amazonaws.com/Automations/LinkedIn+Job+Scraper/data-store-see-data.png" alt="step8" /%}
Run this automation on your own server.
TexAu V3 doesn't host social-platform automations anymore — but the runnable code is yours. Tell us your inputs, outputs, and target environment, and we'll ship you a working version you can deploy and operate yourself.