LinkedIn Job Scraper
Easily scrape LinkedIn job listings, including titles, companies, and locations. Export clean data in seconds with no coding skills or API required.
Last updated
LinkedIn has emerged as the go-to platform for job listings, professional networking, and recruitment. With millions of job postings spanning industries and geographies, it serves as a critical resource for job seekers, recruiters, and businesses alike. Whether you're a professional searching for ne
LinkedIn has emerged as the go-to platform for job listings, professional networking, and recruitment. With millions of job postings spanning industries and geographies, it serves as a critical resource for job seekers, recruiters, and businesses alike. Whether you're a professional searching for new opportunities or a company analyzing hiring trends, LinkedIn’s vast job database can provide unparalleled insights.
However, manually extracting and analyzing job data from LinkedIn is time-intensive and prone to errors. This is where TexAu’s LinkedIn Job Scraper comes in. This tool automates the process, enabling users to extract accurate and actionable job data in a fraction of the time. By leveraging TexAu, individuals and organizations can streamline their efforts, make data-driven decisions, and maximize productivity.
Key Features of TexAu’s LinkedIn Job Scraper
1. Comprehensive Job Data Extraction
TexAu’s LinkedIn Job Scraper collects critical details about job postings, including job titles, company names, locations, descriptions, posting dates, and LinkedIn job URLs. This granular data can be used for detailed analysis, trend identification, and process optimization.
Example Scenario: Imagine a recruiter specializing in tech roles. By using TexAu, they can scrape hundreds of postings for “Data Scientist” roles, gathering key information such as required skills, company hiring practices, and salary expectations. This allows them to refine their outreach and attract top-tier candidates.
2. Customizable Filters
The scraper enables users to narrow their focus by applying filters like keywords, job titles, industries, locations, and company size. These filters ensure that the extracted data is relevant to the user’s specific objectives.
Example Scenario: A job seeker interested in remote roles in the technology sector can set filters to scrape only postings with keywords like “remote” or “work-from-home” in job titles and descriptions. Similarly, a marketer looking for companies in need of “digital transformation services” can apply filters to identify targeted prospects.
3. Bulk Job Scraping
Manually extracting job postings one by one is a laborious process. TexAu eliminates this inefficiency by allowing users to scrape multiple job postings simultaneously, saving both time and effort.
Example Scenario: A business owner aiming to identify companies hiring for roles related to marketing analytics can scrape hundreds of relevant postings in one go. This bulk extraction provides actionable leads that the business can use for targeted outreach. To further refine their lead generation, they can also use LinkedIn Event Scraper to track companies actively participating in LinkedIn-hosted events and conferences.
4. Export Formats
The extracted job data can be downloaded in user-friendly formats like CSV or Excel, making it easy to integrate with other tools such as CRMs, applicant tracking systems, or business analytics software.
Example Scenario: A career coach assisting clients with job applications can use TexAu to scrape job data, export it into an Excel spreadsheet, and track the status of each application in a structured format.
5. Real-Time Updates
TexAu continuously monitors LinkedIn for new job postings and can scrape newly available opportunities automatically. This ensures that your job database remains up-to-date, reflecting the latest openings.
Example Scenario: A job seeker targeting roles in cloud computing sets TexAu to scrape daily updates for postings mentioning “cloud architecture.” The tool ensures they never miss a new opening in their field, giving them a competitive advantage in applying early.
Challenges Addressed by TexAu’s LinkedIn Job Scraper
1. Manual Job Tracking
Manually reviewing and compiling job postings is a time-intensive and repetitive task. For job seekers, recruiters, and marketers managing large volumes of data, this can quickly become overwhelming. TexAu addresses this challenge by automating the process, eliminating the need for manual searches and organizing job postings in a structured and actionable format.
Detailed Example: A digital marketer searching for new opportunities needs to browse LinkedIn daily, identify relevant job postings, save them, and then record the details manually in a spreadsheet. This process consumes several hours every week, reducing the time available for skill development or application preparation. By using TexAu, the marketer can automate job scraping, collecting hundreds of postings in minutes and exporting them into a ready-to-use format like Excel. This saves significant time and ensures no critical opportunities are overlooked.
2. Data Disorganization
When job data is manually collected, it often lacks structure, making analysis and integration with other tools cumbersome. Disorganized data also makes it challenging to identify trends or actionable insights. TexAu ensures all scraped job postings are organized in a clear and consistent format, making it easy to analyze or integrate with systems like CRMs or applicant tracking tools.
Detailed Example: A recruitment agency gathering data on “Product Manager” roles from LinkedIn faces challenges in maintaining consistency while organizing information like company names, locations, and job descriptions. Using TexAu, they can scrape all relevant job postings and structure the data into a neat spreadsheet. This streamlined approach allows them to analyze trends, track hiring patterns, and ensure their records are complete and actionable.
3. Missed Opportunities
In a fast-moving job market, listings often expire or are filled quickly. Manually searching for new opportunities increases the risk of missing out on relevant postings. TexAu’s real-time scraping capability continuously monitors LinkedIn for new job postings, ensuring users never miss a chance to act on fresh opportunities.
Detailed Example: A job seeker focused on senior-level finance roles often misses postings because they rely on sporadic LinkedIn searches. By using TexAu, they set up automated scraping to run every day, filtering for “Finance Manager” roles within their desired location. TexAu ensures all newly posted opportunities are captured immediately, giving the user a head start in the application process.
Benefits of Using TexAu’s LinkedIn Job Scraper
1. Efficient Job Search
TexAu automates the job search process, enabling users to scrape and organize postings in minutes. This eliminates the need for manual browsing, allowing job seekers to focus on more strategic tasks such as improving their resumes, preparing for interviews, or developing their portfolios.
Example Scenario: A graphic designer seeking remote UI/UX roles across different industries spends hours each week scrolling through job postings and saving relevant ones. By using TexAu, they scrape hundreds of postings in one go, applying filters to target remote opportunities. The time saved is redirected to refining their portfolio and tailoring applications for the roles they want most, significantly increasing their efficiency.
2. Market Analysis
For recruiters, HR professionals, and industry analysts, understanding hiring trends and skill demands is crucial for staying competitive. TexAu enables users to extract large volumes of job data and analyze it for trends like emerging skills, hiring hotspots, or industry growth.
Example Scenario: A recruitment agency specializing in IT roles uses TexAu to scrape job postings mentioning “machine learning” across industries. The analysis reveals a surge in demand for professionals skilled in cloud computing and artificial intelligence. The agency uses this insight to focus on sourcing candidates with these skills, aligning their strategies with market demands and ensuring they remain competitive in their industry.
3. Lead Generation
Business owners and marketers can leverage TexAu to identify companies actively hiring for roles aligned with their services or products. This data can be converted into a pipeline of warm leads for outreach, helping businesses expand their client base.
Example Scenario: A SaaS company providing collaboration tools for remote teams scrapes job postings for “remote team managers” or “distributed workforce specialists.” These postings indicate companies prioritizing remote work solutions, making them ideal leads. Armed with this data, the SaaS company reaches out to these businesses, positioning their tools as a solution to optimize remote team management.
4. Application Tracking
Job seekers can use scraped data to track applications systematically. TexAu helps organize job details—such as application deadlines, required qualifications, and posting URLs—into spreadsheets, enabling users to manage their application process effectively.
Example Scenario: A computer science student applying for internships in data analytics uses TexAu to scrape postings mentioning “data analytics intern” within their preferred location. They export the data into an Excel sheet, which includes columns for deadlines, job requirements, and application URLs. The sheet helps them prioritize applications based on deadlines, ensuring they never miss important opportunities.
5. Enhanced Recruitment Insights
Recruiters can use TexAu to analyze job postings from competitors, identify in-demand skills, and track hiring trends within specific industries. These insights enable them to refine their recruitment strategies and source the right talent.
Example Scenario: A recruiter working for a tech company scrapes postings for software engineering roles across competitors. By analyzing the data, they discover that Python, Kubernetes, and AWS certifications are consistently mentioned in job descriptions. This insight prompts the recruiter to adjust their hiring criteria, prioritizing candidates with these qualifications and improving the relevance of their recruitment efforts.
TexAu’s LinkedIn Job Scraper offers a versatile and powerful solution for automating the tedious process of job data extraction and analysis. By addressing common challenges like manual job tracking, data disorganization, and missed opportunities, TexAu empowers job seekers, recruiters, marketers, and business owners to achieve their goals efficiently. Whether it’s streamlining job searches, conducting market analysis, generating leads, or gaining recruitment insights, TexAu enables users to harness the full potential of LinkedIn’s job ecosystem.
By automating repetitive tasks and organizing data into actionable formats, TexAu not only saves time but also unlocks new possibilities for strategic growth.
Use Cases of TexAu’s LinkedIn Job Scraper
1. Job Seekers
Job seekers often struggle to find postings that precisely match their career goals, qualifications, and preferences. TexAu simplifies this process by allowing users to scrape job postings that align with specific criteria, such as job titles, industries, experience levels, and locations. This automation not only saves time but also ensures job seekers focus on the most relevant opportunities.
Example Scenario: A UI/UX designer with over three years of experience is looking for remote roles. Manually filtering LinkedIn job postings for relevant opportunities across various industries can take hours each day. By using TexAu’s LinkedIn Job Scraper, the designer applies filters to extract only remote job postings requiring a minimum of three years of experience. This automation allows them to access hundreds of relevant postings in minutes, enabling them to spend more time perfecting applications and preparing for interviews.
2. Recruiters
Recruiters need to stay ahead of market trends and understand competitor hiring practices to refine their recruitment strategies. TexAu enables recruiters to scrape job postings from specific competitors or industries, providing them with actionable insights into in-demand roles, required skills, and hiring volumes.
Example Scenario: A tech recruiter specializing in software engineering roles uses TexAu to scrape job postings from competitors such as Google, Amazon, and other top tech firms. By analyzing the scraped data, they identify that most postings highlight skills in Python, Kubernetes, and cloud computing platforms like AWS. This insight allows the recruiter to align their hiring strategies with market demands, ensuring they attract top talent by focusing on the most sought-after skills.
3. Business Owners
For business owners, understanding which companies are actively hiring can open doors for partnerships or collaborations. Growing businesses that are actively recruiting may need external services to scale effectively, making them ideal prospects for outreach. TexAu’s LinkedIn Job Scraper identifies such companies by extracting job postings, enabling business owners to tailor their outreach accordingly.
Example Scenario: A consulting firm specializing in operational efficiency wants to target companies that are scaling their workforce. By using TexAu, they scrape job postings for operational roles such as “Operations Manager” or “Process Optimization Specialist.” The extracted data helps the consulting firm identify businesses expanding their teams, positioning them as ideal candidates for collaboration. To further enhance their targeting, they utilize LinkedIn Event Scraper to track which of these businesses are also attending relevant industry events.
4. Marketers
Marketers can use TexAu to identify businesses that require solutions their products or services can address. By analyzing job postings, they can pinpoint companies with specific needs, such as digital marketing, automation, or software tools, and tailor their outreach strategies for maximum impact.
Example Scenario: A marketing agency focusing on digital transformation wants to target businesses that need help with SEO or content marketing. By scraping job postings that mention keywords like “SEO experts” or “digital marketing strategies,” they create a list of companies actively hiring for these roles. These businesses are likely in need of support in the mentioned areas, making them ideal prospects. Armed with this data, the agency reaches out with relevant service offerings, ultimately converting new clients.
Best Practices for Using TexAu’s LinkedIn Job Scraper
1. Use Specific Filters
Applying specific filters such as keywords, industries, and locations ensures that only the most relevant job postings are extracted. This narrows down the data to match your exact requirements, saving time and improving efficiency.
Tips:
- If you’re a job seeker, use filters for job titles, skills, and industries to target roles that align with your career goals.
- Recruiters can filter by competitors or specific skill sets to gather data for market analysis.
- Marketers can focus on job postings mentioning specific challenges or services their business can address.
2. Regularly Update Data
The job market evolves quickly, with new postings added daily and older ones expiring. Scheduling regular scraping tasks ensures that your database reflects the latest opportunities, keeping your data fresh and actionable.
Tips:
- Schedule scraping tasks daily or weekly to capture newly posted jobs.
- Regular updates prevent reliance on outdated data and ensure timely action on opportunities.
3. Analyze Trends
Scraped job data is a goldmine for identifying patterns and trends in hiring practices. By analyzing this data, you can spot shifts in skill demands, emerging industries, or geographic hotspots for job growth. To further refine insights into job market trends, recruiters and business analysts can supplement job scraping with LinkedIn Message Thread Scraper to capture industry discussions and recruiter outreach messages for deeper market intelligence.
Tips:
- Use job data to identify the most in-demand skills and tailor your resume, recruitment strategies, or services accordingly.
- Compare hiring trends across industries to gain insights into emerging opportunities or potential gaps in the market.
Advanced Features of TexAu’s LinkedIn Job Scraper
1. Keyword-Based Scraping
TexAu allows users to extract job postings containing specific keywords in their titles or descriptions. This feature is particularly useful for targeting roles that require niche skills or focus on specific responsibilities.
Example: A recruiter specializing in cloud computing can scrape postings mentioning “cloud architecture” or “AWS” in the job title or description. This helps them build a pipeline of candidates skilled in the most sought-after areas of expertise.
2. Location-Based Filtering
Users can focus their scraping efforts on specific regions or cities to gather localized data. This is particularly beneficial for job seekers looking to relocate or businesses targeting opportunities in specific markets.
Example: A job seeker planning to move to Bangalore can scrape job postings exclusively from this city. Similarly, a marketer can analyze postings from tech hubs like San Francisco to identify businesses needing their services.
3. Company-Specific Scraping
TexAu enables users to target specific companies for competitor analysis or lead generation. This feature provides detailed insights into hiring practices, helping users tailor their strategies accordingly.
Example: A SaaS company competing with a Fortune 500 firm scrapes job postings from the competitor to identify their hiring trends. The data highlights gaps in their offerings that the SaaS company can leverage to position itself as a better alternative.
Real-Life Applications
Case Study 1: Job Search Optimization
A job seeker used TexAu to scrape 1,000 job postings for roles matching their qualifications and preferences. By focusing on opportunities aligned with their career goals, they secured 20 interviews and received five offers.
Details: The scraped data included details like job descriptions, required skills, and deadlines, allowing the job seeker to create tailored applications for each role. This systematic approach significantly improved their application success rate.
Case Study 2: Recruitment Analysis
A recruiter used TexAu to analyze job postings from competitors in the IT sector. By identifying trending skills like Python and Kubernetes, they refined their hiring strategies to attract candidates with these qualifications.
Details: The recruiter discovered a surge in demand for professionals skilled in machine learning and cloud computing, prompting their organization to offer competitive salaries and benefits to secure top talent.
Case Study 3: Business Development
A marketing agency specializing in digital transformation scraped job postings mentioning “digital marketing strategies” or “SEO experts.” The data helped them identify companies in need of their services, resulting in several successful client conversions.
Details: The agency tailored its outreach to address the specific challenges mentioned in job descriptions, demonstrating a clear understanding of the companies’ needs. This targeted approach led to improved engagement and a higher conversion rate.
TexAu’s LinkedIn Job Scraper is a powerful tool that transforms the way job seekers, recruiters, business owners, and marketers extract and utilize job data. By offering features like keyword-based scraping, location filtering, and company-specific targeting, TexAu ensures that users can access actionable insights with minimal effort.
Whether you’re optimizing your job search, refining recruitment strategies, exploring business partnerships, or generating leads, TexAu empowers you to achieve your goals efficiently.
Conclusion
TexAu’s LinkedIn Job Scraper is a versatile tool that empowers job seekers, recruiters, and businesses to extract and analyze job data efficiently. Whether you’re streamlining your job search, refining recruitment strategies, or identifying potential clients, TexAu ensures accurate, actionable results. Start leveraging TexAu today to revolutionize your approach to LinkedIn job data!
The LinkedIn Job Scraper automation allows you to extract comprehensive details from LinkedIn job postings, including job title, company, location, description, and posting date. This tool is ideal for recruiters, job seekers, and market researchers who want to analyze job opportunities or gather hiring insights. Follow this guide to configure the automation, with options to export data to Google Sheets or CSV for organized tracking.
Step 1: Log in to TexAu and Connect LinkedIn
Log in to your TexAu account at v2-prod.texau.com.
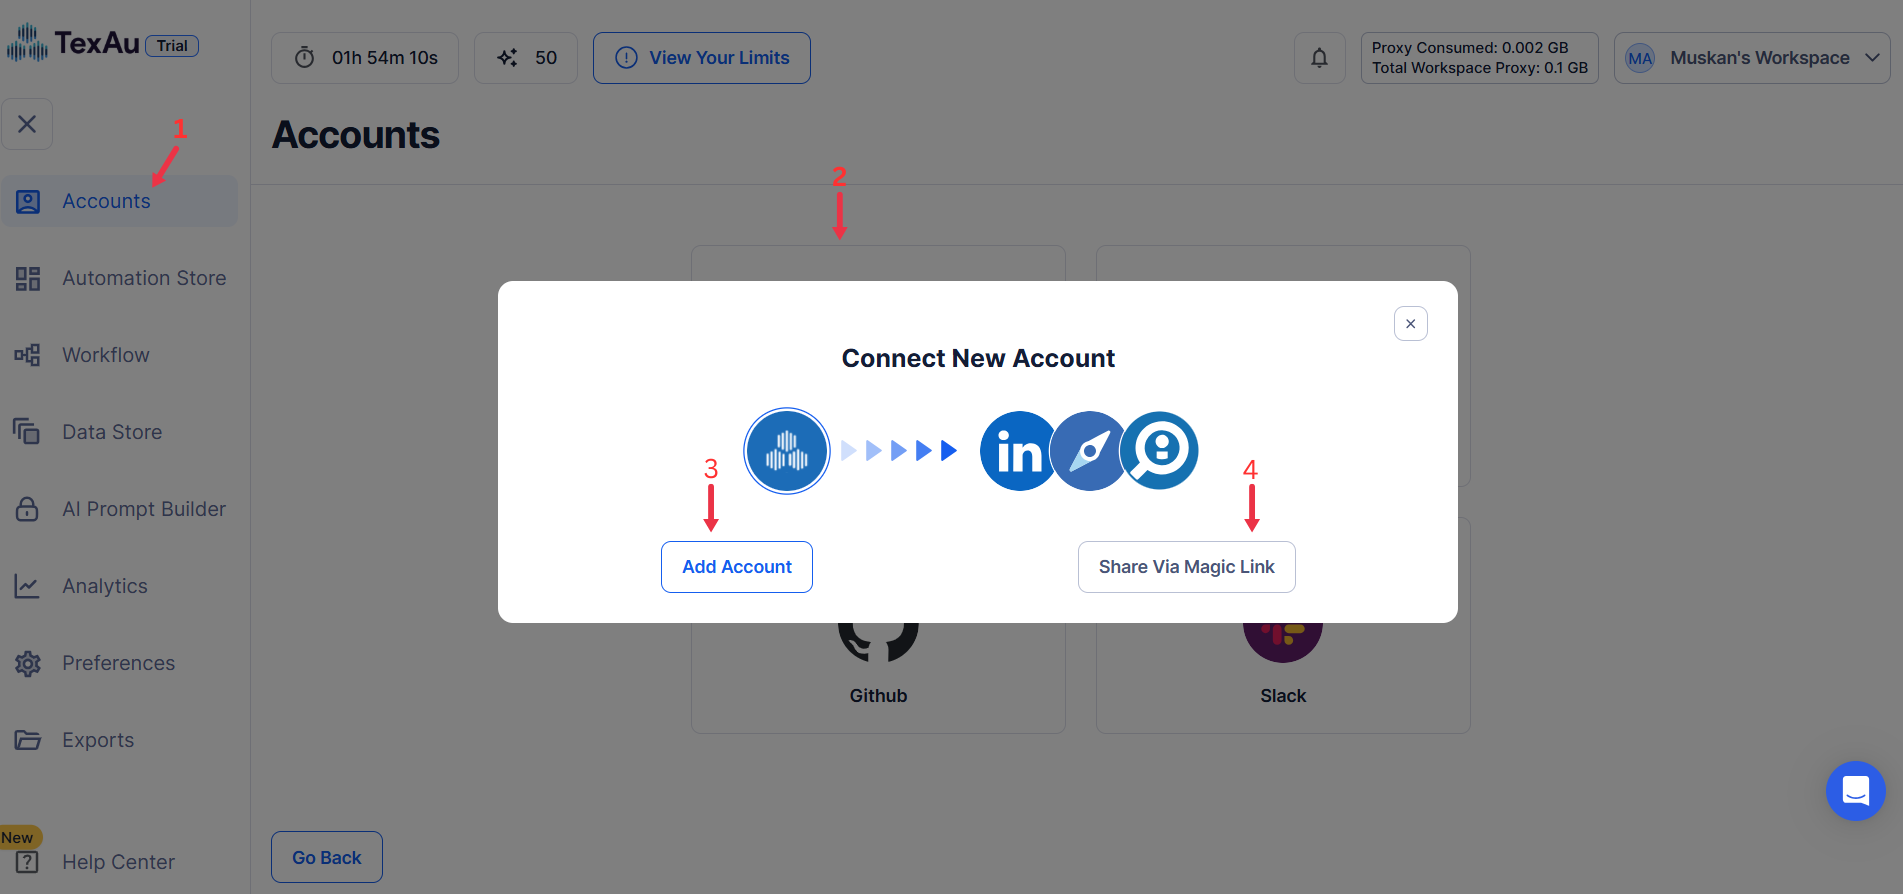
Go to Accounts and connect your LinkedIn account. You can choose one of these methods:
- Share via Magic Link: Share the link, copy it to your browser, and follow the steps to integrate your LinkedIn account securely.
- Add Account: Sync cookies and browser data with TexAu for seamless integration.
Tip: Use Magic Link for an easy and secure connection.
{% custom-image src="https://v2-web-assets.s3.us-east-1.amazonaws.com/Common/log-in-to-texau-and-connect-linkedin/connect-linkedin.png" alt="connect-linkedin" /%}
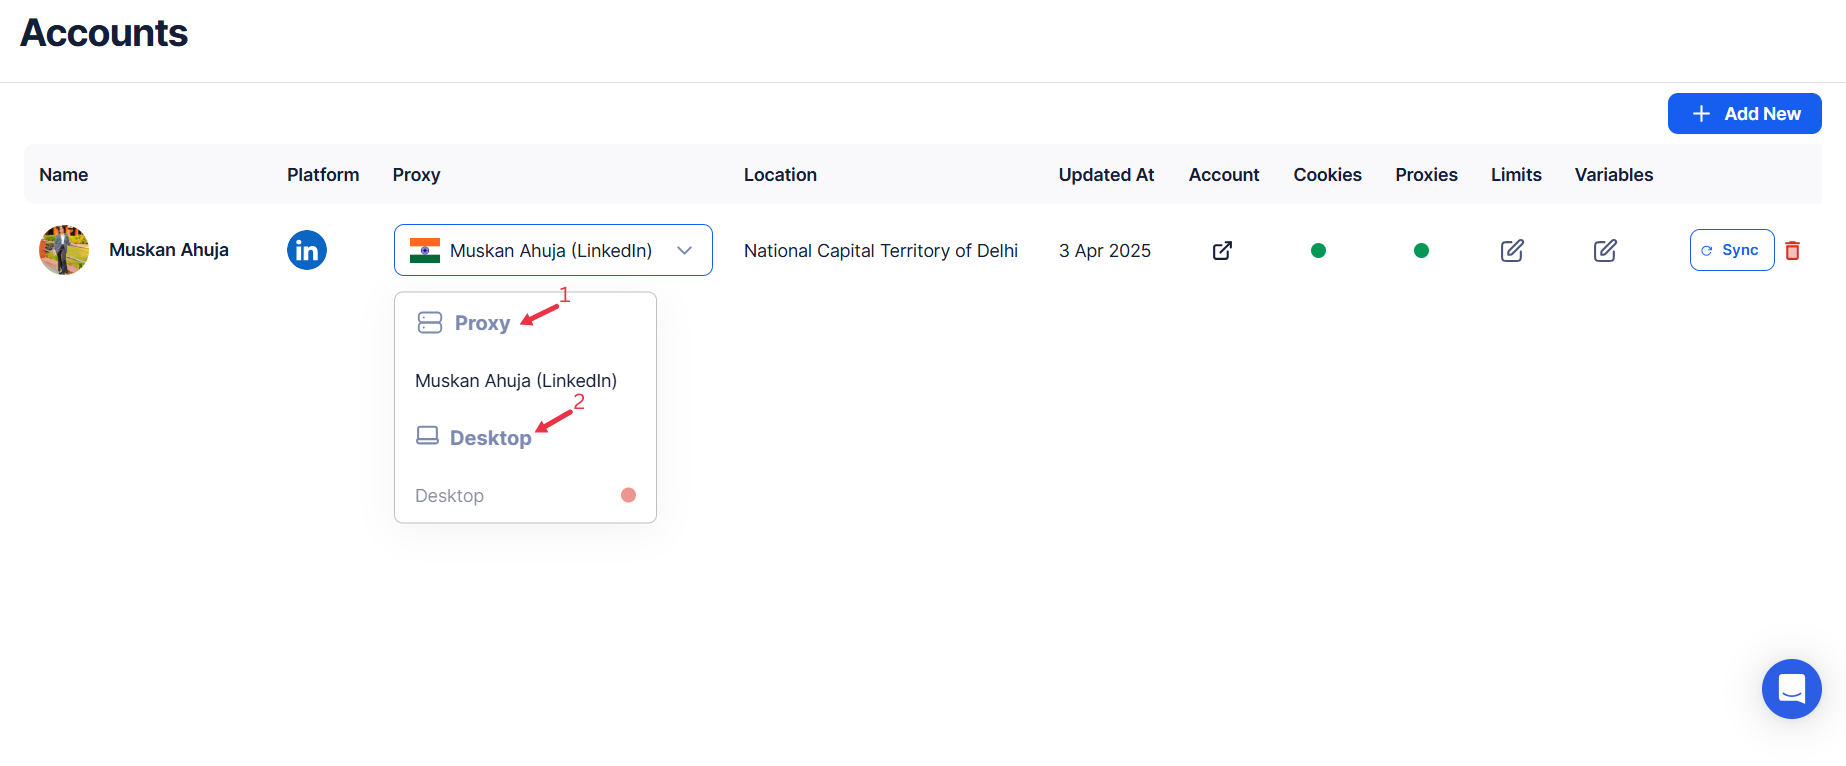
Step 2: Choose Cloud or Desktop Execution
Decide how you want to run the automation:
- Cloud Mode: Automates tasks on TexAu’s servers with built-in proxies. You can add custom proxies via Settings > Preferences > Proxies.
- Desktop Mode: Runs automation on your local device using your IP address.
Tip: Desktop mode saves cloud runtime credits and gives more control over the process.
{% custom-image src="https://v2-web-assets.s3.us-east-1.amazonaws.com/Common/cloud-or-desktop-execution/cloud-or-desktop-execution.png" alt=" choose-cloud-or-desktop-execution" /%}
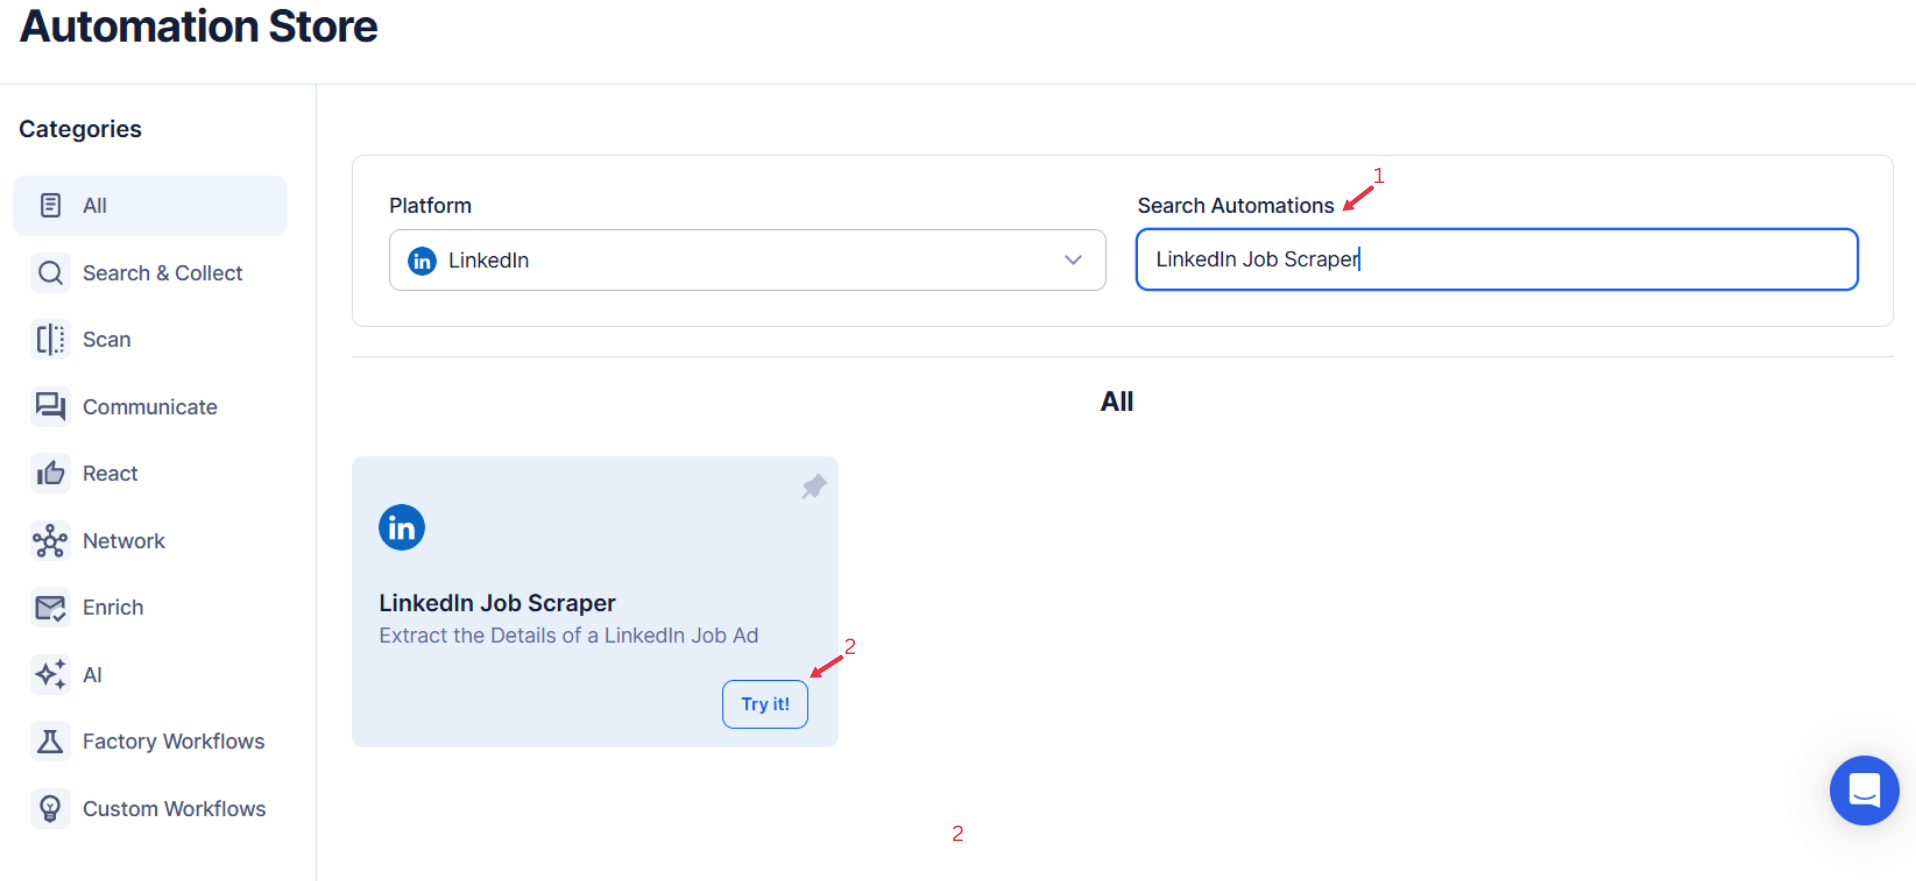
Step 3: Search for the Particular LinkedIn Automation
- Navigate to the Automation Store on TexAu.
- Use the search bar to find LinkedIn Job Scraper automation.
{% custom-image src="https://v2-web-assets.s3.us-east-1.amazonaws.com/Automations/linkedin-job-scraper/linkedin-job-scraper.png" alt="search-for-the-particular-LinkedIn-automation" /%}
Step 4: Select Your Input Source
Define the input source to specify LinkedIn job URLs for the LinkedIn Job Scraper automation. TexAu provides multiple options to suit the needs of founders, companies, sales managers, marketers, and growth hackers. Here's how to configure each:
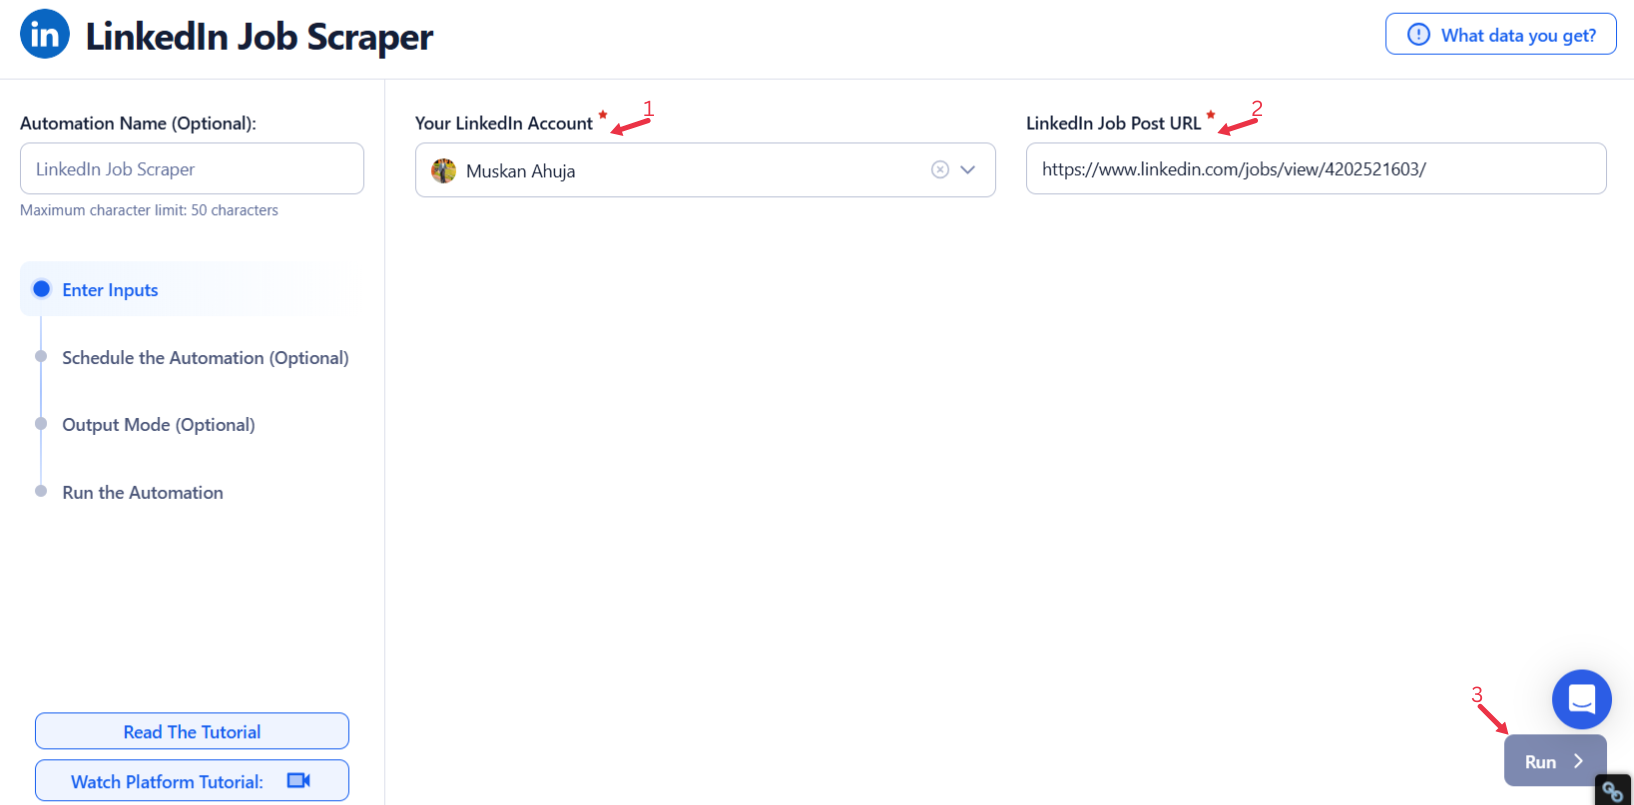
Manually Enter a Single Input
Use this option to scrape job details from a specific LinkedIn job post. Follow these steps:
- Job URL: Enter the LinkedIn job URL directly into the input field.
- Click Run in the lower-right corner to start the automation.
{% custom-image src="https://v2-web-assets.s3.us-east-1.amazonaws.com/Automations/linkedin-job-scraper/linkedin-job-scraper-single-inputs.png" alt="enter-a-single-input" /%}
Use Google Sheets for Bulk Input
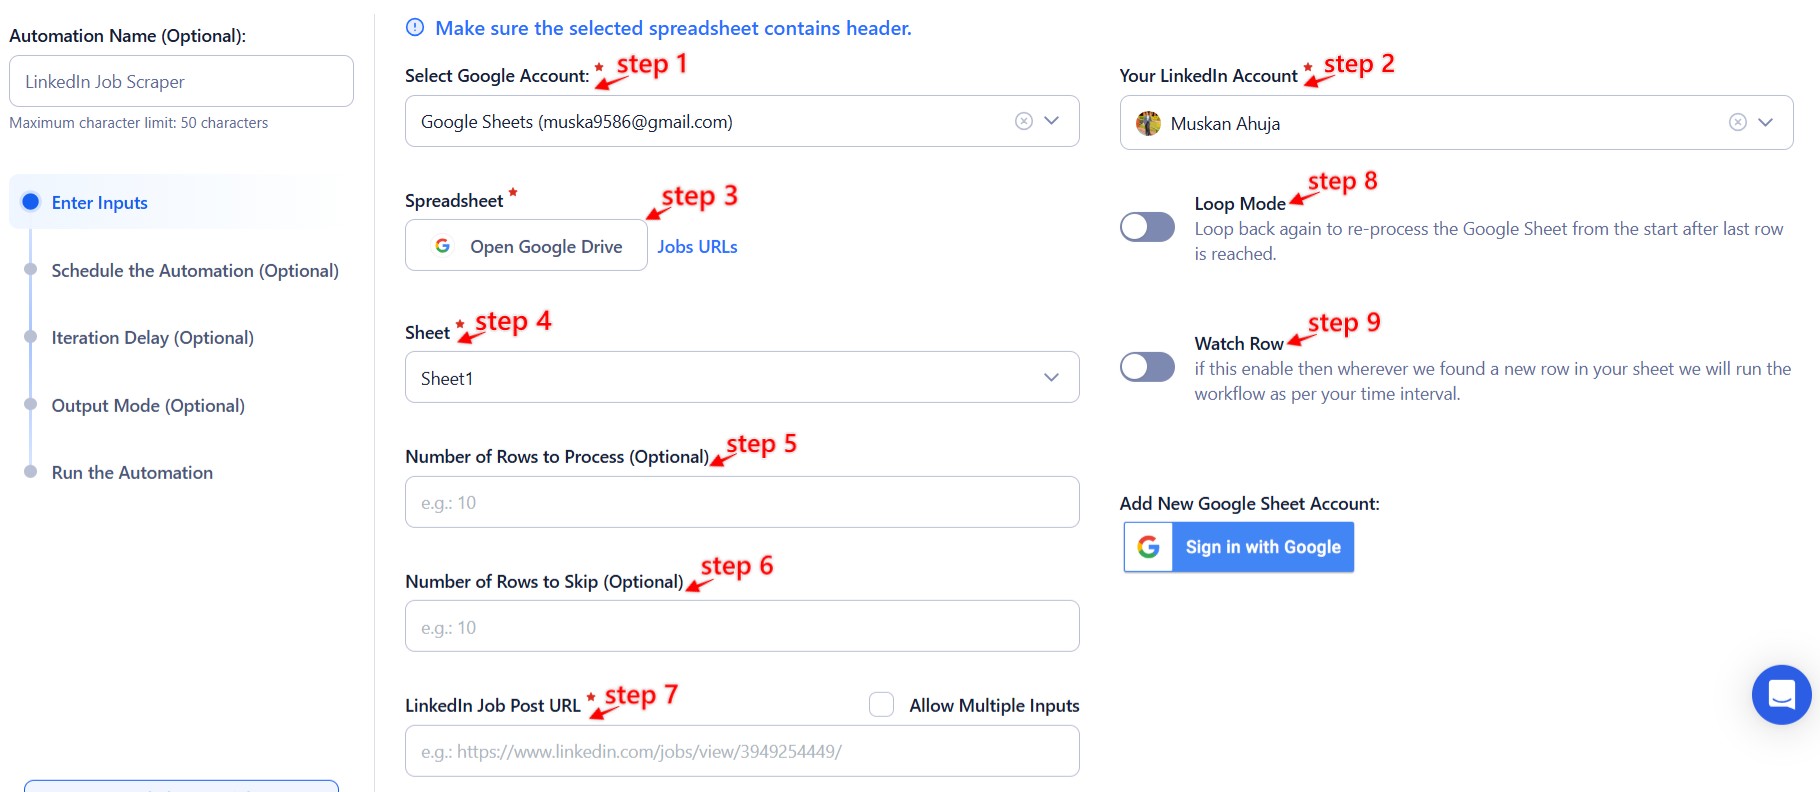
This option is ideal for scraping data from multiple LinkedIn job posts efficiently. Follow these steps:
- Click Select Google Account to choose your Google account or click Add New Google Sheet Account to connect additional accounts.
- Click Accounts to select LinkedIn as the platform.
- Click Open Google Drive to locate the Google Sheet containing LinkedIn job URLs.
- Select the spreadsheet and the specific sheet containing LinkedIn job URLs.
- Job URL: Choose the column header containing LinkedIn job URLs.
Configure additional options:
- Number of Rows to Process (Optional): Define the number of rows you want to process from the sheet.
- Number of Rows to Skip (Optional): Specify rows to skip at the beginning of the sheet.
- Loop Mode (Optional): Enable this to re-process the Google Sheet from the beginning once all rows are completed. This is useful for tasks that require recurring updates.
Click Run in the lower-right corner to start the automation.
Optional Advanced Feature:
- Loop Mode: Enable Loop Mode to re-process the Google Sheet from the beginning once all rows are completed. This is useful for tasks that require recurring updates.
Watch Row (Optional)
Watch Row feature detects new rows in Google Sheets and triggers workflows automatically, reducing manual workload.
Configure Watch Row by selecting an execution interval and setting an end date.
Watch Row Schedule
- None
- Scheduling Intervals (e.g., every 15 minutes, every hour)
- One-Time Execution
- Daily Execution
- Weekly Recurrence (e.g., every Monday and Saturday)
- Monthly Specific Dates (e.g., 13th and 28th)
- Custom Fixed Dates (e.g., August 4)
By default, Watch Row runs every 15 minutes and continues for five days unless modified.
With Watch Row, TexAu ensures workflows stay dynamic and automated.
{% custom-image src="https://v2-web-assets.s3.us-east-1.amazonaws.com/Automations/linkedin-job-scraper/linkedin-job-scraper-google-sheet.jpeg" alt="use-google-sheets-for-bulk-input" /%}
Process a CSV File
This option allows you to process LinkedIn job URLs from a static file. Follow these steps:
- Click Upload CSV File to browse and locate the file containing LinkedIn job URLs.
- Once uploaded, TexAu will display the file name and preview its content. Verify the data to ensure accuracy.
- Job URL: Choose the column header containing LinkedIn job URLs.
Configure additional options:
- Number of Rows to Process (Optional): Specify the number of rows to process from the CSV file.
- Number of Rows to Skip (Optional): Define rows to skip at the beginning of the file.
Click Run in the lower-right corner to initiate the automation.
Screenshot Suggestion: Show the Input Source selection screen, highlighting the CSV file upload feature, file preview, and the Select Header option.
{% custom-image src="https://v2-web-assets.s3.us-east-1.amazonaws.com/Common/texau-input-source-options.png" alt="step3" /%}
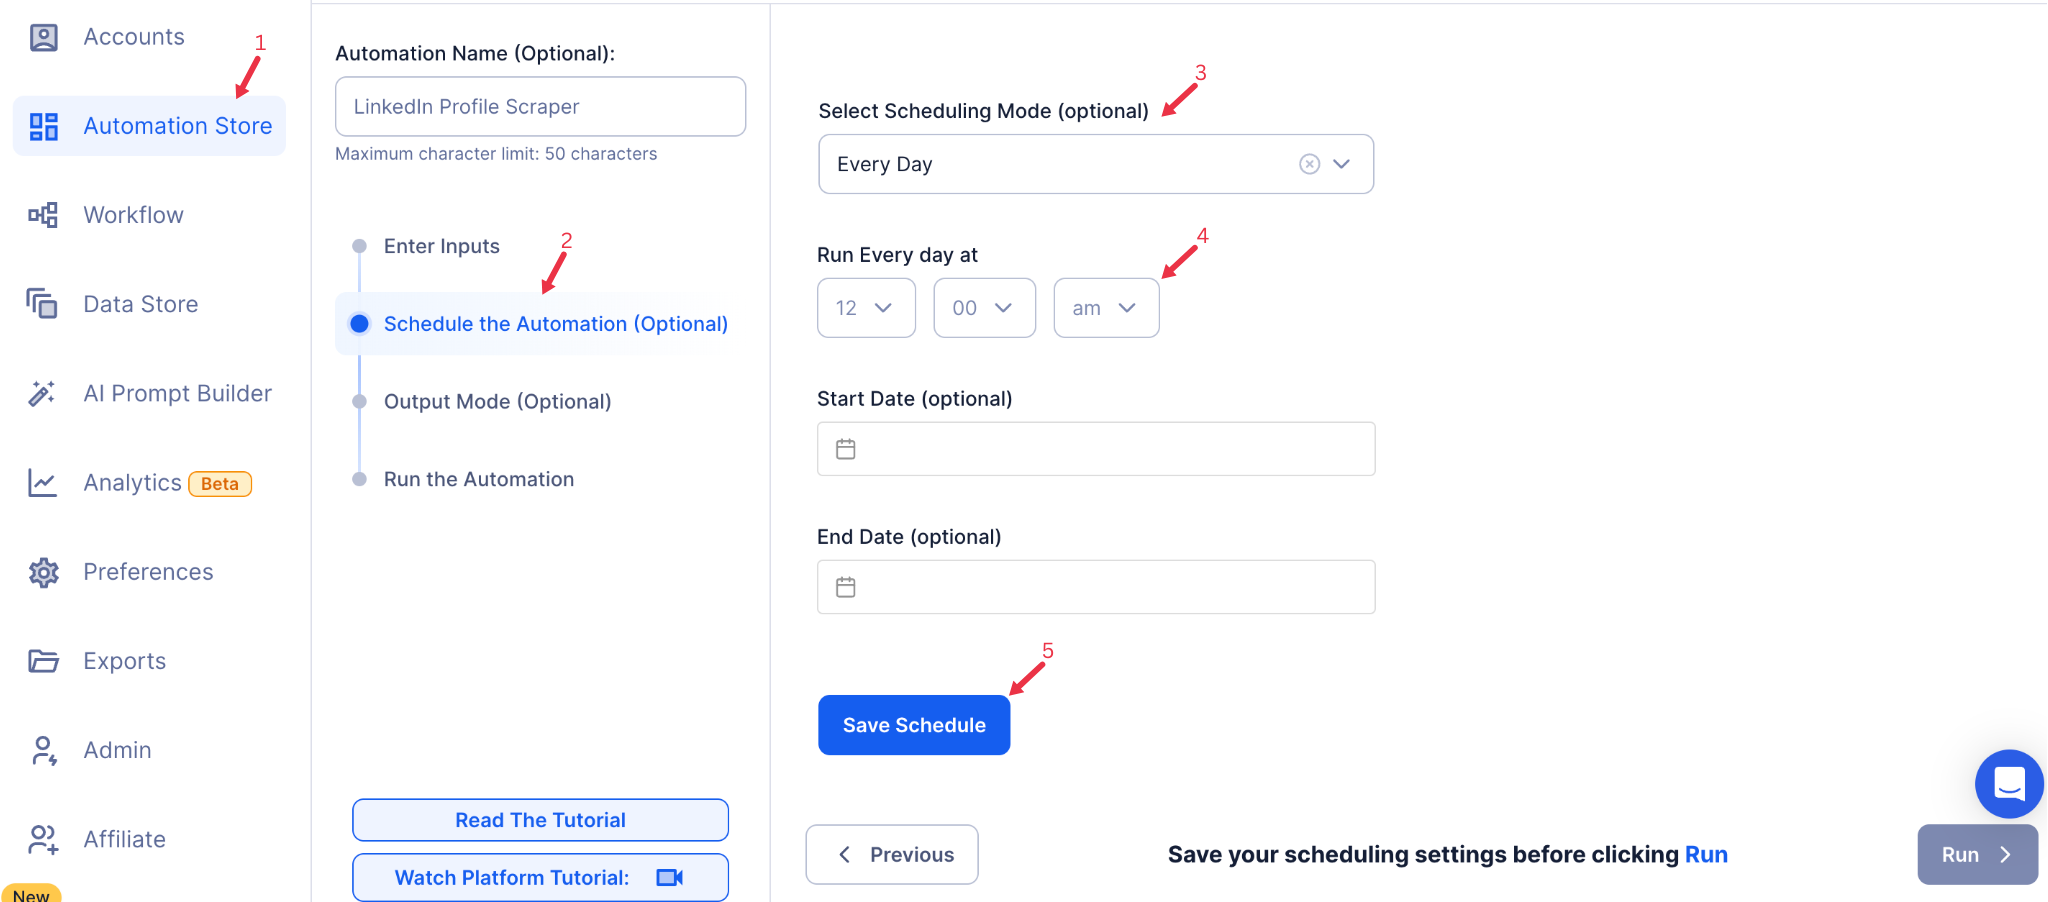
Step 5: Schedule the Automation (Optional)
To update job data at regular intervals, configure the Schedule settings. Click Schedule to set the start date and time, or configure a Recurrence Frequency to repeat the automation:
- At Regular Intervals (e.g., every day or every week)
- Once
- Every Day
- On Specific Days of the Week (e.g., every Monday and Wednesday)
- On Specific Days of the Month (e.g., the 1st and 15th)
- On Specific Dates (e.g., March 1)
Scheduling helps you keep job data current, ensuring you don’t miss new opportunities or trends.
{% custom-image src="https://v2-web-assets.s3.us-east-1.amazonaws.com/Common/schedule-the-automation/schedule-the-automation.png" alt="schedule-the-automation" /%}
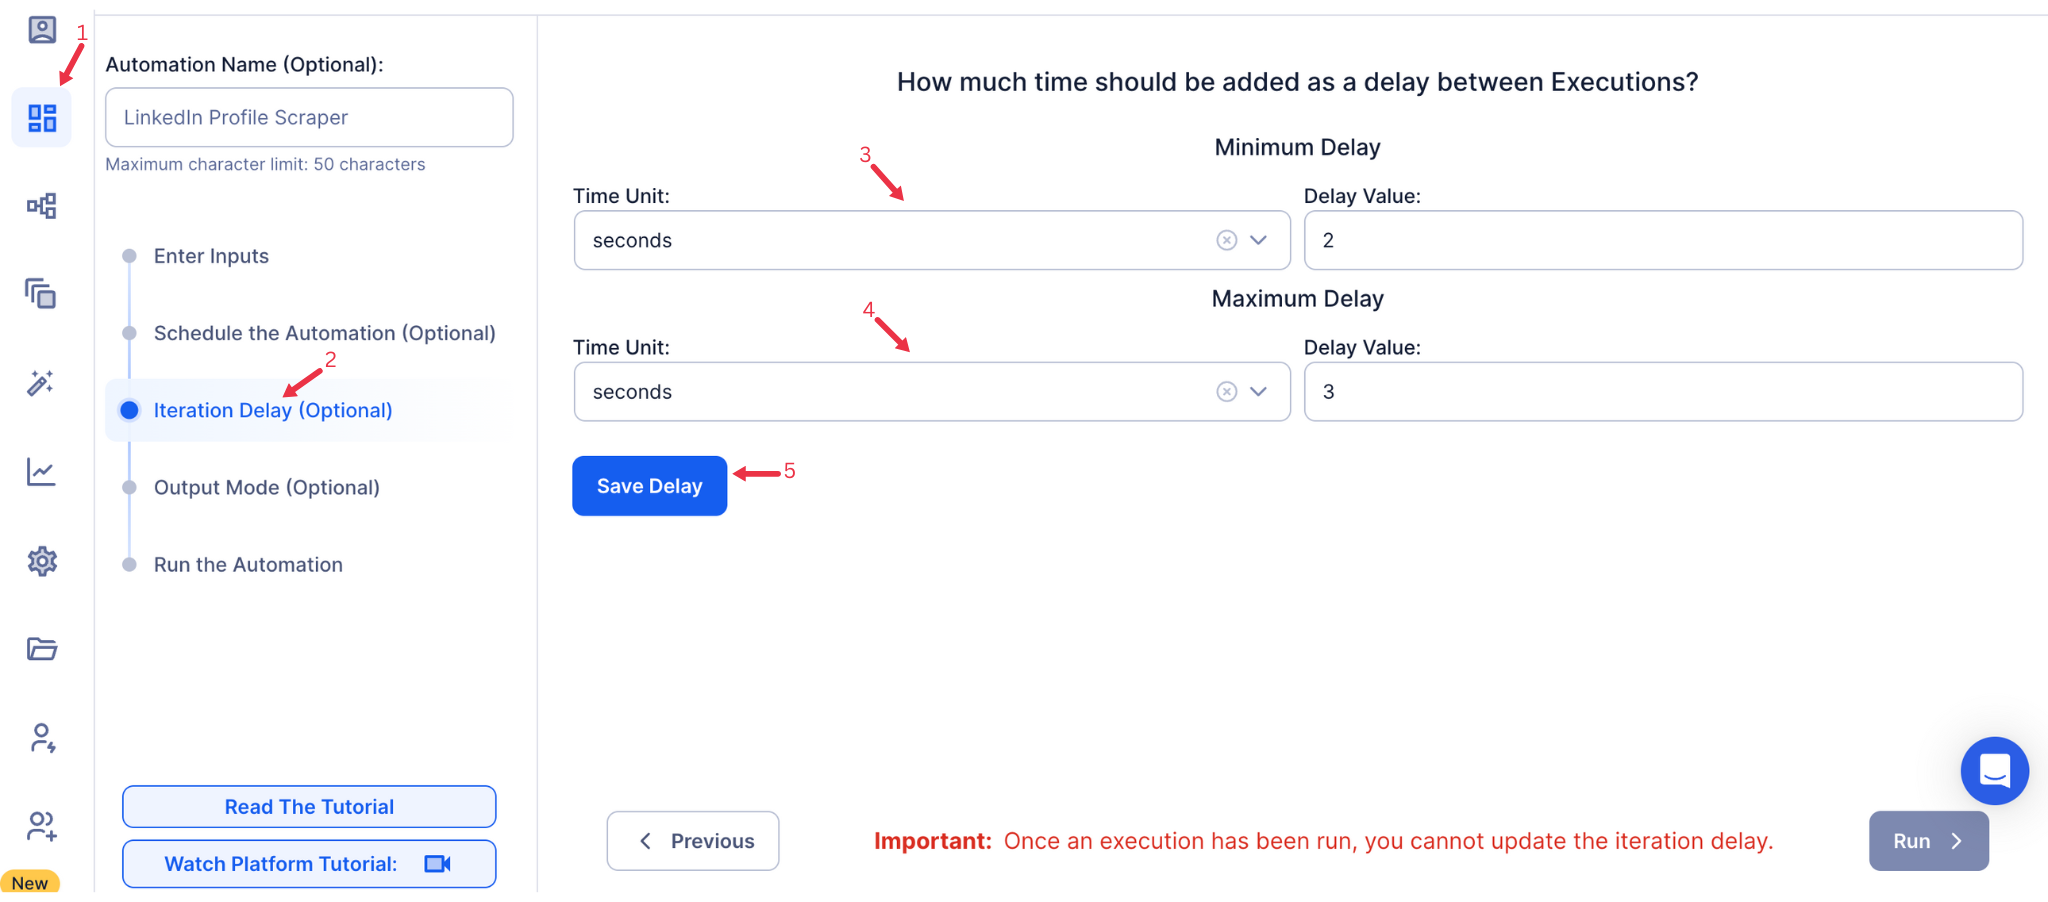
Step 6: Set an Iteration Delay (Optional)
Avoid detection and simulate human-like activity by setting an iteration delay. Choose minimum and maximum time intervals to add randomness between actions. This makes your activity look natural and reduces the chance of being flagged.
- Minimum Delay: Enter the shortest interval (e.g., 10 seconds).
- Maximum Delay: Enter the longest interval (e.g., 20 seconds).
Tip: Random delays keep your automation safe and reliable.
{% custom-image src="https://v2-web-assets.s3.us-east-1.amazonaws.com/Common/iteration-delay/iteration-delay.png" alt="iteration-delay" /%}
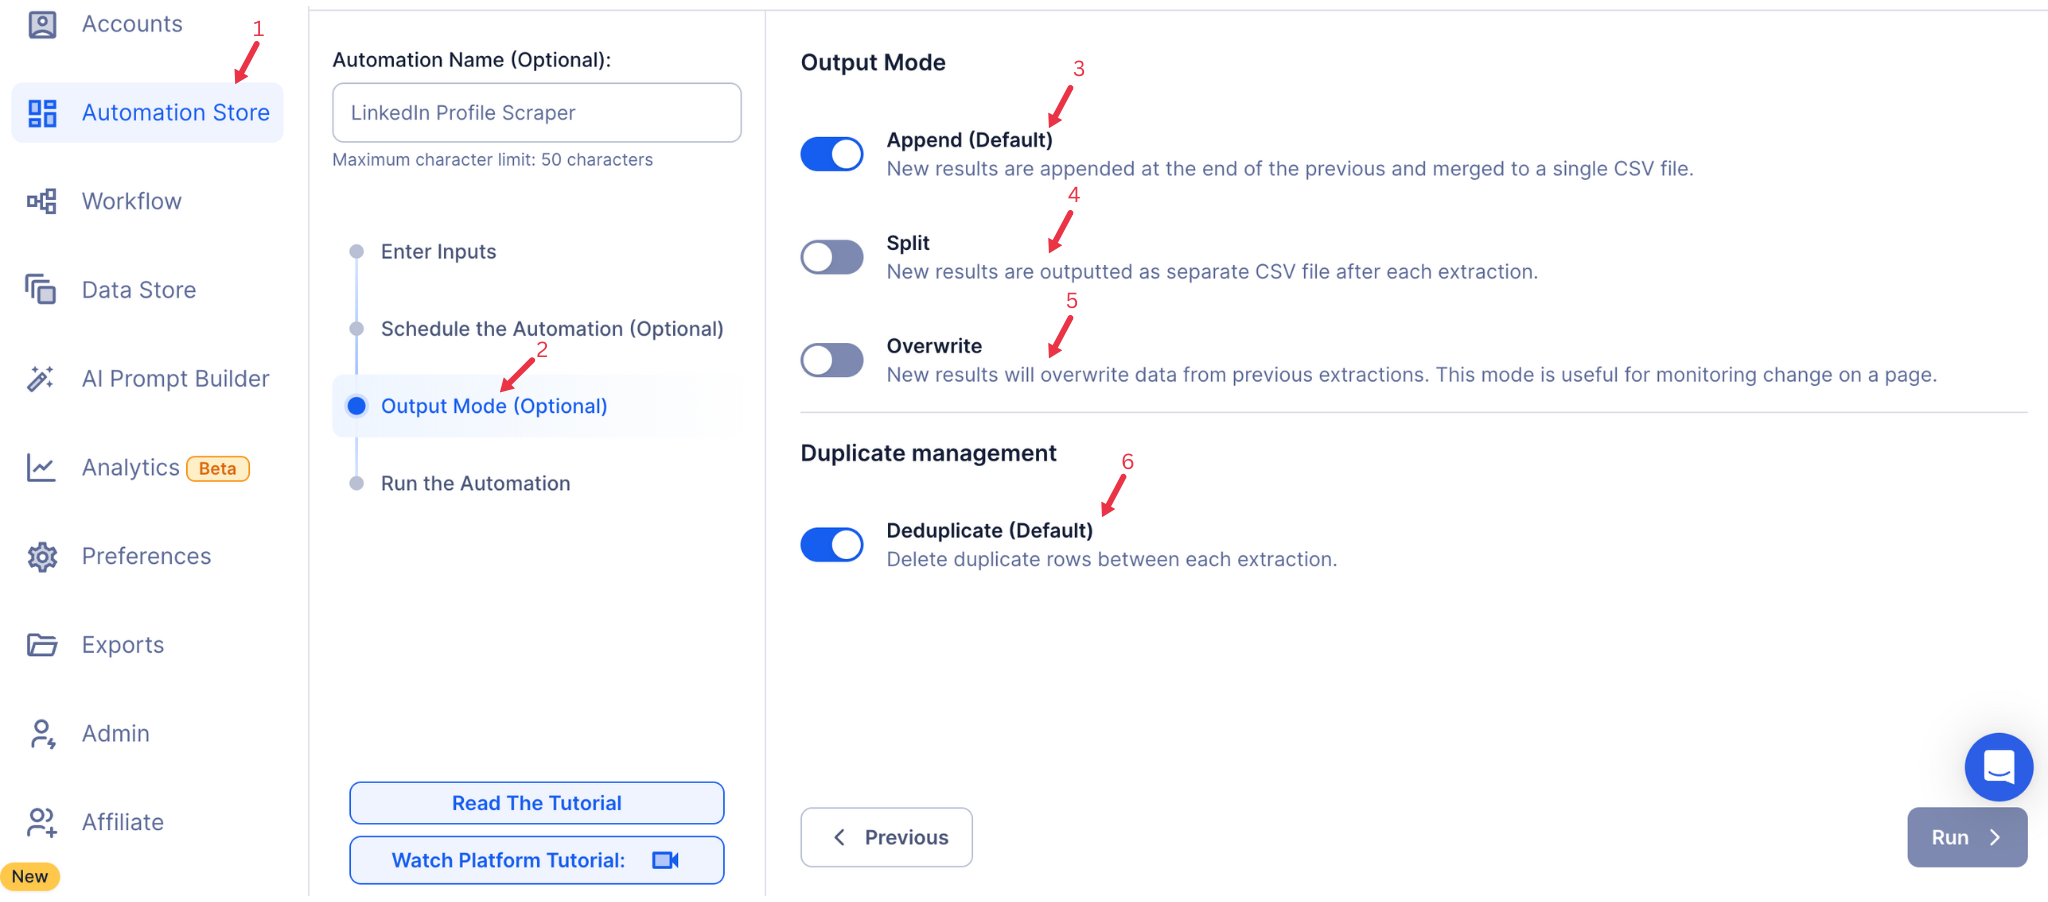
Step 7: Choose Your Output Mode (Optional)
In Output Mode, select how you want to save and organize the job data. Export data to Google Sheets or CSV file for convenient analysis and sharing.
- Export Options: Choose Google Sheets or CSV file as your output format. Link your Google account if you select Google Sheets, allowing for direct export to Google Drive.
- Output Management:
- Append (Default): Adds each job scrape to the end of the existing file, creating a comprehensive list of job postings.
- Split: Each automation run generates a new file, ideal for keeping data organized by session.
- Overwrite: Replaces previous data with the latest extraction, useful if you’re only tracking recent listings.
- Duplicate Management: Enable Deduplicate to automatically remove duplicate entries, ensuring clean and organized data.
{% custom-image src="https://v2-web-assets.s3.us-east-1.amazonaws.com/Common/output-mode/output-mode.png" alt="output-mode" /%}
Step 8: Access the Data from the Data Store
After the automation completes, go to the Data Store section in TexAu to access the extracted job data. Locate the LinkedIn Job Scraper automation and click See Data to view or download the results.
{% custom-image src="https://v2-web-assets.s3.us-east-1.amazonaws.com/Automations/LinkedIn+Job+Scraper/data-store-see-data.png" alt="step8" /%}
The LinkedIn Job Scraper automation simplifies tracking job details from LinkedIn listings, providing valuable insights for recruiters, job seekers, and researchers. With scheduling, flexible input options, and export to Google Sheets or CSV, this tool organizes job data for timely follow-ups, trend analysis, and efficient tracking of hiring opportunities.
Run this automation on your own server.
TexAu V3 doesn't host social-platform automations anymore — but the runnable code is yours. Tell us your inputs, outputs, and target environment, and we'll ship you a working version you can deploy and operate yourself.