Texau Agents
Personal Name Cleaner
Automatically clean, format, and standardize personal names from large datasets with TexAu's Personal Name Cleaner. Perfect for CRMs and more.
Last updated
The **Personal Name Cleaner** automation helps you standardize, clean, and format personal names from raw data. This is particularly useful for marketing, data analysis, or CRM management, ensuring that names are accurate and consistent across your datasets.
The Personal Name Cleaner automation helps you standardize, clean, and format personal names from raw data. This is particularly useful for marketing, data analysis, or CRM management, ensuring that names are accurate and consistent across your datasets.
Follow these steps to configure and run the automation.
Step 1: Log in to the TexAu App and Locate the Automation
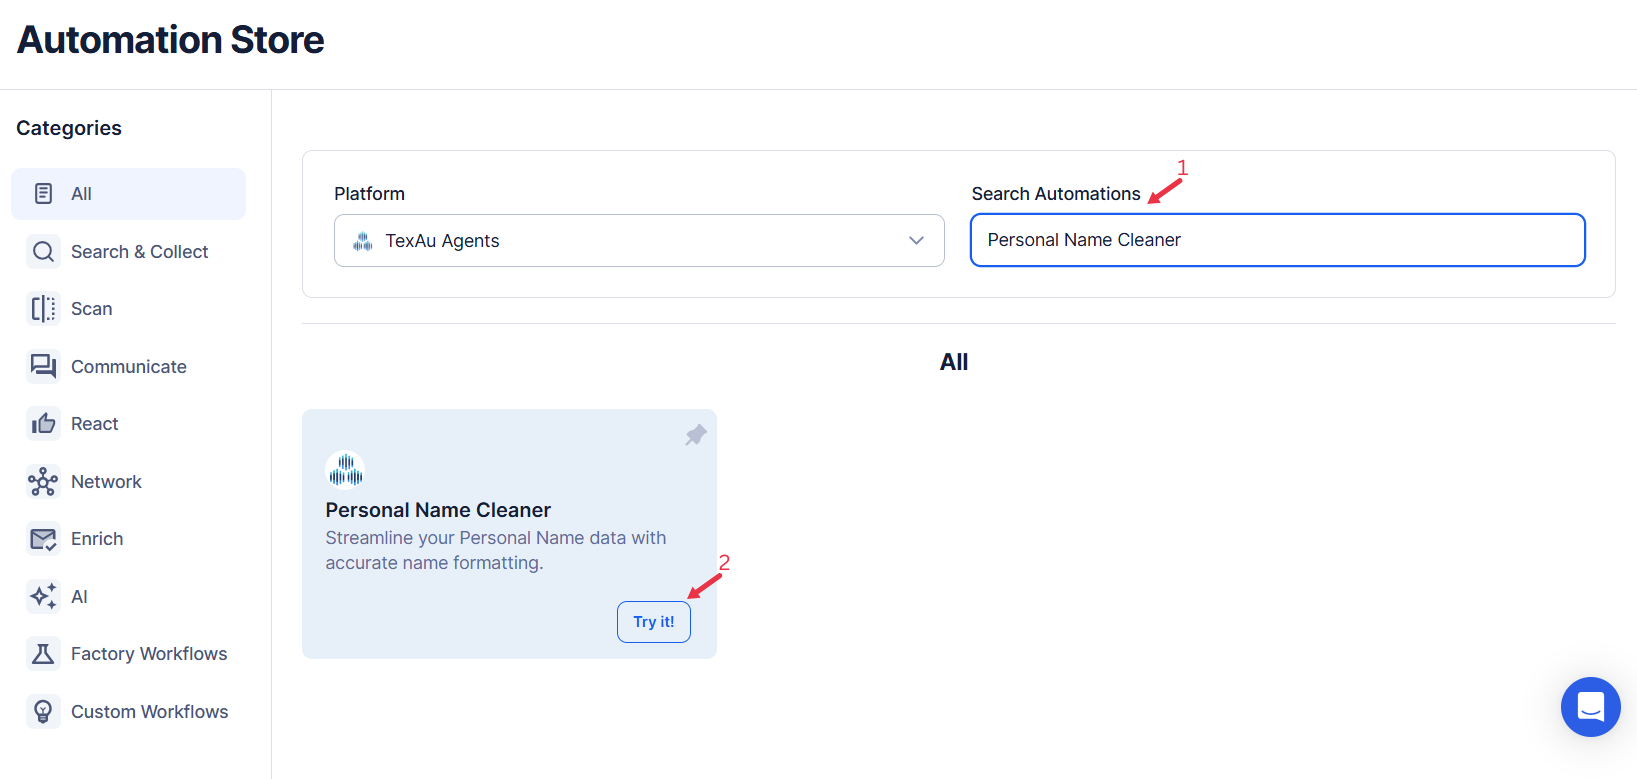
Log in to your TexAu account at v2-prod.texau.com. Navigate to the Automation Store, select Texau Agents platforms and search for Company Name Cleaner to find the tool. This automation cleans and formats company name data for improved consistency and accuracy.
{% custom-image src="https://v2-web-assets.s3.us-east-1.amazonaws.com/Automations/personal-name-cleaner/personal-name-cleaner.png" alt="search-for-the-particular-texau-agents-automation" /%}
Step 2: Select Your Input Source
The Personal Name Cleaner is an efficient automation tool designed to standardize and clean personal names. This tool is particularly useful for improving data quality in databases, ensuring uniformity in name formats, and making data more presentable for professional or analytical purposes. Whether you're working with a single name or a bulk list, this automation simplifies the process and saves time.
Single Input
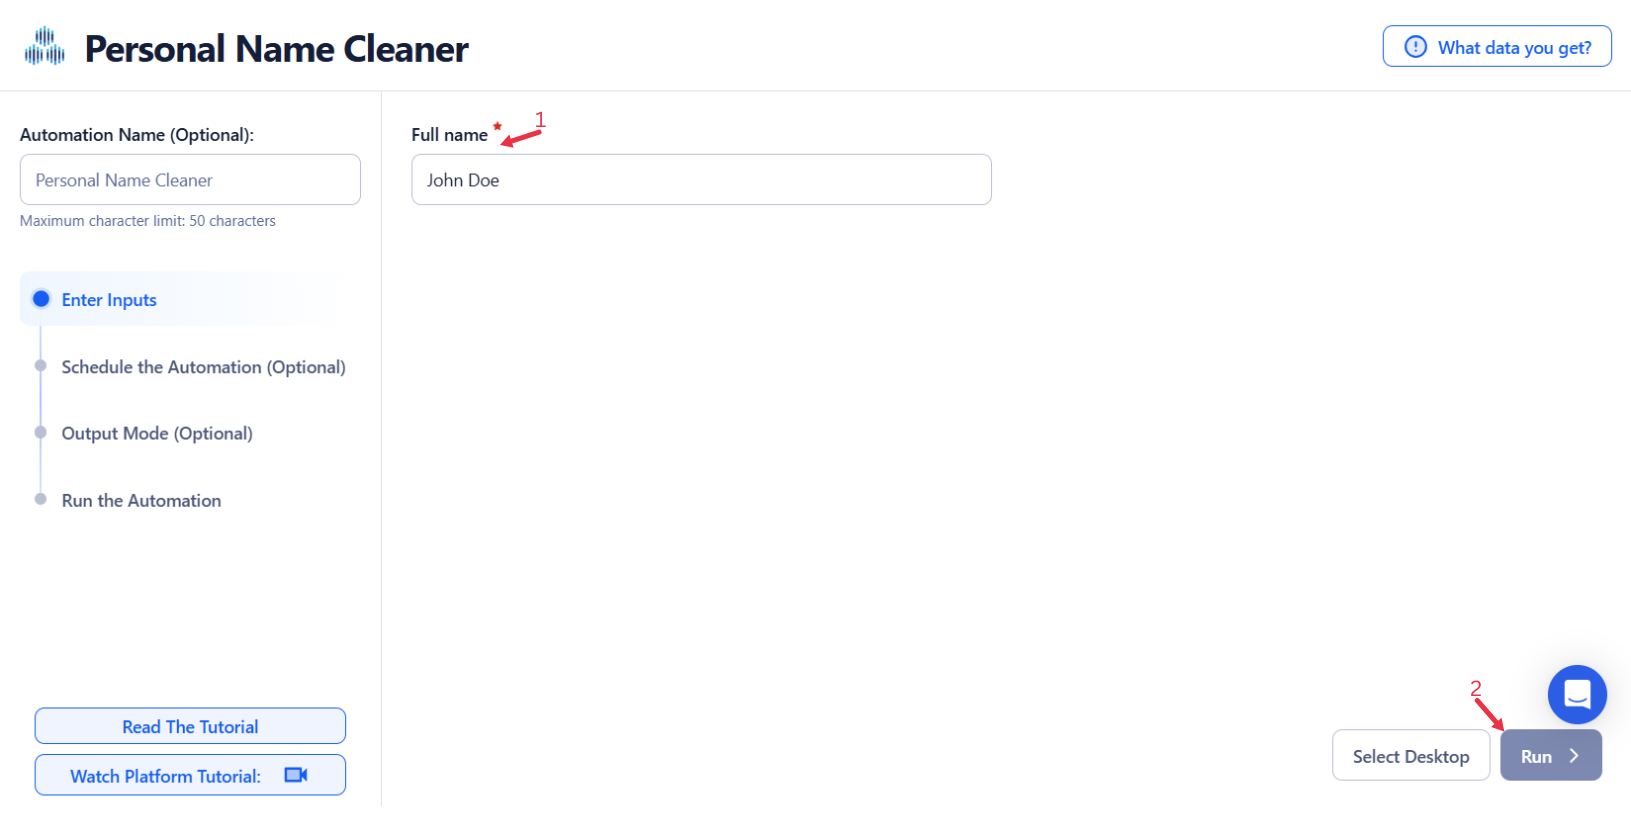
The Personal Name Cleaner tool is designed to refine and standardize personal names for data accuracy.
- Personal Name: Enter the full name (e.g., John Doe) of the individual whose name needs cleaning.
{% custom-image src="https://v2-web-assets.s3.us-east-1.amazonaws.com/Automations/personal-name-cleaner/personal-name-cleaner-single-inputs.png" alt="enter-a-single-input" /%}
Google Sheets
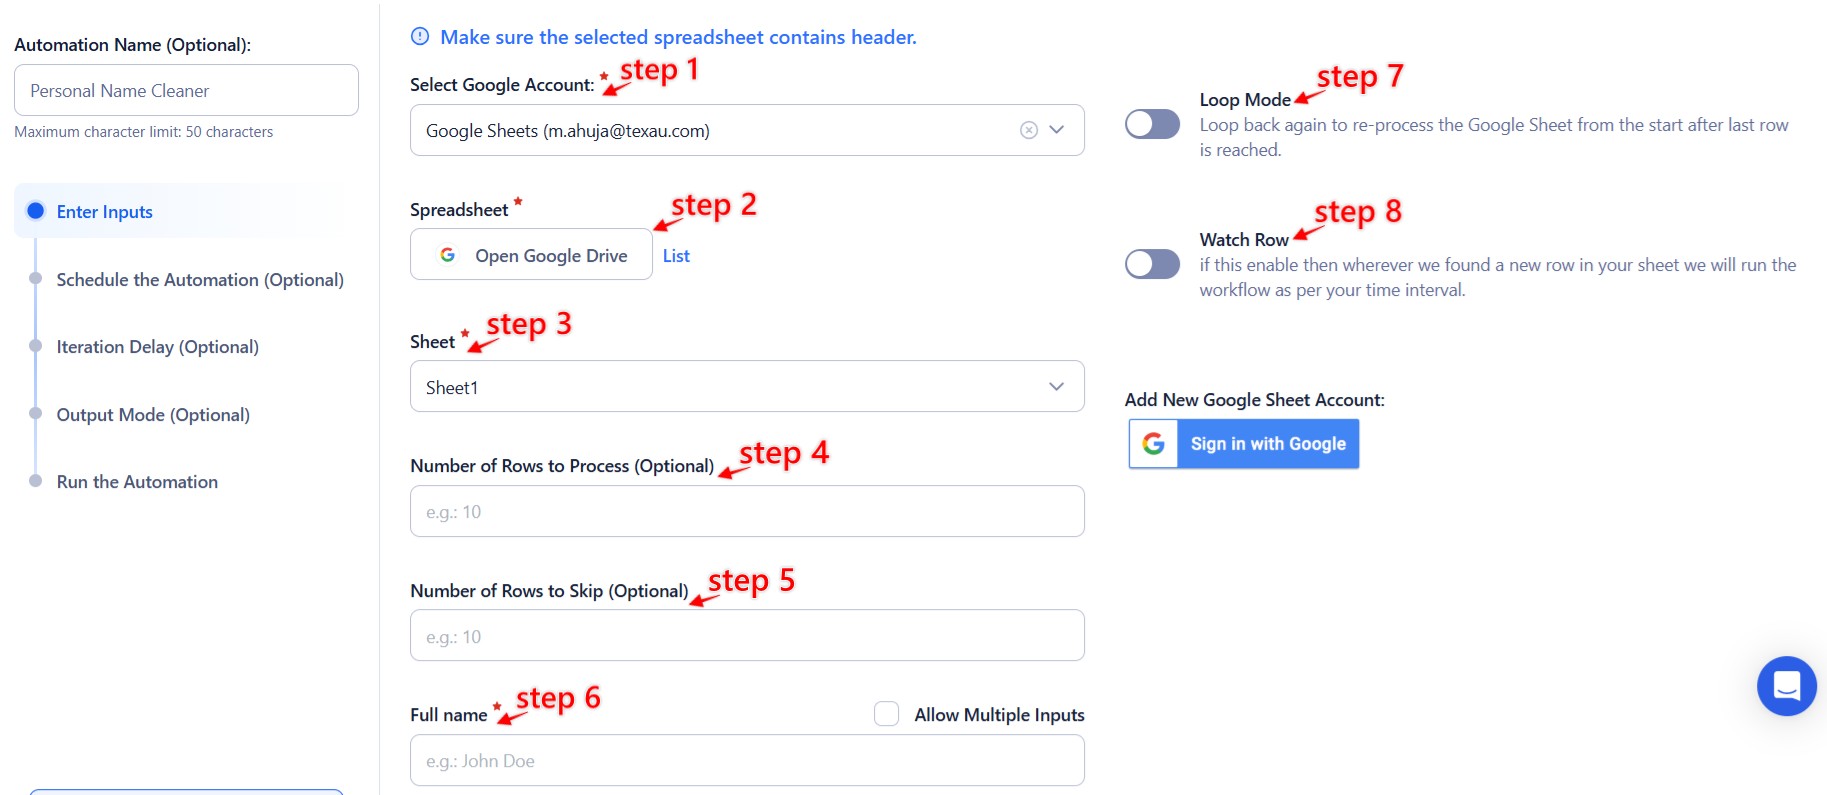
Optimize batch processing of names stored in Google Sheets:
- Choose the Google account where the spreadsheet is located. Use Add New Google Sheet Account if required
- Spreadsheet and Sheet Selection
- Navigate to the spreadsheet using Open Google Drive and select the appropriate sheet.
- Specify Processing Options
- Number of Rows to Process (Optional): Define how many rows to process.
- Number of Rows to Skip (Optional): Enter the number of rows to skip, if any.
- Personal Name Column
- Ensure the relevant column contains full names.
Watch Row (Optional)
With Watch Row, automation runs instantly whenever new data is detected in a Google Sheet. This feature removes the need for manual checks and keeps processes efficient.
To configure, choose a scan frequency and set the start and end dates.
Watch Row Schedule:
- None
- At Regular Intervals (e.g., every 15 minutes or every hour)
- Once
- Every Day
- On Specific Days of the Week (e.g., every Wednesday and Sunday)
- On Specific Days of the Month (e.g., the 10th and 30th)
- On Specific Dates (e.g., January 5)
The system detects changes every 15 minutes and stops scanning after five days, unless modified.
{% custom-image src="https://v2-web-assets.s3.us-east-1.amazonaws.com/Automations/personal-name-cleaner/personal-name-cleaner-google-sheet.jpeg" alt="use-google-sheets-for-bulk-input" /%}
CSV File
Process static name data with a CSV file:
- Upload File
- Click Upload CSV File to select the file.
- Adjust Processing Settings
- Define rows to process and skip, similar to the Google Sheets method.
- Validate Personal Name Column
- Confirm that the CSV contains a column with full names.
Run the automation after verifying inputs to refine and standardize names effectively. Let me know if any edits or enhancements are needed!
Screenshot Suggestion: Show the interface for connecting a data source, highlighting options for Google Sheets, CSV, and manual input.
Step 3: Execute Automations on TexAu Desktop or Cloud
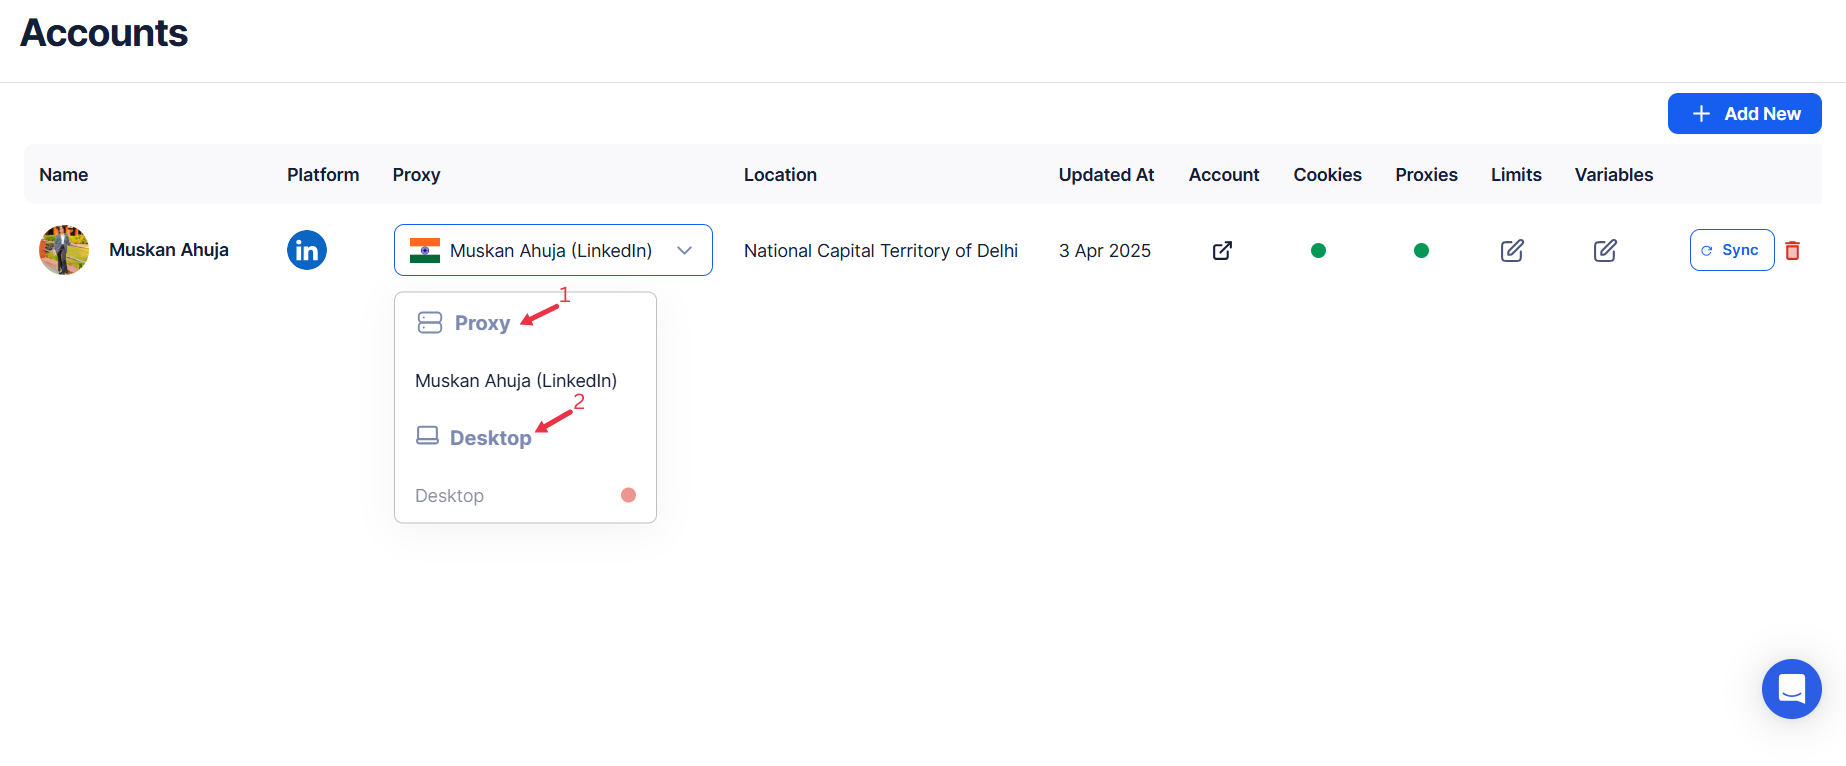
- Open the automation setup and select Desktop Mode.
- Click Choose a Desktop to Run this Automation.
- From the platform, select your connected desktop (status will show as "Connected") or choose a different desktop mode or account.
- Click “Use This” after selecting the desktop to run the automation on your local system.
- Alternatively, if you wish to run the automation on the cloud, click Run directly without selecting a desktop.
{% custom-image src="https://v2-web-assets.s3.us-east-1.amazonaws.com/Common/cloud-or-desktop-execution/cloud-or-desktop-execution.png" alt="choose-cloud-or-desktop-execution" /%}
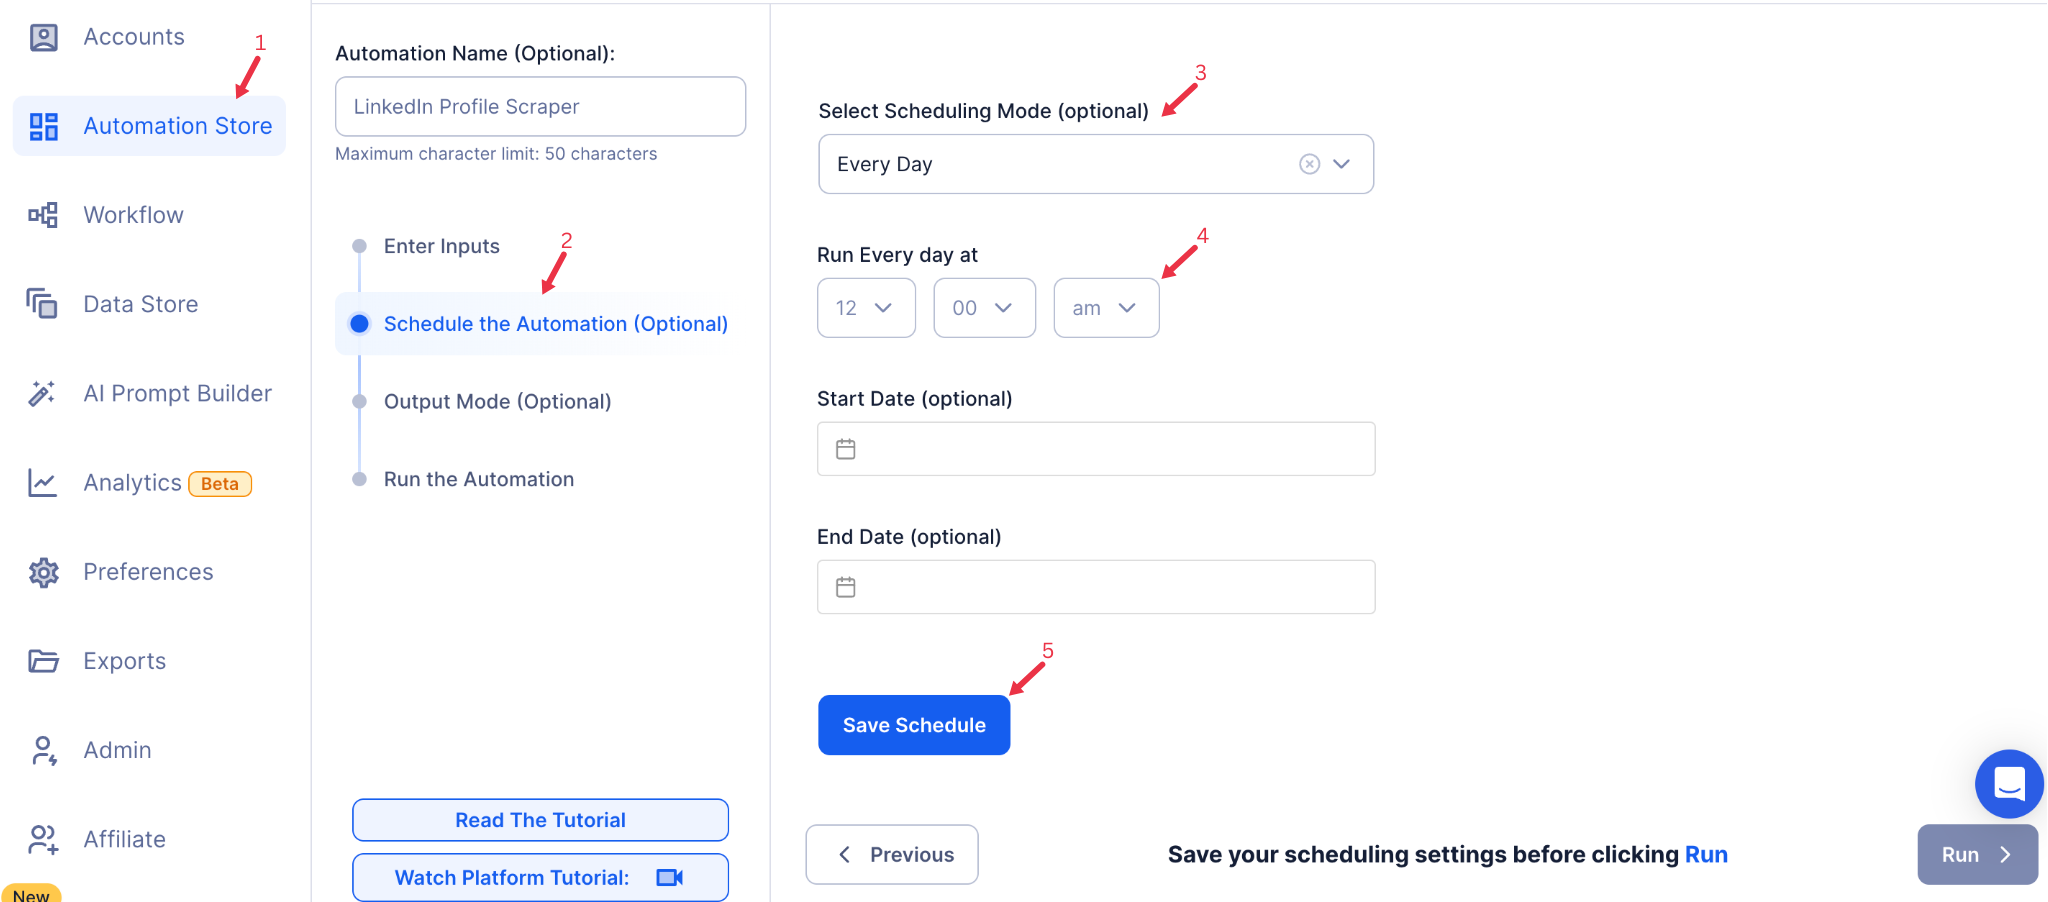
Step 4: Schedule the Automation (Optional)
Schedule the automation to run at specific times or intervals. Click Schedule and choose from the following options:
- None
- At Regular Intervals (e.g., every week or month)
- Once
- Every Day
- On Specific Days of the Week (e.g., Monday and Wednesday)
- On Specific Days of the Month (e.g., the 1st and 15th)
- On Specific Dates (e.g., January 10)
Tip: Scheduling is ideal for keeping your company name database consistently updated over time.
{% custom-image src="https://v2-web-assets.s3.us-east-1.amazonaws.com/Common/schedule-the-automation/schedule-the-automation.png" alt="schedule-the-automation" /%}
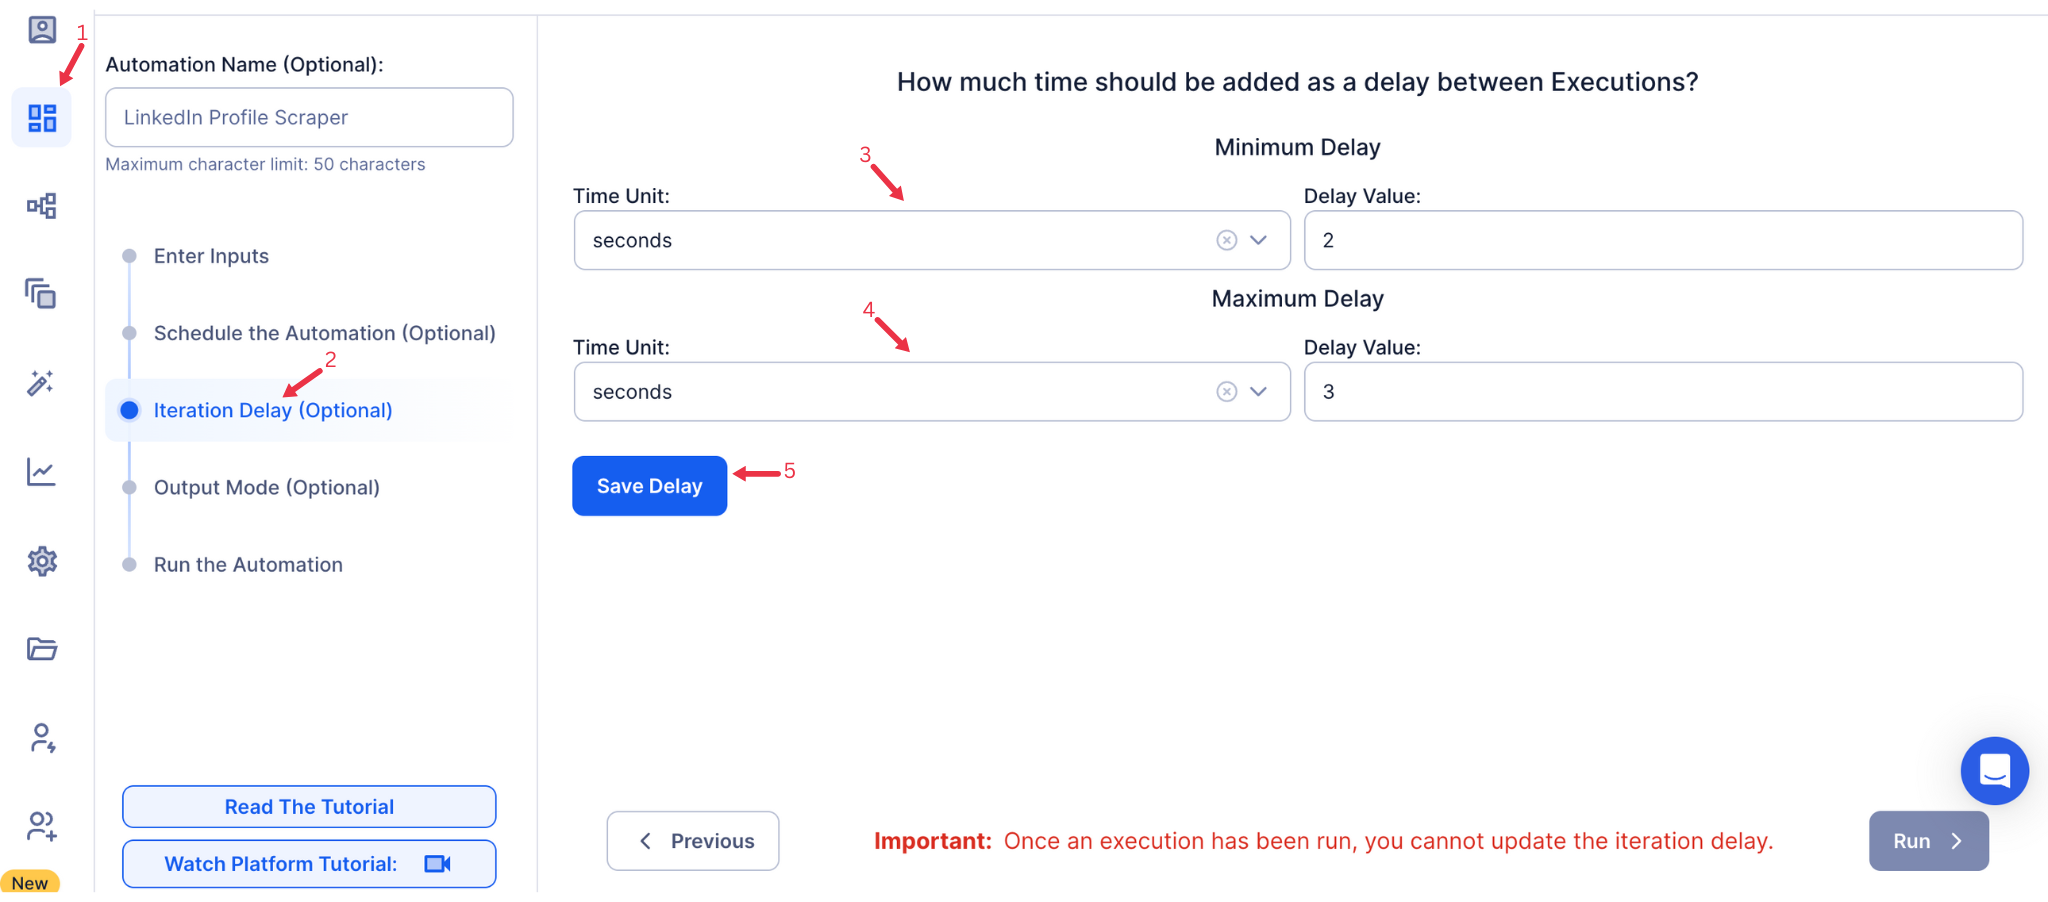
Step 5: Set an Iteration Delay (Optional)
Avoid detection and simulate human-like activity by setting an iteration delay. Choose minimum and maximum time intervals to add randomness between actions. This makes your activity look natural and reduces the chance of being flagged.
- Minimum Delay: Enter the shortest interval (e.g., 10 seconds).
- Maximum Delay: Enter the longest interval (e.g., 20 seconds).
Tip: Random delays keep your automation safe and reliable.
{% custom-image src="https://v2-web-assets.s3.us-east-1.amazonaws.com/Common/iteration-delay/iteration-delay.png" alt="iteration-delay" /%}
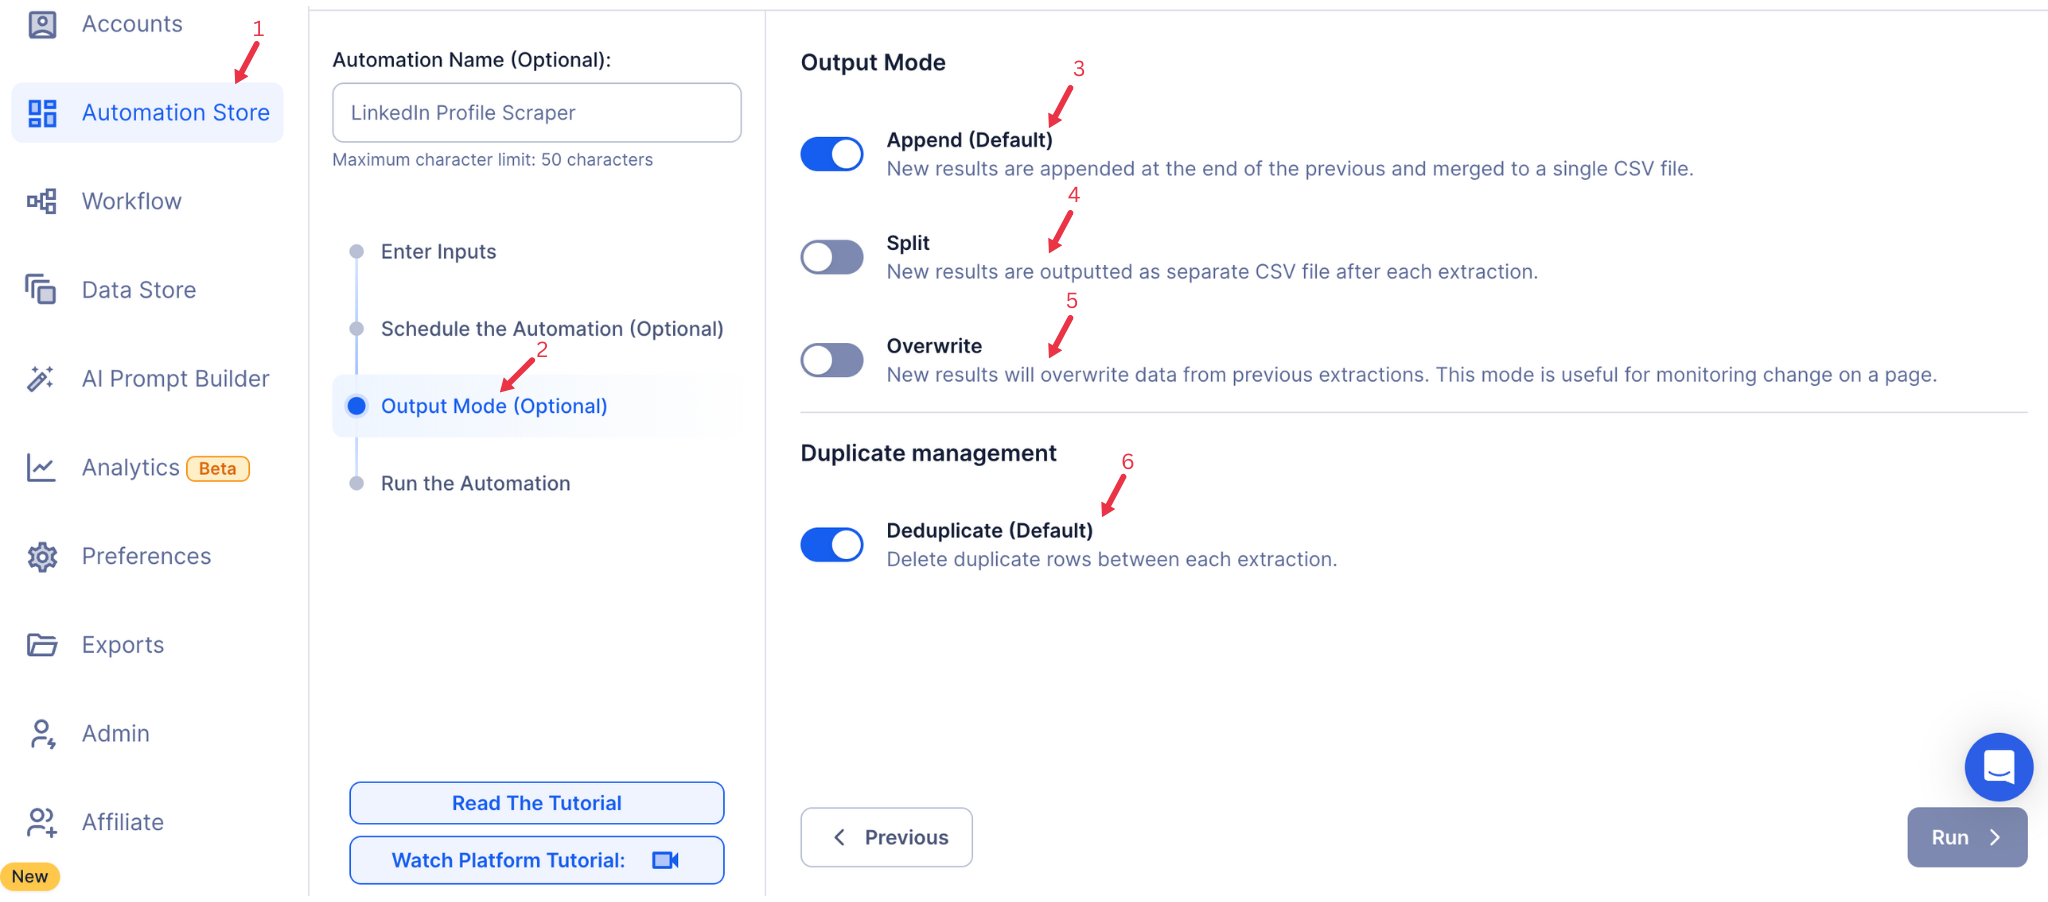
Step 6: Choose Your Output Mode (Optional)
Choose how to save and manage the extracted alumni data. TexAu provides the following options:
- Append (Default): Adds new results to the end of existing data, merging them into a single CSV file.
- Split: Saves new results as separate CSV files for each automation run.
- Overwrite: Replaces previous data with the latest results.
- Duplicate Management: Enable Deduplicate (Default) to remove duplicate rows.
Tip: Google Sheets export makes it easy to collaborate with your team in real time.
{% custom-image src="https://v2-web-assets.s3.us-east-1.amazonaws.com/Common/output-mode/output-mode.png" alt="output-mode" /%}
Step 7: Access the Cleaned Data from the Data Store
After the automation finishes, go to the Data Store in TexAu to view or download the cleaned company names. Locate the Company Name Cleaner automation and click See Data to access your results.
Screenshot Suggestion: Display the Data Store interface with the “See Data” button highlighted.
The Company Name Cleaner automation helps ensure clean, consistent, and accurate company name data for better business outcomes. With configurable scheduling, input options, and export capabilities, TexAu simplifies data management for founders, sales managers, and growth marketers alike.
Run this automation on your own server.
TexAu V3 doesn't host social-platform automations anymore — but the runnable code is yours. Tell us your inputs, outputs, and target environment, and we'll ship you a working version you can deploy and operate yourself.