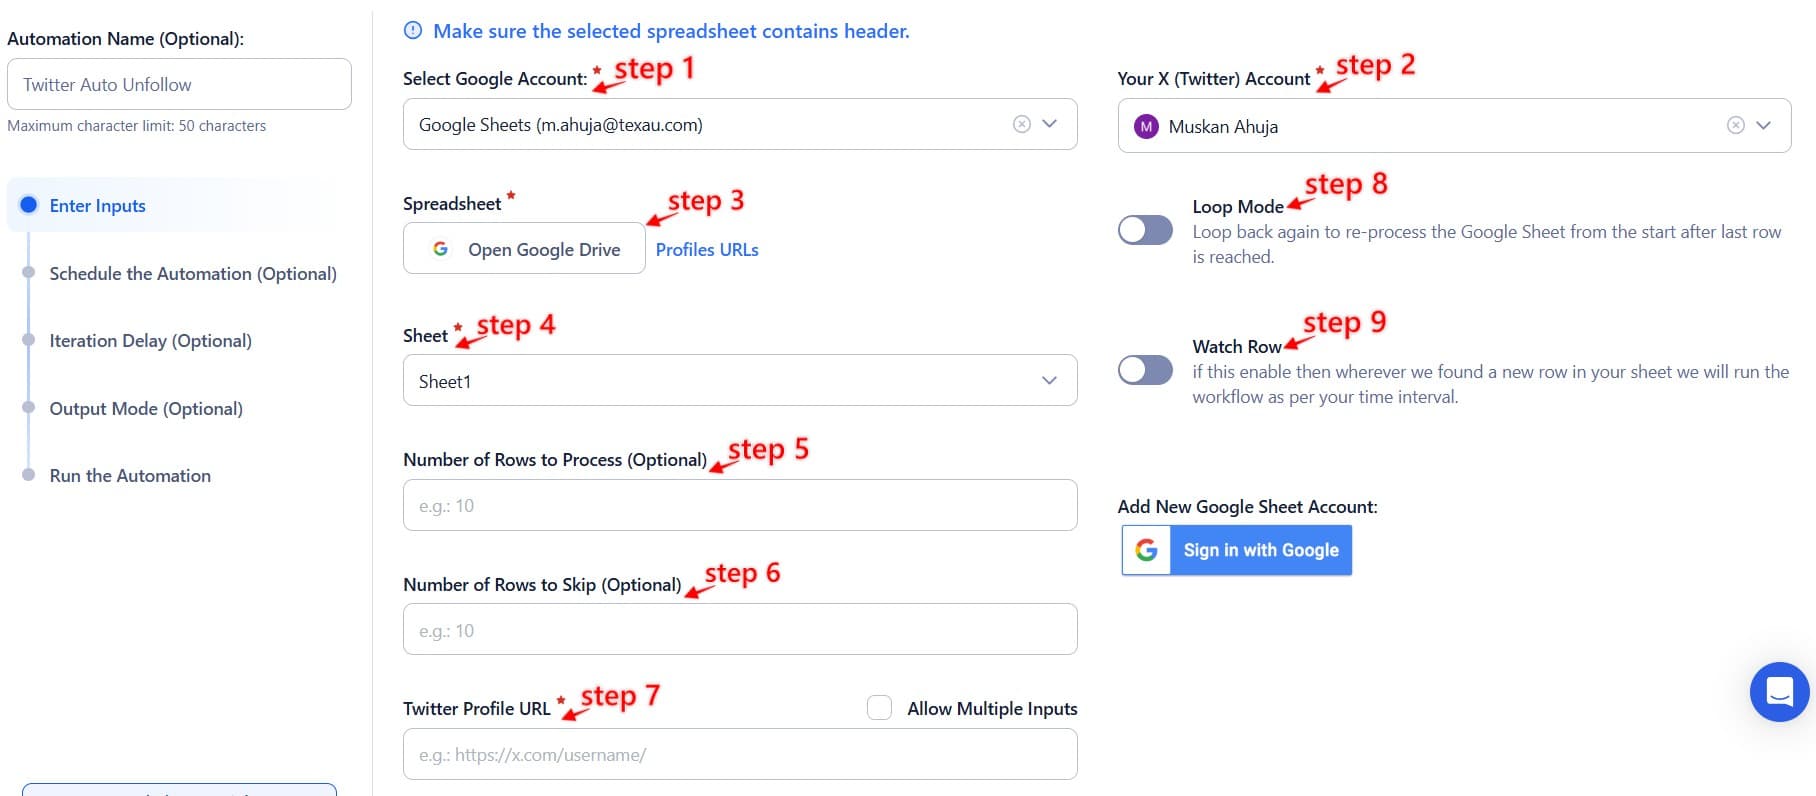
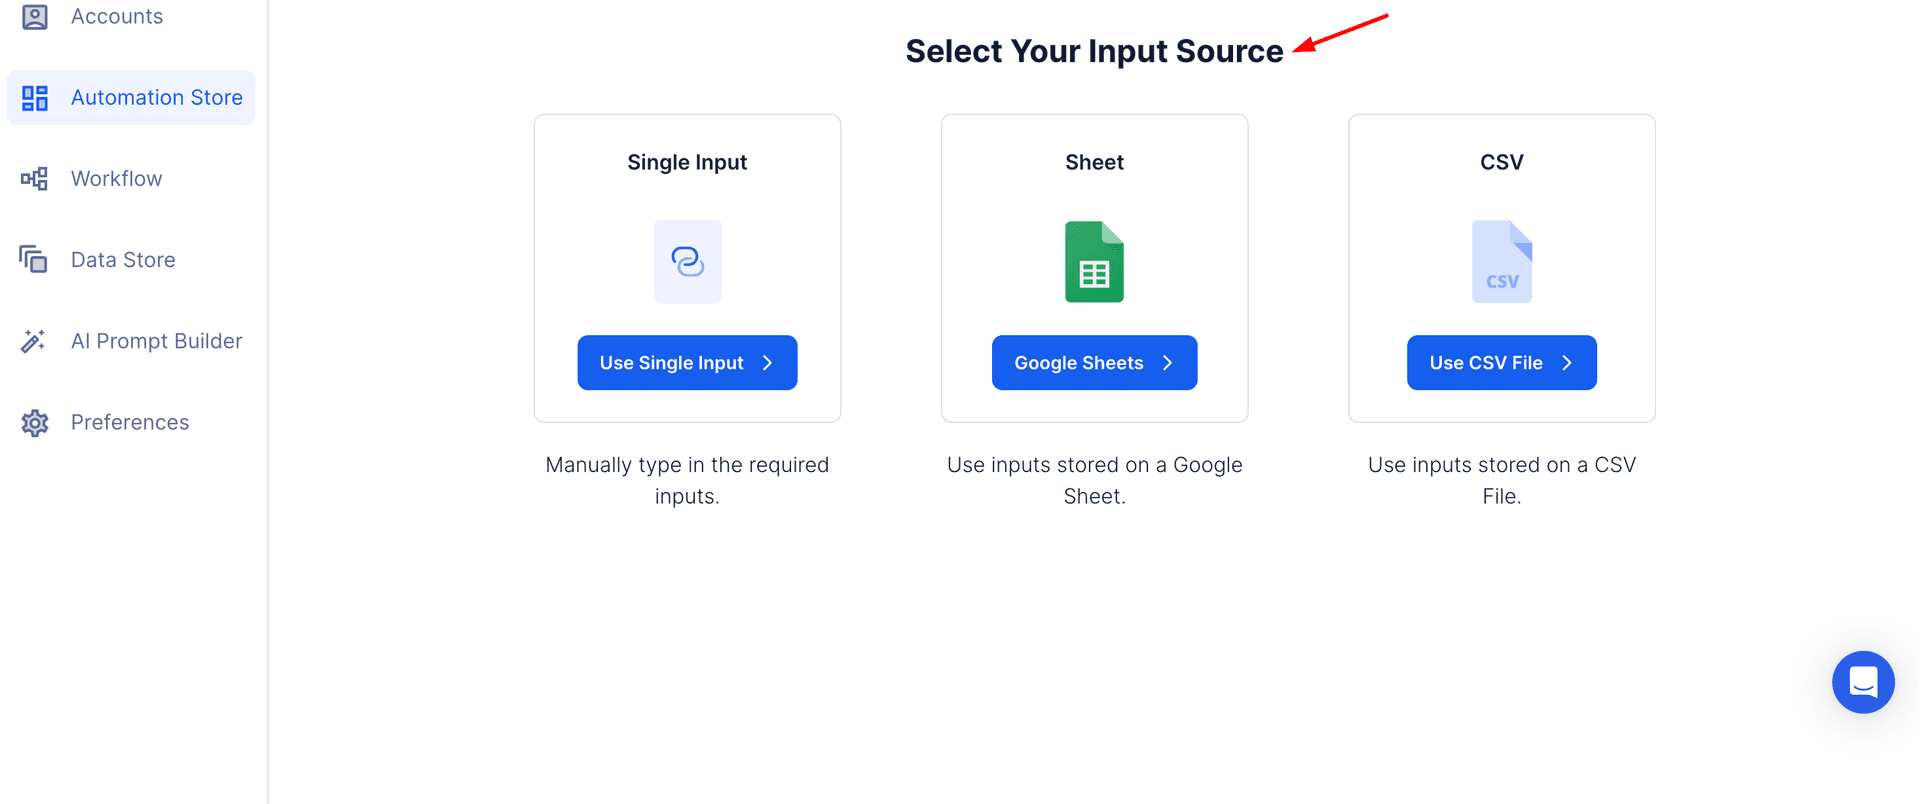
Maintaining a relevant and engaged Twitter profile is crucial for personal branding, business growth, and online influence. An audience filled with inactive users or irrelevant accounts dilutes Twitter engagement metrics, reduces visibility, and hinders meaningful connections. Streamlining your follower list allows you to focus on interactions with active and interested Twitter users who contribute to your account’s objectives.
TexAu’s Twitter Unfollow tool offers a smart solution for managing your follower list efficiently. By automating the process of unfollowing inactive users or irrelevant accounts, TexAu helps you declutter your audience while saving valuable time. This valuable feature is designed to refine your social media strategy by ensuring every connection aligns with your goals. Whether you’re an influencer, a business, or a professional building your brand, optimizing your follower base with TexAu leads to improved Twitter engagement rates and better alignment with your content strategy.
For instance, a digital marketing agency could use TexAu to identify and unfollow accounts that no longer engage with its content. This keeps the Twitter feed active and focused on users who are genuinely interested in marketing tips, case studies, or industry updates. Similarly, an artist aiming to connect with art enthusiasts can remove irrelevant or spam accounts, ensuring their engagement metrics accurately reflect the reach and resonance of their creative work.
By taking a proactive approach to Twitter Automation, TexAu Auto Unfollow empowers users to maintain a dynamic and meaningful relevant network. The result? Higher engagement rates, increased visibility, and a stronger social media presence that aligns with your goals and values.
The Importance of Unfollowing: Why Quality Matters Over Quantity
Unfollowing might seem counterintuitive when growing a Twitter profile, but it’s a crucial step for maintaining quality over quantity. Here’s why:
Eliminating Inactive Accounts
Inactive users clog up your follower list, reducing the likelihood of meaningful interactions. For example, a startup focusing on fintech solutions may follow hundreds of accounts during networking events. Over time, some of these accounts may become inactive or irrelevant. Keeping such followers can skew analytics and Twitter engagement metrics, making it harder to gauge audience interest accurately.
Unfollowing inactive users ensures your Twitter feed remains dynamic and relevant. A tech blogger, for instance, might regularly unfollow accounts that haven’t posted in over six months to focus on engaging with Twitter users who share insights and trends in the tech industry.
Enhancing Engagement Metrics
A streamlined follower list directly improves tweet impressions and engagement rates. Social media platforms prioritize accounts with higher interaction ratios, making your tweets more visible to followers and beyond. For example, a travel agency that unfollows bots or irrelevant accounts will see higher engagement on posts about exotic destinations or travel deals, as the active followers are genuinely interested in the content.
By prioritizing a relevant network of quality followers, businesses, influencers, and individuals can create a more interactive and impactful presence on social networks, ultimately achieving better results with their efforts.
Use Cases for TexAu Auto Unfollow: Tailored Solutions for Every User
TexAu Auto Unfollow caters to diverse users with unique needs, making it an invaluable Twitter automation for streamlining social media strategies. Here’s how different groups can benefit:
For Businesses
Businesses need a professional and relevant follower list to maintain credibility and Twitter engagement. For instance, a digital marketing firm might use TexAu to unfollow user accounts unrelated to its industry or audience. This ensures the brand’s follower base is composed of potential customers, partners, or peers within the relevant network.
A small e-commerce store could use the automation to unfollow accounts that don’t reciprocate engagement, allowing it to focus on cultivating relationships with influencers or Twitter users who actively interact with their products and promotions. This enhances the store’s visibility on the social media platform and boosts engagement metrics.
For Influencers
Influencers often aim to build niche audiences. By removing inactive users or irrelevant followers, they can increase their content’s impact within their target demographic. For example, a fitness influencer specializing in yoga might unfollow accounts unrelated to wellness, ensuring their Twitter profile and feed align with their brand’s ethos.
Unfollowing inactive accounts also helps influencers maintain high tweet impressions and engagement rates, which are critical for securing partnerships and collaborations with brands looking for authentic and engaged audiences.
For Personal Branding
Professionals building their personal brand rely on high-quality engagement to boost credibility. For instance, a career coach might unfollow accounts that aren’t aligned with their industry, focusing instead on engaging with recruiters, job seekers, and HR professionals. This ensures their social media presence reflects their expertise and industry relevance.
TexAu Auto Unfollow provides the efficient tools needed to tailor strategies for diverse goals, making it an essential management tool for refining any Twitter experience.
Features of TexAu Auto Unfollow: Smart Automations for Smarter Strategies
TexAu Auto Unfollow is packed with valuable features that enable users to optimize their Twitter profiles effortlessly. By leveraging these efficient tools, businesses, influencers, and professionals can maintain an engaging and relevant social media presence online.
Customizable Filters
TexAu lets users create precise criteria for unfollowing accounts. For instance, a travel agency could set filters to unfollow inactive users who haven’t interacted with their tweets in six months or accounts that don’t have a profile URL or Twitter profile picture. These accounts often indicate inactivity or a lack of authenticity. By applying these filters, the agency ensures their follower base consists of engaged and credible users, increasing the visibility of their tweets in relevant networks.
Activity Monitoring
TexAu tracks follower activity to identify accounts with low engagement or inactivity. A graphic designer could use this feature to detect Twitter users who never engage with their portfolio updates or promotional posts. By unfollowing these accounts, they refine their audience to those genuinely interested in their work, creating a more meaningful community that supports their brand. This enhances the Twitter experience and boosts overall engagement.
Scheduling Unfollow Actions
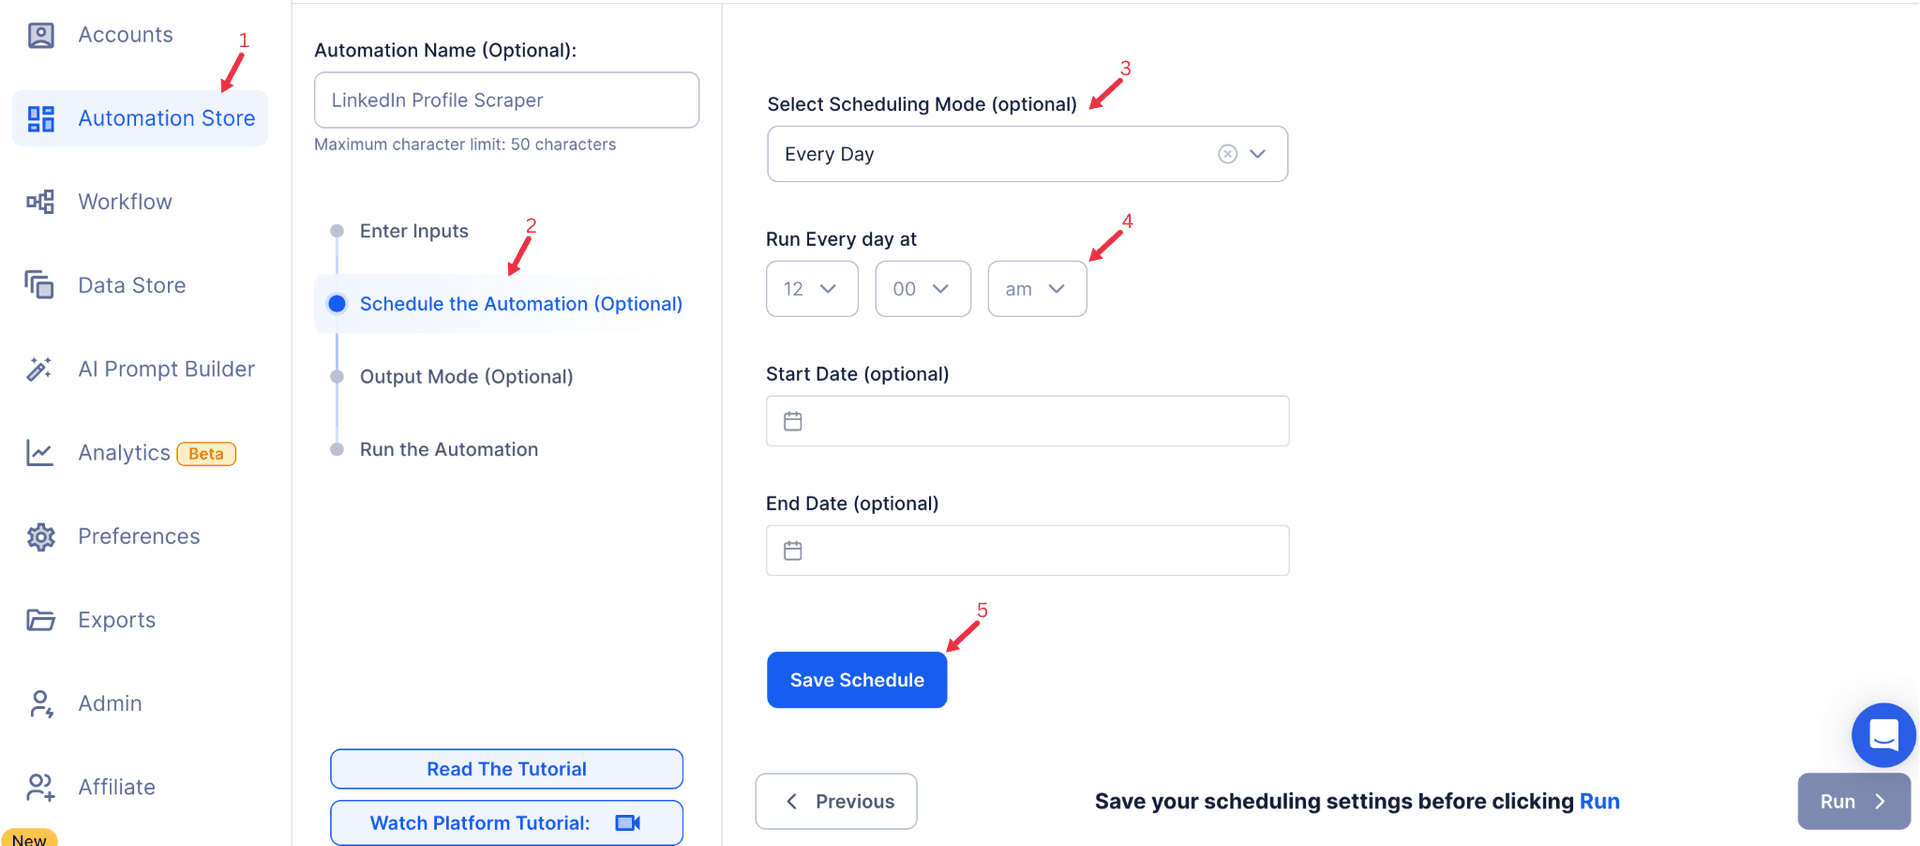
Consistency is key to effective account management, and TexAu’s scheduling feature automates unfollow actions at designated time intervals. For example, an e-commerce brand could set weekly schedules to unfollow a small number of irrelevant accounts gradually, ensuring their Twitter feed isn’t overwhelmed. This systematic approach keeps the follower list relevant without disrupting overall Twitter engagement patterns.
Integration with Analytics
Analytics integration allows users to assess the results of their unfollow strategies. A health coach, for example, could analyze how removing inactive accounts impacts their engagement rate. Insights might reveal that engagement increases when irrelevant accounts are removed, helping them refine their follower list to prioritize active and interested users. By monitoring metrics like tweet impressions and engagement rates, TexAu ensures that unfollow strategies are data-driven and impactful.
These valuable features make TexAu Auto Unfollow a comprehensive social media automation tool for managing and optimizing social media accounts efficiently.
Best Practices for Unfollowing: Strategies for Success
To make the most of TexAu Auto Unfollow, it’s essential to follow best practices. Here’s how to ensure effective and responsible use:
Set Clear Objectives
Before unfollowing, define your goals. Are you eliminating inactive users or focusing on refining your relevant network? For example, a food blogger might aim to unfollow Twitter profiles unrelated to culinary arts while retaining followers interested in recipes or restaurant reviews. This ensures your social media strategy aligns with your niche and drives meaningful interactions.
Avoid Over-Unfollowing
Balance is key. Unfollowing too many accounts at once can create a negative perception and disrupt your Twitter engagement. A business should pace its unfollow actions, ensuring a gradual refinement of its list of users. This approach maintains a positive online presence while improving engagement metrics and ensuring consistency in social media activities.
Monitor Your Strategy
Regularly review the results of your unfollow actions. For example, a motivational speaker might track how metrics like tweet impressions or engagement rates change after unfollowing inactive accounts, adjusting their strategy to optimize results. Using TexAu’s management tool, users can refine their process to prioritize topics relevant to their audience.
By adhering to these practices, users can maximize the benefits of TexAu Auto Unfollow while maintaining a strong and credible presence on Twitter.
Monitoring and Adjusting Unfollow Strategies: Fine-Tuning for Success
Effective unfollow strategies require continuous monitoring and adjustments. Here’s how to refine your approach:
Dynamic Unfollow Filters
TexAu’s efficient tools can be adjusted based on user accounts' behavior or engagement trends. For instance, during a campaign, a retail brand might unfollow inactive users with no recent activity to focus on engaging with Twitter profiles that are more likely to convert. This ensures your Twitter feed reflects a dynamic and relevant audience.
Regular Follower Analysis
Periodic reviews of follower activity are essential. For example, a tech influencer could analyze metrics like tweet impressions to identify and unfollow accounts that consistently ignore their tweets. This strategy helps ensure their content reaches a more engaged audience, improving Twitter engagement and refining their social media strategy.
Adaptation to Account Goals
As goals evolve, so should unfollow strategies. A startup transitioning from B2C to B2B might adjust its criteria to unfollow irrelevant content and consumer-focused accounts while prioritizing connections with industry professionals within a relevant network.
By aligning strategies with account objectives, TexAu Auto Unfollow helps users maintain a valuable presence on Twitter, ensuring their social media platforms are impactful and aligned with long-term goals.
Unfollowing as Part of a Broader Engagement Strategy
Unfollowing shouldn’t occur in isolation. When combined with other strategies, it becomes a powerful automation tool for achieving a well-rounded Twitter engagement strategy:
Combining Unfollows with Follows
Balancing unfollow actions with strategic follows maintains a dynamic and engaging Twitter feed. For instance, a nonprofit might unfollow inactive users while following new supporters or partners to ensure steady growth in a relevant network. This approach enhances social media platforms by keeping connections meaningful and aligned with the organization’s goals.
Leveraging Analytics Across Strategies
Data from unfollow analytics can refine overall strategies. For example, a fashion influencer might notice higher tweet impressions after unfollowing irrelevant accounts, prompting them to focus on creating more targeted content strategies for their Twitter profiles. This ensures their efforts resonate better with a wide audience.
Integrating with Other TexAu Automations
Combining Auto Unfollow with Twitter Automation features like Auto Follow and Auto Like creates a cohesive social media strategy. A brand launching a campaign could use TexAu to unfollow inactive users, follow potential customers, and like relevant tweets to amplify its presence efficiently. For instance, a retail brand could integrate these automations to manage their social networks dynamically, ensuring every interaction contributes to growth and engagement.
Ethical Considerations in Unfollowing
Respectful Unfollowing: Balancing Account Management and Goodwill
Unfollowing accounts can sometimes appear impersonal, but TexAu’s Twitter Unfollow Tool ensures the process is managed with respect and professionalism. For instance, an influencer could use customizable settings to remove inactive users without targeting genuine followers. By focusing on user accounts that no longer engage, they ensure their Twitter profiles remain vibrant and aligned with their goals, without alienating their community. Businesses, too, can streamline followers while maintaining goodwill by being selective in their approach, ensuring their social media platforms reflect an authentic and active network.
Transparency: Communicating Decisions Where Necessary
In certain cases, being transparent about unfollow actions can prevent misunderstandings and maintain a strong online presence. For example, a fitness coach might send a direct message to long-term followers explaining the need to maintain a focused follower list. This strategy builds trust and minimizes negative perceptions. Transparency is especially valuable when managing smaller communities where relationships are more personal and the Twitter experience is built on direct interaction.
Avoid Overuse: Upholding a Positive Brand Image
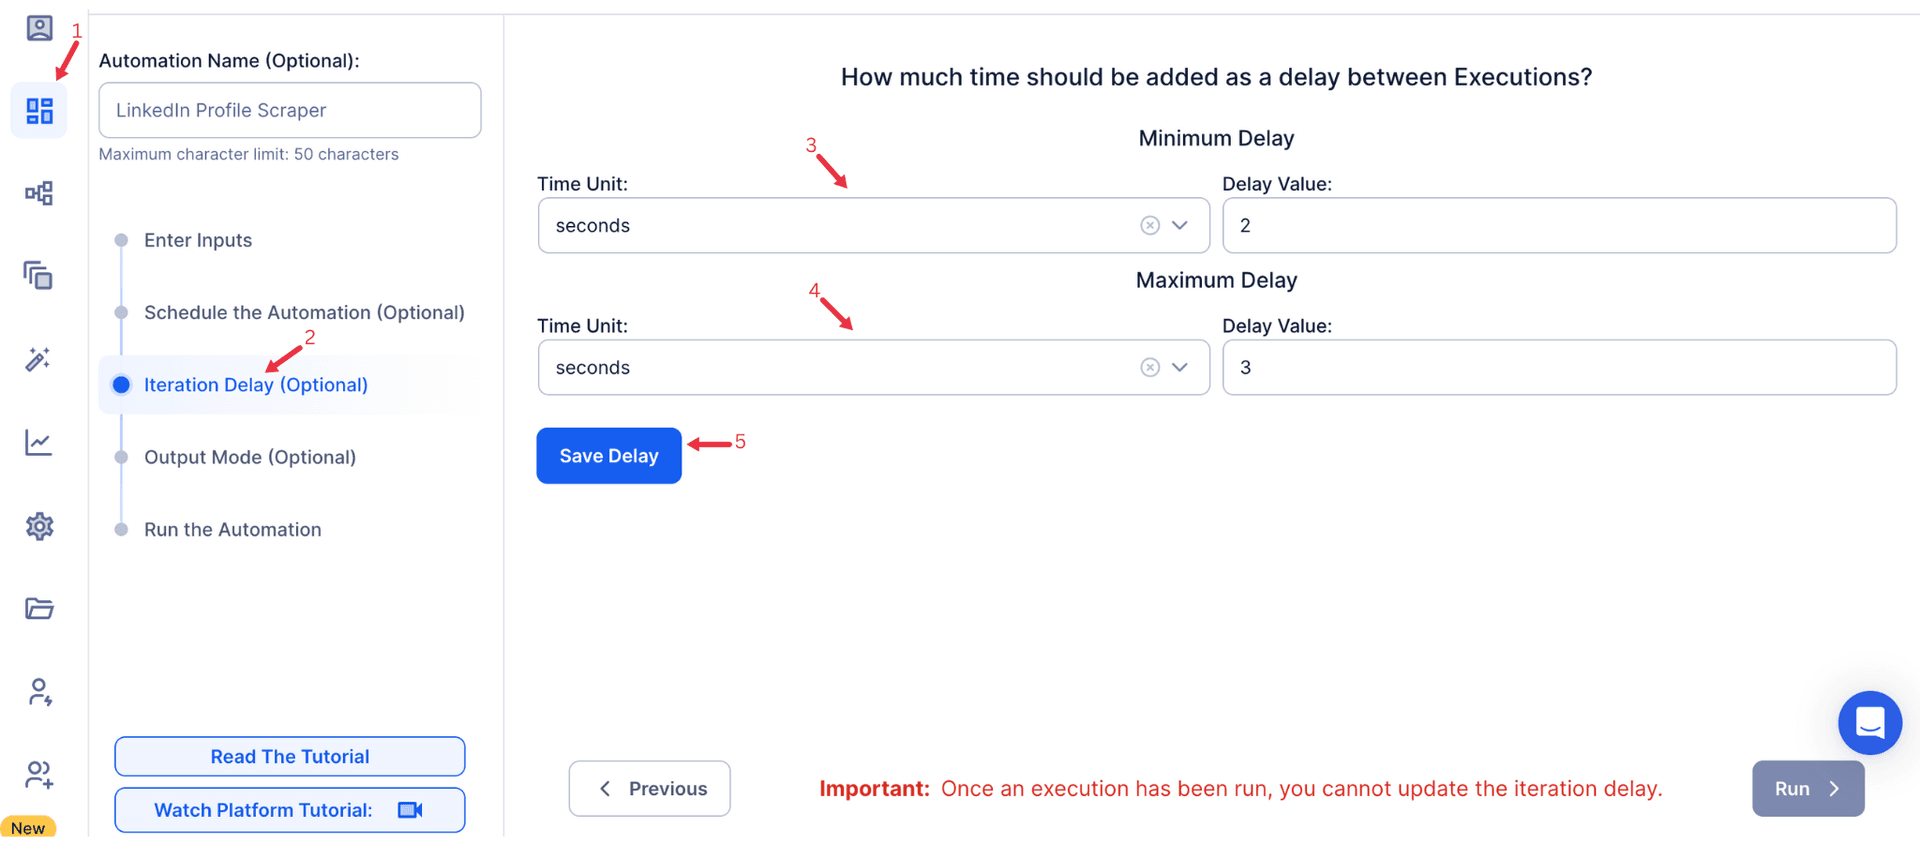
Overusing the unfollow feature can harm your brand’s reputation. A company that aggressively unfollows too many accounts at once may be perceived as disengaged or disingenuous. To prevent this, an e-commerce brand could set clear objectives—such as unfollowing only irrelevant content or spam accounts—and space out actions over time using TexAu’s management tool. This careful approach preserves the account’s image and ensures a positive experience for followers while improving the quality of their Twitter engagement.
Case Studies and Success Stories
TexAu’s Auto Unfollow has empowered businesses and influencers to optimize their follower lists effectively. For example, a digital marketing agency utilized the Twitter unfollow tool to remove inactive users, leading to a 15% boost in Twitter engagement rates. Similarly, an influencer in the travel niche improved Twitter feed interactions after clearing irrelevant followers, ensuring their content reached a more relevant network of users.
Before-and-After Metrics
Clear metrics demonstrate the automation’s impact. For instance, a startup with 10,000 followers achieved a 20% higher tweet impressions after optimizing their follower list. By removing 2,000 inactive accounts, their content appeared more frequently to active users, resulting in increased likes, retweets, and shares. This process also enhanced their overall social media strategy, contributing to better engagement and visibility.
Key Takeaways
Effective implementation of TexAu Auto Unfollow involves setting clear objectives, leveraging valuable features like customizable settings, and monitoring analytics for performance improvements. A tech brand discovered that unfollowing non-engaging accounts helped align their follower list with their Twitter profiles' content strategy. This structured approach not only improved their Twitter experience but also enhanced their social media presence, achieving higher engagement and better alignment with their goals.
Conclusion
TexAu Auto Unfollow provides a streamlined solution for maintaining a high-quality follower list, ultimately enhancing account performance. For example, a fashion blogger discovered that regularly removing irrelevant accounts led to a more engaged audience, with noticeable increases in comments, retweets, and shares on relevant tweets. This automation saves time by handling routine tasks while ensuring your Twitter profiles reflect your goals and values.
By integrating unfollow actions with TexAu’s additional tools—such as Auto Follow and Analytics Integration—users can amplify their results. A business leveraging these automation tools can simultaneously grow its relevant network while streamlining its follower list, creating a more dynamic Twitter experience. Influencers, too, can enhance their social media strategy by focusing on authentic connections that drive meaningful engagement.
TexAu Auto Unfollow isn’t merely about reducing follower counts; it’s a tool for fostering genuine relationships and ensuring your content resonates with the right audience. Businesses and individuals alike can achieve higher tweet impressions, better engagement, and a more vibrant social media presence by aligning their follower list with their objectives.


